Introduction
Google Workspace, formerly known as G Suite, offers a comprehensive suite of productivity tools designed for businesses and individuals. One important aspect of using Google Workspace is the ability to manage and export your email data. Whether you need to transfer your email to a new email provider or simply want to create a backup for safekeeping, exporting your Google Workspace email is a straightforward process.
By following the steps outlined in this guide, you will learn how to export your Google Workspace email data using the Google Takeout tool. Google Takeout is a service provided by Google that allows you to export and download your data from various Google products, including Gmail.
Exporting your email data from Google Workspace provides several benefits. Firstly, it ensures that you have a copy of your important messages, attachments, and contacts in case of any data loss or accidental deletion. Secondly, it allows you to migrate your email data to a new email provider seamlessly, without losing any valuable information.
Whether you are switching to a different email service or simply want to store your email data locally, the steps in this guide will help you accomplish your goal. So, let’s get started with exporting your Google Workspace email data.
Step 1: Navigate to Google Takeout
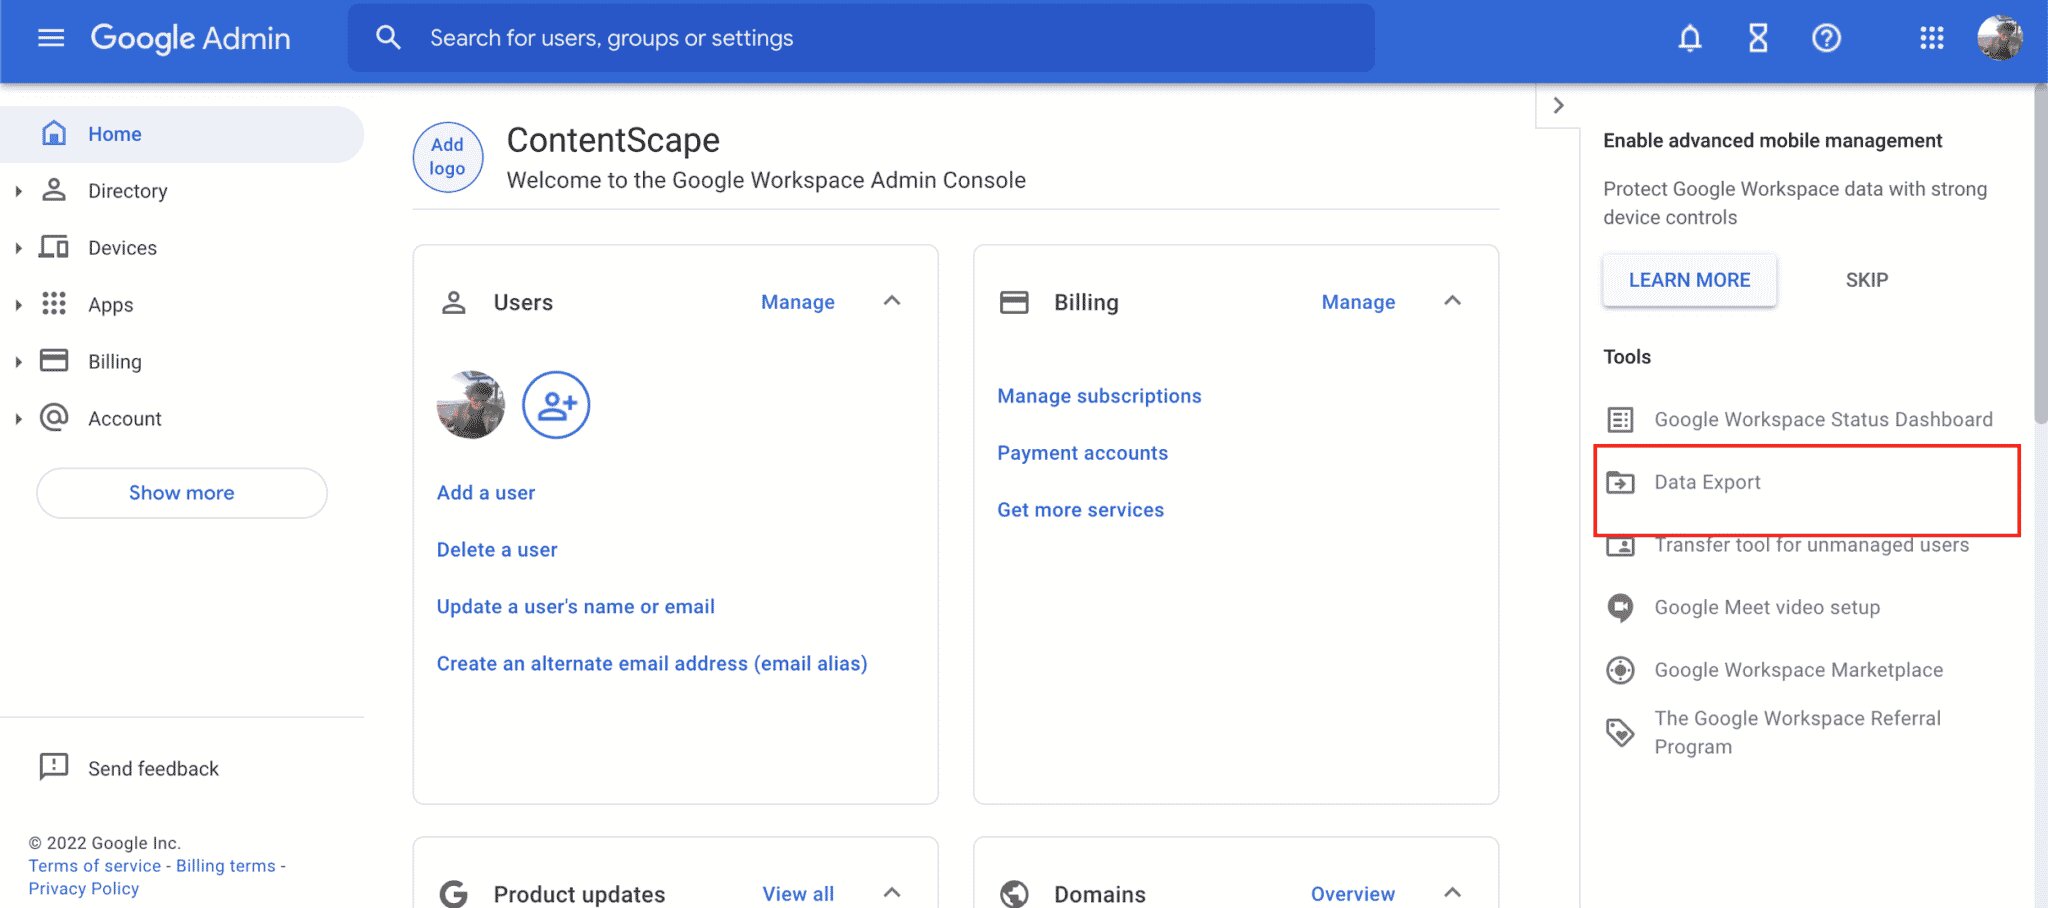
To begin exporting your Google Workspace email data, you will need to navigate to the Google Takeout website. Google Takeout is a convenient tool that allows you to export and download your data from various Google services, including Gmail.
Here are the steps to navigate to Google Takeout:
- Open a web browser on your computer and go to the Google Takeout website.
- Sign in to your Google Workspace account using your email address and password.
- Once you are signed in, you will see a list of Google products that you can export data from.
- Scroll down the list and locate the Gmail option. Click on the checkbox next to Gmail to select it.
- You can also click on the “All Mail data included” link to customize which email data you want to export. This allows you to specify a date range, labels, and other options for your export.
- Once you have selected Gmail and any other desired options, scroll to the bottom of the page and click on the “Next step” button.
By following these steps, you will be directed to the next stage of the export process, where you can further customize your export settings before initiating the export. It is important to note that the availability of certain options may vary depending on your Google Workspace subscription and administrator settings.
In the next step, you will learn how to select the specific email data you want to export from Google Workspace.
Step 2: Select the data to export
After navigating to the Google Takeout website and selecting Gmail as the data source, you will now have the opportunity to choose the specific email data you want to export. This step allows you to customize your export settings according to your preferences and requirements.
Follow the steps below to select the data you want to export:
- On the Google Takeout page, you will see a section labeled “Choose the data you want to include in your download”. Here, you can select the specific aspects of your Gmail data that you want to export.
- Click on the checkbox next to “Mail” to include all of your email messages in the export. This will export both incoming and outgoing messages.
- If you only want to export specific labels or categories, click on the “Select labels” button. A pop-up window will appear, allowing you to choose the labels you wish to export.
- You can also choose to export other aspects of your email data, such as attachments, drafts, and chats. Simply click on the checkboxes next to these options to include them in the export.
- As you make your selections, you will see the estimated file size and the amount of data that will be included in the export. This can help you manage your export size, especially if you have limited storage space or need to transfer the data to another platform.
- Once you have selected the data you want to export, scroll to the bottom of the page and click on the “Next step” button.
By following these steps, you can choose the specific email data that is most relevant to you and exclude any unnecessary information. This level of customization ensures that you have full control over the exported data and can streamline the export process.
In the next step, you will learn how to further customize your export settings before initiating the export.
Step 3: Customize export settings
Now that you have selected the specific email data you want to export, it’s time to customize the export settings according to your preferences. This step allows you to tailor the export process to meet your specific requirements and ensure a smooth transition of your Gmail data.
Follow the steps below to customize your export settings:
- In the Google Takeout page, you will see a section labeled “Customize archive format”. This is where you can choose the file format of your exported data.
- Click on the drop-down menu next to “File type” to select the format you prefer. The available options include .zip, .tgz, and .tbz file formats.
- Consider the compatibility and ease of use of the file format for importing the exported data to your desired destination. Choose a format that suits your needs best.
- If you want to include all of your email messages in a single archive file, click on the checkbox next to “Export all your messages in one file”. Otherwise, each label or category will be exported as separate files.
- You also have the option to split large exported archives into smaller, more manageable file sizes. By checking the “Split into multiple files” checkbox, you can specify the maximum size of each generated file.
- If you want to receive an email notification with a download link when your export is ready, tick the checkbox next to “Send download link via email. This ensures you don’t have to manually monitor the export process.
- Once you have customized the export settings according to your preferences, scroll down to the bottom of the page and click on the “Create export” button.
By following these steps, you can customize the archive format, file structure, and other export settings to ensure the exported data is organized and accessible in a way that suits your needs.
In the next step, you will learn how to choose your preferred method for receiving the exported data.
Step 4: Choose export method
After customizing your export settings, it’s time to choose your preferred method for receiving the exported Gmail data. Google Takeout provides multiple options to accommodate different user preferences and requirements.
Follow the steps below to choose your export method:
- In the Google Takeout page, you will see a section labeled “Choose how to deliver your export”. This is where you can select the method of delivery for your exported data.
- By default, the option “Add to Drive” is selected, which means the exported data will be saved directly to your Google Drive storage. This is a convenient option if you want to access the data from your Google Drive or share it with others in your organization.
- If you prefer a different method, click on the drop-down menu and choose another option. You can select “Send download link via email” to receive an email with a link to download your exported data, or “Add to Dropbox” if you prefer to save it to your Dropbox account.
- Consider factors such as storage space, convenience, and accessibility when choosing your export method. Make sure you have sufficient available storage or that your chosen service has enough capacity to accommodate the exported data.
- Once you have selected your desired export method, review your settings and verify that everything is set up according to your preferences.
- Finally, click on the “Create export” button to initiate the export process using your chosen export method.
By following these steps, you can choose the export method that aligns with your specific needs and workflow. This ensures that the exported Gmail data is delivered to you in a manner that is convenient and accessible.
In the next step, you will learn how to initiate the export process and wait for it to complete.
Step 5: Initiate the export
After customizing your export settings and choosing your preferred export method, it’s time to initiate the export process. This step will start the transfer of your Gmail data to the chosen destination, whether it’s your Google Drive, email inbox, or another cloud storage service.
Follow the steps below to initiate the export:
- In the Google Takeout page, review all the settings and options you have selected to ensure they are correct.
- Double-check that the email address associated with your Google Workspace account is accurate, especially if you have chosen the option to receive a download link via email.
- When you are confident that everything is in order, click on the “Create export” or “Start export” button to initiate the export process.
- Depending on the size of your Gmail data and the export options you have chosen, the export process may take some time to complete. Google will notify you when the export is ready for download or provide a link to access the exported files.
- It is important to note that you may not be able to cancel or interrupt the export process once it has started. Therefore, it is crucial to review your settings carefully before initiating the export.
By following these steps, you will be able to initiate the export process and transfer your Gmail data to the designated location. Be patient as the export completes, especially if you are exporting a large amount of data.
In the next step, you will learn what to do while waiting for the export to complete.
Step 6: Wait for the export to complete
After initiating the export process, it’s time to exercise patience and wait for the export to complete. The time required for the export to finish may vary depending on factors such as the size of your Gmail data and the export options you have chosen. During this waiting period, it’s important to remain patient and let the process run its course.
Here are a few things you can do while waiting for the export to complete:
- Check your email for any notifications: If you have selected the option to receive a download link via email, keep an eye on your inbox for any notifications from Google. This email will provide instructions or a link to access your exported Gmail data once the export is complete.
- Continue working in Google Workspace: While the export is in progress, you can continue using other Google Workspace tools such as Google Docs, Sheets, or Calendar. The export process will run in the background, allowing you to multitask and stay productive.
- Take advantage of this time to organize your email: Use the export process as an opportunity to clean up and organize your Gmail account. Delete unnecessary emails, archive important messages, and manage your labels and folders. This will ensure that your exported data is streamlined and only contains the emails you truly need.
- Plan for the next steps: If you are migrating to a new email provider or transferring the exported data to another platform, use this waiting period to research and plan the next steps. Familiarize yourself with the import process of your chosen platform and ensure you have all the necessary steps in place.
- Stay connected with colleagues or clients: If you are exporting Gmail data for business purposes, stay connected with your colleagues or clients to ensure continuity of communication. Let them know about the export process and provide alternative contact information if needed.
By following these suggestions, you can make the most of the waiting period while your Gmail data is being exported. Patience and careful planning will ensure a smooth transition to the next phase of utilizing your exported data.
In the next step, you will learn what to do once the export is complete and you can access your exported Gmail data.
Step 7: Download the exported data
Once the export process is complete, it’s time to download your exported Gmail data. Whether you have chosen to save the data to your Google Drive, receive a download link via email, or export it to another cloud storage service, this step will allow you to access and save the exported files.
Follow the steps below to download your exported Gmail data:
- If you have chosen to save the data to your Google Drive, open your Google Drive account by visiting drive.google.com in your web browser.
- Locate the folder named “Takeout” or “Google Takeout” within your Google Drive. This is where the exported Gmail data will be stored.
- Open the folder and you will find the exported data files. They may be organized into separate folders based on labels, categories, or other preferences you selected during the export process.
- To download specific files or folders, right-click on them and select the “Download” or “Save As” option from the context menu. Choose a location on your computer where you want to save the files, and the download process will begin.
- If you have chosen to receive a download link via email, check your inbox for the email notification from Google. Open the email and click on the provided link to access your exported Gmail data. Follow any on-screen instructions to download the files to your computer.
- If you have exported the data to another cloud storage service like Dropbox or OneDrive, access your account on that platform and navigate to the folder where the exported data is located. Follow the platform’s instructions to download the files to your computer.
By following these steps, you will be able to download your exported Gmail data and save it to your computer or preferred storage location. Make sure to keep your downloaded files in a safe and easily accessible location for future reference or migration.
With your exported Gmail data now securely saved, you can proceed with importing it into your desired email provider or use it for backup purposes. Take the necessary steps to import the data and ensure a smooth transition to your new email environment.
Conclusion
Exporting your Google Workspace email data is an important process that allows you to manage, backup, or transfer your valuable emails, attachments, and contacts. By following the steps outlined in this guide, you can successfully export your Gmail data using the Google Takeout tool.
From navigating to Google Takeout and selecting the data to export, to customizing the export settings and choosing your preferred export method, each step is crucial in ensuring a smooth and tailored export process. The waiting period allows you to remain patient while the export completes, and once it’s finished, you can download the exported data to your preferred location.
Remember to be mindful of the size of your Gmail data and consider the storage capacity and compatibility of your chosen export method. Take note of any notifications or download links provided, and keep your exported data organized and secure for future use.
Whether you are switching to a new email provider, creating a backup of your data, or simply want to have more control over your Gmail information, the ability to export your Google Workspace email is an invaluable feature. By following this guide, you have gained the knowledge and confidence to manage your Gmail data effectively.
Now, take the necessary steps to import the exported data into your desired email provider or store it safely for future reference. Enjoy the benefits of having your Gmail data at your fingertips and the peace of mind that comes with having a backup of your important emails.