Introduction
A power supply unit (PSU) is a crucial component in any electronic device, including a Vizio TV. The PSU is responsible for converting the incoming electrical power from the wall outlet into the appropriate voltage and current required by the different components of the TV. Without a functioning PSU, the TV may not turn on or experience various power-related issues.
Knowing how to test a Vizio power supply unit can help you diagnose and potentially fix problems with your TV. Whether the TV doesn’t power on at all, keeps turning off randomly, or displays unusual behavior, a faulty power supply unit could be the culprit.
However, before diving into testing the power supply unit, it’s essential to understand the signs of a failing PSU. This knowledge will help you determine if the power supply is the likely source of your TV’s issues. Additionally, it’s crucial to take safety precautions and have the necessary tools on hand to ensure a successful and safe testing process.
In this guide, we will walk you through the step-by-step process of testing a Vizio power supply unit. The methods outlined here are commonly used by professionals and enthusiasts alike, allowing you to identify whether the power supply is indeed causing the problem and potentially save you the cost of a replacement or repair service.
Please note that while testing the power supply unit can be a helpful diagnostic step, attempting any repairs or modifications on your own may void the warranty and pose a risk to your safety. If you’re uncertain or uncomfortable with performing the tests, it’s always recommended to seek professional assistance.
What is a Power Supply Unit (PSU)?
A power supply unit (PSU) is an essential component in electronic devices that provides the necessary electrical power for their operation. In the context of a Vizio TV, the power supply unit is responsible for converting the incoming AC (alternating current) power from the wall outlet into the appropriate DC (direct current) voltage and current required by the various components of the TV.
The PSU ensures a stable and regulated power supply to the different circuits in the TV, including the main logic board, audio processor, display panel, and other peripherals. It acts as the central hub that delivers power to these components and plays a crucial role in the overall performance and functionality of the TV.
Power supply units are designed to provide different voltage levels, such as +5V, +12V, and -12V, depending on the specific requirements of the electronic device. In the case of a Vizio TV, the power supply unit typically supplies power to the main logic board, backlighting system, and other critical components.
Modern power supply units often come with additional features, such as power factor correction (PFC) and efficiency optimization, to ensure maximum energy efficiency and reduce power wastage. PFC helps regulate the power factor and reduces the harmonic distortion of the input current, resulting in a more efficient power conversion process.
Power supply units also incorporate various protection mechanisms, such as overvoltage protection, overcurrent protection, and short-circuit protection. These safeguards help prevent damage to the TV and its components in the event of power fluctuations or potential faults.
In summary, a power supply unit is a vital component that converts the incoming AC power into the appropriate DC voltage and current required for the proper functioning of electronic devices. Understanding the role of the power supply unit is essential when diagnosing and troubleshooting power-related issues in a Vizio TV.
Signs of a Failing Power Supply Unit
When a power supply unit (PSU) starts to fail, it can manifest in various ways. It’s crucial to be aware of the common signs of a failing PSU as they can help you identify whether the power supply is the cause of your Vizio TV’s issues. Here are some telltale signs that indicate a potential problem with the power supply unit:
- No Power: One of the most obvious signs of a failing power supply unit is when the TV doesn’t power on at all. When you press the power button, nothing happens, and there are no signs of life from the TV. This could be indicative of a fault in the power supply unit or a power delivery issue.
- Frequent Shutdowns: If your Vizio TV keeps shutting down abruptly and without warning, it could be due to an unstable power supply. When the power supply unit is failing, it may struggle to provide a consistent and reliable power flow, causing the TV to lose power intermittently.
- Intermittent Power Issues: Another sign of a failing power supply unit is when the TV turns on and off randomly or experiences power fluctuations. The screen may flicker, the audio may cut in and out, or the TV may reboot unexpectedly. These irregular power issues can be attributed to an unstable power supply.
- Delayed Start: If your Vizio TV takes a significantly longer time to power on than usual, it could indicate a power supply problem. A failing PSU may require more time to stabilize and provide the necessary power, resulting in a delayed startup process for the TV.
- Unusual Noises or Smells: In some cases, a failing power supply unit may emit strange noises, such as buzzing, humming, or whining sounds. Additionally, you may detect a burning or unusual odor coming from the TV. These audible and olfactory cues suggest a potential issue with the power supply unit’s components.
If you notice any of these signs while using your Vizio TV, it’s advisable to perform a power supply unit test to further investigate the issue. Keep in mind that other factors, such as faulty connections or a malfunctioning component, may also contribute to similar symptoms. Therefore, it’s essential to rule out other potential causes and focus on the power supply unit as a potential culprit.
Tools You Will Need
Before you begin testing a Vizio power supply unit (PSU), it’s essential to gather the necessary tools to ensure a smooth and effective testing process. Having the right tools at hand will make it easier to perform accurate measurements and diagnose any potential issues with the power supply. Here are the essential tools you will need:
- Digital Multimeter: A digital multimeter is a versatile tool that allows you to measure voltage, current, and resistance. It’s an indispensable tool for testing the voltage output and continuity of the power supply unit. Make sure your digital multimeter is capable of measuring DC voltage and resistance.
- Testing Probes: Most digital multimeters come with detachable testing probes. These probes have sharp tips that can easily penetrate through insulation to make accurate contact with the test points on the power supply unit.
- Screwdriver Set: A set of screwdrivers with various sizes and types will be needed to disassemble the TV and access the power supply unit. Ensure you have both flathead and Phillips head screwdrivers to handle different screw types.
- Anti-static Strap: To prevent accidental damage to sensitive electronic components, it’s advisable to wear an anti-static strap during the testing process. This strap helps discharge any static electricity, protecting the TV and the power supply unit from potential harm.
- Electrical Tape: Electrical tape can be used to insulate exposed wires and connections during the testing process. It offers protection against accidental short circuits and ensures safety during evaluation and testing.
- Magnifying Glass: A magnifying glass can be helpful for examining the power supply unit closely, especially when looking for physical damage such as bulging capacitors or burnt components.
- Work Area with Sufficient Lighting: Create a well-lit and clean work area where you can comfortably disassemble and test the TV. Sufficient lighting will help you see details clearly, ensuring accurate measurements and visual inspection of the power supply unit.
Having these tools ready before you begin testing the power supply unit will streamline the process and increase your chances of identifying any faults or issues accurately. Remember to exercise caution and follow safety protocols while working with electronic devices and power sources.
Step 1: Safety Precautions
Before proceeding with testing a Vizio power supply unit (PSU), it’s crucial to prioritize safety. Working with electronic devices involves handling potentially hazardous components and exposing yourself to electrical currents. Therefore, it’s essential to follow these safety precautions to minimize the risk of injury or damage:
- Power Off the TV: Ensure that the Vizio TV is completely powered off and unplugged from the electrical outlet before starting any testing. This will prevent accidental electric shocks and reduce the risk of short circuits.
- Use Personal Protective Equipment (PPE): Wear appropriate personal protective equipment, such as safety goggles and gloves, to protect yourself from any potential electrical hazards or sharp edges during the disassembly and testing process.
- Ground Yourself: To avoid static electricity discharge that may damage sensitive components, it’s recommended to ground yourself before touching any electronic parts. Use an anti-static strap or touch a grounded metal surface to discharge any static electricity.
- Work in a Well-Ventilated Area: Ensure that you’re working in a well-ventilated area to prevent the accumulation of potentially harmful fumes. Some electronic components may emit odors or gases when heated or damaged, and proper ventilation can minimize the inhalation of these substances.
- Be Mindful of Sharp Objects and Moving Parts: Take caution when handling tools and disassembling the TV. Be aware of any sharp edges or moving parts that could cause injury. Use the appropriate tools for the job and handle them with care.
- Avoid Direct Contact with Capacitors: Capacitors store electrical energy even when the TV is powered off. To avoid electric shock, never touch the terminals of capacitors directly. Always use an insulated tool or the appropriate testing probes when necessary.
- Inspect for Physical Damage: Prior to testing, visually inspect the power supply unit for any signs of physical damage, such as bulging capacitors, burnt components, or loose connections. If you notice any severe damage, it’s recommended to seek professional assistance rather than attempting repairs on your own.
By following these safety precautions, you can ensure a safer testing process and minimize the risk of injury or damage to yourself and the electronic components. Remember, if you are unsure or uncomfortable with any step of the testing process, it’s always advised to consult a professional technician for assistance.
Step 2: Unplug and Disassemble the TV
Before you can access the power supply unit (PSU) for testing, you’ll need to unplug the TV and carefully disassemble it. Follow these steps to ensure a safe and proper disassembly process:
- Power Off the TV: Make sure the Vizio TV is turned off and unplugged from the electrical outlet. This step is crucial to prevent any electrical shock or damage during disassembly.
- Prepare a Clean Work Area: Choose a well-lit and clutter-free work area where you can comfortably disassemble the TV. Clear any obstructions and cover the work surface with a soft cloth or a non-static surface to provide a clean and safe workspace.
- Remove the Base or Stand: If your Vizio TV has a base or stand attached, locate the screws or clips securing it to the TV. Use the appropriate screwdriver or release mechanism to detach the base carefully. Set the base aside in a safe place.
- Remove the Back Cover: Look for the screws securing the back cover of the TV. Use a screwdriver to remove these screws. Keep track of the screws and place them in a container or on a magnetic tray to avoid misplacing them. Gently lift and remove the back cover, revealing the internal components of the TV.
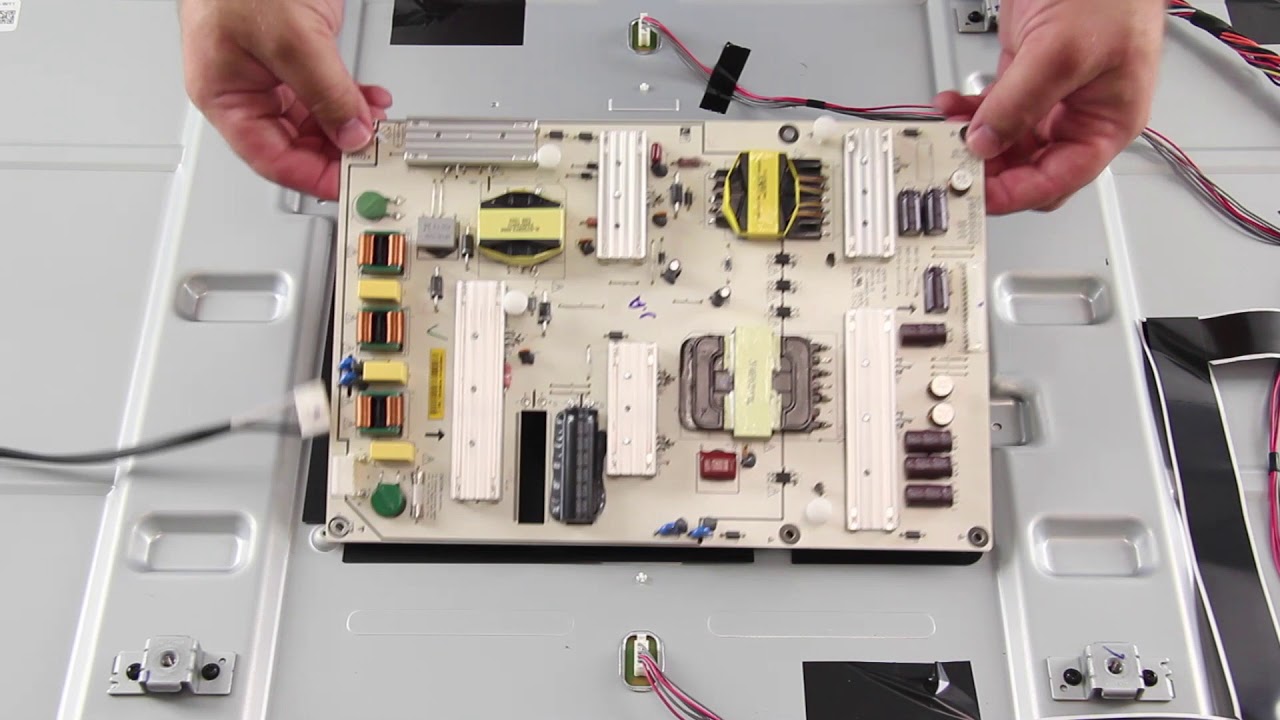
- Locate the Power Supply Unit (PSU): Once the back cover is removed, locate the power supply unit. The PSU is typically a rectangular or square-shaped board that connects to the AC power input and distributes power to the rest of the TV’s components. Take note of its position and the connections attached to it.
- Disconnect Cables and Wires: Carefully disconnect any cables or wires connected to the power supply unit. Take note of their positions and use caution not to damage any delicate connectors or components during this step. You may need to detach cables such as the AC input, main logic board connector, and any peripheral connectors.
- Remove the Power Supply Unit (optional): Depending on the testing method and your level of comfort, you may choose to remove the power supply unit from the TV for further inspection and testing. If you decide to remove it, locate the mounting screws or clips securing the PSU to the TV’s chassis. Unscrew or unclip them carefully and gently lift the PSU out of its housing.
By properly unplugging and disassembling the TV, you can gain access to the power supply unit for thorough testing. Remember to take caution and handle the components with care to avoid causing any unintended damage. In the next steps, we will focus on testing the power supply unit to determine its functionality and potential issues.
Step 3: Locating the Power Supply Unit
After safely unplugging and disassembling your Vizio TV, the next step in testing the power supply unit (PSU) is to locate its position within the TV’s internal components. By identifying the PSU, you can proceed with inspecting and testing it for any potential issues. Follow these steps to locate the power supply unit:
- Take a Visual Survey: Carefully examine the internal components of the TV to get a general idea of the layout. Look for a rectangular or square-shaped board within the TV that is separate from the main logic board, audio processor, or other peripheral boards. This board is typically the power supply unit.
- Refer to the Manufacturer’s Documentation: If you have access to the manufacturer’s documentation or service manual of your Vizio TV, consult it for a clear diagram or labeling of the internal components. The documentation may specifically identify the power supply unit and its location within the TV.
- Observe the AC Power Input Connections: Locate the AC power input connections on the back of the TV where the power cord is connected. Follow the path of these connections internally to trace them to the power supply unit. The PSU is usually in close proximity to the AC power input for efficient power distribution.
- Identify the Mounting Location: Look for mounting screws or clips that secure the power supply unit to the TV’s chassis. These mounting points can offer valuable clues about the location of the PSU. It’s common for the power supply unit to be attached to the TV’s chassis to ensure stability and proper grounding.
- Take Note of Connections: While identifying the power supply unit, pay attention to the various cables and connectors that are attached to it. These connections include the AC input, main logic board connector, peripheral connectors, and any other cables involved in power distribution within the TV.
By carefully observing and inspecting the internal components of your Vizio TV, you can locate the power supply unit with ease. Remember to refer to any available documentation or service manuals for additional guidance. Once you have identified the power supply unit, you can proceed with further inspection and testing to determine its condition and functionality.
Step 4: Inspecting the Power Supply Unit
Once you have located the power supply unit (PSU) within your Vizio TV, the next step in testing is to thoroughly inspect the PSU for any visible signs of damage or issues. By visually examining the power supply unit, you can identify potential problems that may be affecting its functionality. Follow these steps to inspect the power supply unit:
- Get a Clear View: Take a good look at the power supply unit and ensure you have proper lighting to observe its components and circuitry clearly. Use a magnifying glass if necessary to examine the PSU closely.
- Look for Bulging Capacitors: Check the capacitors on the power supply unit for any signs of bulging or deformation. Capacitors are cylindrical components with a metal top and can be easily identified. If you notice any capacitors with swollen tops or leaking electrolyte, it indicates a failure and the need for replacement.
- Inspect for Burnt Components or Discoloration: Examine the circuitry and components on the power supply unit for any visible signs of burnt components or discoloration. Look for charred marks, blackened areas, or melted plastic around any components, which can indicate a short circuit or component failure.
- Check for Loose Connections: Ensure that all the connections on the power supply unit are securely fastened. Look for any loose cables or connectors that may have come undone or show signs of being improperly connected.
- Ensure Proper Heat Sink Functionality: Check if the heat sink on the power supply unit is clean and free from dust or debris. A clogged heat sink can lead to overheating and affect the performance of the PSU. Clean out any accumulated dust with compressed air or a soft brush if necessary.
- Verify the On/Off Switch: Inspect the on/off switch on the power supply unit for any visible damage or loose connections. Make sure it operates smoothly and properly engages when turning the TV on or off.
During the inspection, if you notice any significant physical damage or issues with the power supply unit, it may warrant further professional evaluation or replacement. If all looks well during the visual inspection, you can proceed to the next steps to test the PSU for voltage output, continuity, and physical integrity.
Step 5: Testing for Voltage Output
Testing the voltage output of the power supply unit (PSU) is a crucial step in diagnosing its functionality. By measuring the voltage across various components, you can determine if the PSU is providing the correct voltage levels to power the different circuits in your Vizio TV. Follow these steps to test the voltage output:
- Set Up the Digital Multimeter: Turn on your digital multimeter and select the DC voltage measurement mode. Ensure the multimeter is properly calibrated and set to an appropriate range higher than the expected voltage output of the PSU.
- Attach the Testing Probes: Connect the red testing probe to the positive (+) port of the multimeter and the black testing probe to the negative (-) port.
- Identify Test Points: Refer to the schematic diagram or service manual of your Vizio TV to locate the test points on the power supply unit. These test points are typically labeled and indicate the voltage output to specific components or circuits.
- Touch the Test Points: Place the red testing probe on the designated positive test point and the black testing probe on the corresponding negative (ground) test point. Make sure the probes make direct contact with the metal parts of the test points for accurate measurements.
- Read the Voltage Measurement: Take note of the voltage reading displayed on the digital multimeter. Ensure that the measured voltage matches the specified voltage for the particular test point. Compare the readings against the expected voltage levels to determine if the PSU is delivering the correct voltage output.
- Repeat for Other Test Points: Test the voltage output at different test points on the power supply unit, covering all relevant circuits. Compare the readings against the expected values to ensure consistent voltage output across the PSU.
- Interpret the Results: If the measured voltages closely match the specified values for each test point, it indicates that the power supply unit is providing the correct voltage output. However, if the measured voltage significantly deviates from the expected values or is nonexistent, it suggests a potential issue with the PSU that requires further investigation.
Testing the voltage output of the power supply unit helps identify any abnormalities in the PSU’s performance. It is important to compare the measured voltages with the expected values to determine if the PSU is functioning correctly. If the voltage output is inconsistent or incorrect, further testing and troubleshooting may be necessary to diagnose the underlying issue.
Step 6: Testing for Continuity
Continuity testing is an important step in evaluating the functionality of the power supply unit (PSU) in your Vizio TV. By testing for continuity, you can determine if there are any breaks or interruptions in the electrical path of the PSU. Follow these steps to perform continuity testing:
- Set Up the Digital Multimeter: Ensure your digital multimeter is in the continuity testing mode. This mode allows the multimeter to detect if there is an uninterrupted flow of electrical current between two test points.
- Attach the Testing Probes: Connect the red testing probe to the positive (+) port of the multimeter and the black testing probe to the negative (-) port.
- Select Test Points: Identify the test points on the power supply unit that you want to test for continuity. These test points may correspond to specific connectors, cables, or components on the PSU.
- Touch the Test Points: Place one testing probe on one test point and the other testing probe on the corresponding test point. Ensure that both probes make direct contact with the metal parts of the test points.
- Check for Continuity: Observe the digital multimeter’s display to see if it indicates continuity. If the multimeter emits a continuous beep or displays a “0” reading on the screen, it means that there is continuity between the test points, and the electrical path is uninterrupted. If there is no beep or a reading other than “0”, it suggests a break or interruption in the path, indicating a potential issue.
- Repeat for Other Test Points: Perform continuity testing on other relevant test points across the power supply unit, covering all necessary connectors, cables, and components. This ensures a comprehensive evaluation of continuity within the PSU.
- Interpret the Results: If continuity is present between all tested points, it indicates a functioning PSU with proper electrical connections. However, if continuity is absent or inconsistent between certain test points, it suggests a break in the electrical path, which requires further investigation to identify and rectify the issue.
Testing for continuity helps verify the integrity of the electrical connections within the power supply unit. By performing this test, you can identify any breaks or interruptions in the electrical path that may be affecting the PSU’s functionality. If continuity is not present, additional troubleshooting and inspection may be necessary to determine the cause and resolve the issue.
Step 7: Checking for Physical Damage
Checking for physical damage is an essential step in evaluating the condition of the power supply unit (PSU) in your Vizio TV. By examining the PSU for any visible signs of damage or abnormalities, you can identify potential issues that may be affecting its performance. Follow these steps to check for physical damage:
- Examine the Components: Take a close look at the different components of the power supply unit. Check for any visible signs of damage, such as burnt or charred areas, melted components, or loose connections.
- Inspect the Capacitors: Pay special attention to the capacitors on the PSU. Look for signs of bulging or leaking electrolyte, which indicates a failure. Damaged or faulty capacitors can significantly impact the functionality of the power supply unit.
- Check for Burn Marks or Discoloration: Examine the circuitry and surrounding areas of the power supply unit for any signs of burn marks or discoloration. Burn marks and discoloration usually indicate overheating or electrical shorts, which may lead to performance issues or complete failure of the PSU.
- Look for Loose or Damaged Connections: Inspect all the connections on the power supply unit for any loose or improperly secured cables or connectors. Loose connections can lead to intermittent power supply or unreliable operation.
- Visually Inspect Other Components: Scan other components on the power supply unit for any obvious physical damage, such as bent pins, broken components, or damaged connectors. Any abnormalities found should be carefully evaluated for potential impact on the functionality of the PSU.
- Check for Signs of Moisture or Corrosion: Moisture or corrosion can significantly affect the performance of electronic components. Look for signs of water damage or corrosion on the power supply unit. Corrosion may appear as a greenish or white buildup on the surface of the components.
During the physical inspection, if you notice any significant damage or abnormalities with the power supply unit, it may indicate a need for further evaluation or replacement. However, if no visible damage is observed, it’s still advisable to proceed with further testing to ensure the PSU’s functionality and performance are not compromised.
Step 8: Reassembling and Testing
Once you have completed the necessary inspections and testing of the power supply unit (PSU) in your Vizio TV, it’s time to reassemble the TV and conduct additional tests to verify the functionality of the PSU. Follow these steps to reassemble and test your TV:
- Reconnect Cables and Wires: Begin by reconnecting any cables or wires that were detached during the testing process. Ensure that each connection is secure and properly seated.
- Reattach the Power Supply Unit: If you removed the power supply unit from the TV, carefully reattach it to its original position. Secure it using the mounting screws or clips you removed earlier.
- Replace the Back Cover: Align the back cover of the TV and gently press it into place. Make sure it is properly aligned with the screw holes. Reinsert and tighten the screws to secure the back cover.
- Reattach the TV Base or Stand: If applicable, reattach the TV base or stand using the screws or clips you removed earlier. Ensure that the base is properly secured and stable.
- Plug in the TV: Plug the power cord back into the electrical outlet and ensure that it is securely connected to the TV’s power input.
- Power On the TV: Turn on the TV and observe if the power supply unit is functioning correctly. Check if the TV powers on smoothly and remains stable during operation.
- Monitor for Power-related Issues: Keep an eye out for any signs of power-related issues, such as random shutdowns, flickering screen, or abnormal behavior. If the TV exhibits any of these issues, it may indicate a persistent problem with the power supply unit.
- Perform Additional Tests (optional): If necessary, you can perform additional tests, such as measuring the voltage output or checking for continuity again, to confirm the stability and performance of the power supply unit.
By reassembling the TV and conducting further tests, you can ensure that the power supply unit is functioning properly after the inspection and testing procedures. If you continue to experience power-related issues or suspect a problem with the PSU, it may be necessary to consult a professional technician for further assistance or consider a replacement if deemed necessary.
Conclusion
Testing a Vizio power supply unit (PSU) is an essential step in diagnosing power-related issues with your TV. By following the step-by-step process outlined in this guide, you can assess the functionality and condition of the power supply unit, helping you identify any potential problems that may be affecting its performance.
Throughout the testing process, it’s important to prioritize safety by following the recommended safety precautions. Unplugging the TV, wearing personal protective equipment, grounding yourself, and working in a well-ventilated area are critical steps in ensuring your safety.
By inspecting the power supply unit visually, checking for physical damage, and testing for voltage output and continuity, you can gather valuable information about the PSU’s status. Additionally, reassembling the TV and conducting further tests will help verify the functionality and stability of the power supply unit.
Remember to interpret the results of each test carefully. If you notice any significant damage, inconsistencies in voltage output, or disruptions in continuity, it may indicate a problem with the power supply unit that requires further investigation or professional assistance.
Performing these tests yourself can help you save time and money by potentially identifying the root cause of power-related issues in your Vizio TV. However, if you are uncomfortable or unsure about any aspect of the testing process, it is always recommended to seek the help of a professional technician.
With proper testing techniques and safety measures in place, you can effectively diagnose and address power supply issues in your Vizio TV, ultimately restoring its functionality and ensuring an optimal viewing experience.