Introduction
Welcome to this step-by-step guide on how to take off the PlayStation 5 cover. Whether you’re looking to upgrade your console’s storage, clean out the internal components, or simply give it a new look, removing the cover of your PlayStation 5 is a relatively straightforward process. By following the instructions outlined in this guide, you’ll be able to safely remove the cover and gain access to the internal components of your console.
The PlayStation 5 has quickly become one of the most popular gaming consoles on the market, offering incredible performance and stunning visuals. However, as with any electronic device, there may come a time when you need to remove the cover to perform maintenance or modifications.
Before we dive into the step-by-step process, it’s important to note that removing the cover of your PlayStation 5 may void the warranty. If your console is still under warranty and you’re experiencing issues, it’s best to contact Sony or your retailer for assistance. However, if you’re comfortable with the risks and want to proceed, let’s get started with the necessary tools you’ll need.
Tools Needed
Before you begin the process of removing the PlayStation 5 cover, it’s essential to gather the necessary tools. Here’s a list of items you’ll need:
- Small Phillips screwdriver: You’ll need this tool to unscrew the back and side panels of your PlayStation 5.
- Clean cloth or microfiber towel: It’s always a good idea to have a soft cloth on hand to wipe away any dust or debris that may accumulate during the process.
- Optional: Compressed air or a soft-bristle brush: If you want to thoroughly clean the internal components of your console, having compressed air or a brush can help remove any stubborn dust particles.
Make sure that you have these tools readily available before you proceed with removing the cover. It’s important to use a small Phillips screwdriver that fits snugly into the screws to avoid stripping them. Additionally, having a clean cloth or microfiber towel will help you maintain the exterior of your console and keep it looking its best.
Remember, taking the cover off your PlayStation 5 requires some precision and care, so having the right tools will ensure the process goes smoothly. Once you have the required tools ready, you can move on to the step-by-step instructions for removing the cover of your PlayStation 5.
Step 1: Shut Down the PlayStation 5
Before you start removing the cover of your PlayStation 5, it’s crucial to shut down the console properly. This step will ensure that there is no risk of damaging the internal components or encountering any unexpected issues during the process. Here’s how to shut down your PlayStation 5:
- On your controller, press and hold the PlayStation button located in the center.
- A quick menu will appear on your screen.
- Scroll down and select “Power.”
- In the power menu, select “Turn Off PS5.
- Confirm your selection by choosing “Full Shutdown.”
Wait for a few moments, and your PlayStation 5 will power down completely. It’s important to ensure that the console is turned off and not in rest mode to avoid any potential electrical hazards or damage.
Once the console is shut down, unplug the power cable from the back of the PlayStation 5. This step is necessary to ensure your safety and prevent any electric shock.
Now that you’ve properly shut down the PlayStation 5 and disconnected the power cable, you’re ready to proceed with the next steps of removing the cover.
Step 2: Unplug the PlayStation 5
After shutting down your PlayStation 5, the next step is to unplug the console from the power source. This step is crucial for your safety and to avoid any potential electrical hazards during the process of removing the cover. Follow these steps to unplug your PlayStation 5:
- Locate the power cable connected to the back of your PlayStation 5.
- Hold the power cable firmly at its base.
- Gently pull the power cable out of the console.
Ensure that you grip the power cable securely and avoid pulling on the cable itself to prevent any damage. Take your time during this step to ensure a smooth and safe disconnection.
Once the power cable is unplugged, it’s a good idea to wait for a few minutes before proceeding to the next step. This brief pause allows any residual power to dissipate and ensures that the console is completely powered off.
Unplugging the PlayStation 5 reduces the risk of electrical shocks and protects the internal components from accidental damage. With the console safely disconnected from the power source, you’re now ready to move on to the next steps of removing the cover.
Step 3: Locate the Screw on the Back Panel
Now that your PlayStation 5 is shut down and unplugged, the next step is to locate the screw on the back panel of the console. This screw secures the back panel in place and needs to be removed in order to proceed with removing the cover. Follow these steps to locate the screw:
- Position your PlayStation 5 so that the rear of the console is facing you.
- Look for a screw located near the bottom edge of the back panel.
- The screw may be covered by a plastic cap or disc.
- Use your small Phillips screwdriver to remove the screw.
Be sure to place the screwdriver securely in the screw head and apply steady, controlled pressure to turn it in a counterclockwise direction. Avoid using excessive force to prevent any potential damage to the screw or the back panel.
Once you have successfully removed the screw, set it aside in a safe place where it won’t be easily misplaced. Removing this screw is a crucial step in the process as it allows for the subsequent removal of the back panel, which will grant access to the internal components of your PlayStation 5.
With the screw on the back panel removed, you’re now ready to proceed to the next step of actually unscrewing the back panel and taking it off.
Step 4: Unscrew the Back Panel
Now that you’ve located and removed the screw on the back panel of your PlayStation 5, it’s time to unscrew the back panel itself. This step will allow you to gain access to the internal components of the console. Follow these instructions to unscrew the back panel:
- Gently grip the edges of the back panel on both sides.
- Apply a slight upward pressure to the panel to disengage the remaining clips.
- Slowly slide the back panel towards the top of the console.
- Continue sliding the panel until it completely detaches from the PlayStation 5.
As you slide the back panel off, be careful not to apply too much force or twist it forcefully. The panel should come off smoothly and easily if all the clips are disengaged.
Set the back panel aside in a safe location where it won’t get damaged or misplaced. Taking off the back panel reveals the inner workings of your PlayStation 5, allowing you to perform maintenance tasks or make modifications if needed.
It’s important to note that the back panel removal is necessary for specific actions such as cleaning out any accumulated dust or installing additional storage. If you don’t have any specific reason to remove the back panel, it’s recommended to proceed with caution and avoid unnecessary disassembly of your console.
With the back panel successfully unscrewed and removed, you’re now ready to move on to the next steps of taking off the side panel and the top cover of your PlayStation 5.
Step 5: Lift the Back Panel Off the PlayStation 5
With the screw removed and the back panel of your PlayStation 5 unscrewed, it’s time to lift the back panel off the console. This step will grant you access to the internal components and allow for various maintenance tasks or modifications. Follow these instructions to lift the back panel off:
- With the back panel slid up and detached from the console, gently lift it upwards.
- Ensure that you lift the panel evenly to avoid putting unnecessary pressure on any particular area.
- Continue lifting until the back panel is completely removed from the PlayStation 5.
As you lift the back panel off, be careful not to snag or damage any internal wires or components. Take your time and proceed with caution to avoid any accidents or mishaps.
Once the back panel is successfully lifted off, set it aside in a safe place where it won’t be easily damaged or misplaced. You can now fully access the internal components of your PlayStation 5 for cleaning, repairs, or upgrades.
Remember that removing the back panel may void the warranty of your console, so it’s crucial to exercise caution and carefully follow the manufacturer’s guidelines. If you’re unsure about any specific task or modification, it’s always best to consult the official documentation or reach out to Sony support for assistance.
Now that the back panel is lifted off, you can move on to the next steps of removing the side panel and ultimately taking off the top cover of your PlayStation 5.
Step 6: Locate the Screw on the Side Panel
After successfully removing the back panel of your PlayStation 5, it’s time to locate the screw on the side panel. This screw secures the side panel in place and needs to be removed in order to proceed with taking off the cover. Follow these instructions to locate the screw:
- Position your PlayStation 5 so that the side panel facing you is visible.
- Look for a screw located near the rear edge of the side panel.
- The screw may be covered by a small plastic cap or disc.
- Use your small Phillips screwdriver to carefully remove the screw.
Make sure to insert the screwdriver firmly into the screw head and apply gentle pressure in a counterclockwise direction to remove it. Take your time and be cautious during this step to prevent any damage to the screw or side panel.
Once you have successfully removed the screw, set it aside in a safe place where it won’t be easily misplaced. Removing this screw is an important step as it allows for the subsequent removal of the side panel, which will then grant you access to the top cover of your PlayStation 5.
With the screw on the side panel located and removed, you’re now ready to proceed to the next step of unscrewing the side panel and taking it off.
Step 7: Unscrew the Side Panel
Now that you’ve located and removed the screw on the side panel of your PlayStation 5, it’s time to unscrew the panel itself. This step will allow you to access the top cover of the console and make any necessary modifications or perform maintenance tasks. Follow these instructions to unscrew the side panel:
- Gently hold the side panel on the edges.
- Apply a slight upward pressure to disengage the remaining clips.
- Slowly slide the side panel towards the rear of the console.
- Continue sliding the panel until it completely detaches from the PlayStation 5.
Be cautious and ensure you don’t exert excessive force or twist the panel forcefully while sliding it off. The side panel should come off smoothly if all the clips are disengaged.
Once you have successfully unscrewed the side panel, set it aside in a safe location where it won’t get damaged or misplaced. This step allows you to access the internal components of your PlayStation 5 and proceed with any desired modifications or maintenance.
Remember, removing the side panel may void the warranty of your console, so exercise caution and follow the manufacturer’s instructions. If you are uncertain about any specific task, it’s best to consult official documentation or seek assistance from Sony support.
With the side panel successfully unscrewed and removed, you’re now ready to move on to the next step of gently removing the top cover of your PlayStation 5.
Step 8: Lift the Side Panel Off the PlayStation 5
With the side panel unscrewed from your PlayStation 5, it’s time to lift the panel off the console. This step will allow you to access the internal components and make any necessary modifications or perform maintenance tasks. Follow these instructions to lift the side panel off:
- Gently grip the edges of the side panel on both sides.
- Apply a slight upward pressure to disengage the remaining clips.
- Slowly lift the side panel upwards until it is completely detached from the PlayStation 5.
As you lift the side panel off, be careful not to snag or damage any internal wires or components. Take your time and proceed with caution to avoid any accidents or mishaps.
Once the side panel is successfully lifted off, set it aside in a safe place where it won’t be easily damaged or misplaced. You can now fully access the internal components of your PlayStation 5 for cleaning, repairs, or upgrades.
It’s important to note that removing the side panel may void the warranty of your console, so it’s crucial to proceed with caution and carefully follow the manufacturer’s guidelines. If you’re unsure about any specific task or modification, it’s always best to consult the official documentation or reach out to Sony support for assistance.
With the side panel lifted off, you’re now ready to proceed to the final steps of gently removing the top cover of your PlayStation 5.
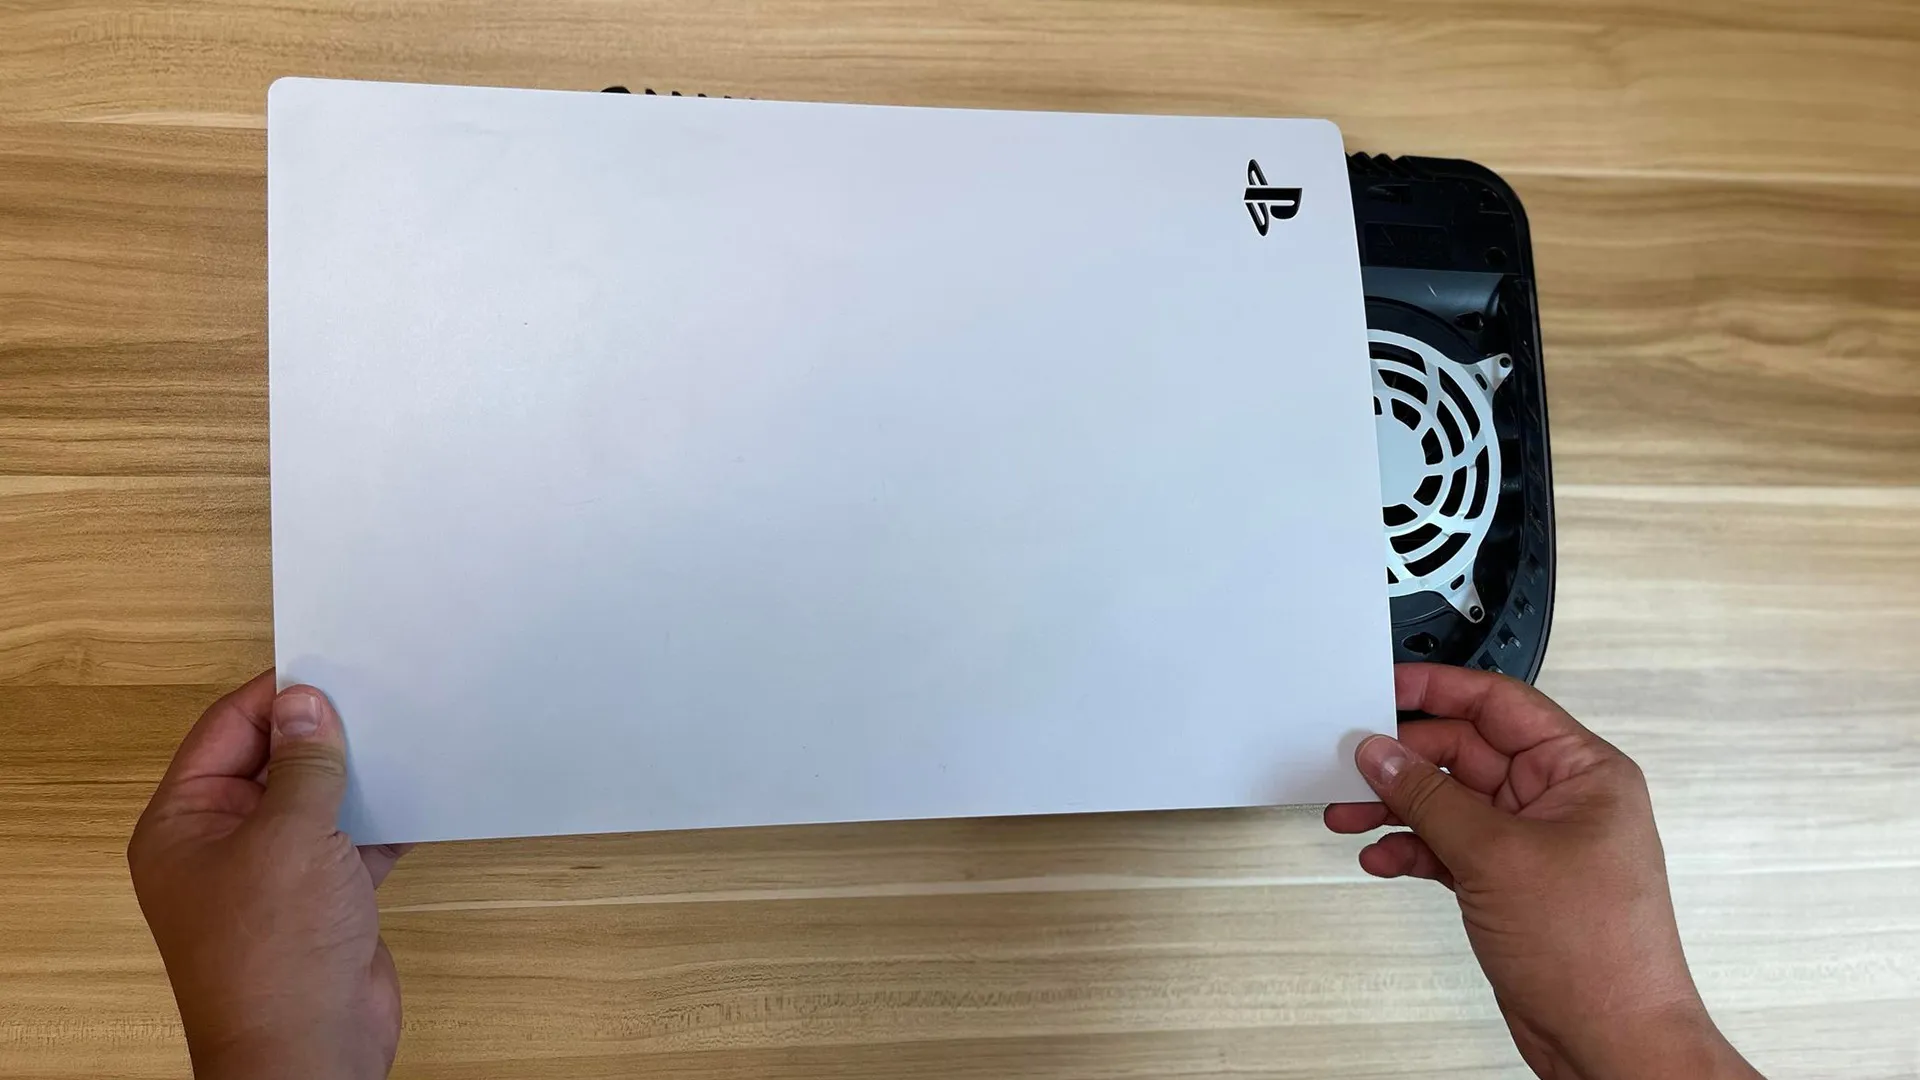
Step 9: Gently Remove the Top Cover of the PlayStation 5
With the side panel of your PlayStation 5 removed, it’s time to gently remove the top cover of the console. Removing the top cover will grant you access to the internal components for cleaning, upgrades, or modifications. Follow these instructions to safely remove the top cover:
- Ensure that the PlayStation 5 is positioned with the side without the side panel facing upward.
- Locate the front edge of the top cover, near the front USB ports.
- Gently lift the front edge of the top cover upwards.
- Continue lifting the top cover, moving towards the back of the PlayStation 5.
- Be cautious not to apply excessive force or twist the cover while lifting.
- Once the top cover is lifted, set it aside in a safe place, taking care not to damage it.
As you remove the top cover, be mindful of any wires or cables that may be connected to the console. Take your time to ensure a smooth and careful removal process, avoiding any unnecessary strain or potential damage to the components.
With the top cover successfully removed, you have full access to the internal components of your PlayStation 5. This allows you to clean out any accumulated dust, perform maintenance tasks, or install upgrades such as additional storage.
Remember to handle the top cover with care and keep it in a secure location to avoid any accidental damage. If you plan to reattach the cover later, ensure that no damage occurs to the clips or any components underneath.
Now that you’ve safely removed the top cover, you can proceed with your intended maintenance or modification tasks. Just be sure to follow any manufacturer guidelines or consult official documentation for further instructions.
Step 10: Reattach the Cover of the PlayStation 5
After completing your desired maintenance or modification tasks on your PlayStation 5, it’s time to reattach the cover. Properly reattaching the cover ensures the console’s functionality, aesthetics, and protection. Follow these instructions to securely reattach the cover:
- Hold the top cover above the PlayStation 5, aligning the edges with the console.
- Gently lower the cover onto the console, ensuring it fits snugly into place.
- Apply light pressure to the top cover, pushing down to engage the clips and secure it.
- Start with the front of the console and work your way towards the back, ensuring all clips are properly engaged.
- Listen for audible clicks or check for visual cues indicating that the cover is securely reattached.
Take your time and be careful not to force the cover into place. It should fit smoothly and securely, without any gaps or misalignment. Double-check that all clips and edges are properly aligned before proceeding.
If your PlayStation 5 had a screw on the side panel, reinsert and tighten the screw with your small Phillips screwdriver. Make sure it is snug but not over-tightened to avoid any potential damage.
Once you have reattached the cover and, if necessary, tightened the screw, visually inspect the console to ensure that everything is in its correct position and secure. Confirm that the top cover is flush with the sides and back of the PlayStation 5 for a polished finish.
With the cover securely reattached, you can now connect the power cable to the back of the console, plug it back into a power source, and power on your PlayStation 5 to enjoy your gaming experience once again.
Remember to exercise caution when reattaching the cover, as improper installation may lead to issues or potential damage. If you encounter any difficulties or uncertainties during this process, consult official documentation or seek assistance from Sony support.
Congratulations! You have successfully reattached the cover of your PlayStation 5 and completed the process of removing and reassembling its components.
Conclusion
Removing and reattaching the cover of your PlayStation 5 can be a straightforward process when approached with caution and the right tools. By following the step-by-step instructions outlined in this guide, you can safely access the internal components of your console for maintenance, upgrades, or modifications.
Throughout this guide, we discussed the importance of shutting down and unplugging the PlayStation 5 before beginning the cover removal process. We also highlighted the tools needed for the task, such as a small Phillips screwdriver and a clean cloth for maintenance purposes.
From locating and removing the screws on the back and side panels to lifting them off carefully, we walked through each step to ensure a smooth and safe progression. We also emphasized the need to handle the top cover with care when removing it and securely reattaching it to maintain the console’s functionality and aesthetics.
Remember, when performing any modifications or maintenance on your PlayStation 5, there is a risk of voiding the warranty, so approach the process with caution and consult official documentation or seek assistance from Sony support if needed.
Now that you have the knowledge and understanding of how to take off and reattach the cover of your PlayStation 5, you have the freedom to explore upgrades, clean out dust, or perform other maintenance tasks under the cover. Enjoy your enhanced gaming experience on your PlayStation 5!


