Introduction
The PlayStation 4 is a popular gaming console that delivers immersive gaming experiences to millions of players worldwide. Whether you’re a avid gamer or a casual enthusiast, there may come a time when you need to take apart your PlayStation 4 for maintenance or repair purposes. While disassembling your console may seem daunting at first, with the right tools and knowledge, it can be a relatively straightforward process. In this guide, we will walk you through the step-by-step process of taking apart your PlayStation 4, ensuring that you can handle any necessary repairs or upgrades with confidence.
Before embarking on the disassembly journey, it’s important to note that taking apart your PlayStation 4 may void the warranty. So, if your console is still under warranty and you encounter any issues, it’s recommended to consult a professional or contact the manufacturer for assistance. However, if your warranty has expired or you’re comfortable with performing the necessary steps yourself, let’s dive into the tools you’ll need to get started.
Tools Needed
Before you begin disassembling your PlayStation 4, make sure you have the necessary tools on hand. Having the right tools will ensure that you can perform the disassembly safely and efficiently. Here are the essential tools you’ll need:
- Screwdriver (Torx T9 and Phillips PH1)
- Plastic spudger or pry tool
- Tweezers
- Cotton swabs
- Isopropyl alcohol (for cleaning purposes)
- Antistatic wrist strap (recommended to prevent electrostatic discharge)
- Clean, lint-free cloth
These tools are commonly available and can be purchased from electronics stores or online platforms. Make sure to have them nearby before proceeding with the disassembly. Additionally, it’s important to work in a clean and well-lit area to minimize the risk of losing small components or damaging any delicate parts of the console.
Step 1: Prepare for Disassembly
Before diving into the disassembly process, it’s crucial to prepare your workspace and ensure your PlayStation 4 is turned off and unplugged from the power source. Here’s what you need to do:
- Gather your tools: Make sure you have all the necessary tools mentioned earlier in the “Tools Needed” section. Having them within reach will help you stay organized and save time during the disassembly process.
- Clean your workspace: Clear a clean, well-lit area where you can comfortably work. This will help prevent any dust or debris from interfering with the disassembly process.
- Power off the console: Ensure your PlayStation 4 is completely powered off. Press and hold the power button until you hear the system beep and the indicator light turns off. Unplug the console from the power source.
- Discharge static electricity: To protect sensitive components from electrostatic discharge, it’s recommended to wear an antistatic wrist strap. Alternatively, you can touch a grounded metal object to discharge any static electricity buildup on your body.
- Remove any accessories: Take off any external accessories, such as USB drives or game discs, from the console to avoid damaging them during the disassembly process.
By following these preliminary steps, you’ll be well-prepared to begin taking apart your PlayStation 4. It’s important to approach the disassembly process with patience and caution to ensure a successful and damage-free experience. Let’s move on to the next step: removing the external casing.
Step 2: Remove the External Casing
With the tools ready and the console prepared, it’s time to start disassembling your PlayStation 4. The first step is to remove the external casing. Here’s how to do it:
- Flip the PlayStation 4 upside down: Carefully turn the console upside down, so the bottom side is facing up.
- Locate and remove the screw covers: Look for the screw covers on the back of the console. These covers hide the screws that secure the casing. Gently pry off the covers using a plastic spudger or pry tool.
- Unscrew the casing screws: Using a Phillips PH1 screwdriver, remove the screws that were concealed by the screw covers. Keep the screws in a safe place to avoid losing them.
- Remove the bottom casing: Once all the screws are removed, carefully slide the bottom casing away from the console, starting from the back and moving towards the front. Be gentle to avoid damaging any internal components.
Once the bottom casing is successfully removed, you’ll have access to the inner components of your PlayStation 4. Remember to handle the console with care and avoid placing excessive pressure on any delicate parts. Next, we’ll move on to step 3: disconnecting the power supply.
Step 3: Disconnect the Power Supply
After removing the outer casing of your PlayStation 4, the next step is to disconnect the power supply. This will ensure your safety and prevent any accidents during the disassembly process. Here’s how to proceed:
- Locate the power supply: On the back of the console, you’ll find the power supply unit (PSU). It’s a rectangular component with power cables attached to it.
- Disconnect the power cables: Carefully unplug the cables connected to the power supply. Start by removing the main power cable that connects to the wall outlet. Then, detach any additional cables, such as the power adapter cable or any other auxiliary power cables.
- Remove the power supply: Once all the cables are disconnected, locate and remove the screws securing the power supply to the console. Keep these screws safe for later reassembly. With the screws removed, gently lift and remove the power supply from the PlayStation 4.
It’s important to handle the power supply with care, as it contains sensitive components. Avoid applying excessive force or putting any unnecessary pressure on the power supply unit. Once the power supply is safely removed, set it aside and move on to the next step: removing the hard drive.
Step 4: Remove the Hard Drive
The next component to remove in the disassembly process is the hard drive. This step may be necessary if you need to replace or upgrade your hard drive. Follow these steps to remove the hard drive from your PlayStation 4:
- Locate the hard drive bay: The hard drive bay is located on the side panel of your PlayStation 4. It is secured by a plastic or metal bracket.
- Unscrew the hard drive bracket: Using a Phillips PH1 screwdriver, remove the screws that secure the hard drive bracket in place.
- Remove the hard drive: Once the screws are removed, gently slide or lift the hard drive out of the bay. Be cautious not to damage the connectors or any other nearby components as you remove it.
If you’re replacing the hard drive, you’ll need to install the new hard drive into the bracket by aligning it with the screw holes and securing it with the screws you previously removed. Ensure that the connections are properly seated and that the hard drive is secure before proceeding.
If you don’t need to replace the hard drive, you can skip this step and move on to the next section of the disassembly process. Removing the hard drive may be necessary for data backup or if you’re experiencing issues with the storage. With the hard drive removed, you’re ready to proceed further with dismantling your PlayStation 4.
Step 5: Remove the Optical Drive
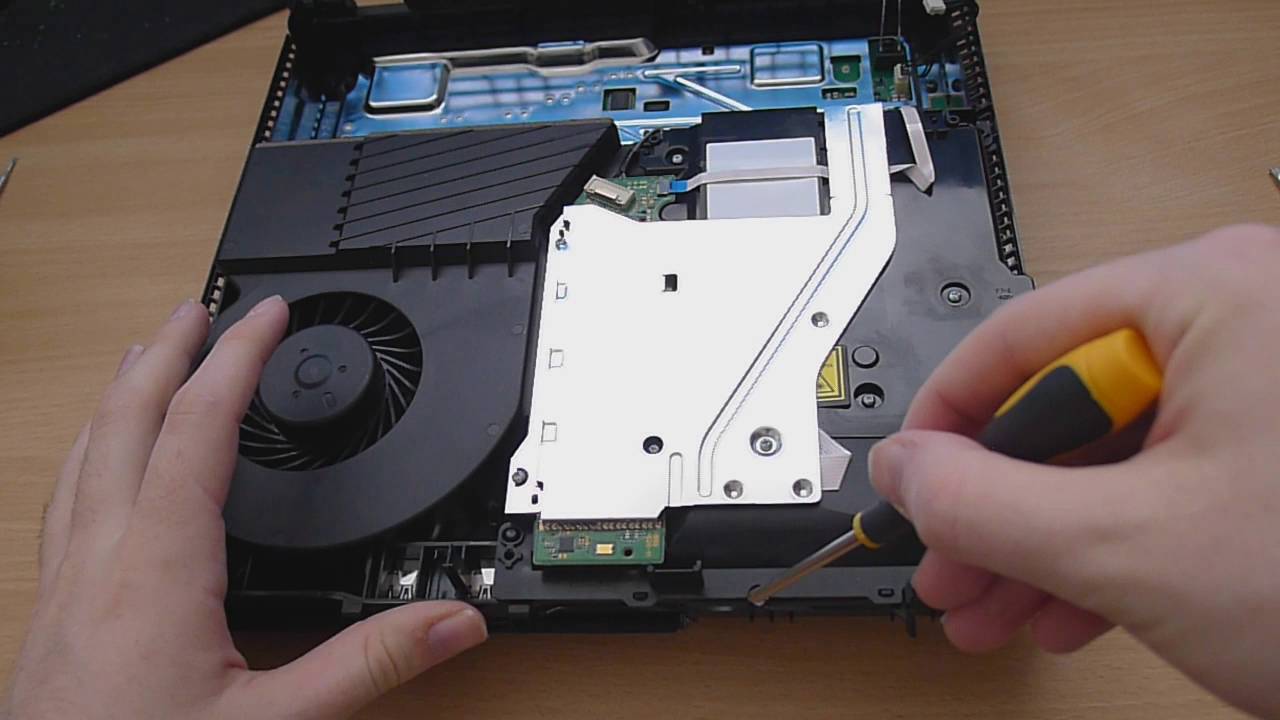
The optical drive, also known as the disc drive, is the component responsible for reading and playing game discs on your PlayStation 4. If you need to replace the optical drive or address any issues related to it, follow these steps to remove it from your console:
- Locate the optical drive: The optical drive is usually situated on the front side of your PlayStation 4, beneath the top casing.
- Unplug the cables: Carefully disconnect the ribbon cable and power cable connected to the back of the optical drive. Some models may also have a small data cable that needs to be unplugged.
- Remove the optical drive bracket: Use a Phillips PH1 screwdriver to remove the screws securing the optical drive bracket. Set the screws aside in a safe place.
- Eject the drive: Press the manual eject button located near the front of the optical drive to partially eject it from the console.
- Detach the optical drive: Once partially ejected, gently pull the optical drive out of the console, making sure to disconnect any remaining cables or connectors, if applicable.
When reinstalling or replacing the optical drive, follow the steps in reverse order. Make sure to firmly seat the drive into the correct position and reattach all necessary cables securely. Test the functionality of the optical drive before proceeding to the next steps of the disassembly process.
With the optical drive successfully removed, you’re one step closer to fully disassembling your PlayStation 4. Keep the removed components and screws organized and proceed to the following steps with caution.
Step 6: Disconnect the Wi-Fi and Bluetooth Antennas
In this step, we will disconnect the Wi-Fi and Bluetooth antennas from your PlayStation 4. This is necessary if you need to replace or troubleshoot connectivity issues with these wireless components. Follow these steps to disconnect the Wi-Fi and Bluetooth antennas:
- Locate the Wi-Fi and Bluetooth antennas: The Wi-Fi and Bluetooth antennas are typically located near the front of the console, beneath the top casing. They are small, rectangular modules with wire connectors attached to them.
- Carefully remove the connectors: Use a pair of tweezers to gently grasp the wire connectors attached to the Wi-Fi and Bluetooth antennas. Proceed to disconnect the connectors by pulling them straight up, being careful not to tug on the wires themselves.
- Unhook the antennas: After disconnecting the wire connectors, locate the hooks or clips that secure the antennas in place. Depress or release these hooks to free the antennas from their mounting points.
- Remove the antennas: With the hooks released, gently lift the Wi-Fi and Bluetooth antennas out of their positions. Take care not to damage the delicate wiring as you remove them.
When reassembling or replacing the Wi-Fi and Bluetooth antennas, ensure they are correctly aligned with the mounting points and securely fastened in place. Reattach the wire connectors firmly but gently, taking care not to bend or strain the wires.
By disconnecting the Wi-Fi and Bluetooth antennas, you can now move on to further disassemble your PlayStation 4 and access the internal components. Maintain a methodical approach and keep track of the removed parts and their respective locations for smoother reassembly later on.
Step 7: Disconnect the Fan and Heat Sink
The fan and heat sink are crucial components of your PlayStation 4, responsible for keeping the system cool during intense gaming sessions. If you need to clean or replace these components, follow the steps below to disconnect the fan and heat sink:
- Locate the fan and heat sink: The fan and heat sink assembly is typically found near the center or rear of the console, attached to the motherboard.
- Identify the fan power connector: Look for the cable that connects the fan to the motherboard. It is a small, square connector with wires leading to the fan assembly.
- Disconnect the fan power connector: Gently pull on the fan power connector to detach it from the motherboard. Avoid pulling on the wires to prevent damage.
- Locate the heat sink screws: Examine the heat sink assembly and identify the screws that secure it to the motherboard. These screws may be colored differently or marked in some way for easy identification.
- Remove the heat sink screws: Use a screwdriver appropriate for the heat sink screws (typically Phillips PH1 or Torx T9) and carefully unscrew each one. Keep track of the screws as you remove them to ensure they can be properly reattached later.
- Detach the heat sink: Once the screws are removed, gently lift the heat sink away from the motherboard. Be cautious of any thermal paste between the heat sink and the processor, as it can be sticky.
When reassembling or replacing the fan and heat sink, ensure that the fan power connector is securely plugged back into the motherboard. Apply a fresh layer of thermal paste between the heat sink and the processor to ensure proper heat transfer.
Disconnecting the fan and heat sink allows for easy access to other inner components of your PlayStation 4. Continue the step-by-step disassembly process, taking care to handle the components delicately and maintain an organized workspace.
Step 8: Separate the Motherboard from the Bottom Casing
To proceed with the disassembly of your PlayStation 4, the next step is to separate the motherboard from the bottom casing. This will allow you to access and inspect the motherboard and its various components. Follow these steps to safely separate the motherboard:
- Locate the screws: Look for the screws that secure the motherboard to the bottom casing. These screws are typically located around the edges of the motherboard and may vary in size or color.
- Remove the screws: Using the appropriate screwdriver, carefully unscrew each of the motherboard screws. Take note of the screw positions and keep them organized for reassembly.
- Disconnect any remaining cables: Check for any cables or connectors still attached to the motherboard. These may include ribbon cables, fan connectors, or other wiring. Gently unplug and detach these connections from the motherboard.
- Lift the motherboard: Once all the screws and cables are removed, carefully lift the motherboard away from the bottom casing. Be cautious of any adhesive or clips that may be holding it in place.
It’s crucial to handle the motherboard with care, as it houses sensitive components. Avoid applying excessive force or bending the motherboard during the separation process. Place the motherboard on a clean and static-free surface to prevent any damage.
With the motherboard successfully separated, you can now inspect it for any signs of damage or issues. This is also a good opportunity to clean any dust or debris from the motherboard and its surrounding components. Proceed with caution, as the motherboard is a critical part of your PlayStation 4’s functionality.
Moving forward, you can continue the disassembly process by focusing on individual components and their removal. Take your time, stay organized, and ensure the proper reassembly of each part as you progress through the next steps.
Step 9: Remove the Power Supply Unit
In this step, we will focus on removing the power supply unit (PSU) from your PlayStation 4. Whether you need to replace a faulty PSU or access other components, follow these steps to safely remove the power supply unit:
- Locate the power supply unit: The power supply unit is typically positioned near the back or side of the console, attached to the bottom casing.
- Identify the power supply cables: Take note of the cables connected to the power supply. These include the main power cable from the wall outlet, as well as auxiliary power cables for other components.
- Disconnect the power supply cables: Carefully unplug each power cable from the power supply unit. The main power cable may require stronger force to detach, while other cables may use connectors or clips.
- Remove the screws: Locate and remove the screws that secure the power supply unit to the bottom casing. Some screws may be visible, while others may be hidden beneath stickers or plastic covers.
- Detach the power supply unit: With the screws removed, gently lift and detach the power supply unit from the bottom casing. Be mindful of any remaining cables or connectors that may still be attached.
When reinstalling the power supply unit or replacing it with a new one, ensure that all cables are properly connected and secured. Double-check the alignment of the unit and the screw holes before tightening the screws.
The power supply unit is a critical component of your PlayStation 4’s functionality, so handle it with care to avoid any damage. With the power supply unit successfully removed, you can now proceed to the next steps of the disassembly process with confidence.
Step 10: Detach the Motherboard from the Top Casing
In this step, we will focus on detaching the motherboard from the top casing of your PlayStation 4. This step is crucial if you need to access or replace specific components on the motherboard. Follow these steps to safely detach the motherboard:
- Locate the screws: Look for the screws that secure the motherboard to the top casing. These screws are usually positioned around the edges or corners of the motherboard.
- Remove the screws: Using the appropriate screwdriver, carefully unscrew each of the motherboard screws. Keep track of the screw positions to ensure proper reassembly later on.
- Disconnect any remaining cables: Check for any cables or connectors still attached to the motherboard. These may include ribbon cables, fan connectors, or other wiring. Gently unplug and detach these connections from the motherboard.
- Separate the motherboard from the top casing: Once all the screws and cables are removed, lift the motherboard away from the top casing. Be cautious of any adhesive or clips that may still be holding it in place.
When handling the motherboard, it’s important to exercise caution and avoid bending or flexing it. Place the motherboard on a clean, static-free surface to prevent any damage.
With the motherboard detached from the top casing, you now have easier access to inspect and work on specific components. Take this opportunity to clean any dust or debris and address any issues you may have encountered. Remember to handle the motherboard and its components with care to prevent any damage.
As you proceed with the disassembly process, remember to keep track of the removed screws and cables for organized reassembly. Take your time and stay organized to ensure a successful disassembly of your PlayStation 4.
Step 11: Remove the Power Button Circuit Board
In this step, we will focus on removing the power button circuit board from your PlayStation 4. The power button circuit board is responsible for controlling the power functionality of the console. Follow these steps to safely remove the power button circuit board:
- Locate the power button circuit board: The power button circuit board is usually positioned near the front of the console, adjacent to the power button.
- Identify the connectors: Take note of the connectors attached to the power button circuit board. These connectors typically include ribbon cables or wires.
- Disconnect the connectors: Gently unplug the connectors from the power button circuit board. Use caution to avoid applying excessive force or damaging the connectors.
- Remove any screws or clips: Check for any screws or clips securing the power button circuit board to the console. Unscrew or unclip these fasteners to release the board.
- Detach the power button circuit board: Once all connectors and fasteners are removed, carefully lift and detach the power button circuit board from the console.
Take care not to bend or damage the connectors or ribbon cables during the removal process. If necessary, use a pair of tweezers or a plastic spudger to gently pry the connectors from their sockets.
When reassembling or replacing the power button circuit board, ensure that the connectors are securely plugged in and that any screws or clips are properly fastened.
With the power button circuit board safely removed, you can now proceed with further disassembling your PlayStation 4. Always exercise caution, keep track of the removed components, and follow the steps carefully for a successful disassembly process.
Step 12: Take Apart the Controller Ports
In this step, we will focus on taking apart the controller ports on your PlayStation 4. The controller ports allow you to connect and use your game controllers. If you need to clean or replace the controller ports due to connectivity issues, follow these steps:
- Locate the controller ports: The controller ports are typically situated on the front of your PlayStation 4, near the power button and disc drive.
- Identify the screws: Look for the screws that secure the controller ports to the console casing. These screws are usually small and may require a Phillips PH1 screwdriver to remove.
- Unscrew the controller port screws: Use the appropriate screwdriver to carefully unscrew the screws holding the controller ports in place. Keep the screws in a safe place for reassembly later.
- Separate the controller ports from the casing: Once the screws are removed, gently separate the controller ports from the console casing, ensuring not to damage any wires or connectors attached to them.
When reassembling or replacing the controller ports, align them with the appropriate slots in the console casing. Insert and secure the screws to ensure a proper fit, but avoid overtightening them.
With the controller ports successfully taken apart, you can now clean or replace them as needed. Use a clean cloth and isopropyl alcohol to gently clean the contacts and connectors, making sure to remove any dirt or debris that may be causing connectivity issues.
Proceed with caution and maintain an organized workspace as you continue the disassembly process. Carefully handle the removed components and keep track of the screws to ensure a smooth reassembly of your PlayStation 4.
Step 13: Separate the USB and HDMI Ports
In this step, we will focus on separating the USB and HDMI ports from your PlayStation 4. These ports are essential for connecting external devices and accessories. If you need to clean or replace the USB and HDMI ports due to connectivity issues, follow these steps:
- Locate the USB and HDMI ports: The USB and HDMI ports are typically located on the back of your PlayStation 4, near the controller ports and power supply unit.
- Identify the screws: Look for the screws that secure the USB and HDMI ports to the console casing. These screws may be small and require a Phillips PH1 screwdriver to remove.
- Unscrew the port screws: Using the appropriate screwdriver, carefully unscrew the screws holding the USB and HDMI ports in place. Set the screws aside for reassembly later on.
- Separate the ports from the casing: Once the screws are removed, gently pull the USB and HDMI ports away from the console casing, ensuring not to strain or damage any wires or connectors attached to them.
When reassembling or replacing the USB and HDMI ports, align them with the corresponding slots on the console’s casing. Insert and secure the screws to ensure a proper fit, being careful not to overtighten them.
With the USB and HDMI ports separated, you can now clean or replace them if necessary. Inspect the ports for any dirt, debris, or bent pins that may be causing connectivity issues. Use a can of compressed air or a soft brush to remove any dust or debris, and straighten any bent pins carefully using a pair of tweezers.
Maintain your focus and organization as you continue with the disassembly process. Handle the removed components with care and keep track of the screws to ensure a successful reassembly of your PlayStation 4.
Step 14: Remove the Fan and Heat Sink from the Motherboard
In this step, we will focus on removing the fan and heat sink from the motherboard of your PlayStation 4. The fan and heat sink are essential for keeping the console cool during operation. If you need to clean or replace the fan and heat sink, follow these steps:
- Locate the fan and heat sink: The fan and heat sink assembly are typically positioned on top of the motherboard, covering the central processing unit (CPU).
- Unplug the fan connector: Locate the connector from the fan to the motherboard. Gently unplug the fan connector, ensuring not to pull on the wires.
- Identify the screws: Look for the screws that secure the fan and heat sink assembly to the motherboard. These screws may be in different sizes and may require a Phillips PH1 or Torx T9 screwdriver to remove.
- Unscrew the fan and heat sink screws: Use the appropriate screwdriver to carefully unscrew each screw that attaches the fan and heat sink assembly to the motherboard. Keep the screws in a safe place for reassembly later on.
- Detach the fan and heat sink: Once all screws are removed, gently lift and detach the fan and heat sink assembly from the motherboard. Be cautious of any thermal paste that may be present between the heat sink and the CPU.
When reassembling or replacing the fan and heat sink, apply a fresh layer of thermal paste on the CPU before attaching the heat sink. Ensure that the fan connector is securely plugged into the motherboard and that all screws are properly tightened without over-tightening them.
With the fan and heat sink successfully removed, take the opportunity to clean the components. Use a can of compressed air to remove any dust or debris from the fan blades and the heat sink fins. Ensure that the components are completely clean and free from any blockages before reassembling.
As you continue with the disassembly process, handle the components with care and keep track of the screws for organized reassembly.
Step 15: Clean and Reassemble the PlayStation 4
In this final step, we will focus on cleaning the disassembled components and reassembling your PlayStation 4. Cleaning the components will help improve performance and ensure proper functionality. Follow these steps to clean and reassemble your console:
- Clean the components: Use a can of compressed air, a soft brush, or lint-free cloth to remove any dust or debris from the various disassembled components. Pay special attention to the fan, heat sink, and other areas prone to dust accumulation.
- Inspect for damage: Take a moment to inspect each component for any signs of damage. Look for loose cables, bent pins, or other abnormalities that may affect the performance of your PlayStation 4.
- Apply thermal paste: If you removed the heat sink, apply a thin layer of thermal paste to the CPU before reattaching the heat sink. This will help optimize heat transfer and ensure proper cooling.
- Reassemble the console: Follow the steps in reverse order to reassemble your PlayStation 4. Begin by attaching components such as the fan and heat sink, motherboard, power button circuit board, USB and HDMI ports, controller ports, and so on. Use the appropriate screws and connectors to secure each component in place.
- Tighten screws carefully: When tightening screws, ensure they are securely fastened but avoid over-tightening, as this may damage the components or strip the screw holes. Use a screwdriver appropriate for the screw head and size.
- Double-check connections: Before completing the reassembly, double-check that all cables, connectors, and ribbons are properly connected. Ensure everything is in its correct place and securely seated.
Once you have reassembled your PlayStation 4, it’s time to test its functionality. Plug in the power cable, connect it to your TV or monitor, and power on the console. Check that all components are working correctly, including the controllers, disc drive, and any other peripherals.
Congratulations! You have successfully cleaned and reassembled your PlayStation 4. Regular maintenance and cleaning will help keep your console in optimal condition for a better gaming experience. Enjoy your gaming sessions with your newly refreshed PlayStation 4!
Conclusion
Taking apart your PlayStation 4 may seem like a daunting task, but armed with the right tools and knowledge, it can be a manageable process. By following the step-by-step guide provided, you can safely disassemble your console, clean and inspect components, and perform necessary repairs or upgrades.
Throughout the disassembly process, it is crucial to exercise caution and handle the components with care. Avoid applying excessive force, bending delicate wires, or overtightening screws. Keeping track of the removed screws and organizing the components will simplify the reassembly process.
Remember that disassembling your PlayStation 4 may void the warranty. If your console is still under warranty, consult a professional or contact the manufacturer for assistance to avoid any potential issues.
Regular maintenance, including cleaning and inspection, can help prolong the lifespan of your PlayStation 4 and maintain optimal performance. Taking the time to clean dust and debris from the fan, heat sink, and other components will aid in cooling and prevent overheating.
Whether you’re seeking to address hardware issues, replace components, or simply give your console some TLC, the ability to disassemble your PlayStation 4 provides you with greater control over its maintenance and customization. Just remember to proceed with caution, stay organized, and enjoy the rewarding experience of working on your own gaming console.
Now that you have successfully disassembled, cleaned, and reassembled your PlayStation 4, you can look forward to a smoother gaming experience and a console that will continue to bring you joy for years to come.


