Introduction
With the advancements in technology, staying connected has become an integral part of our daily lives. One of the most convenient ways to stay connected is through email. Whether it’s for personal or professional use, email allows us to send and receive messages instantly, making communication efficient and effective. When it comes to managing emails on the go, having a reliable email app on your Samsung tablet is essential. In this article, we will guide you through the process of syncing your email on a Samsung tablet, ensuring that you have access to your emails wherever you are.
Syncing your email on your Samsung tablet not only enables you to receive new messages instantaneously but also keeps your email folders, contacts, and other settings up to date across all of your devices. Whether you’re setting up your email account for the first time or need to reconfigure it, the steps outlined in this guide will help you achieve a seamless email syncing experience.
Step 1: Open Email App
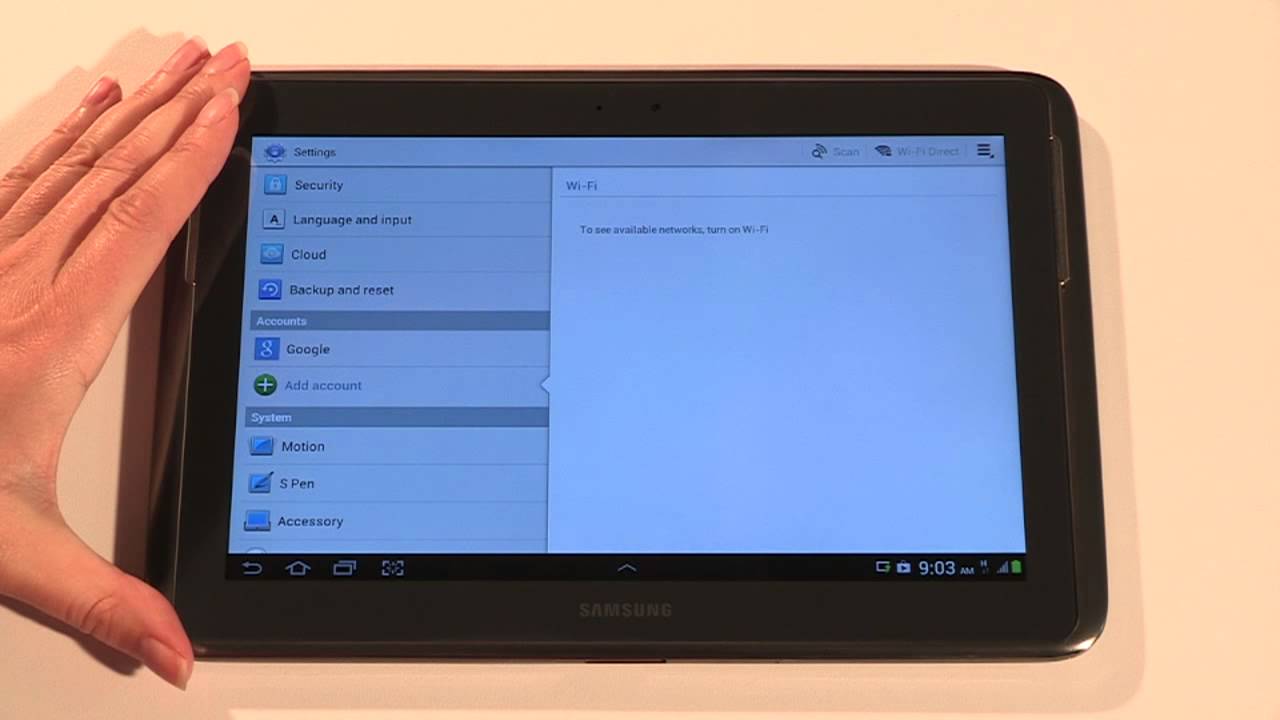
The first step towards syncing your email on your Samsung tablet is to open the email app. Locate the app icon on your tablet’s home screen or in the app drawer and tap on it to launch the application.
If you haven’t set up an email account on your tablet before, you will be prompted to add an account. In this case, proceed to the next step. However, if you already have an email account set up, you can skip to Step 2 and proceed directly to adding another account or reconfiguring an existing one.
Once you open the email app, you will be presented with a screen that displays your currently configured email accounts, if any. This screen may vary depending on the email app you are using, but typically, it will provide options such as “Add Account,” “Settings,” and “Accounts.”
It is worth noting that Samsung tablets often come with a pre-installed email app called “Email.” However, you may also choose to use a third-party email app from the Google Play Store or a different email provider’s app, based on your personal preferences.
By opening the email app and reaching the account configuration screen, you are now ready to proceed to the next step, where you will add your email account to begin the syncing process.
Step 2: Add Email Account
To sync your email on your Samsung tablet, you need to add your email account to the email app. This step allows you to configure your email settings and establish the necessary connection between your tablet and the email server. Follow these simple steps to add your email account:
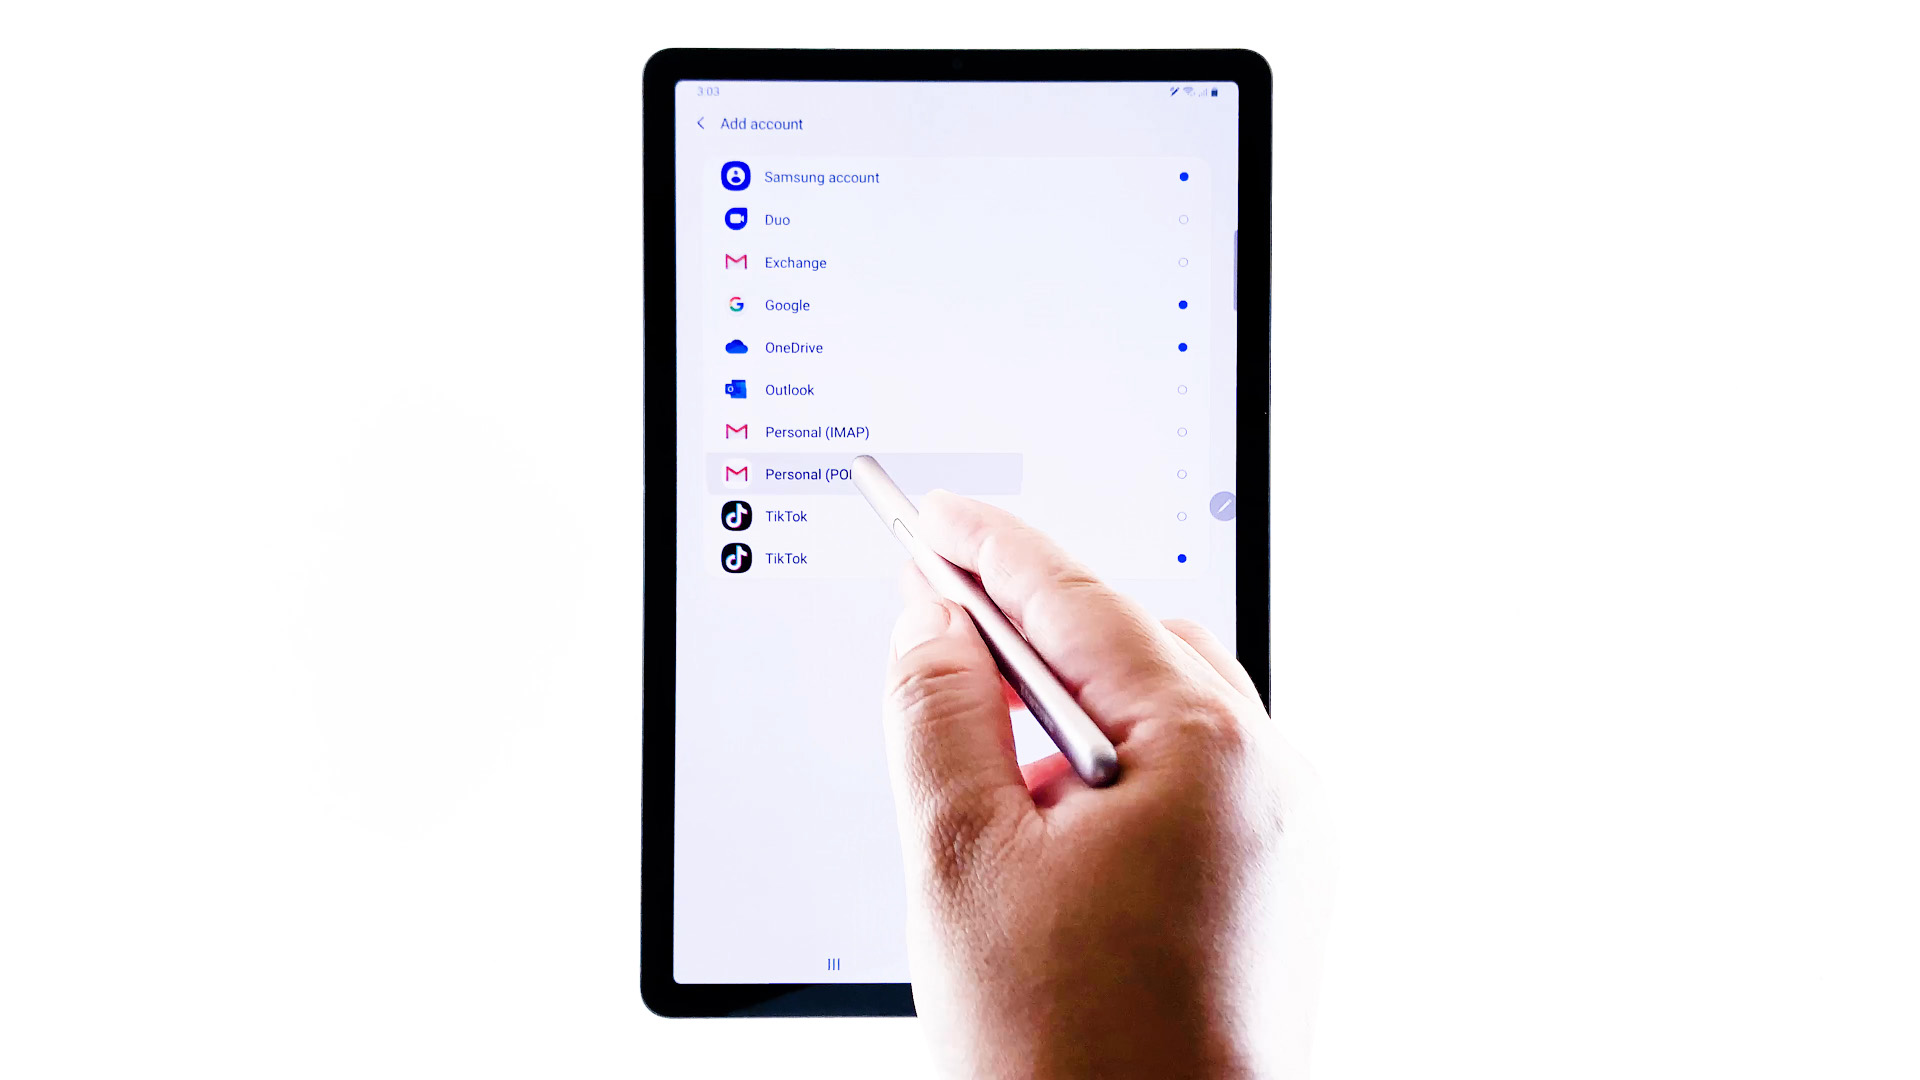
- On the account configuration screen of the email app, tap on the “Add Account” option. This will open a screen where you can select the type of email account you want to add.
- Choose the type of email account you have. Common options include “Exchange,” “Google,” “Yahoo,” “Outlook,” “IMAP,” or “POP3.” Select the appropriate option based on the email provider you are using.
- Provide your email address in the designated field. Make sure to enter the correct address to ensure successful syncing of your email.
- Tap the “Next” button to proceed. The email app will attempt to automatically detect the email server settings based on the entered email address.
- If the automatic detection is successful, you will be prompted to enter your account password. Enter the password associated with your email address and tap “Next” to proceed. If the detection fails, you may need to enter the server settings manually.
- Once you have entered the password or manually configured the server settings, the email app will verify the account and establish a connection. This may take a few moments, depending on your internet connection and email server response time.
- After the account verification is complete, you will be presented with additional options to customize your email settings. These options may include choosing the synchronization frequency, selecting which folders to sync, or enabling notifications for new emails.
- Adjust these settings according to your preferences and tap “Next” or “Save” to complete the process. Congratulations! Your email account is now added to the email app, and the syncing process will begin.
By successfully adding your email account to the email app, you have completed the second step of syncing your email on your Samsung tablet. In the following steps, we will further customize your email settings and ensure a smooth syncing experience.
Step 3: Enter Email Address
In order to sync your email on your Samsung tablet, you need to provide your email address during the account setup process. Follow these steps to enter your email address:
- After selecting the type of email account you want to add in the previous step, you will be prompted to enter your email address. This is where you need to input the email address associated with the account you want to sync.
- Ensure that you enter your email address correctly to avoid any syncing issues. Double-check for any typos or missing characters before proceeding to the next step.
- Once you have entered your email address, tap the “Next” or “Continue” button to proceed. The email app will then attempt to automatically detect the server settings based on the entered email address.
- If the automatic detection is successful, you will be prompted to enter your account password. This step helps to verify your ownership of the email address before proceeding with the syncing process.
- Enter the password associated with your email address in the designated field. Make sure to enter the correct password to ensure a secure and successful synchronization of your email.
- Once you have entered your password, tap the “Next” or “Continue” button to proceed. The email app will then verify your account details and establish a connection with the email server.
- This verification process may take a few moments, depending on your internet connection and the responsiveness of the email server. Be patient and let the email app complete the verification process.
- If the email app successfully verifies your email address and password, you will be directed to the next step in the setup process. If there are any issues during verification, double-check your email address and password, and ensure that they are correct.
By properly entering your email address and password, you are one step closer to syncing your email on your Samsung tablet. In the following steps, we will guide you through additional configuration options to customize your email settings and optimize the syncing experience.
Step 4: Enter Password
Once you have entered your email address during the email account setup process on your Samsung tablet, the next step is to enter the associated password. This ensures the security and privacy of your email account while allowing the email app to establish a secure connection with the email server. Follow these steps to enter your password:
- After entering your email address, you will be prompted to enter your account password. This is the password that you set up for your email account and is used to authenticate your access to the account.
- On the password entry screen, carefully type in your password. Ensure that you enter it accurately to avoid any issues with syncing your email on your Samsung tablet.
- If you are unsure about the password or have forgotten it, you can tap on the “Forgot Password” option if available. This will guide you through the steps to recover or reset your password, allowing you to regain access to your email account.
- Double-check your password entry before proceeding to the next step. Passwords are case-sensitive, so make sure to enter any uppercase or lowercase letters as needed.
- Once you have entered your password, tap the “Next” or “Continue” button to proceed. The email app will then use the entered password to verify your ownership of the email account.
- The email app will establish a secure connection with the email server using the provided password. This connection allows the email app to securely sync your email, ensuring that your messages, folders, and other account details are up to date on your Samsung tablet.
- Depending on your internet connection and the responsiveness of the email server, the verification process may take a few moments. Be patient and allow the email app to complete the process.
- If the password verification is successful, you will be directed to the next step in the email account setup process. If there are any issues during verification, double-check your password to ensure that it is correct.
By accurately entering your email account password, you have successfully completed the fourth step in syncing your email on your Samsung tablet. The next step will guide you through additional options to further customize your email settings and optimize the syncing experience.
Step 5: Click Next
After entering your email address and password during the account setup process on your Samsung tablet, the next step is to click the “Next” or “Continue” button. This action allows the email app to proceed with the configuration and synchronization of your email account. Here’s how to click “Next” and move forward with the setup process:
- Look for the “Next” or “Continue” button on the screen. It is usually located at the bottom of the screen or in a prominent position, such as a large button or highlighted text.
- Once you have located the button, gently tap on it to proceed to the next step. Make sure to tap in the designated area to ensure a proper response from the touch screen.
- Clicking “Next” or “Continue” initiates the configuration and synchronization process of your email account. The email app will start communicating with the email server to retrieve your email data and update your inbox accordingly.
- During this synchronization process, the email app may display a progress bar or loading indicator to indicate the status of the syncing operation. This helps you track the progress and know that your email account is being set up and synced.
- The syncing process may take a few moments, depending on the size of your email account and the speed of your internet connection. Be patient and allow the email app to complete the process.
- Once the synchronization is complete, you will be directed to your email inbox, where you can view your received and sent emails, organize folders, and manage your email settings.
- If there are any issues during the process, such as incorrect login credentials or problems connecting to the email server, the email app may prompt you to review the entered information or troubleshoot the connectivity problem. Follow the on-screen instructions to address any issues that arise.
- By clicking “Next” and proceeding with the setup process, you have successfully completed the fifth step in syncing your email on your Samsung tablet. The next steps will guide you through additional customization options to optimize your email settings and enhance your syncing experience.
Step 6: Account Sync Options
After clicking “Next” and successfully setting up your email account on your Samsung tablet, you will be presented with a range of account sync options. These options allow you to customize how your email account is synchronized with your tablet and manage the flow of incoming and outgoing messages. Follow these steps to navigate the account sync options:
- On the account sync options screen, you will see various settings and checkboxes related to syncing your email account. These options may include “Sync Contacts,” “Sync Calendar,” “Sync Attachments,” or “Sync Frequency.”
- Review each option to understand its functionality and decide which settings you want to enable or disable based on your preferences. For example, enabling the “Sync Contacts” option allows your tablet to download and update the contact information associated with your email account.
- Tick the checkboxes or toggle switches corresponding to the sync options you would like to activate. If you prefer to sync all available options, you can tick all checkboxes or enable all switches.
- Take note that some sync options may require additional permissions or access to specific services on your tablet. If prompted, grant the necessary permissions to enable those sync options.
- If there are any advanced options or settings available, such as selecting specific folders to sync or enabling push notifications for new emails, explore these options accordingly.
- It’s important to strike a balance between having your email account synced to your tablet while also considering factors like data usage and battery life. Customizing sync options allows you to optimize these aspects as per your needs.
- After reviewing and adjusting the account sync options, click the “Next” or “Continue” button to save your settings and apply them to your email account.
- The email app will then implement the chosen sync options and adjust its behavior to reflect your preferences. This may involve downloading contacts, synchronizing your calendar, or adjusting the frequency at which new emails are retrieved.
- Once the sync options have been configured, you will be directed to your email inbox or the main email screen of the app, where you can start accessing and managing your emails.
By customizing the account sync options, you can tailor the syncing process to your specific needs and ensure that your email account is optimized for use on your Samsung tablet. The next steps will guide you through additional customization options to further enhance your email settings and improve your overall syncing experience.
Step 7: Choose Sync Frequency
Choosing the sync frequency for your email account on your Samsung tablet allows you to specify how frequently the email app checks for new messages and updates your inbox. This step enables you to control the frequency of synchronization and optimize battery usage and data consumption. Follow these steps to select your preferred sync frequency:
- On the account sync options screen, locate the sync frequency or “Sync Interval” setting.
- Review the available options, which typically include options like “15 minutes,” “30 minutes,” “1 hour,” “2 hours,” “4 hours,” or “Manual.”
- Select the sync frequency that best suits your needs. For example, if you require real-time access to your emails, you can choose a shorter interval like 15 minutes. However, if battery life is a concern, you may opt for a longer interval like 1 hour or manually syncing the email account.
- Keep in mind that shorter sync intervals will result in more frequent updates and faster access to new emails, but they can also consume more battery power and data usage.
- On the other hand, longer sync intervals will conserve battery life and reduce data usage, but there may be a delay in receiving new emails.
- If you prefer to manually sync your email account instead of a predefined interval, choose the “Manual” option. With this selection, you will need to manually initiate the syncing process whenever you want to retrieve new emails.
- Once you have selected your preferred sync frequency or manual syncing, click the “Next” or “Continue” button to save your settings.
- The email app will then update its sync behavior according to your chosen frequency. It will periodically check for new messages during the specified intervals or wait for manual syncing based on your preference.
- With the sync frequency configured, you are ready to start using your email account on your Samsung tablet, knowing that your inbox will be updated at your chosen intervals.
By selecting the sync frequency that aligns with your needs, you can strike a balance between real-time email access and device resource optimization. The next steps will guide you through additional customization options to further improve your email settings and enhance your overall syncing experience.
Step 8: Customize Email Settings
Customizing the email settings on your Samsung tablet allows you to personalize your email experience and tailor it to your specific preferences. By adjusting these settings, you can optimize how your emails are displayed, organized, and managed on your device. Follow these steps to customize your email settings:
- Open the email app on your Samsung tablet and navigate to the settings menu. This menu is typically accessible by tapping on the three-dot or three-line icon located in the top-right or bottom-right corner of the screen.
- In the settings menu, look for options such as “General Settings,” “Account Settings,” or “Preferences.” Tap on the appropriate option to access the email customization options.
- Depending on the email app you are using, you may find various customization options, including:
- Theme: Choose a different color scheme or visual theme for your email app to personalize its appearance.
- Signature: Create a customized email signature that will be automatically appended to the end of each outgoing email.
- Notifications: Configure notification settings to determine how and when you receive alerts for new emails, such as sound, vibration, or pop-up notifications.
- Layout: Adjust the layout preferences, such as the conversation view or the order in which emails are displayed.
- Filters: Set up filters to automatically categorize or prioritize incoming emails based on specific criteria, such as sender, subject, or keywords.
- Auto-reply: Enable automatic reply messages to be sent to incoming emails when you are away or unable to respond.
- Security: Configure security settings to protect your email account from unauthorized access, such as enabling two-factor authentication or setting a secure lock screen.
- Review each customization option and adjust them according to your preferences. Take your time to explore the available options and understand how they can enhance your email experience.
- Once you have customized the desired email settings, save your changes by tapping the “Save” or “Apply” button in the settings menu.
- The email app will then implement the customized settings, reflecting your preferences when managing and interacting with your emails on your Samsung tablet.
- You can revisit the email settings at any time to make further adjustments or explore additional options that may enhance your email experience.
By customizing the email settings on your Samsung tablet, you can tailor the email app to your liking and ensure that it aligns with your specific preferences and needs. With these settings customized, you are now ready to make the most of your email account and enjoy a seamless syncing experience on your Samsung tablet.
Conclusion
Syncing your email on your Samsung tablet allows you to conveniently access and manage your emails on the go. By following the step-by-step guide provided in this article, you can easily set up and customize your email account, ensuring that your emails are synchronized and up to date across all your devices. Remember the key steps to syncing your email on your Samsung tablet:
- Open the Email App
- Add Email Account
- Enter Email Address
- Enter Password
- Click Next
- Choose Sync Frequency
- Customize Email Settings
By successfully following these steps, you can enjoy the benefits of instant communication and efficient email management. Whether you are using your tablet for personal or professional purposes, syncing your email ensures that you are always connected and up to date.
Take the time to explore and customize the available options, such as adjusting the sync frequency or customizing email settings, to optimize your email experience. By doing so, you can personalize the app to suit your preferences and make it work seamlessly for you.
Remember to periodically review and update your email settings as needed. Technology is constantly evolving, and your email preferences may change over time. By staying up to date with the latest options and features, you can make the most of your email syncing experience on your Samsung tablet.
With your email account set up and synchronized on your Samsung tablet, you can now enjoy the convenience of accessing your emails wherever you are. Stay connected, organized, and efficient with your email management on your Samsung tablet.
Now, go ahead and start syncing your email on your Samsung tablet to enhance your productivity and streamline your communication experience!