Introduction
Amazon Fire tablets are popular devices that offer a wide range of features and functionalities. Whether you use your Fire tablet for watching movies, playing games, or reading books, one aspect that you may want to control is the volume. Fortunately, Amazon provides a built-in feature that allows you to set a volume limit on your Fire tablet.
This volume limit feature is particularly handy if you’re concerned about loud noises damaging your hearing or if you want to prevent children from turning the volume up too high. By setting a volume limit, you can enjoy your Fire tablet without worrying about sudden loud bursts of sound.
In this article, we’ll guide you through the step-by-step process of setting a volume limit on your Amazon Fire tablet. We’ll show you how to access the settings menu, adjust the volume limit, enable the limit, and even configure a passcode to prevent unauthorized changes to the volume limit. So, let’s get started and ensure your Fire tablet’s volume is customized to your preferences and needs!
Step 1: Accessing the Settings menu
To begin, we need to access the settings menu on your Amazon Fire tablet. Follow these simple steps:
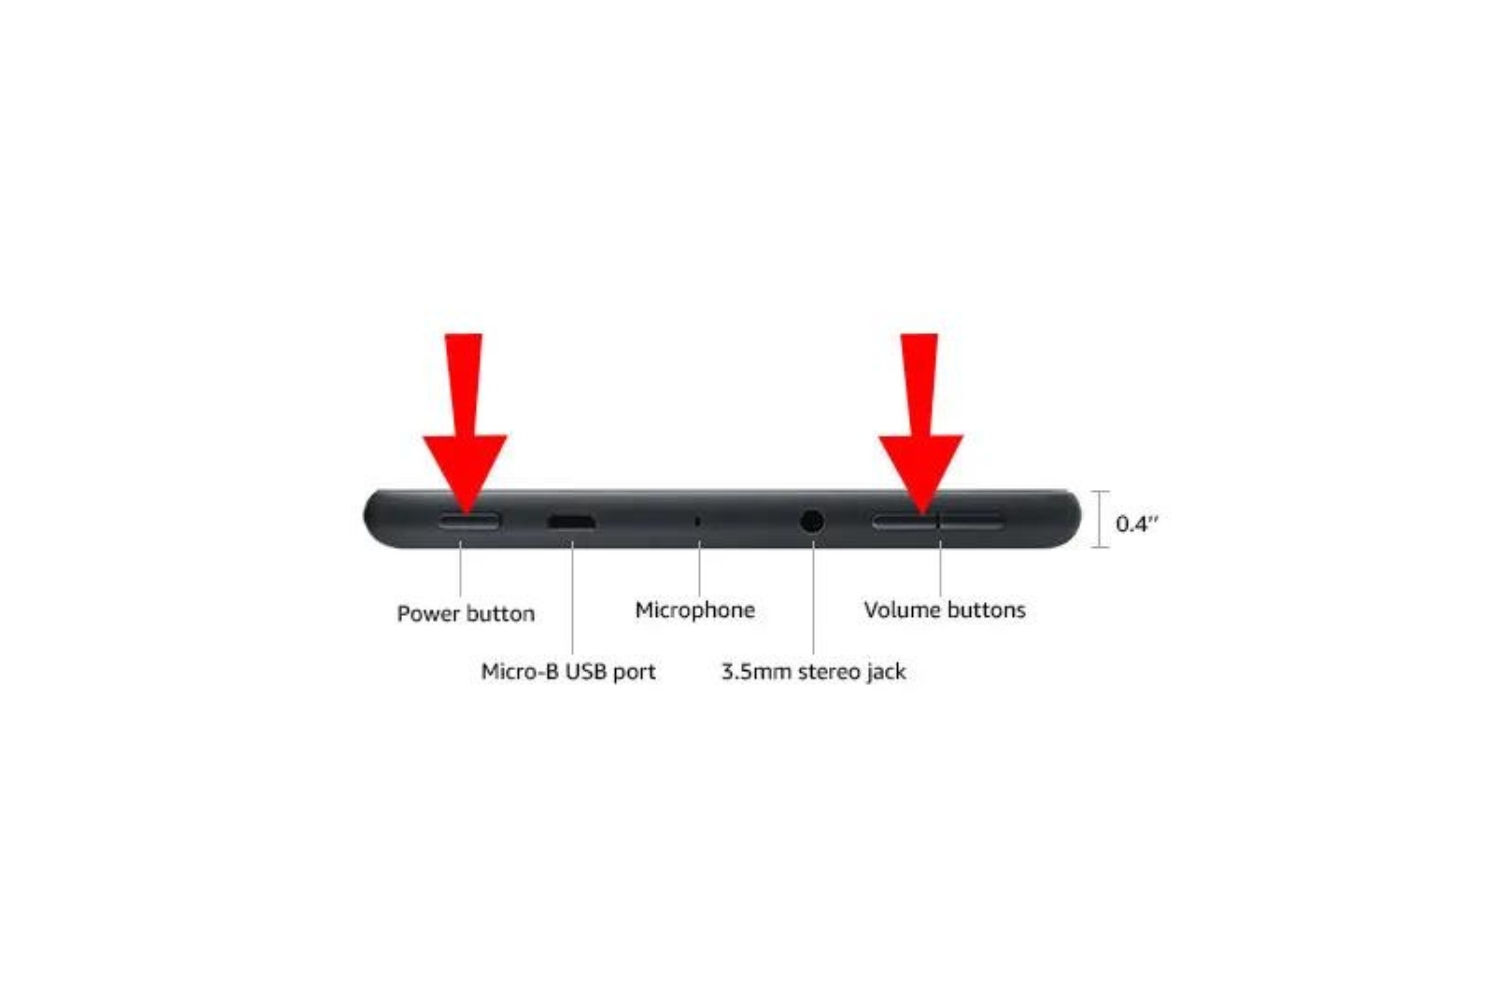
- First, unlock your Fire tablet by entering your passcode or using the designated unlock method.
- Once you’re on the home screen, swipe down from the top of your tablet’s screen to reveal the notification panel. Alternatively, you can swipe up from the bottom if you are using a newer model.
- In the top-right corner of the screen, you will find the gear-shaped icon. Tap on it to access the settings menu.
- The settings menu will open, displaying various options and configurations for your Fire tablet.
- Now that you have accessed the settings menu, you can proceed to the next step to set the volume limit on your device.
It’s important to note that the steps may vary slightly depending on the model and operating system version of your Fire tablet. However, the general process remains the same, so you should be able to locate the settings menu and proceed with ease.
Step 2: Selecting the Sound & Notification option
Now that you have accessed the settings menu, the next step is to locate and select the Sound & Notification option. Follow these steps to proceed:
- Within the settings menu, scroll down until you find the section labeled “Device” or “Device Settings”. Tap on it to expand the options.
- Look for the “Sound & Notification” option. The exact wording may vary depending on your Fire tablet model, but it should be located within the “Device” or “Device Settings” section.
- Once you have found the “Sound & Notification” option, tap on it to access the sound settings for your Fire tablet.
- The sound settings menu will open, offering a range of options to customize the audio settings on your device.
By selecting the Sound & Notification option, you are one step closer to setting the volume limit on your Fire tablet. Remember to explore the other sound settings available in this menu, as you can adjust various aspects such as notification sounds, media volume, and alarm volume to suit your preferences.
If you encounter any difficulties in locating the Sound & Notification option, refer to your device’s user manual or the official Amazon support website for further assistance. Once you have successfully accessed the sound settings, you can proceed to the next step to configure the volume limit.
Step 3: Adjusting the volume limit
Now that you have accessed the sound settings menu, it’s time to adjust the volume limit on your Amazon Fire tablet. Follow these simple steps:
- Within the sound settings menu, look for the option labeled “Volume Limit” or “Volume Restriction”. This option allows you to set a maximum volume level for your Fire tablet.
- Tap on the “Volume Limit” option to open the volume restriction settings.
- You will see a slider or numerical value that represents the current volume limit on your device. By default, it may be set to the maximum volume level.
- Slide the volume limit slider to your desired level or enter a specific numerical value that you want to set as the maximum volume limit for your Fire tablet.
- As you adjust the volume limit, you may notice a sample sound playing to help you determine if the volume level suits your preferences.
- Take your time to find the optimal volume limit that provides a comfortable listening experience while ensuring it stays within a safe range.
You now have successfully adjusted the volume limit on your Fire tablet. This means that even if you accidentally turn the volume up to its maximum, it will not exceed the specified limit you set. This is especially useful if you want to protect your hearing or manage the volume levels for younger users.
Remember, you can revisit the volume limit settings at any time to make further adjustments. It’s always a good idea to periodically review the volume limit to ensure it aligns with your preferences and needs.
Step 4: Enabling the volume limit
Now that you have adjusted the volume limit on your Amazon Fire tablet, the next step is to enable this setting to ensure it takes effect. Follow these steps to enable the volume limit:
- Within the volume limit settings, look for the option to “Enable” or “Turn on” the volume limit. This option may be located at the top or bottom of the settings screen, depending on your Fire tablet model.
- Tap on the toggle switch or checkbox next to the “Enable” option to activate the volume limit on your device.
- Once the volume limit is enabled, your Fire tablet will automatically restrict the volume level within the specified limit.
- You may see a confirmation message or symbol indicating that the volume limit is active.
Enabling the volume limit ensures that your Fire tablet will maintain a safe and controlled audio level, providing you with peace of mind and a more enjoyable user experience. It helps prevent accidental volume increases beyond the specified limit, helping preserve your hearing and providing a consistent volume level across different applications and media.
If you ever need to adjust or disable the volume limit in the future, simply access the volume limit settings again and make the necessary changes. Remember, it’s essential to strike a balance between protecting your hearing and enjoying your Fire tablet’s audio capabilities.
Step 5: Configuring a passcode for volume changes
To add an extra layer of security and prevent unauthorized changes to the volume limit on your Amazon Fire tablet, you can configure a passcode. Follow these steps to set up a passcode for volume changes:
- Within the volume limit settings, look for an option related to “Passcode” or “Password”. This option allows you to require a passcode when attempting to modify the volume limit.
- Tap on the “Passcode” or “Password” option to open the passcode settings.
- You will be prompted to enter a passcode of your choice. Enter a combination that you will remember but is not easily guessed by others.
- Confirm the passcode by entering it again when prompted.
- Once you have set a passcode, any attempt to modify the volume limit on your Fire tablet will require entering this passcode for verification.
Configuring a passcode for volume changes adds an additional layer of control and security to your device. This feature is particularly useful if you want to prevent unauthorized users, such as children, from modifying the volume limit or tampering with the audio settings.
Remember to choose a passcode that is easy for you to remember but difficult for others to guess. Avoid using common combinations like birthdays or sequential numbers. Consider using a unique combination of numbers, letters, and special characters to enhance the security of your Fire tablet.
If you ever need to change or remove the passcode in the future, simply revisit the passcode settings and make the necessary adjustments. Having a passcode for volume changes ensures that only you have the authority to modify the volume limit settings on your Fire tablet.
Conclusion
Setting a volume limit on your Amazon Fire tablet is a straightforward process that allows you to control and customize the audio experience to your preferences and needs. By following the steps outlined in this guide, you can ensure that the volume remains within a safe and comfortable range, protecting your hearing and avoiding sudden loud noises.
Remember to access the settings menu, select the Sound & Notification option, adjust the volume limit, and enable it to take effect. Additionally, configuring a passcode provides an extra layer of security, preventing unauthorized changes to the volume limit settings.
Whether you’re using your Fire tablet for entertainment, educational purposes, or any other activities, having control over the volume level adds to the overall enjoyment and convenience of the device.
Take the time to explore the other sound settings available on your Fire tablet, such as notification sounds and media volume, to fine-tune your audio experience further.
Now that you have learned how to set a volume limit and configure it on your Amazon Fire tablet, you can enjoy your favorite apps, games, movies, books, and more with peace of mind, knowing that your hearing is protected and the volume levels are optimized for your comfort.
We hope this guide has been helpful in providing clear instructions on how to set a volume limit on your Fire tablet. If you have any further questions or need additional assistance, refer to the device’s user manual or visit the official Amazon support website for more information.
Enjoy your personalized audio experience on your Amazon Fire tablet!