Introduction
Welcome to the world of Windows 11, the latest and greatest operating system from Microsoft. With its sleek design and improved features, Windows 11 offers a seamless computing experience. If you’re a tech enthusiast or a gamer, you might be eager to know more about your system’s hardware, particularly your graphics processing unit (GPU). Your GPU plays a crucial role in delivering stunning visuals and smooth performance in games and other graphically demanding applications. In this article, we will explore various methods to see your GPU on Windows 11.
Knowing your GPU can be useful in a variety of situations. It allows you to check if your system meets the recommended requirements for certain software or games. Additionally, it helps you troubleshoot graphics-related issues or update your GPU drivers to ensure optimal performance.
In the following sections, we will discuss four different methods to see your GPU on Windows 11. These methods range from using built-in Windows utilities to third-party software. Regardless of your technical expertise, you will find a method that suits your needs, whether you prefer a straightforward approach or need more detailed information about your GPU.
Method 1: Using the Device Manager
The Device Manager is a powerful built-in tool in Windows that allows you to manage and view the hardware components of your system. It provides detailed information about each device, including your GPU. To see your GPU using the Device Manager on Windows 11, follow these steps:
- Right-click on the Start button and select Device Manager from the context menu.
- In the Device Manager window, expand the Display adapters category by clicking on the arrow next to it.
- You will now see the list of display adapters installed on your system. Your GPU will be listed here. It might be named as AMD Radeon, NVIDIA GeForce, or Intel Graphics, depending on the manufacturer.
- To view more details about your GPU, double-click on its name. In the properties window, you will find information such as the device status, driver version, and other related details.
Using the Device Manager is one of the simplest and quickest methods to see your GPU on Windows 11. However, keep in mind that this method provides basic information about your GPU. If you need more detailed specifications or want to monitor your GPU’s performance in real-time, you might need to explore other methods mentioned in this article.
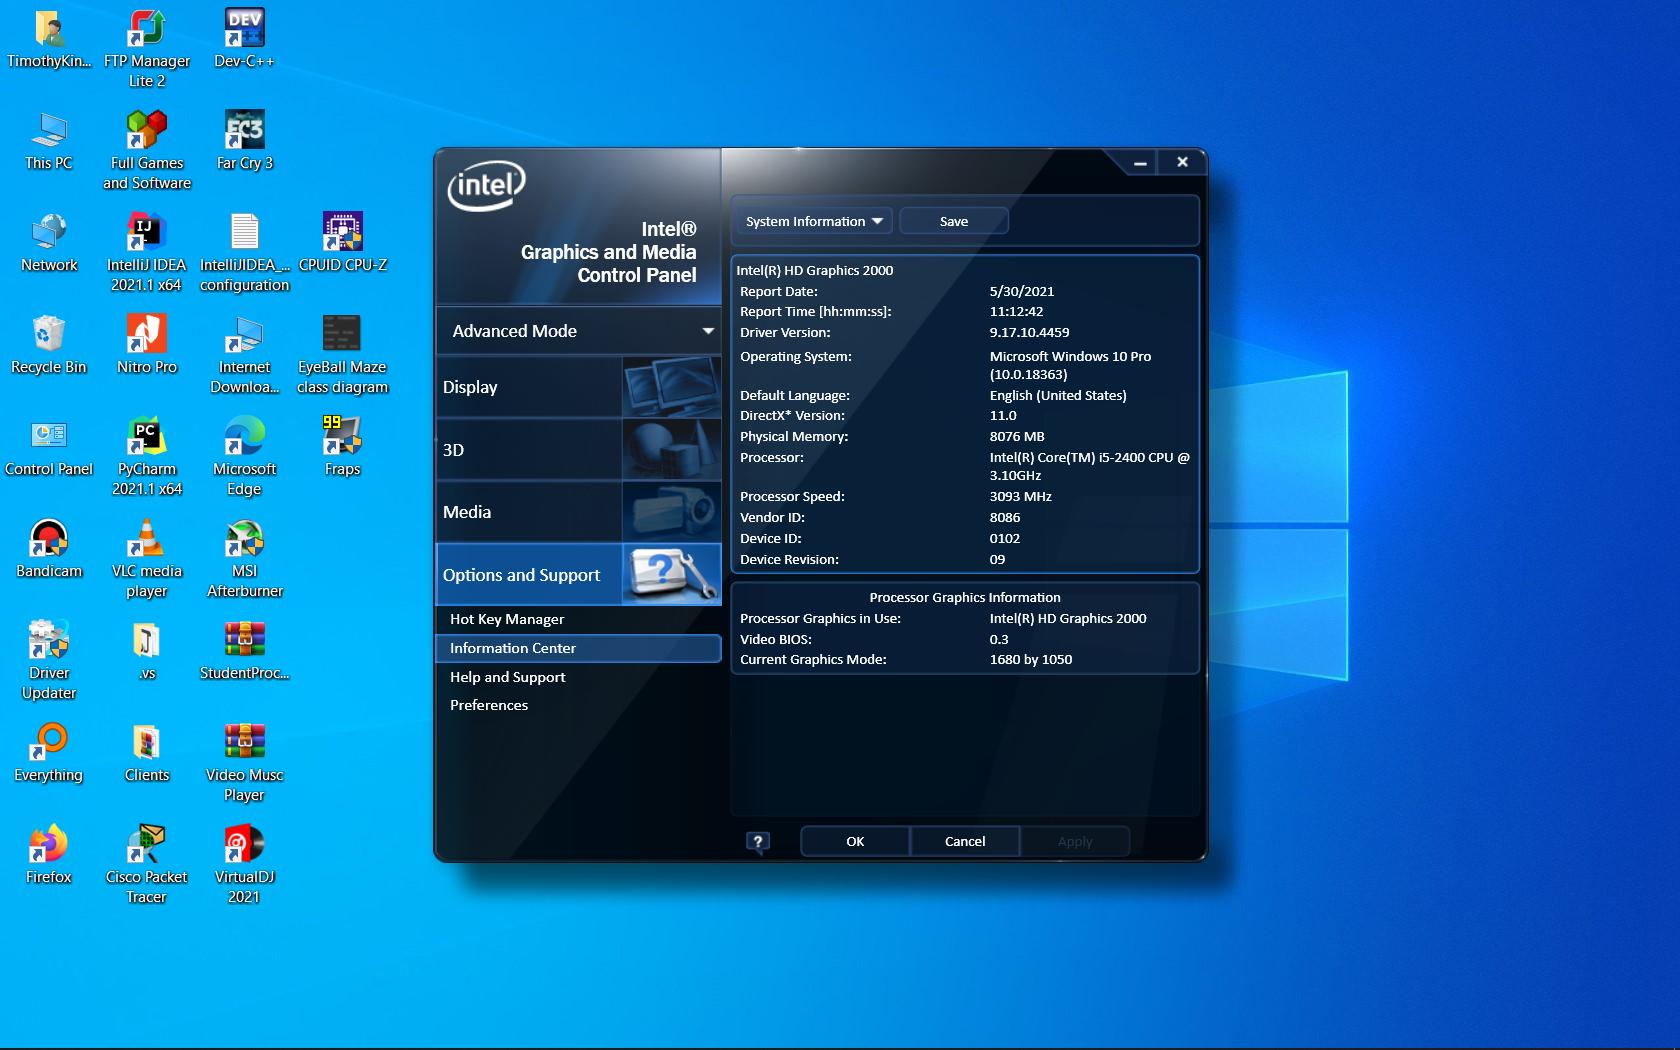
Method 2: Using DirectX Diagnostic Tool
The DirectX Diagnostic Tool, also known as Dxdiag, is a built-in utility in Windows that provides detailed information about your system’s DirectX capabilities, including your GPU. To see your GPU using the DirectX Diagnostic Tool on Windows 11, follow these steps:
- Press the Windows key + R to open the Run dialog box.
- Type “dxdiag” (without quotes) in the text field and press Enter.
- The DirectX Diagnostic Tool window will open. It will take a few moments to gather information about your system.
- Click on the Display tab.
- Here, you will find detailed information about your GPU, including the name, manufacturer, driver details, and display memory.
The DirectX Diagnostic Tool provides more detailed information about your GPU compared to the Device Manager. It also offers additional information about your system’s DirectX version and other hardware components. This tool can be particularly useful if you are troubleshooting graphics-related issues or checking compatibility with certain DirectX-dependent software.
Now that you know how to use the DirectX Diagnostic Tool, you can easily access information about your GPU and ensure that it meets the requirements for your favorite games and multimedia applications.
Method 3: Using PowerShell
PowerShell is a powerful command-line shell and scripting language that comes with Windows. It provides advanced control over your system and allows you to retrieve detailed information about your GPU. To see your GPU using PowerShell on Windows 11, follow these steps:
- Open PowerShell by searching for it in the Start menu or by pressing Windows key + X and selecting Windows PowerShell.
- In the PowerShell window, type the following command and press Enter:
- PowerShell will retrieve the information about your GPU, including its name, video memory (AdapterRAM), and video mode description.
Get-WmiObject -Class Win32_VideoController | Select-Object Name, AdapterRAM, VideoModeDescription
The PowerShell method provides a concise way to view essential information about your GPU without the need for third-party software. However, keep in mind that this method offers basic details and may not include all the detailed specifications or real-time monitoring options you might find in other methods.
With PowerShell, you can quickly access GPU information and incorporate it into your scripts or automation processes, making it a handy method for system administrators and power users.
Method 4: Using Third-Party Software
If you are looking for more advanced features and real-time monitoring options, using third-party software is an excellent option. There are several popular software applications available that can provide comprehensive information about your GPU and even allow you to monitor its performance. Here are a few examples:
- GPU-Z: GPU-Z is a lightweight and free software that provides detailed information about your GPU, including clock speeds, memory usage, and sensor data. It is a popular choice among tech enthusiasts and overclockers.
- MSI Afterburner: While primarily known for its GPU overclocking capabilities, MSI Afterburner also provides extensive monitoring and customization options. You can view real-time GPU stats, adjust fan speeds, and even create custom profiles.
- HWiNFO: HWiNFO is a powerful system monitoring software that not only provides information about your GPU but also offers detailed insights into your entire system’s hardware components. It is a comprehensive solution for those who want to monitor their GPU alongside other system parameters.
To use third-party software, simply download and install the application of your choice from a trusted source. Launch the software, and it will automatically detect and display information about your GPU. Depending on the software, you may have access to advanced features such as overclocking, benchmarking, and temperature monitoring.
Third-party software offers a wealth of information and customization options for your GPU. Whether you are a gaming enthusiast, a content creator, or simply curious about your system’s performance, these tools can provide you with valuable insights and help you optimize your GPU for the best possible experience.
Conclusion
Knowing how to see your GPU on Windows 11 is essential for understanding your system’s capabilities and ensuring optimal performance in games and graphics-intensive applications. In this article, we explored four different methods to view your GPU:
- Using the Device Manager allows you to quickly view basic information about your GPU.
- The DirectX Diagnostic Tool provides more detailed information about your GPU and your system’s DirectX capabilities.
- PowerShell offers a command-line approach to retrieve basic information about your GPU.
- Third-party software, such as GPU-Z, MSI Afterburner, and HWiNFO, provides comprehensive insights and real-time monitoring options.
Each method has its own advantages and may cater to different user preferences. If you need a quick glance at your GPU, the Device Manager or PowerShell methods are straightforward and built-in Windows utilities. However, if you require more detailed information or want to monitor your GPU’s performance, third-party software can provide advanced features and customization options.
Ultimately, the choice of method depends on your specific requirements and level of technical expertise. Whether you’re a casual user or a power user, having the ability to see your GPU can help you make informed decisions about your system’s configuration, troubleshoot issues, and optimize performance.
So, go ahead and explore these methods to discover more about your GPU and unleash its full potential on Windows 11!