Introduction
Screen recording is a valuable feature that can be beneficial in various scenarios, such as creating tutorial videos, capturing gameplay, or even documenting software bugs. If you’re a Windows 10 user, you’re in luck because the operating system provides a built-in tool that allows you to easily screen record without the need for third-party software. In this article, we’ll explore the step-by-step process of screen recording in Windows 10 using the Xbox Game Bar.
The Xbox Game Bar is a versatile tool primarily designed for gamers, but it also includes powerful screen recording capabilities accessible to all Windows 10 users. Whether you want to showcase your gaming skills on social media or create instructional videos for your YouTube channel, the Xbox Game Bar can be your go-to solution.
Throughout this guide, we’ll walk you through each step of the screen recording process, from opening the Xbox Game Bar to accessing and sharing your recorded videos. By the end, you’ll have a clear understanding of how to utilize this powerful feature to its fullest potential.
Before we dive into the details, it’s worth mentioning that the Xbox Game Bar comes pre-installed on Windows 10, but if you can’t find it on your system, don’t worry. You can simply head to the Microsoft Store and search for “Xbox Game Bar” to download and install it for free.
Now that we’ve set the stage let’s get started with the first step of the screen recording process—opening the Xbox Game Bar.
Step 1: Open the Xbox Game Bar
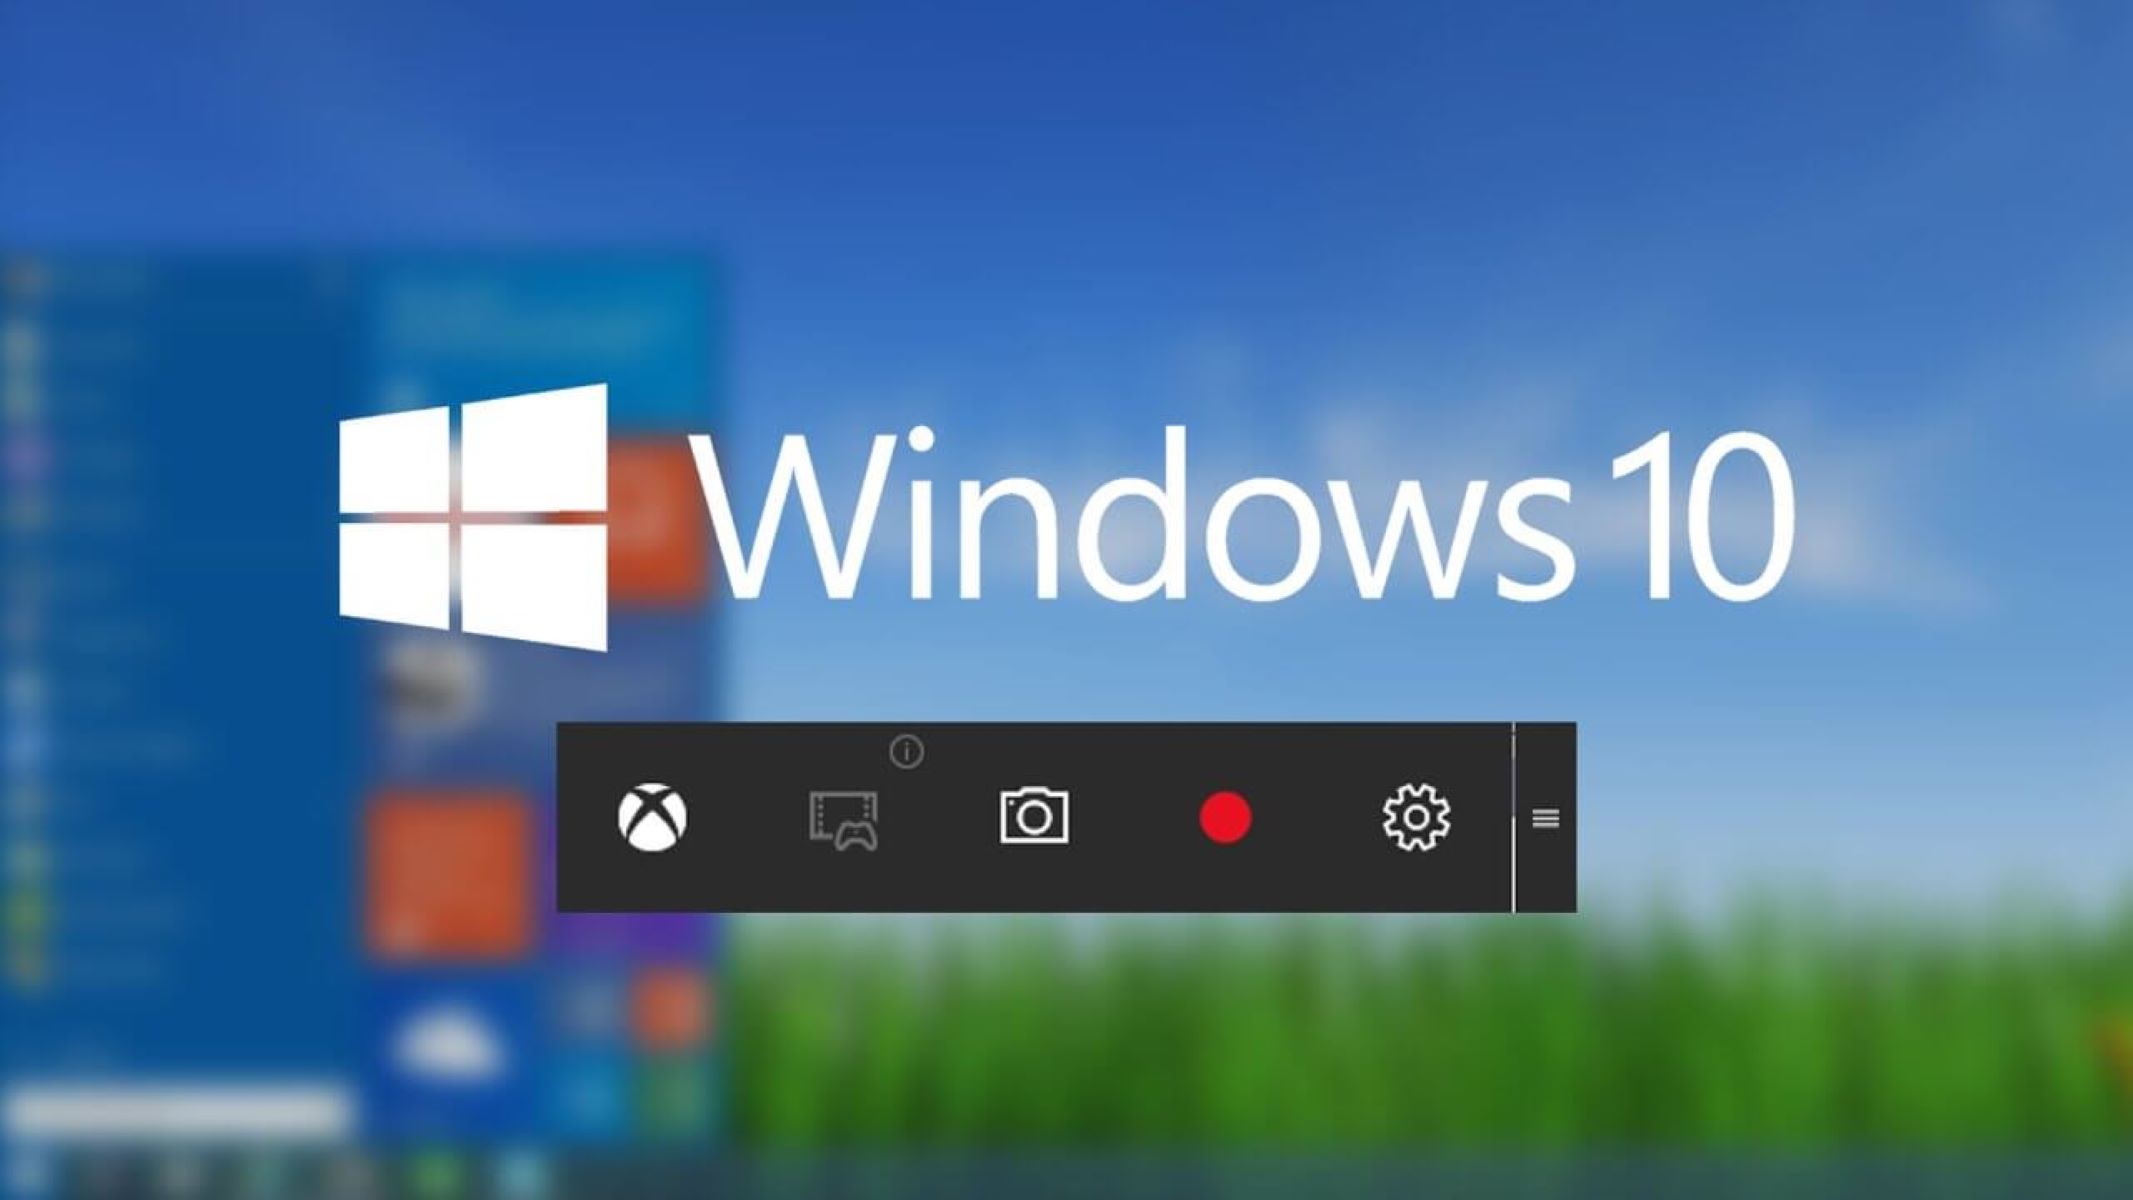
The first step in screen recording on Windows 10 is to open the Xbox Game Bar. This tool provides a host of features, including screen recording, that can be accessed with just a few clicks.
To open the Xbox Game Bar, you can use either of the following methods:
- Use the keyboard shortcut: Press Windows key and G simultaneously. This will bring up the Xbox Game Bar overlay on your screen.
- Use the Start menu: Click on the Start button located in the bottom-left corner of the screen. Then, search for “Xbox Game Bar” and click on it when it appears in the search results. The Xbox Game Bar will launch.
Once the Xbox Game Bar is open, you’ll see a small overlay on your screen with a variety of tools and options. This interface is designed to be unobtrusive, allowing you to access the features you need without interrupting your workflow.
Now that we’ve successfully opened the Xbox Game Bar, let’s move on to the next step where we’ll start the screen recording process.
Step 2: Start the Screen Recording
Now that you have the Xbox Game Bar open, it’s time to start the screen recording. This is where the real magic happens, allowing you to capture everything happening on your screen in real-time.
Follow these simple steps to start the screen recording:
- Locate the Record icon in the Xbox Game Bar overlay. It looks like a round button with a dot inside it.
- Click on the Record icon to start the screen recording. As soon as you click it, the recording will begin, and a timer will appear at the top-right corner of the screen to indicate that you’re currently recording.
Once you’ve started the screen recording, you’ll have the flexibility to continue using your computer as usual. The Xbox Game Bar will work silently in the background, capturing every action on your screen.
One thing to note is that the screen recording feature of the Xbox Game Bar is not limited to recording the entire screen. You have the option to record a specific portion of your screen by simply clicking and dragging the recording frame to the desired area.
Now that the screen recording is underway, let’s move on to the next step where we’ll explore how to customize the recording settings.
Step 3: Customize the Recording Settings
While the default settings of the Xbox Game Bar screen recording feature are suitable for most users, it’s worth exploring the customization options to tailor the recording experience to your specific needs. This step will guide you through the process of customizing the recording settings.
To access the recording settings, follow these steps:
- Click on the Settings icon in the Xbox Game Bar overlay. It looks like a gear or cogwheel icon.
- A settings panel will appear on your screen, where you can modify various options related to screen recording.
Here are some noteworthy options you can customize:
- Audio: By default, the Xbox Game Bar records both your system audio and microphone input. If you want to disable audio recording entirely or choose a specific audio input device, you can tweak these settings to fit your preference.
- Video Quality: The Xbox Game Bar offers two video quality options: Standard and High. The Standard quality setting is a good balance between file size and visual clarity, while the High quality setting provides sharper visuals at the cost of larger file sizes.
- Capturing the Mouse Cursor: You have the option to include or exclude the mouse cursor in your screen recordings. If you’re demonstrating software usage or providing instructions, enabling the mouse cursor can help viewers follow along more easily.
- Keyboard Shortcuts: The Xbox Game Bar allows you to customize keyboard shortcuts for various actions, including starting and stopping the recording. If you prefer a different key combination, feel free to modify it in this section.
Once you’ve customized the recording settings to your liking, you’re ready to continue with the screen recording. Remember, these settings are not set in stone, and you can always revisit them to make adjustments in the future.
Now that we’ve covered the customization options, let’s proceed to the next step where we’ll learn how to stop the screen recording.
Step 4: Stop the Screen Recording
Once you’ve finished capturing the desired content with the screen recording feature of the Xbox Game Bar, it’s time to put an end to the recording process. Stopping the recording is a simple and straightforward step that ensures your video is properly saved and ready for further use.
To stop the screen recording, follow these steps:
- Locate the Stop icon in the Xbox Game Bar overlay. It will appear as a square button with a vertical line inside it.
- Click on the Stop icon to end the screen recording. You can also use the keyboard shortcut Windows key + G and then click the Stop button.
Upon stopping the recording, the Xbox Game Bar overlay will disappear, and a notification will appear stating that the recording is saved. The saved video file will be stored in a default location on your computer, usually in the “Videos” folder.
It’s important to note that the length of your recording and the quality settings you’ve chosen will impact the size of the video file. Larger files may take longer to save, so be patient until the process is complete.
Now that you’ve successfully stopped the screen recording, let’s move on to the final step where we’ll explore how to access and share the recorded video.
Step 5: Accessing the Recorded Video
Once you’ve completed the screen recording and stopped the process using the Xbox Game Bar, it’s time to access the recorded video file. Retrieving the recorded video is essential if you plan to edit, review, or share your recording with others.
Here’s how you can access the recorded video:
- Open File Explorer by clicking on the folder icon in the taskbar or by pressing the Windows key + E keyboard shortcut.
- Navigate to the default Videos folder, where the recorded video files from the Xbox Game Bar are saved. Alternatively, you can search for the video file using the provided filename.
- Locate the recorded video file in the folder, usually with a file extension such as .mp4 or .mkv.
- Double-click on the video file to open and play it using your default media player. You can also right-click on the file and choose “Open with” to select a specific media player.
Once you’ve accessed the recorded video, you can perform various actions with it, depending on your needs. You might want to edit the video using a video editing software, upload it to a video sharing platform, or share it with others through email or social media.
It’s important to remember that the Xbox Game Bar allows you to record multiple videos in succession. Each recording will be saved as a separate file, making it easy to organize and manage your recordings.
Now that you know how to access the recorded videos, you can start exploring the possibilities and unleash your creativity with the screen recording feature of the Xbox Game Bar.
Conclusion
Screen recording in Windows 10 using the Xbox Game Bar is a convenient and accessible feature that allows you to capture and share your screen effortlessly. Whether you’re a gamer looking to showcase your skills, a content creator producing tutorials, or simply need to document software bugs, the Xbox Game Bar provides a powerful solution.
In this guide, we’ve covered the step-by-step process of screen recording in Windows 10 using the Xbox Game Bar. From opening the Xbox Game Bar to customizing the recording settings, stopping the screen recording, and accessing the recorded videos, you now have a solid understanding of how to utilize this feature.
Remember that the Xbox Game Bar offers additional features that can enhance your recording experience. You can utilize features like capturing the microphone input, recording specific portions of the screen, and customizing keyboard shortcuts to suit your preferences.
Once you’ve finished recording, accessing and sharing your recorded videos is as simple as navigating to the default “Videos” folder on your computer. From there, you can edit, review, and share the recorded videos with ease.
The screen recording feature of the Xbox Game Bar is just one of the many powerful tools available to Windows 10 users. It provides a seamless and efficient way to capture and share your screen, contributing to a productive and creative computing experience.
So, go ahead and unleash your creativity, capture those amazing moments, and share your knowledge with the world using screen recording in Windows 10 with the Xbox Game Bar.