Introduction
Are you struggling to remember the parental PIN for your Amazon Fire Tablet? Don’t worry, you’re not alone! It’s easy to forget the PIN, especially if you haven’t used it in a while. The parental PIN is a security feature that allows you to control the content and access on your tablet, ensuring a safe browsing experience for you and your family.
Fortunately, resetting the parental PIN on your Amazon Fire Tablet is a straightforward process. In this guide, we’ll walk you through the steps to reset your parental PIN so you can regain control of your tablet’s settings.
Before we dive into the steps, make sure you have your Amazon Fire Tablet handy and that it’s charged. Also, note that resetting the parental PIN will remove any restrictions you may have set previously, so you’ll have to set them again after resetting the PIN.
So, without further ado, let’s get started with the process of resetting your parental PIN on your Amazon Fire Tablet.
Step 1: Go to “Settings”
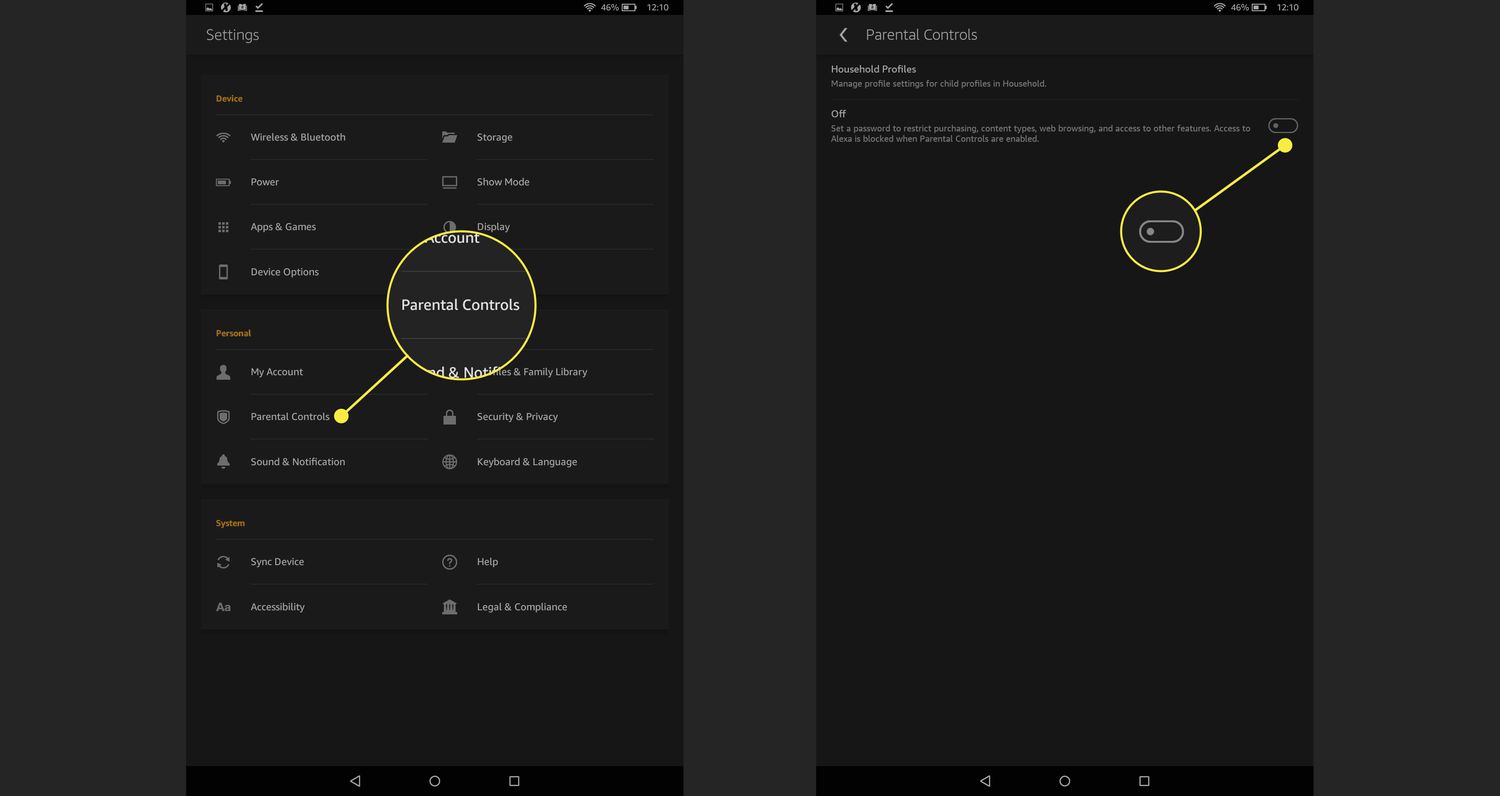
The first step in resetting your parental PIN on your Amazon Fire Tablet is to navigate to the “Settings” menu. This is where you’ll find all the options to customize and manage your tablet’s settings.
To access the “Settings” menu, find the gear icon on your tablet’s home screen or swipe down from the top of the screen to open the notification panel and tap on the gear icon in the top-right corner. This will open the “Settings” menu, where you can make various adjustments to your tablet’s preferences.
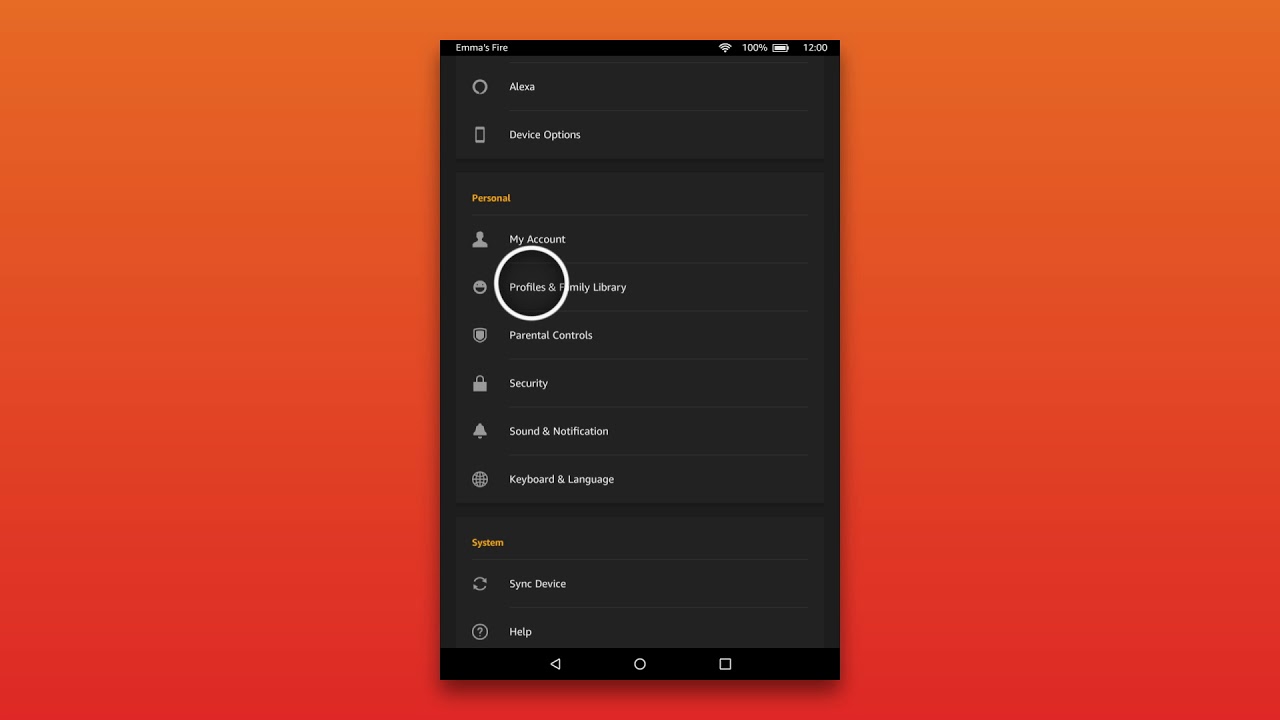
Once you’re in the “Settings” menu, you’ll see different categories of options. Scroll down until you find the “Device Options” or “Device” category, depending on your tablet’s version. Tap on it to proceed.
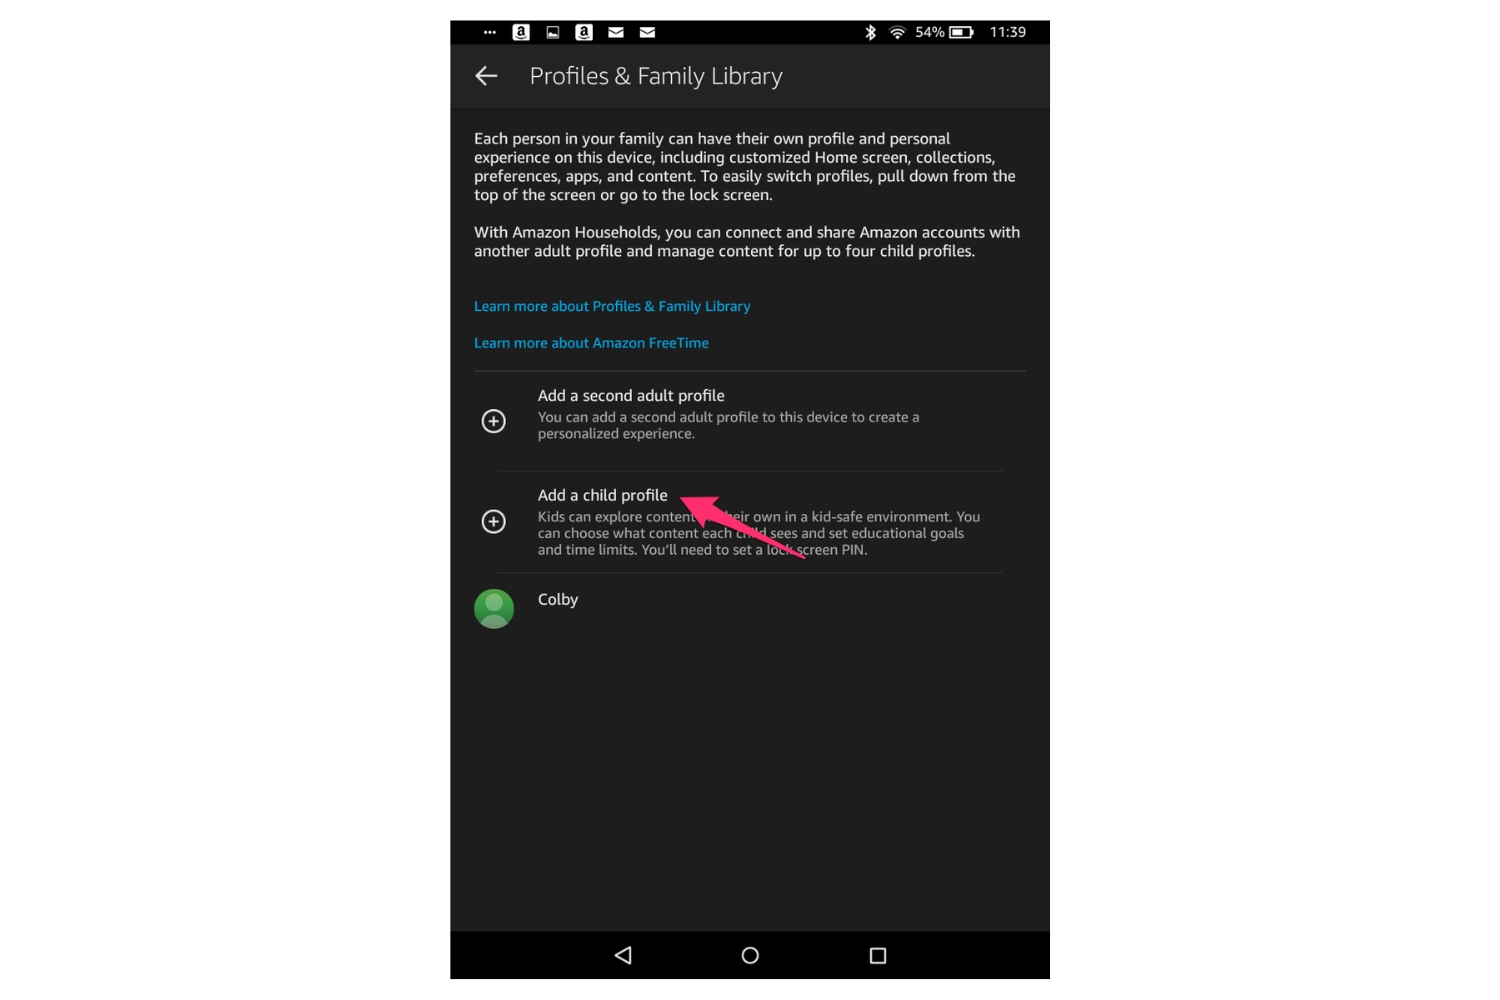
Inside the “Device Options” or “Device” menu, you’ll find several settings related to your Amazon Fire Tablet. Look for the option called “Parental Controls” or “Parental Controls & Profiles” and tap on it to access the parental control settings.
If you’re using an older version of the Amazon Fire Tablet, the “Parental Controls” option may be located directly in the “Settings” menu, without the need to go through the “Device Options” or “Device” category.
Once you’ve successfully reached the parental control settings, you’re ready to move on to the next step in resetting your parental PIN.
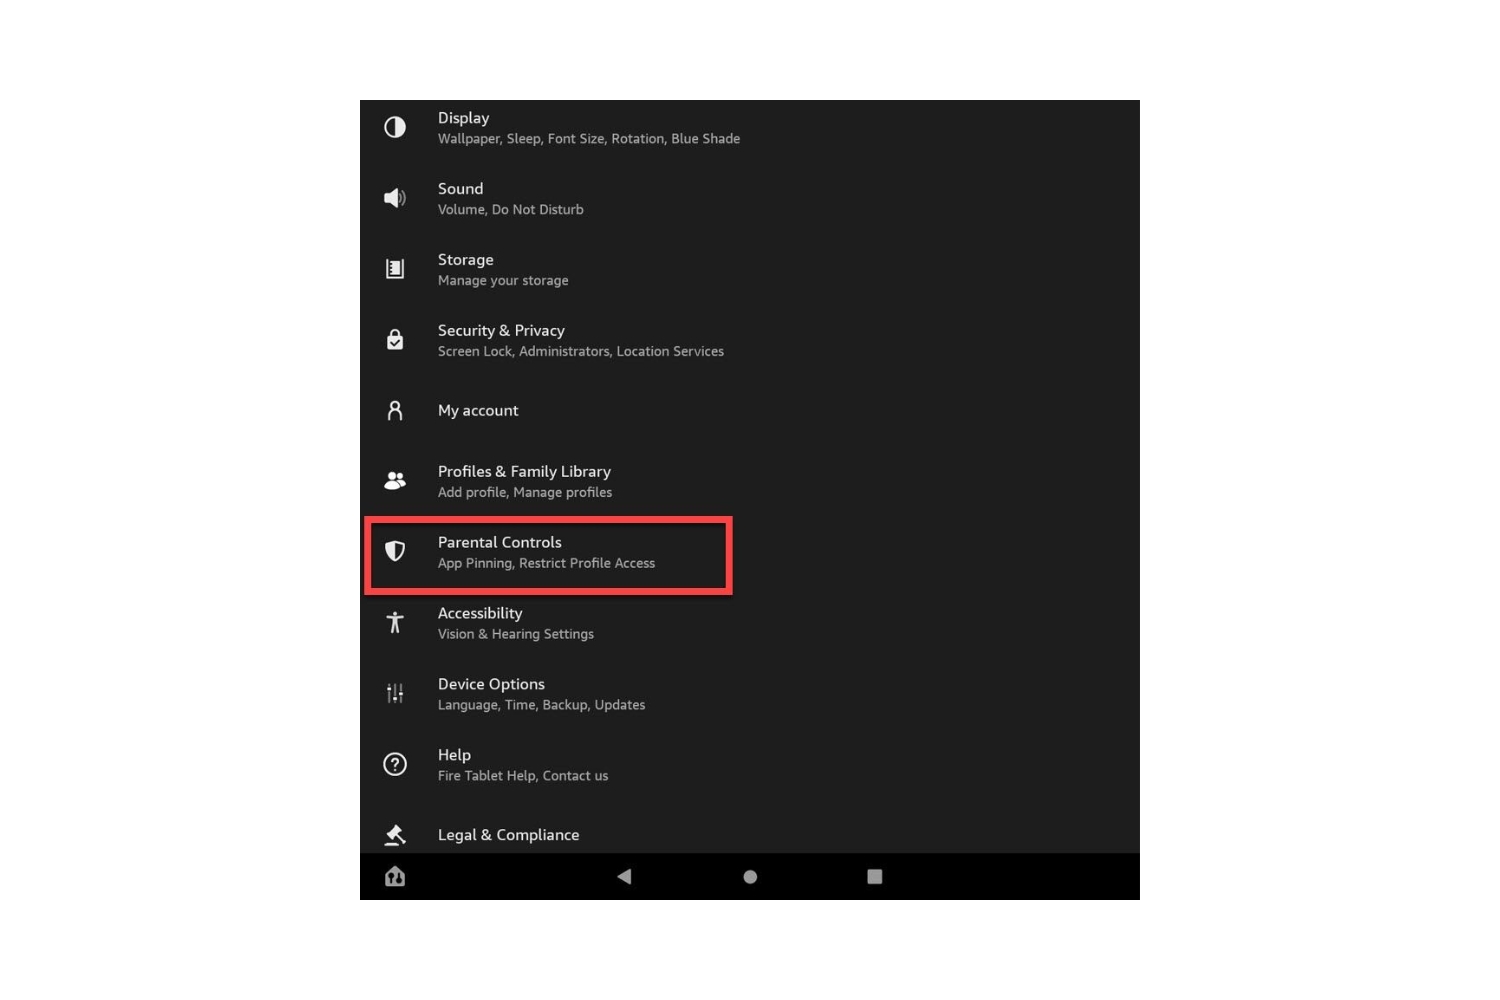
Step 2: Tap on “Parental Controls”
In this step, you’ll need to locate and tap on the “Parental Controls” option within the settings menu. This is where you can manage and customize the parental control settings for your Amazon Fire Tablet.
Once you’re in the parental control settings, you may see a prompt asking you to enter your current PIN. If you remember your PIN, go ahead and enter it. If you’ve forgotten your PIN, don’t worry. We’ll cover how to reset it if you can’t remember later on in the guide.
After entering your PIN, or if you don’t have one set up yet, you’ll be taken to the main parental control menu. This menu allows you to configure various restrictions and settings for your tablet, giving you control over what content can be accessed and by whom.
Within the parental control menu, you’ll find options to manage web browsing, app usage, and content filters. From here, you can enforce age restrictions, block specific websites, set time limits, and much more, depending on your preference.
Take some time to explore the different sections and options available within the parental control menu. Familiarize yourself with the settings, as this is where you’ll be able to tweak and modify the restrictions and access on your Amazon Fire Tablet.
Once you’re comfortable with the parental control settings and have made any necessary adjustments, you’re ready to move on to the next step, which involves changing your current PIN to a new one.
Step 3: Enter your current PIN
In this step, you’ll need to enter your current PIN to proceed with changing or resetting it. If you remember your current PIN, follow the instructions below to enter it in the parental control settings. If you’ve forgotten your PIN, don’t worry. We’ll cover how to reset it if you can’t remember later on in the guide.
On the parental control menu, you’ll likely find a field or prompt asking for your current PIN. This is a security measure to ensure that only authorized users can make changes to the parental control settings.
Using your touch screen, tap on the numerical keypad that appears on the screen to enter your current PIN. Take your time to accurately input each digit of your PIN, as entering it incorrectly may result in an error or prevent you from accessing certain features.
Once you’ve entered your current PIN, double-check it to ensure that it’s correct. If you’ve successfully entered the correct PIN, you’ll be able to proceed to the next step. If you’re prompted with an error or the PIN is not accepted, please ensure that you’re entering the correct PIN or move on to the next step if you’ve forgotten it.
Entering your current PIN is an essential step in the process to verify your identity and authority to make changes to the parental control settings. So, make sure you enter it accurately before moving on to the next step.
Step 4: Tap on “Change PIN”
After successfully entering your current PIN, it’s time to change it to a new one. This step will allow you to set a new parental PIN that you can easily remember and use to manage the access and restrictions on your Amazon Fire Tablet.
In the parental control settings menu, look for the option labeled “Change PIN” or a similar phrase that indicates the ability to modify the PIN. This option is typically found within the main menu or in a submenu specifically dedicated to PIN-related settings.
Once you’ve located the “Change PIN” option, tap on it to continue. This will open a new screen or dialogue box where you can enter your new PIN.
Depending on your tablet’s software version, you may be prompted to enter your current PIN one more time for verification purposes. This additional step ensures that only authorized users can change the PIN and modify the parental control settings.
Carefully enter your new PIN using the on-screen numerical keypad. Make sure to choose a PIN that is easy for you to remember but not predictable for others to guess. It’s best to avoid using common sequences like “1234” or personal information such as birthdays or addresses.
As you enter your new PIN, make sure to pay attention to any requirements or rules related to the PIN. Some tablets may have specific criteria, such as a minimum length or a combination of numbers and letters.
Once you’ve entered your new PIN, double-check to ensure that you’ve inputted it correctly before proceeding to the next step. The confirmation of your new PIN is crucial to maintaining the security and control of your Amazon Fire Tablet.
With your new PIN set, you’re one step closer to regaining full control over the parental control settings. In the next step, we’ll guide you through the process of confirming your new PIN to ensure its accuracy and validity.
Step 5: Enter a new PIN
Now that you’ve selected the option to change your parental PIN, it’s time to enter your new PIN. This step will allow you to set a new code that you can easily remember and use to manage the access and restrictions on your Amazon Fire Tablet.
Within the PIN modification screen or dialogue box, you’ll find a field where you can enter your new PIN. This field is typically accompanied by a numerical keypad that you can use to input your desired PIN.
Carefully enter your new PIN using the on-screen keypad. Remember to choose a code that is both secure and easy to remember. It is advisable to avoid using easily guessable combinations such as “1234” or personal information like birthdays or addresses, as this can compromise the security of your tablet.
Some tablets may have additional requirements or restrictions for the new PIN, such as a minimum or maximum length, the inclusion of numbers and letters, or the prohibition of certain characters. Make sure to follow any guidelines provided to ensure that your new PIN meets the necessary criteria.
As you enter your new PIN, take your time and double-check each digit to ensure accuracy. This is important because an incorrect entry may result in difficulties accessing the parental control settings or cause unintended modifications to the restrictions.
Once you’ve entered your new PIN, verify that it is correctly inputted before proceeding. This will help prevent any potential frustrations or difficulties later on when trying to use the PIN to manage the parental control settings.
With your new PIN successfully entered, you’re one step closer to completing the process of resetting your parental PIN on the Amazon Fire Tablet. The next step will involve confirming your new PIN to ensure its accuracy and validity.
Step 6: Confirm the new PIN
Now that you’ve entered your new PIN, it’s important to confirm it to ensure its accuracy. This step acts as a final check to make sure that the new PIN you’ve selected has been correctly entered and will work as intended.
Within the PIN modification screen or dialogue box, you’ll find a second field labeled “Confirm PIN” or a similar phrase. This is where you’ll need to re-enter your new PIN to validate it.
Carefully input your new PIN once again using the on-screen numerical keypad. Double-check each digit to ensure that it matches the PIN you initially entered. It’s crucial to enter the PIN accurately to prevent any issues when attempting to access the parental control settings in the future.
When confirming the new PIN, be mindful of any requirements or rules stated for the PIN. Some tablets may have specific criteria, such as a minimum length or a combination of numbers and letters. Ensure that your confirmed PIN adheres to the guidelines provided.
After entering the confirmed PIN, take a moment to review all the digits and verify their correctness. This extra step is essential to ensure that you have successfully established your new PIN on the Amazon Fire Tablet.
Once you’re confident that the confirmed PIN matches your new PIN, you can proceed to save or apply the changes. Look for a “Save” or “Apply” button within the PIN modification screen, and tap on it to finalize the process.
Congratulations! You have successfully changed your parental PIN on your Amazon Fire Tablet. From now on, you’ll use the new PIN to access and manage the parental control settings.
Remember to keep your new PIN in a secure place or commit it to memory. Regularly updating and maintaining a strong and secure PIN will ensure the continued safety and control of your tablet’s content and access.
Step 7: Resetting the PIN if forgotten
If you’ve forgotten your parental PIN and are unable to access the parental control settings on your Amazon Fire Tablet, don’t panic. There’s a simple process to reset the PIN and regain control of your device.
To begin the PIN reset process, go back to the parental control settings by following the steps outlined in the earlier sections of this guide. Once you’ve reached the parental control menu, look for an option called “Forgot PIN” or a similar phrase. This option is typically located below the field where you would enter the PIN.
Tap on the “Forgot PIN” option, and you’ll likely be presented with a prompt to verify your identity. This can be done by entering your Amazon account password or by answering security questions associated with your account.
Provide the required information accurately to proceed with the PIN reset. If you’re unsure about the answers to your security questions, it’s a good idea to have your Amazon account password handy as an alternative method of verification.
After successfully verifying your identity, you’ll be prompted to enter a new PIN. Follow the guidelines mentioned in previous steps to choose a secure and memorable PIN. Make sure to confirm the new PIN by re-entering it in the provided field.
Take a moment to review and verify the new PIN, ensuring that it has been entered correctly. Once you’re satisfied, save or apply the changes as indicated by the on-screen instructions.
Congratulations! You have successfully reset your parental PIN on your Amazon Fire Tablet. Remember to keep your new PIN in a secure place or memorize it to prevent future difficulties accessing the parental control settings.
It’s a good practice to periodically review and update your PIN to maintain the security of your device. By regularly resetting your PIN, you can ensure that your Amazon Fire Tablet remains protected and that you have full control over the content and access on your device.
Conclusion
Resetting the parental PIN on your Amazon Fire Tablet is a straightforward process that allows you to regain control over the content and access on your device. Whether you’ve forgotten your PIN or simply want to change it for security reasons, following the steps outlined in this guide will ensure a smooth and successful reset.
By accessing the “Settings” menu, tapping on “Parental Controls,” entering your current PIN, and then changing it to a new one, you can easily customize the parental control settings to suit your needs and preferences. Additionally, if you forget your PIN in the future, the guide provides steps to reset it and regain access to the settings.
Remember, the parental PIN is a valuable tool for maintaining a safe browsing experience for you and your family. Take the time to select a strong and secure PIN and regularly update it to ensure continued protection.
By following these steps and taking control of your parental PIN, you can ensure a safe and enjoyable digital experience on your Amazon Fire Tablet. Now, go ahead and reset your parental PIN with confidence, knowing that you have the knowledge and tools to manage the content and access on your device effectively.