Introduction
Replacing the CPU (Central Processing Unit) in your laptop can be a daunting task, but with the right tools and a little know-how, you can upgrade the heart of your computer and enjoy improved performance. Whether you’re a tech enthusiast looking to boost your laptop’s processing power or a professional in need of more computing capabilities, this step-by-step guide will walk you through the process of replacing the CPU in your laptop.
Upgrading your CPU can have a significant impact on your laptop’s performance, allowing for smoother multitasking, faster data processing, and improved overall responsiveness. It’s important to note that not all laptops have replaceable CPUs, as some models come with soldered processors. Before attempting to replace your CPU, check your laptop’s specifications or consult the manufacturer’s documentation to ensure that your laptop is upgradeable.
In this guide, we’ll provide you with detailed instructions on how to replace the CPU in your laptop, from gathering the necessary tools to powering on and testing the new processor. This guide assumes a basic understanding of computer hardware and recommends following all safety precautions to avoid damage to your laptop or injury.
Step 1: Gather the necessary tools and equipment
Before you begin the process of replacing the CPU in your laptop, it’s essential to have all the required tools and equipment on hand. Here’s a list of what you’ll need:
- Screwdriver set: A set that includes various sizes and types of screwdrivers will come in handy for removing the screws that secure the laptop’s back cover.
- Thermal paste and cleaning solution: Thermal paste is essential for ensuring proper heat transfer between the CPU and the cooling system. Cleaning solution, such as isopropyl alcohol, is necessary for removing any existing thermal paste.
- Antistatic wristband: To protect your laptop from electrostatic discharge, an antistatic wristband is recommended. It helps prevent damage to sensitive electronic components.
- CPU socket cover: Some CPUs come with a protective cover. If your new CPU has one, it’s important to have a socket cover as well.
- Soft cloth or microfiber cloth: This will be useful for cleaning the CPU socket and removing any debris or dust particles.
Make sure to double-check the specifications of your laptop’s CPU to ensure compatibility with the new processor you plan to install. This information can usually be found online through the manufacturer’s website or documentation. Having the right tools and equipment at the beginning will make the process smoother and help you avoid unnecessary delays.
Once you have gathered all the necessary tools and equipment, you’re ready to move on to the next step: powering off and disconnecting all cables.
Step 2: Power off and disconnect all cables
The next step in replacing the CPU in your laptop is to power off the device and disconnect all cables. Follow these instructions to safely power off your laptop:
- Save your work: Make sure to save any open files and close all programs before proceeding. This will help prevent data loss or corruption.
- Power down the laptop: Shut down your laptop by clicking on the Start menu, selecting the Power option, and choosing Shut Down. Allow the laptop to completely power down before continuing.
- Unplug the power adapter: Disconnect the power adapter from the laptop. This will ensure that there is no electrical current flowing through the device.
- Remove the battery: If your laptop has a removable battery, carefully remove it by sliding the release latch and gently lifting the battery out of its compartment. If your laptop has an integrated battery, you can skip this step.
- Disconnect all peripheral devices: Unplug any external devices such as USB drives, printers, or monitors from your laptop. This will prevent any potential damage or interference during the CPU replacement process.
- Ground yourself: Before proceeding, it’s important to discharge any static electricity from your body to avoid damaging sensitive components. You can do this by wearing an antistatic wristband or by touching a grounded metal object.
Once you have powered off your laptop and disconnected all cables, you’re ready to move on to the next step: removing the back cover of your laptop.
Step 3: Remove the back cover of your laptop
Now that you’ve safely powered off your laptop and disconnected all cables, it’s time to remove the back cover to gain access to the internal components. Follow these steps to remove the back cover:
- Locate the screws: Look for the screws that secure the back cover of your laptop. Note that the number and placement of screws may vary depending on the laptop model.
- Use the appropriate screwdriver: Select the correct size and type of screwdriver from your set. Carefully loosen and remove the screws that hold the back cover in place. Keep the screws in a safe place to avoid losing them.
- Gently pry open the back cover: Once the screws are removed, use a plastic pry tool or your fingers to carefully pry open the back cover. Start at one corner and work your way around the edges, applying gentle and even pressure to avoid damaging the cover or any internal components.
- Inspect for any additional clips or latches: Some laptops may have additional clips or latches securing the back cover. If you encounter any resistance while trying to remove the cover, carefully examine the edges and corners for any hidden clips or latches and release them as needed.
- Set aside the back cover: Once the back cover is completely free, set it aside in a safe and clean location. Be mindful of any cables or connectors that may still be attached to the cover and gently disconnect them if necessary.
With the back cover successfully removed, you now have access to the internal components of your laptop, including the CPU. Take a moment to familiarize yourself with the layout and components inside the laptop before proceeding to the next step.
Step 4: Locate and remove the existing CPU
Now that you have removed the back cover of your laptop, it’s time to locate and remove the existing CPU. Follow these steps carefully:
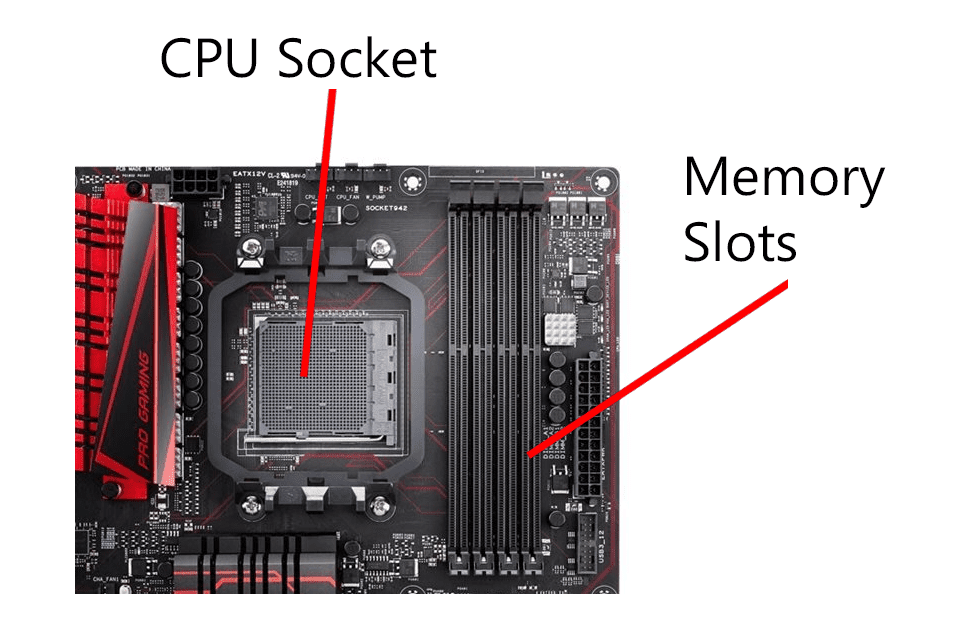
- Locate the CPU socket: Look for the rectangular socket on the motherboard where the CPU is installed. It is usually located near the center or towards one corner of the motherboard.
- Unlock the CPU socket: Most laptops have a lever or latch mechanism that locks the CPU in place. Gently lift or slide the lever to unlock the CPU socket. Pay attention to any markings or arrows on the lever that indicate the unlock direction.
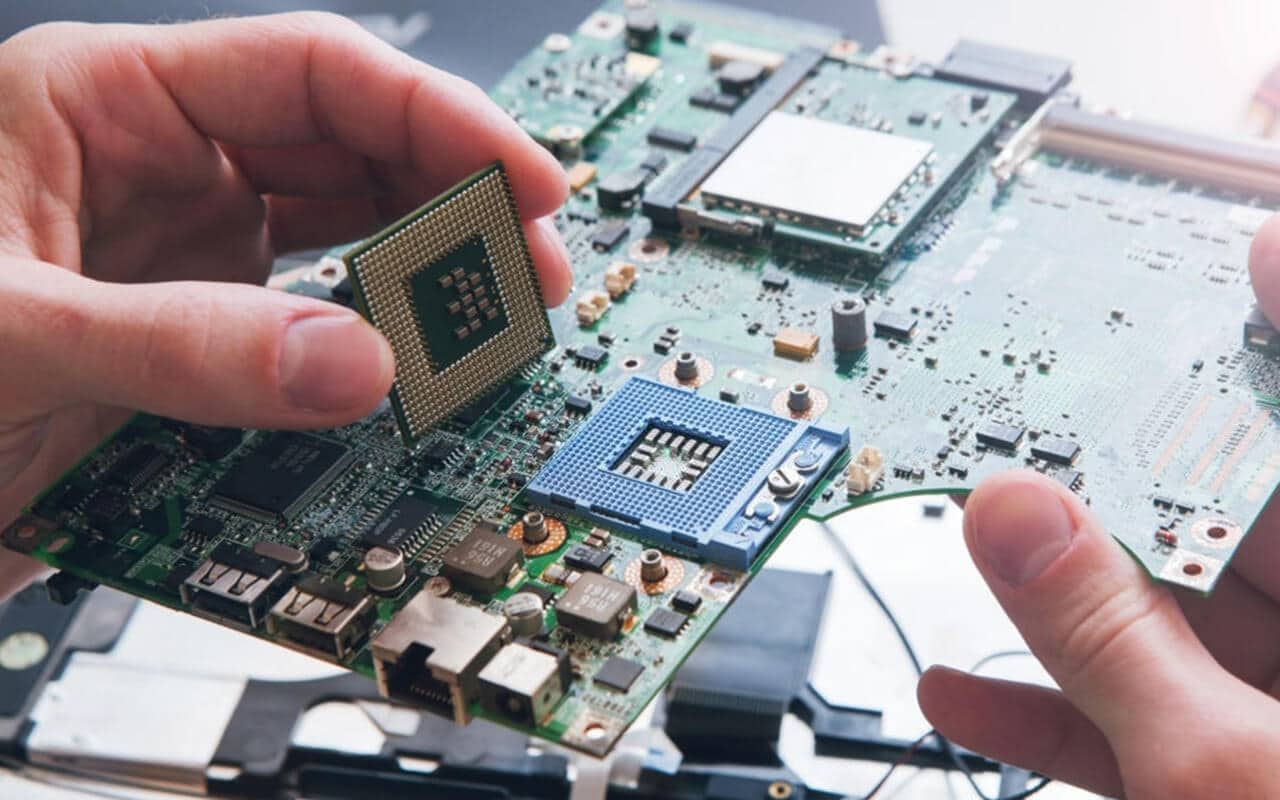
- Remove the CPU: Once the socket is unlocked, carefully lift the existing CPU out of the socket. Hold the CPU by its sides or use an antistatic wristband to avoid any possible electrostatic discharge. Place the CPU in an antistatic bag or on a clean, non-conductive surface.
- Inspect the CPU: Take a moment to examine the condition of the removed CPU. Look for any signs of damage, such as bent or missing pins, and compare it to the new CPU to ensure compatibility.
It’s worth noting that some laptops may have additional retention mechanisms, such as screws or brackets, that secure the CPU in place. If this is the case for your laptop, carefully follow the manufacturer’s instructions or consult the laptop’s documentation to correctly remove the CPU.
With the existing CPU successfully removed, you’re now ready to prepare for the installation of the new CPU. In the next step, you’ll learn how to clean the CPU socket and apply thermal paste to ensure optimal heat transfer.
Step 5: Clean the CPU socket and apply thermal paste
After removing the existing CPU, it’s crucial to clean the CPU socket and apply thermal paste before installing the new processor. Follow these steps to ensure proper heat transfer and prevent any potential issues:
- Clean the CPU socket: Use a soft, lint-free cloth or a microfiber cloth to gently clean the CPU socket. Remove any dust, debris, or old thermal paste residue that may be present. Be careful not to apply too much pressure or damage any of the delicate pins or connectors in the socket.
- Apply thermal paste: Thermal paste, also known as thermal compound or thermal grease, helps in transferring heat between the CPU and the cooling system. Apply a small, pea-sized amount of thermal paste onto the center of the CPU. Avoid applying too much, as it can result in improper heat dissipation and cause issues with temperature regulation.
- Spread the thermal paste: Using a clean and non-conductive tool, such as a plastic spreader or a credit card, carefully spread the thermal paste over the entire surface of the CPU. Ensure that the paste is evenly distributed and covers the entire surface without any gaps or excess buildup.
Note: Different CPU models and manufacturers may have specific recommendations for applying thermal paste. It’s always a good idea to consult the documentation or instructions provided with your new CPU to ensure proper application.
Once the thermal paste is applied, you’re now ready to proceed with installing the new CPU. In the next step, we’ll guide you through the process of inserting the new CPU into the socket.
Step 6: Insert the new CPU
With the CPU socket cleaned and the thermal paste applied, it’s time to insert the new CPU into the socket. Follow these steps carefully to ensure a successful installation:
- Align the new CPU: Carefully align the new CPU with the socket, ensuring that the notches or alignment markers on the CPU match with those on the socket. Take your time to properly position the CPU to avoid bending any pins.
- Lower the CPU into the socket: Gently lower the CPU into the socket, ensuring that it is inserted evenly and fully. Avoid applying excessive force or tilting the CPU during the insertion process.
- Lock the CPU in place: Once the CPU is properly inserted, gently push down the lever or latch on the socket to lock the CPU in place. It should fit snugly and secure the CPU without any wobbling or movement.
Ensure that the CPU is locked in securely and in the correct orientation; improper installation can lead to damage or malfunction. Take a moment to double-check that everything is aligned correctly before moving on to the next step.
Now that the new CPU is successfully inserted into the socket, you’re ready to proceed with reassembling your laptop. In the next step, we’ll guide you through the process of reassembling the laptop with the new CPU in place.
Step 7: Reassemble your laptop
After successfully inserting the new CPU, it’s time to reassemble your laptop. Follow these steps to put everything back together:
- Place the back cover: Take the back cover that you set aside earlier and align it with the laptop’s chassis. Carefully press it down until it snaps or screws back into place. Ensure that the cover is securely fastened.
- Tighten the screws: If your laptop uses screws to secure the back cover, use your screwdriver to carefully tighten them. Be mindful not to overtighten, as it can damage the screws or strip the threads.
- Reconnect cables and peripherals: Reconnect any cables or connectors that were detached during the disassembly process. This includes peripheral devices and the laptop’s power adapter.
- Insert the battery (if applicable): If your laptop has a removable battery, carefully reinsert it into its compartment and secure it in place. Ensure that the battery is properly aligned and snaps into place.
Double-check that all connections are secure and properly aligned before proceeding.
With the laptop reassembled, you’ve completed the physical installation of the new CPU. The next step involves powering on your laptop and testing the new processor to ensure it is functioning correctly.
Please note that the specific reassembly steps may vary depending on your laptop model. Always refer to the manufacturer’s documentation or online resources for detailed instructions tailored to your specific laptop model.
Step 8: Power on and test the new CPU
Now that you have reassembled your laptop with the new CPU installed, it’s time to power it on and test the functionality of the upgraded processor. Follow these steps to ensure everything is working as expected:
- Reconnect the power adapter: Plug in the laptop’s power adapter and ensure it is securely connected to both the laptop and a power source. This will provide the necessary power for the laptop to boot up.
- Power on your laptop: Press the power button to turn on your laptop. As it boots up, pay attention to the display and listen for any unusual noises. The laptop should power on smoothly without any issues.
- Check BIOS/UEFI settings: During the startup process, you may need to access the BIOS/UEFI settings to verify that the new CPU is detected and properly recognized. Consult your laptop’s documentation or online resources to learn how to access and navigate the BIOS/UEFI settings.
- Monitor CPU temperatures: Use software monitoring tools to check the temperature of the new CPU. High temperatures could indicate an issue with the thermal paste application or cooling system. If you notice unusually high temperatures, consider reapplying the thermal paste or seeking assistance from a professional.
- Perform stress tests: Run benchmarking or stress testing software to put the new CPU under heavy load and measure its performance. This will help verify that the CPU is functioning at its expected capacity without any overheating or stability issues.
If the laptop powers on, the new CPU is detected, and there are no abnormal temperature readings or stability issues, congratulations! You’ve successfully replaced the CPU in your laptop.
If you encounter any problems during the testing phase or notice any unusual behavior, it’s recommended to reach out to technical support or consult a professional for assistance.
Keep in mind that CPU replacements can have compatibility limitations, and it’s crucial to ensure that the new CPU is supported by your laptop. Always refer to the manufacturer’s documentation and resources for compatibility information.
Conclusion
Replacing the CPU in your laptop can breathe new life into your device and boost its performance. By following the steps outlined in this guide, you have successfully learned how to replace the CPU in your laptop. From gathering the necessary tools and equipment to testing the new processor, you have gained the knowledge and skills to tackle this technical task.
It’s important to remember that CPU replacements can vary depending on the specific model and manufacturer of your laptop. Always consult the manufacturer’s documentation or seek professional guidance if needed. Additionally, exercise caution and follow safety precautions throughout the entire process to avoid damaging your laptop or compromising your safety.
Whether you upgraded your CPU for gaming, multimedia editing, or simply to enjoy a faster computing experience, the effort and precision put into the CPU replacement process can be well worth it. Enjoy your newly upgraded laptop and revel in the enhanced performance it provides.
If you encounter any difficulties or have further questions, it’s always recommended to seek assistance from technical support or consult a professional. They can provide personalized guidance and ensure a smooth CPU replacement process.
Thank you for following this guide, and we hope it has been helpful in your journey to replace the CPU in your laptop!