Introduction
Welcome to our guide on how to remove someone from a Slack group chat. Slack is a powerful communication tool used by teams to collaborate and stay connected, but there may be instances where you need to remove a member from a group chat. Whether it’s due to a change in team composition or addressing inappropriate behavior, removing a member can help maintain a productive and respectful environment.
In this article, we will walk you through the step-by-step process of removing a member from a Slack group chat. We’ll cover everything from accessing the group chat settings to communicating the removal to the rest of the members. Let’s get started!
Before we proceed, please note that only admins and owners can remove members from group chats. If you don’t have the necessary permissions, reach out to a team admin or owner to assist you.
It’s important to handle these situations with professionalism and respect, taking into consideration any company policies or guidelines regarding member removal. With that said, let’s dive into the steps you’ll need to follow to remove someone from a Slack group chat.
Step 1: Open Slack and select the group chat
The first step in removing someone from a Slack group chat is to open the Slack application or website and navigate to the group chat you want to modify. Once you’re logged in, you’ll be able to access all of your group chats from the sidebar on the left-hand side.
Scroll through the list or use the search bar at the top to find the group chat you wish to remove a member from. Slack allows you to create and join multiple group chats, so make sure you select the correct one.
Click on the group chat’s name, and the chat window will open up, displaying all of the channel’s messages, members, and activity. Make sure you have the necessary permissions to manage the group chat or contact an admin or owner if you don’t.
Opening the group chat is the initial step towards removing a member. Now that you’re in the right place, let’s move on to the next step.
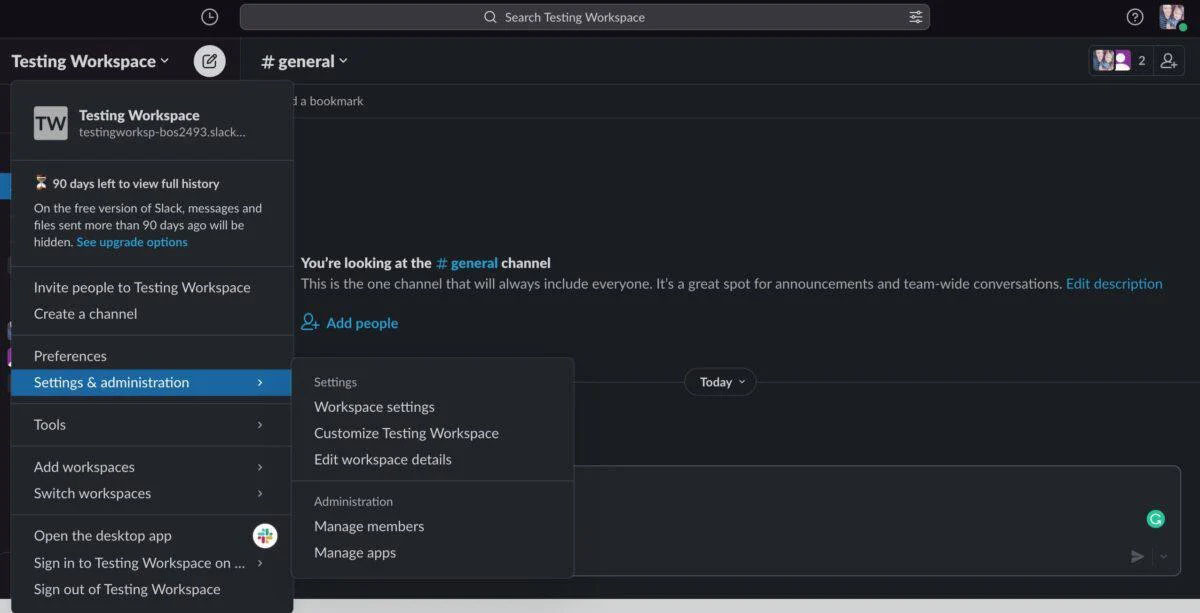
Step 2: Click on the group chat settings
Once you have the group chat open, you’ll need to access the group chat settings in order to remove a member. The settings menu provides you with various options to manage the group chat’s members, permissions, and other configurations.
In the top-right corner of the group chat window, you’ll find a gear icon or a three-dot menu icon (depending on the Slack version you’re using). Click on this icon to open the group chat settings menu.
When you click on the settings icon, a drop-down menu will appear with several options related to group chat management. Look for an option that says something like “Manage Members,” “Manage Channel Members,” or “Member Settings.” This is the option you need to select to proceed.
Clicking on the appropriate option will take you to the group chat’s member settings page, where you’ll be able to view all the members and their roles, as well as perform various actions.
Accessing the group chat settings brings you one step closer to removing a member. Let’s move on to the next step to complete the process.
Step 3: Remove a member from the group chat
Now that you’re in the member settings page, you can proceed to remove the specific member from the group chat. Locate the member you want to remove from the list of members displayed on the page.
Next to the member’s name, you should see a set of options or icons that allow you to perform actions on that member. Look for an option that denotes removing or kicking out the member from the group chat. This option may be represented by an icon like a “minus” sign or a “remove” button.
Click on the appropriate option to initiate the removal process. Depending on your Slack settings, you may be prompted to confirm the removal or provide a reason for the removal.
Take a moment to review your decision and ensure that you’re removing the correct member. Removing someone from a group chat is a serious action and may have significant implications. Double-checking can help avoid any mistakes or unintended consequences.
Once you’re confident in your decision, proceed with the removal. The member will be immediately removed from the group chat, and their access and visibility to the chat will be revoked.
Congratulations! You have successfully removed a member from the group chat. However, there are a few more steps to complete the process and ensure the rest of the group is aware of the removal. Let’s move on to the next step.
Step 4: Confirm the removal
After removing a member from the group chat, it’s important to confirm the action to ensure everything has been executed correctly. This helps you avoid any confusion or misunderstandings within the team.
Once you have removed the member, Slack may display a confirmation message or notification indicating that the removal was successful. Take a moment to read this message and make sure there are no errors or issues mentioned.
While the member has been removed from the group chat, it’s wise to double-check that their access has been revoked. You can do this by looking for their name in the list of members or simply refreshing the page to ensure the changes have taken effect.
If you encounter any problems or if the member’s name is still visible after refreshing, consider reaching out to your team admin or owner to address the issue. They may need to take additional steps to fully remove the member from the group chat.
Verifying the removal can provide you with peace of mind, knowing that the member has been successfully removed from the group chat. Now, let’s move on to the final step to complete the process.
Step 5: Communicate the removal to the group chat
After removing a member from the group chat, it’s important to communicate this decision to the rest of the group. Transparency and clear communication help maintain a positive and respectful team environment.
Start by drafting a message or announcement that explains the removal. Be mindful of your wording and tone, ensuring that it remains professional and discreet. You may want to consult with your team admin or owner to align on how to frame the message effectively.
In your communication, provide a brief explanation for the removal without divulging any confidential or sensitive information. Emphasize the importance of maintaining a productive and harmonious team dynamic and reassure the remaining members that any concerns or issues will be addressed promptly.
Once you have crafted the message, share it with the group chat. You can do this by simply typing the message in the chat window and pressing enter. Depending on your group chat settings, you may also be able to pin the message or send it as a separate notification to ensure everyone sees it.
Encourage open and respectful dialogue among the team members to address any questions or concerns related to the removal. Foster an environment where everyone feels comfortable expressing their thoughts, but remind them to do so respectfully and professionally.
By communicating the removal to the group chat, you are ensuring that everyone is informed about the change and can move forward with a clear understanding of the team dynamics.
Congratulations! You have successfully completed the process of removing a member from a Slack group chat. Remember to follow any additional internal procedures or guidelines set forth by your organization when dealing with member removals.
Removing a member from a group chat can be a sensitive matter, so it’s important to handle it with care and professionalism. By following these steps and maintaining clear communication within the team, you can help foster a positive and productive work environment.
Conclusion
Removing a member from a Slack group chat can be a necessary step in maintaining a productive and respectful team environment. By following the steps outlined in this guide, you can successfully remove a member from a group chat in Slack.
Remember, it’s important to approach member removals with professionalism and sensitivity. Always consider any company policies or guidelines regarding member removals and consult with team admins or owners if needed.
Throughout this process, we covered the essential steps involved in removing someone from a Slack group chat:
- Open Slack and select the group chat
- Click on the group chat settings
- Remove a member from the group chat
- Confirm the removal
- Communicate the removal to the group chat
By following these steps, you can not only remove a member from the group chat but also ensure that the remaining team members are informed and that the team can move forward in a productive and harmonious manner.
Remember that transparent and respectful communication is key throughout this process. Be mindful of the impact removing a member can have on the team, and take the time to address any concerns or questions that may arise.
Thank you for reading our guide on how to remove someone from a Slack group chat. We hope you found it helpful for your team management needs. If you have any further questions or need additional assistance, don’t hesitate to reach out to the Slack support team or your organization’s designated Slack administrators.