Introduction
Welcome to our guide on how to remove a member from Slack. Slack is a widely-used communication and collaboration platform that allows teams to work together efficiently. Whether you need to remove a member due to a change in their role or employment status, or for any other reason, this guide will walk you through the process step by step.
Removing a member from Slack can be done by workspace administrators or owners. It’s important to ensure that you have the necessary permissions before proceeding. By removing a member, you will revoke their access to the workspace, including all channels and conversations they were a part of.
Before removing a member, it’s essential to communicate with them and any relevant stakeholders to avoid any potential miscommunications or misunderstandings. Depending on the circumstances, you may need to provide the individual with access to certain files or information before removing them from Slack.
This guide will provide a comprehensive overview of the steps required to remove a member from your Slack workspace. From accessing the workspace to confirming the removal, we’ll cover everything you need to know. Let’s get started!
Step 1: Accessing the Slack workspace
The first step in removing a member from Slack is to access the Slack workspace. To do this, you will need to have administrative or ownership permissions.
Start by logging into your Slack account using your credentials. Once logged in, you will be taken to the Slack dashboard, which displays all of your workspaces. Locate the workspace from which you want to remove a member and click on its name.
If you are a member of multiple workspaces, ensure that you select the correct one. Double-check the workspace name and logo to confirm you’re in the right place.
Upon entering the workspace, you will have access to various features and settings that allow you to manage the members and channels. Take a moment to familiarize yourself with the layout and navigation options.
It’s important to note that only workspace administrators and owners have the authority to remove members. If you don’t have the necessary permissions, you will need to reach out to an appropriate team member who can assist you or request the needed permissions.
By accessing the Slack workspace, you have taken the first step towards removing a member. Now, let’s move on to the next step, where we will navigate to the member’s profile and initiate the removal process.
Step 2: Navigating to the member’s profile
Once you have accessed the Slack workspace, the next step in removing a member is to navigate to their profile. By going to the member’s profile, you will have the option to remove them from the workspace.
To locate the member’s profile, you can follow these simple instructions:
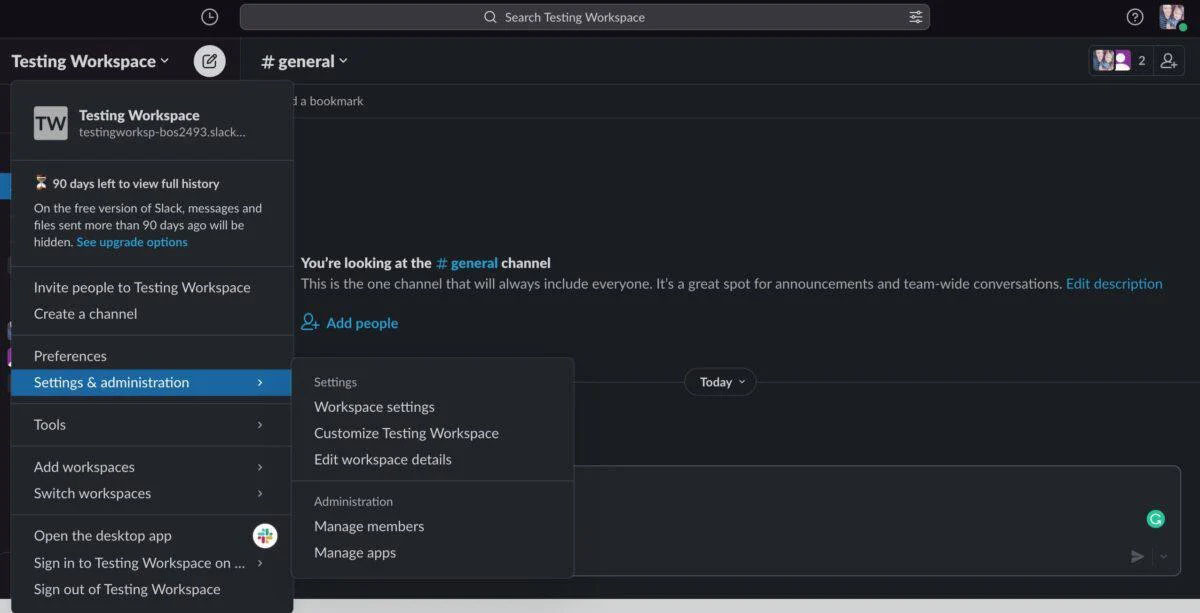
- Look for the sidebar on the left-hand side of the Slack dashboard. This sidebar contains various options and settings for managing the workspace.
- Scroll down until you find the “People & User Groups” section. Click on it to expand the options.
- Under the “People & User Groups” section, click on the “Manage Members” option.
- A new window will appear, displaying the list of all the members in the workspace. This list includes their names, profile pictures, and roles within the workspace.
- Scroll through the list or use the search bar to find the profile of the member you want to remove.
- Once you have located the member’s profile, click on their name to access their profile information.
In the member’s profile, you will find additional details about their activity within the workspace, including the channels they are part of and any direct messages they have had. This information can help you make an informed decision before proceeding with the removal.
By successfully navigating to the member’s profile, you have taken the necessary steps to initiate the removal process. In the next step, we will explain how to remove the member from the Slack workspace.
Step 3: Removing a member from the workspace
Now that you have accessed the member’s profile, it’s time to remove them from the Slack workspace. By removing a member, you revoke their access to all channels, conversations, and files within the workspace.
To remove a member from the workspace, follow these steps:
- In the member’s profile, look for the three-dot menu icon. It is typically located in the upper-right corner of the profile window. Click on it to reveal a dropdown menu.
- From the dropdown menu, select the “Remove from workspace” or a similar option. The wording might vary depending on your Slack version or settings.
- A confirmation dialog box may appear, asking you to confirm the removal. Read the dialog carefully to ensure you are removing the correct member from the workspace.
- If you are absolutely sure about removing the member, click on the “Confirm” or “Remove” button to proceed. Otherwise, click on “Cancel” to abort the removal process.
After confirming the removal, Slack will proceed to remove the member from the workspace. This action is irreversible. The member will no longer have access to any channels, messages, or files within the workspace.
It’s worth noting that removing a member does not delete their account entirely. They will still have access to their individual Slack account, including any other workspaces they might be part of.
With the member successfully removed from the workspace, you have completed the main steps in the removal process. However, it’s essential to communicate the removal to the team and address any concerns or questions they may have. We’ll cover this in the next step.
Step 4: Confirming the removal
After removing a member from the Slack workspace, it’s important to confirm the removal and ensure that the necessary actions have been taken. Additionally, it’s crucial to communicate the removal to the team and address any concerns or questions that may arise.
To confirm the removal and take the necessary follow-up steps, consider the following:
- Double-check: Go back to the member’s profile and verify that they no longer appear in the list of workspace members. This ensures that the removal was successful.
- Disable or revoke access: If the removed member had any integrations or third-party tools connected to their account, make sure to disable or revoke their access to those applications as well. This will prevent any unauthorized use of company resources.
- Notify the team: Communicate the removal to the team members who need to be aware of the change. You can do this through a Slack announcement, a team meeting, or any other suitable communication channel. Provide a brief explanation for the removal to avoid unnecessary speculation or confusion.
- Address concerns: Be prepared to address any concerns or questions that team members may have regarding the removal. Clarify the reasons behind the removal, reassure the team about any potential impact, and offer support or guidance as needed.
- Update documentation and access control: If the removed member had access to specific documents, files, or projects, update the necessary permissions and access control to ensure the right people have the appropriate level of access.
By confirming the removal and taking the necessary steps afterward, you can ensure a smooth transition and maintain the integrity of the Slack workspace. Remember to handle the process with sensitivity, transparency, and professionalism.
Step 5: Communicating the removal to the team
Once a member has been removed from the Slack workspace, it’s crucial to communicate this change to the rest of the team. Effective communication helps to maintain transparency, avoid confusion, and address any concerns team members may have. Here are the steps you can follow to communicate the removal:
- Choose an appropriate communication channel: Decide on the most effective way to inform the team about the removal. Depending on your team’s communication practices, this could be through a dedicated Slack channel, an email, a team meeting, or any other internal communication method.
- Choose the right timing: Consider the timing when communicating the removal. It’s best to inform the team as soon as possible after the removal has been completed. This avoids any unnecessary speculation or rumors among team members.
- Provide a concise explanation: In your communication, offer a brief explanation for the removal without divulging any confidential or sensitive information. Focus on providing a clear and concise reason that maintains the privacy of the individual involved.
- Reassure the team: Address any concerns or questions that team members may have about the removal. Reassure them that the decision was made in the best interest of the team and the organization. Emphasize that all necessary steps have been taken to ensure a smooth transition.
- Offer support and guidance: If team members need assistance or have any issues following the removal, let them know that support is available. Offer guidance regarding any changes in responsibilities or procedures as a result of the team member’s departure.
- Encourage open communication: Promote an environment of open communication where team members feel comfortable discussing their thoughts, concerns, or questions related to the removal. Encourage them to approach the appropriate channels or team members should they need further information or assistance.
By effectively communicating the removal to the team, you can foster a positive and supportive work environment. This helps to maintain team morale and ensures that everyone is well-informed about the changes taking place within the Slack workspace.
Conclusion
Removing a member from Slack requires careful navigation and communication to maintain the integrity of the workspace and ensure a smooth transition for the team. By following the steps outlined in this guide, you can effectively remove a member from your Slack workspace:
First, access the Slack workspace by logging in and selecting the appropriate workspace where the member needs to be removed. Then, navigate to the member’s profile by going to the “People & User Groups” section and selecting “Manage Members.”
Next, initiate the removal process by accessing the member’s profile and selecting the option to remove them from the workspace. Confirm the removal to revoke their access to all channels, conversations, and files within the workspace.
After removing the member, it’s important to confirm the removal by double-checking their absence from the member list. Disable or revoke any integrations or third-party tool access they had, and communicate the removal to the team to keep everyone informed.
Finally, address any concerns or questions team members may have and update documentation and access control as necessary.
By following these steps and maintaining transparency throughout the process, you can effectively remove a member from your Slack workspace while ensuring a positive and supportive work environment for the rest of the team.
Remember, removing a member from Slack is an important decision that should be approached with professionalism and sensitivity. Communicate openly and provide support to your team members throughout the process to foster a collaborative and productive workspace.