Introduction
Welcome to this guide on how to remove the battery from an HP Ultrabook. Whether you need to replace a faulty battery or simply want to perform maintenance on your device, knowing how to safely remove the battery is essential. This step-by-step tutorial will provide you with the necessary instructions to successfully complete the task.
Before we dive into the process, it’s important to note that removing the battery from your Ultrabook may void any existing warranties. Therefore, please proceed at your own risk. If you’re unsure or uncomfortable with this procedure, it’s always best to consult a professional or contact the manufacturer for assistance.
In order to successfully remove the battery, there are a few tools you’ll need to gather. These include a small Phillips-head screwdriver, an anti-static wrist strap (optional but recommended), and a clean, well-lit workspace. Having these tools handy will help ensure a smooth and efficient battery removal process.
Now that you’re equipped with the necessary tools and a clear understanding of the potential risks involved, let’s move on to the step-by-step instructions to safely remove the battery from your HP Ultrabook. By following these guidelines carefully, you’ll be able to accomplish the task with ease and confidence.
Disclaimer
Before proceeding with the battery removal process, it’s important to understand and acknowledge the potential risks involved. Removing the battery from your HP Ultrabook may void any existing warranties, and there is a possibility of causing damage to your device if not done correctly. Therefore, it’s crucial to exercise caution and proceed at your own risk.
This guide is intended to provide general instructions for removing the battery from an HP Ultrabook. However, every Ultrabook model may have slight variations in design and components, so it’s essential to consult the user manual specific to your device for accurate guidance.
If you are unsure or uncomfortable with performing this procedure yourself, it is recommended to seek assistance from a professional technician or contact the manufacturer’s support team. They will have the expertise and knowledge to ensure the battery removal is done safely and in accordance with the warranty terms.
The information provided in this guide is for informational purposes only and is not intended as professional advice. The steps outlined here are based on general procedures, but it’s important to consider the specific details and precautions outlined by HP for your particular model.
The author and the website hosting this guide cannot be held responsible for any damage, injury, or loss that may occur as a result of following these instructions. It is the reader’s responsibility to ensure they have a comprehensive understanding of the risks involved and to proceed with caution.
Always remember to exercise proper safety measures throughout the process, including proper grounding techniques and ensuring a static-free environment. It’s crucial to double-check and follow all safety guidelines provided by HP to minimize the risk of damage or injury.
By proceeding with the battery removal process, you acknowledge and accept the aforementioned risks and understand that the author and website cannot be held liable for any consequences that may occur.
Step 1: Prepare the tools
Before you begin the battery removal process, it’s essential to gather the necessary tools to ensure a smooth and efficient procedure. Here are the tools you’ll need:
- A small Phillips-head screwdriver: This tool is typically required to remove any screws securing the battery compartment.
- An anti-static wrist strap (optional but recommended): This helps prevent the buildup of static electricity and protects your Ultrabook from any potential damage.
- A clean, well-lit workspace: Setting up a dedicated workspace will provide you with a suitable area to work on your Ultrabook and keep the tools organized.
Before starting, make sure to power off your Ultrabook and unplug any power cables or peripherals connected to it. This will help prevent any accidental damage or electrical hazards during the battery removal process.
Once you have gathered the necessary tools and prepared your workspace, you’re ready to move on to the next step. Proceed with caution and be sure to follow each step carefully to ensure a successful battery removal.
Step 2: Shut down the Ultrabook
Before you begin removing the battery from your HP Ultrabook, it’s important to shut down the device properly. This ensures that all active processes are closed and that the system is in a safe state for the battery removal process.
To shut down the Ultrabook, follow these steps:
- Save any open files or documents and close all running applications.
- Click on the “Start” button in the bottom left corner of the screen.
- Select the “Power” option.
- Choose “Shut down” from the dropdown menu.
Wait for the Ultrabook to complete the shutdown process before proceeding to the next step. It’s important not to rush this step to ensure that the device is fully powered off.
Shutting down the Ultrabook properly helps prevent any data loss or potential damage during the battery removal process. Once the device is powered off, you can move on to the following steps to continue safely removing the battery from your HP Ultrabook.
Step 3: Disconnect from the power source
Before proceeding with the battery removal process, it’s crucial to ensure that your HP Ultrabook is completely disconnected from any power sources. This step helps prevent any electrical accidents or damage to the device.
Follow these steps to disconnect the Ultrabook from the power source:
- Unplug the power adapter from the Ultrabook.
- If your Ultrabook has a removable battery, proceed to the next step. If not, skip to Step 4.
- Remove the power cable from the wall outlet or power strip.
- Double-check that there are no other power sources connected to your device, such as USB hubs or docking stations.
Ensure that the power lights on your Ultrabook are turned off, indicating a complete disconnection from any power sources. This step is critical to prevent any electrical shocks or damage to the device and yourself during the battery removal process.
It’s important to mention that some Ultrabooks may have different power configurations or specific steps to disconnect from the power source. Therefore, it’s always recommended to consult the user manual for your specific HP Ultrabook model to ensure you follow the correct instructions.
Once you have successfully disconnected your HP Ultrabook from the power source, you can proceed to the next step to continue with the battery removal process.
Step 4: Flip the Ultrabook
Now that your HP Ultrabook is powered off and disconnected from the power source, it’s time to flip the device to expose the bottom panel where the battery is located. This step will allow you to access the battery compartment and continue with the removal process.
Follow these steps to flip the Ultrabook:
- Close the lid of your Ultrabook if it’s open.
- Place the device on a flat and stable surface, like a table or desk.
- Turn the Ultrabook upside down so that the bottom panel is facing upwards.
- Ensure the Ultrabook is securely positioned, and none of the edges are hanging over the surface to prevent any accidental slips or falls.
By flipping the Ultrabook, you’ll be able to access the necessary components for the battery removal process. This step allows for easier and safer handling of the device during the subsequent steps.
It’s important to note that some Ultrabooks may have specific labels or markers on the bottom panel to indicate the battery compartment location. If you cannot identify the battery compartment visually, it’s recommended to refer to the user manual or the manufacturer’s website for your specific HP Ultrabook model to ensure you locate the correct compartment.
Once you have successfully flipped your HP Ultrabook and positioned it securely, you’re ready to move on to the next step and continue with the battery removal process.
Step 5: Locate the battery release latch
Now that you have flipped your HP Ultrabook, the next step is to locate the battery release latch. This latch is typically located on the bottom panel of the device and is responsible for securing the battery in place.
Follow these steps to locate the battery release latch:
- Inspect the bottom panel of your Ultrabook and look for any markings, labels, or symbols that indicate the location of the battery compartment.
- If you don’t find any visible indications, consult the user manual or the manufacturer’s website for your specific HP Ultrabook model. These resources may provide detailed diagrams or explanations to help you locate the battery compartment.
- Once you have identified the battery compartment, examine the area to find the battery release latch. In most cases, it will be a sliding switch or a small lever.
- Take note of the latch’s position, as you will need to manipulate it in the upcoming steps.
It’s important to locate the battery release latch accurately, as improper handling or attempting to remove the battery without releasing the latch can result in damage to the device or the battery itself.
Remember that different HP Ultrabook models may have variations in the design and placement of the battery release latch. Taking the time to familiarize yourself with the specific instructions provided by HP for your particular model will ensure a successful battery removal process.
Once you have located the battery release latch, you’re ready to proceed to the next step and release the battery from your HP Ultrabook.
Step 6: Release the battery latch
Now that you have located the battery release latch on your HP Ultrabook, it’s time to release it in order to remove the battery. This latch is responsible for securing the battery in place, and releasing it will allow you to safely extract the battery from its compartment.
Follow these steps to release the battery latch:
- Ensure that you have identified the battery release latch correctly, as mentioned in the previous step.
- Using your fingers or a small tool, such as a flathead screwdriver or a spudger, gently manipulate the battery release latch as indicated by the manufacturer.
- Slide, push, or lift the latch as instructed, taking care not to apply excessive force or damage any other components.
- Listen for a click or feel for a release as the latch disengages from its locked position.
It’s important to note that the exact method of releasing the battery latch may vary depending on your specific HP Ultrabook model. Be sure to consult the user manual or refer to the manufacturer’s guidelines for the correct procedure.
Once you have successfully released the battery latch, you’re ready to proceed to the next step and remove the battery from your HP Ultrabook. Be mindful and handle the battery with care to avoid any accidental damage.
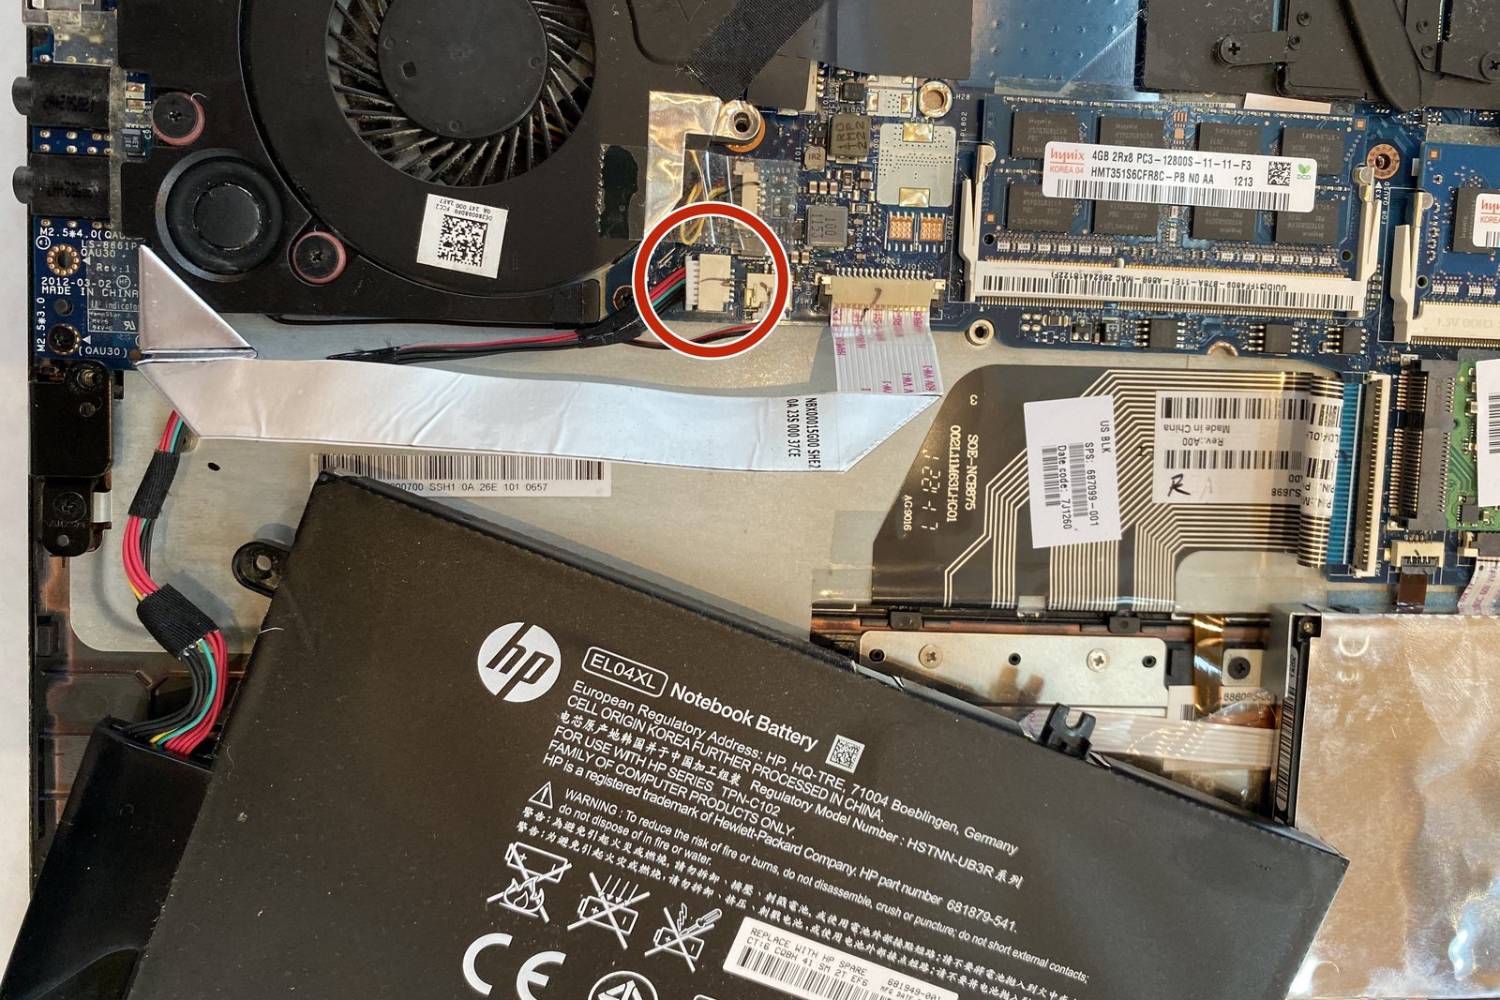
Step 7: Remove the battery
Now that you have successfully released the battery latch on your HP Ultrabook, it’s time to remove the battery from its compartment. This step requires careful handling to ensure the safe extraction of the battery without causing any damage to the device.
Follow these steps to remove the battery:
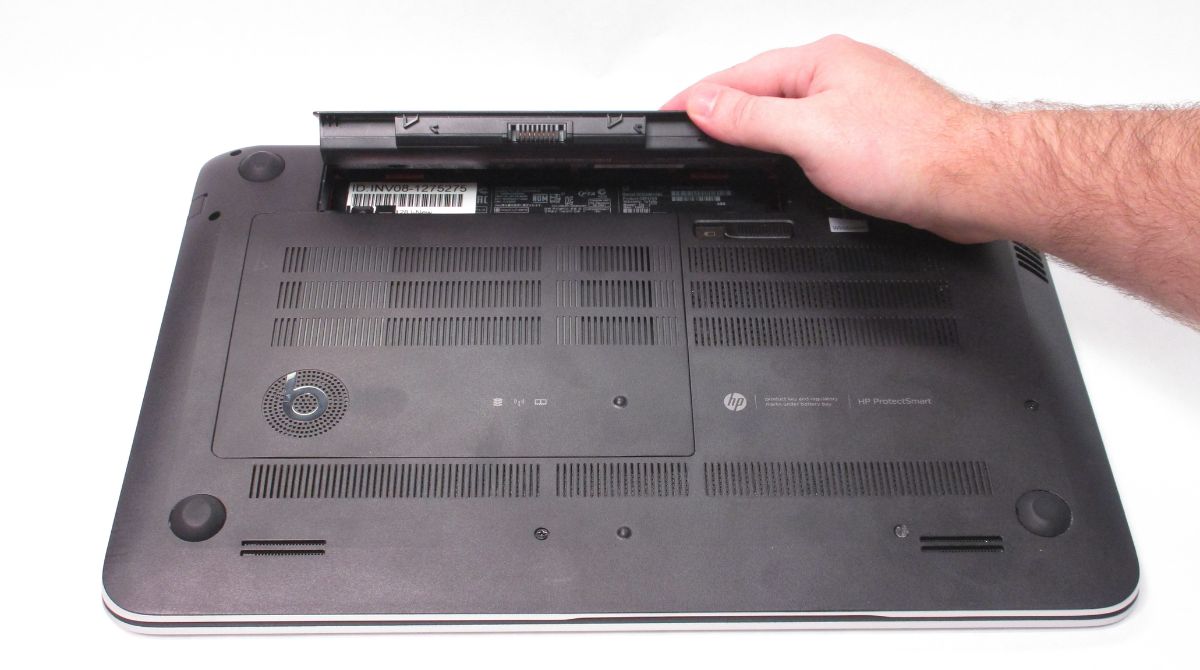
- Locate the tabs or notches on the battery that are designed for easy removal.
- Gently grasp the battery by these tabs or notches, ensuring a firm but gentle grip.
- Safely and steadily pull the battery away from the compartment, keeping it parallel to the surface of the Ultrabook.
- Avoid any excessive twisting or bending of the battery during the removal process.
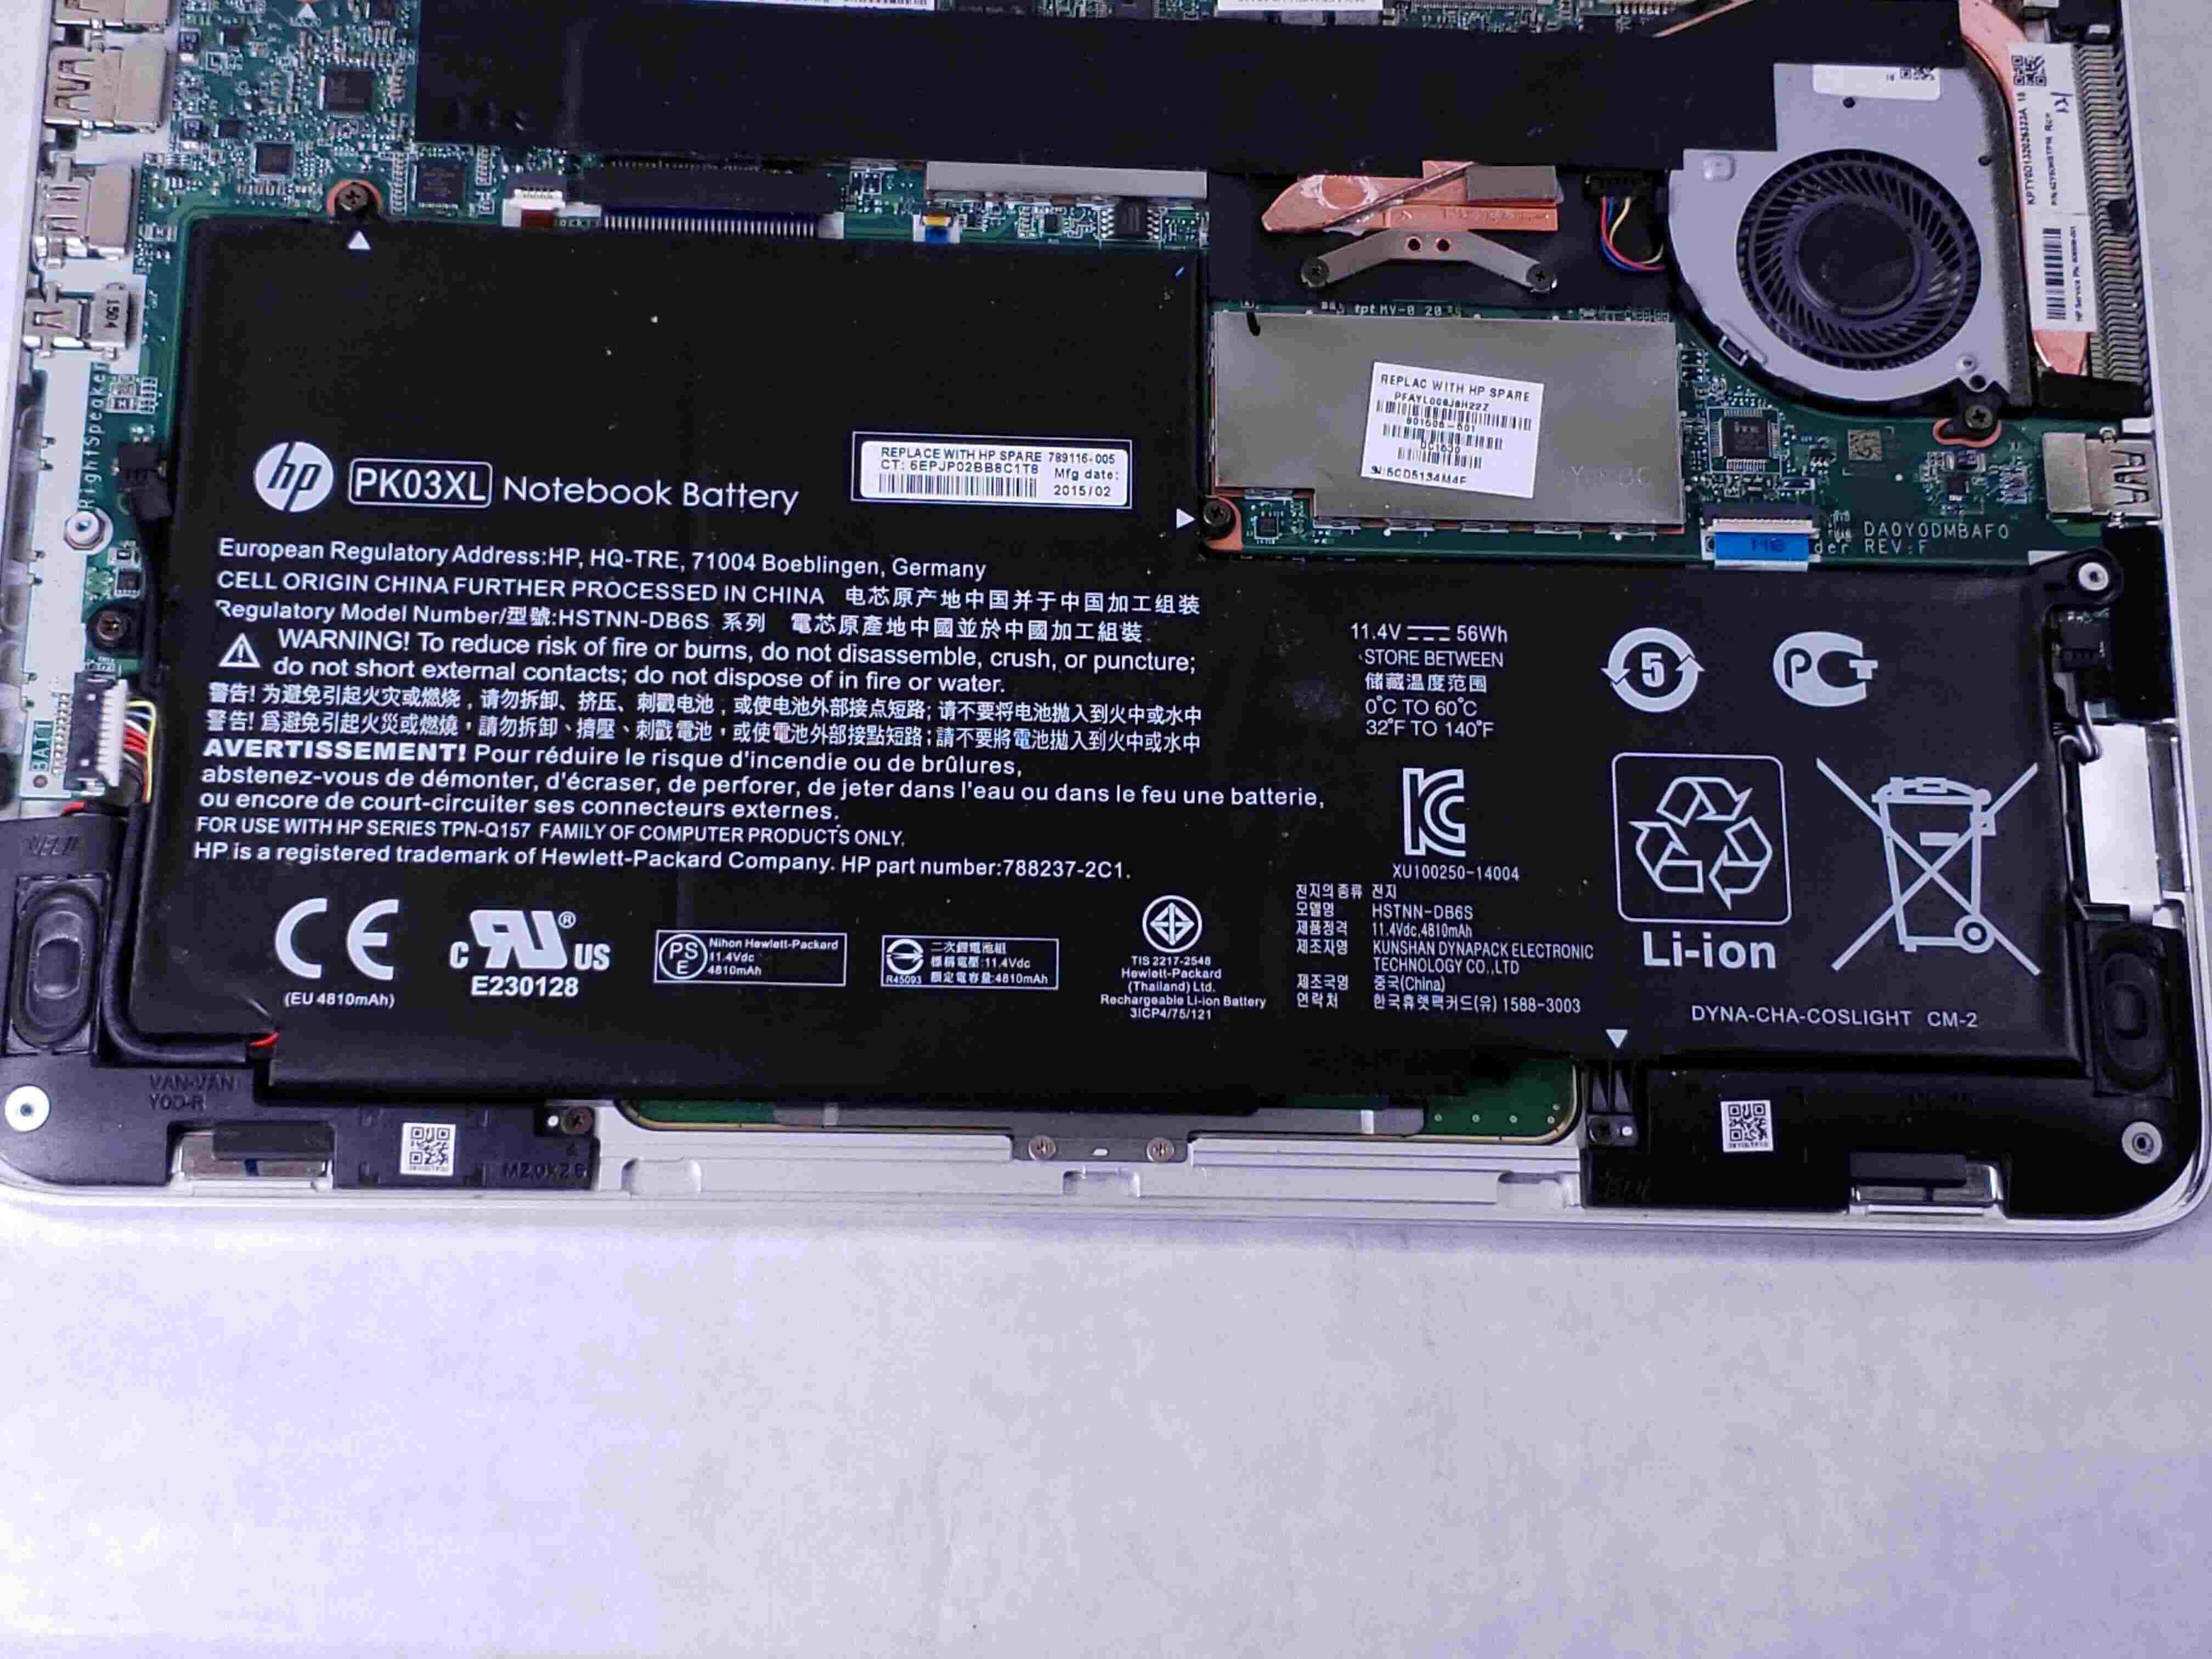
It’s important to note that some Ultrabooks may have batteries that are soldered to the motherboard, making them non-removable by the user. In such cases, it’s recommended to consult the user manual or contact HP support for further guidance regarding battery removal or replacement.
When removing the battery, exercise caution not to damage any other internal components or delicate wiring. Make sure to keep the battery in a safe place away from heat sources or liquids to prevent any potential hazards.
If you plan to replace the battery with a new one, be sure to handle the new battery with care and install it according to the manufacturer’s instructions. Alternatively, if you do not intend to reinstall the battery at this time, store it safely using the manufacturer’s guidelines to maintain its quality.
With the battery successfully removed, you have completed the main steps of removing the battery from your HP Ultrabook. However, if you wish to reinstall the battery or perform any other maintenance, continue to the next step. Otherwise, you can conclude the process.
Step 8: Reinstall the battery (optional)
If you have removed the battery from your HP Ultrabook for maintenance purposes and intend to reinstall it, follow these steps to securely place the battery back into its compartment:
- Ensure that the battery compartment is clean and free from any debris or dust.
- Hold the battery in the correct orientation, aligning the connectors on the battery with the corresponding connectors in the compartment.
- Gently slide the battery into the compartment, making sure it fits snugly and securely.
- Once the battery is positioned correctly, push it gently until you hear or feel a click, indicating that it has been properly installed and the battery latch is engaged.
Note that the installation process may vary depending on your specific HP Ultrabook model. It’s important to refer to the user manual or manufacturer’s guidelines for any specific instructions or precautions.
After reinstalling the battery, perform a quick visual inspection to ensure that it is properly seated and secured in the compartment. Double-check that the battery latch is in its locked position to prevent any accidental dislodging of the battery.
If you encounter any difficulties during the reinstallation process or feel unsure about any step, it’s advisable to seek assistance from a professional technician or contact HP support for guidance.
With the battery successfully reinstalled, you have completed the optional step of the battery removal and reinstallation process. Your HP Ultrabook is now ready to be powered on and used as intended.
Conclusion
Congratulations! You have successfully learned how to remove the battery from your HP Ultrabook. By following the step-by-step instructions and taking necessary precautions, you can safely perform this maintenance task.
Remember that removing the battery from your Ultrabook may void any warranties, so proceed at your own risk. If you are unsure or uncomfortable with performing the battery removal process, it’s highly recommended to consult a professional technician or contact the manufacturer’s support team for assistance.
Throughout the process, we emphasized the importance of gathering the necessary tools, shutting down the Ultrabook, disconnecting from the power source, flipping the device, locating and releasing the battery latch, and safely removing the battery. Following these steps will minimize the risk of damage to your device and ensure a successful battery removal.
If you plan to reinstall the battery, be sure to review the optional step for guidance on how to securely place the battery back into its compartment. Alternatively, if you do not wish to reinstall the battery, ensure that it is stored safely according to the manufacturer’s guidelines.
Remember that each HP Ultrabook model may have slight variations in design and components, so it’s essential to consult the user manual specific to your device for accurate guidance. Additionally, always exercise caution, handle the battery and your Ultrabook with care, and follow any additional instructions provided by the manufacturer.
Now that you have successfully completed the battery removal process, you can confidently perform maintenance on your HP Ultrabook as needed. Take pride in your newfound skills and enjoy the reliable performance of your device!