Introduction
Welcome to this step-by-step guide on how to take the battery out of an HP Envy Ultrabook 4-1043Cl. Whether you need to replace the battery or want to perform some maintenance on your laptop, knowing how to remove the battery is essential. In this guide, we will walk you through the process and provide clear instructions to help you complete it successfully.
Removing the battery from your HP Envy Ultrabook 4-1043Cl requires a few simple steps. By following this guide, you can ensure that you handle your laptop with care and avoid any potential damage. Before we begin, it is important to note that the steps provided here are specific to the HP Envy Ultrabook 4-1043Cl. If you have a different model, the process may vary slightly, so it’s always a good idea to consult the user manual for your specific laptop.
For this task, you won’t need any specialized tools. However, it’s always a good idea to have a small flat-head screwdriver or a similar tool on hand, as it can be helpful for some steps. Apart from that, all you need is your HP Envy Ultrabook 4-1043Cl and a clean, flat surface to work on. With these simple tools in hand, let’s get started!
Tools Needed
Before you begin the process of removing the battery from your HP Envy Ultrabook 4-1043Cl, it is important to gather the necessary tools. While this task doesn’t require any specialized equipment, having a few basic tools on hand can make the process smoother and safer. Here are the tools you will need:
- Small flat-head screwdriver: A small flat-head screwdriver or a similar tool can be useful for certain steps, such as releasing the battery latch. It allows for better grip and control, ensuring that you perform the task with precision.
- Clean, flat surface: It’s essential to have a clean and stable surface to work on when removing the battery. This surface will provide stability and prevent any damage that can occur from accidentally dropping or mishandling the laptop.
With these tools in hand, you are now ready to proceed with the battery removal process. Remember to handle your laptop with care and follow the instructions carefully to avoid any potential damage. Let’s move on to the next step!
Step 1: Prepare the laptop
Before removing the battery from your HP Envy Ultrabook 4-1043Cl, it’s important to prepare the laptop to ensure a smooth and safe process. These steps will help protect your device and minimize the risk of damage. Follow the instructions below to get started:
- Power down your laptop: Save any open files and shut down your laptop properly. This will prevent any accidental data loss and ensure that the laptop is completely powered off before proceeding.
- Unplug the power adapter: Disconnect the laptop from the power source by unplugging the power adapter. This is essential for your safety and to avoid any potential electrical hazards.
- Remove any external devices: If you have any external devices, such as a USB flash drive or external hard drive, connected to your laptop, unplug them. This will prevent any interference or possible damage when removing the battery.
- Ground yourself: Before touching any internal parts of your laptop, it’s a good idea to ground yourself to discharge any static electricity that could potentially damage sensitive components. You can do this by touching a grounded metal object or wearing an anti-static wristband.
By following these preparation steps, you will ensure that your laptop is ready for the battery removal process. Taking these precautions will safeguard your device and help you avoid any unnecessary complications. Now that your laptop is prepared, let’s move on to the next step!
Step 2: Power off your laptop
In order to safely remove the battery from your HP Envy Ultrabook 4-1043Cl, it is crucial to power off your laptop completely. This step ensures that the device is not running and reduces the risk of any electrical mishaps. To power off your laptop, follow the steps below:
- Save your work: Prior to shutting down your laptop, save any open files or projects you are working on. This will prevent data loss and allow for a smooth transition.
- Close all applications: Make sure all applications and programs are closed. This will help speed up the shutdown process and reduce the chance of any errors or complications.
- Click on the Start Menu: Locate the Start Menu button, typically found in the bottom left corner of the screen. Click on it to access the shutdown options.
- Choose the Shutdown option: From the shutdown options that appear, select “Shut down.” This will initiate the shutdown process.
- Wait for the laptop to power off: Give your laptop some time to complete the shutdown process. You may see a message indicating that Windows is shutting down or a spinning wheel indicating that processes are being terminated.
- Verify that the laptop is powered off: Once the screen goes completely black and all lights on the laptop have turned off, it is safe to say that your laptop is powered off.
Ensuring that your laptop is properly powered off is essential before proceeding to remove the battery. This step guarantees your safety and prevents any potential damage to internal components. Once you have successfully powered down your laptop, you’re ready to move on to the next step!
Step 3: Locate the battery release latch
Now that your HP Envy Ultrabook 4-1043Cl is powered off, it’s time to locate the battery release latch. This latch allows you to securely hold and release the battery from its place. Follow these steps to find the battery release latch:
- Flip your laptop over: Carefully turn your laptop over so that the bottom side is facing up. Place it on a clean, flat surface to work on.
- Examine the bottom of the laptop: Take a close look at the bottom panel of your laptop. Look for any visible markings or icons that indicate the position of the battery.
- Locate the battery compartment: The battery compartment is usually located towards the center or rear of the laptop’s bottom panel. It is a rectangular or square-shaped section that houses the battery.
- Identify the battery release latch: On the battery compartment, you will find a small latch or switch that secures the battery in place. It may be labeled with a battery symbol or a lock/unlock icon.
Take your time to inspect the bottom of your HP Envy Ultrabook 4-1043Cl and locate the battery release latch. Familiarizing yourself with its position will make it easier for you to proceed with the next steps. It’s important to handle the latch with care to avoid any damage. Once you have identified the battery release latch, you’re ready to move on to the next step!
Step 4: Release the battery latch
With the battery release latch located, it’s time to safely release it to remove the battery from your HP Envy Ultrabook 4-1043Cl. Follow these steps to release the battery latch:
- Ensure the laptop is still flipped over: Make sure your laptop is still turned upside down, with the bottom panel facing up.
- Locate the battery release latch: Refer back to the area where you previously identified the battery release latch.
- Slide or flip the battery release latch: Depending on the design of your HP Envy Ultrabook 4-1043Cl, the battery release latch may require sliding it to one side or flipping it up or down. Follow the indicated direction to release the latch.
- Hold the battery release latch in the unlocked position: Once the latch is released, hold it in the unlocked position. This ensures that the latch doesn’t re-engage while you’re removing the battery.
Releasing the battery latch is a crucial step in safely removing the battery. Take your time and be gentle while manipulating the latch to avoid any damage. It’s important to keep the latch in the unlocked position throughout the battery removal process. Once the latch is released and held in place, you’re now ready to proceed with actually removing the battery in the next step!
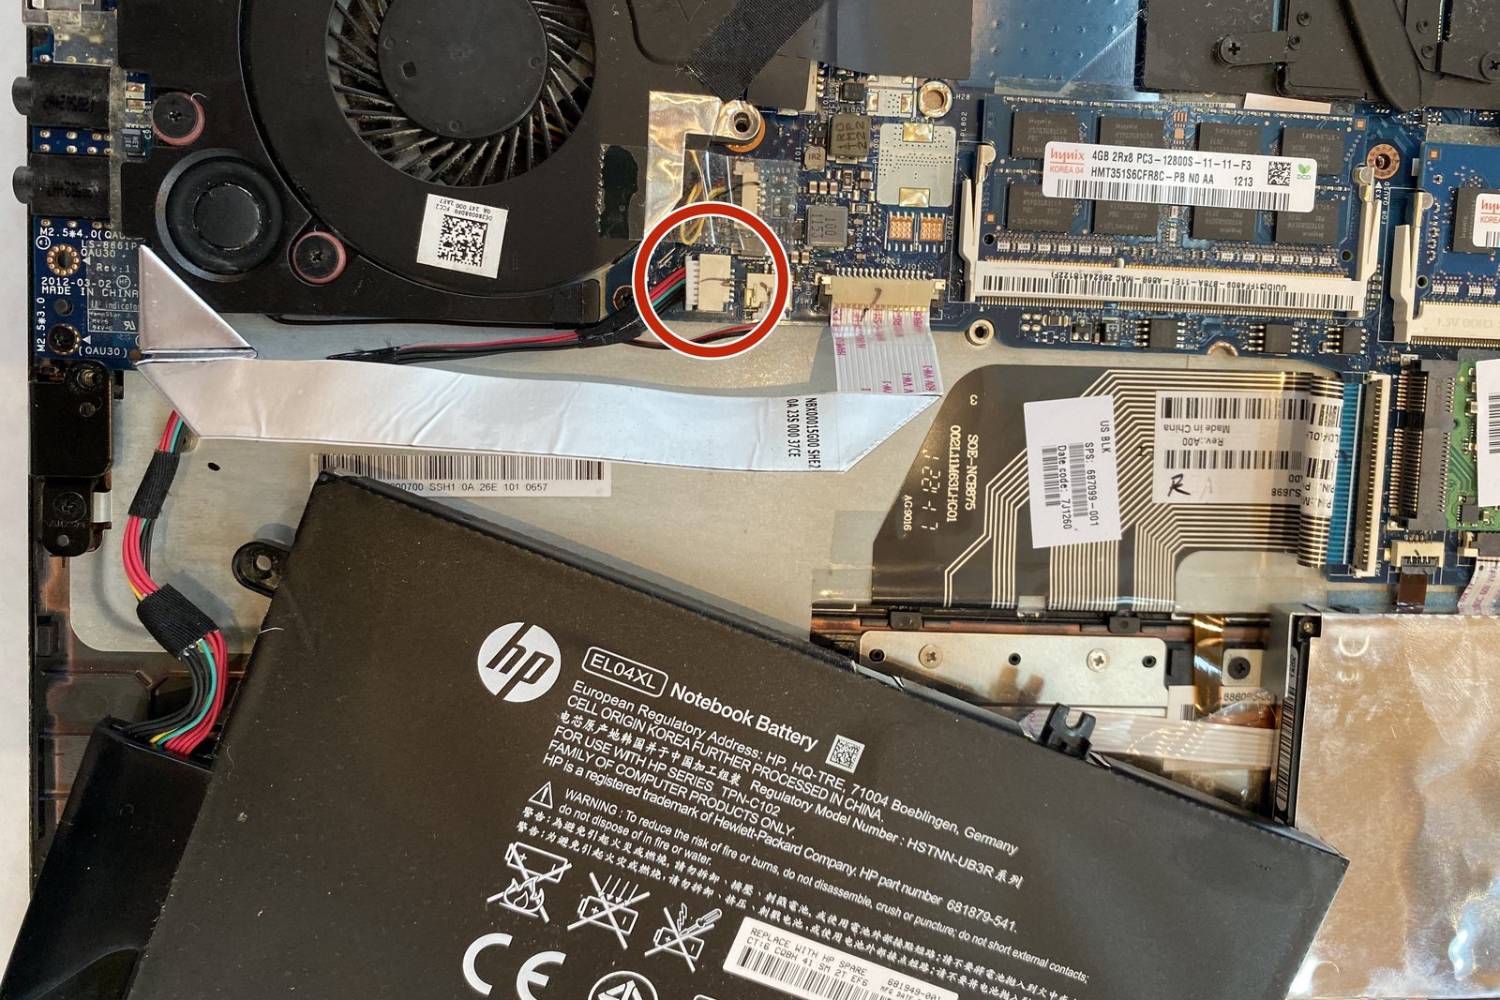
Step 5: Remove the battery
Now that the battery release latch is unlocked, it’s time to remove the battery from your HP Envy Ultrabook 4-1043Cl. Follow these steps carefully to ensure a smooth and safe removal:
- Hold the laptop securely: With one hand on the bottom panel and the other on the keyboard, hold your HP Envy Ultrabook 4-1043Cl securely to provide stability while removing the battery.
- Align your fingers: Locate the edges or sides of the battery within the battery compartment. Align your fingers with the edges for a secure grip.
- Gently lift the battery: Using a gentle and steady motion, lift the battery out of the compartment. Apply equal pressure on both edges to avoid any unnecessary strain or imbalance.
- Set the battery aside: Once the battery is removed, place it on a clean and static-free surface. This will ensure the battery remains safe and prevent any potential damage.
Take your time when removing the battery to prevent any accidental damage. Be cautious to maintain a firm grip and avoid dropping the battery. Make sure to set the battery aside in a safe place to keep it protected. With the battery successfully removed from your HP Envy Ultrabook 4-1043Cl, you can now proceed to the next step!
Step 6: Reassemble the laptop
After successfully removing the battery from your HP Envy Ultrabook 4-1043Cl, it’s time to reassemble the laptop. Follow these steps to ensure that everything is back in place:
- Place the battery back into the compartment: Align the battery with the compartment and gently slide it back into place. Ensure that the battery is securely seated and fits snugly, without any gaps.
- Lock the battery in place: If your laptop has a battery release latch, now is the time to lock it back into position. Simply flip the latch or slide it to secure the battery in place.
- Flip the laptop back over: Carefully turn your laptop back over, so that the keyboard is facing up, and place it on a stable surface.
- Connect the power adapter: Plug in the power adapter to provide power to your laptop. Ensure that the connection is secure.
- Power on your laptop: Press the power button to turn on your HP Envy Ultrabook 4-1043Cl. Wait for the operating system to load, and check that the laptop is functioning properly.
- Verify the battery status: Once your laptop is powered on, check the battery status to ensure it is recognized and charging as expected.
By following these steps, you have successfully reassembled your laptop after removing the battery. It’s important to double-check everything to ensure that all components are in their proper place. Now you can resume using your HP Envy Ultrabook 4-1043Cl with the battery securely back in its compartment. Congratulations on completing the process!
Conclusion
Removing the battery from your HP Envy Ultrabook 4-1043Cl might seem like a daunting task, but by following the step-by-step guide provided here, you can do it with ease and confidence. Remember to handle your laptop with care throughout the process to avoid any damage to its components.
We started by preparing the laptop, ensuring it was powered off, and locating the battery release latch. We then proceeded to release the latch and safely remove the battery. After that, we reassembled the laptop, locked the battery in place, and powered it on to ensure everything was working correctly.
It’s important to note that the steps described in this guide are specific to the HP Envy Ultrabook 4-1043Cl. If you have a different model, the process may vary slightly. It’s always a good idea to consult the user manual or seek assistance from the manufacturer if you are unsure.
By following these instructions, you have successfully learned how to take the battery out of an HP Envy Ultrabook 4-1043Cl. Whether you need to replace the battery or perform maintenance on your laptop, you now have the knowledge and confidence to do so. Remember to exercise caution and follow the steps carefully to ensure a smooth battery removal process.
Thank you for using this guide, and we hope it has been helpful to you. If you have any further questions or need additional assistance, feel free to reach out for support. Happy computing!