Introduction
Welcome to our guide on how to replace the keyboard on an HP Ultrabook. Over time, keyboards can become worn, damaged, or unresponsive, making it difficult or impossible to work efficiently. Fortunately, replacing a keyboard on an HP Ultrabook is a relatively straightforward process that can be done by following a few simple steps.
Before we dive into the steps, it’s worth noting that anyone attempting to replace their keyboard should exercise caution and take their time. It’s important to ensure that you have the necessary tools and materials and follow each step carefully to avoid any accidental damage or further issues.
In this guide, we will walk you through each of the steps necessary to replace the keyboard on an HP Ultrabook successfully. We’ll cover everything from gathering the tools and materials needed to disconnecting the old keyboard and installing the new one.
Replacing the keyboard on an HP Ultrabook can be a cost-effective solution compared to purchasing a new laptop. It allows you to continue using the Ultrabook you’re familiar with while enjoying the benefits of a fully functional keyboard. Even if you’re not particularly tech-savvy, with some patience and attention to detail, you can accomplish this task.
So, if you’re ready to take on the challenge, let’s get started with gathering the necessary tools and materials!
Step 1: Gather the necessary tools and materials
Before you begin replacing the keyboard on your HP Ultrabook, it’s essential to have the right tools and materials at your disposal. Here’s a list of what you’ll need:
1. Screwdriver: Make sure you have a small Phillips head screwdriver, as most laptops use this type of screw for securing the keyboard. You can also check the specific screw size required for your HP Ultrabook model.
2. Replacement keyboard: Purchase a compatible replacement keyboard for your HP Ultrabook. It’s crucial to ensure that the keyboard matches the model and layout of your existing keyboard to ensure a proper fit.
3. Anti-static wrist strap: While not mandatory, wearing an anti-static wrist strap during the replacement process can help prevent any static electricity from damaging sensitive components of the Ultrabook. This is especially important if you’re working on a carpeted or static-prone surface.
4. Soft cloth or towel: Having a soft cloth or towel nearby can be handy for placing the disconnected keyboard or providing a clean surface to work on.
5. Container or magnetic tray: It’s a good idea to have a small container or magnetic tray to store the screws that you will remove during the process. This will help prevent them from getting lost and make reassembly easier.
Once you’ve gathered all the necessary tools and materials, you’re ready to move on to the next step: powering off the HP Ultrabook and disconnecting all peripherals.
Step 2: Power off the HP Ultrabook and disconnect all peripherals
Before you begin replacing the keyboard on your HP Ultrabook, it’s important to ensure that it is powered off and all peripherals are disconnected. This will help prevent any accidental damage and ensure your safety during the process. Follow these steps:
1. Save your work and close all applications: Make sure you save any important files and close all running applications to avoid data loss or corruption.
2. Shut down the Ultrabook: Click on the “Start” button, then select “Shutdown” from the options. Allow the Ultrabook to power down completely.
3. Disconnect the power adapter: Unplug the power adapter from the Ultrabook and remove any other external power sources. This will ensure a safe working environment and prevent any electrical mishaps.
4. Remove any USB devices or cables: Disconnect any USB devices or cables, such as a mouse, external hard drive, or printer. This will prevent any interference or accidental damage to these peripherals.
5. Remove the battery (if applicable): If your HP Ultrabook has a removable battery, carefully remove it by following the manufacturer’s instructions. This step may not be applicable to all Ultrabook models, as some have integrated or non-removable batteries.
By powering off the Ultrabook and disconnecting all peripherals, you ensure a safe working environment and minimize the risk of any electrical damage. Once you have completed this step, you can proceed to the next step: removing the battery from the Ultrabook.
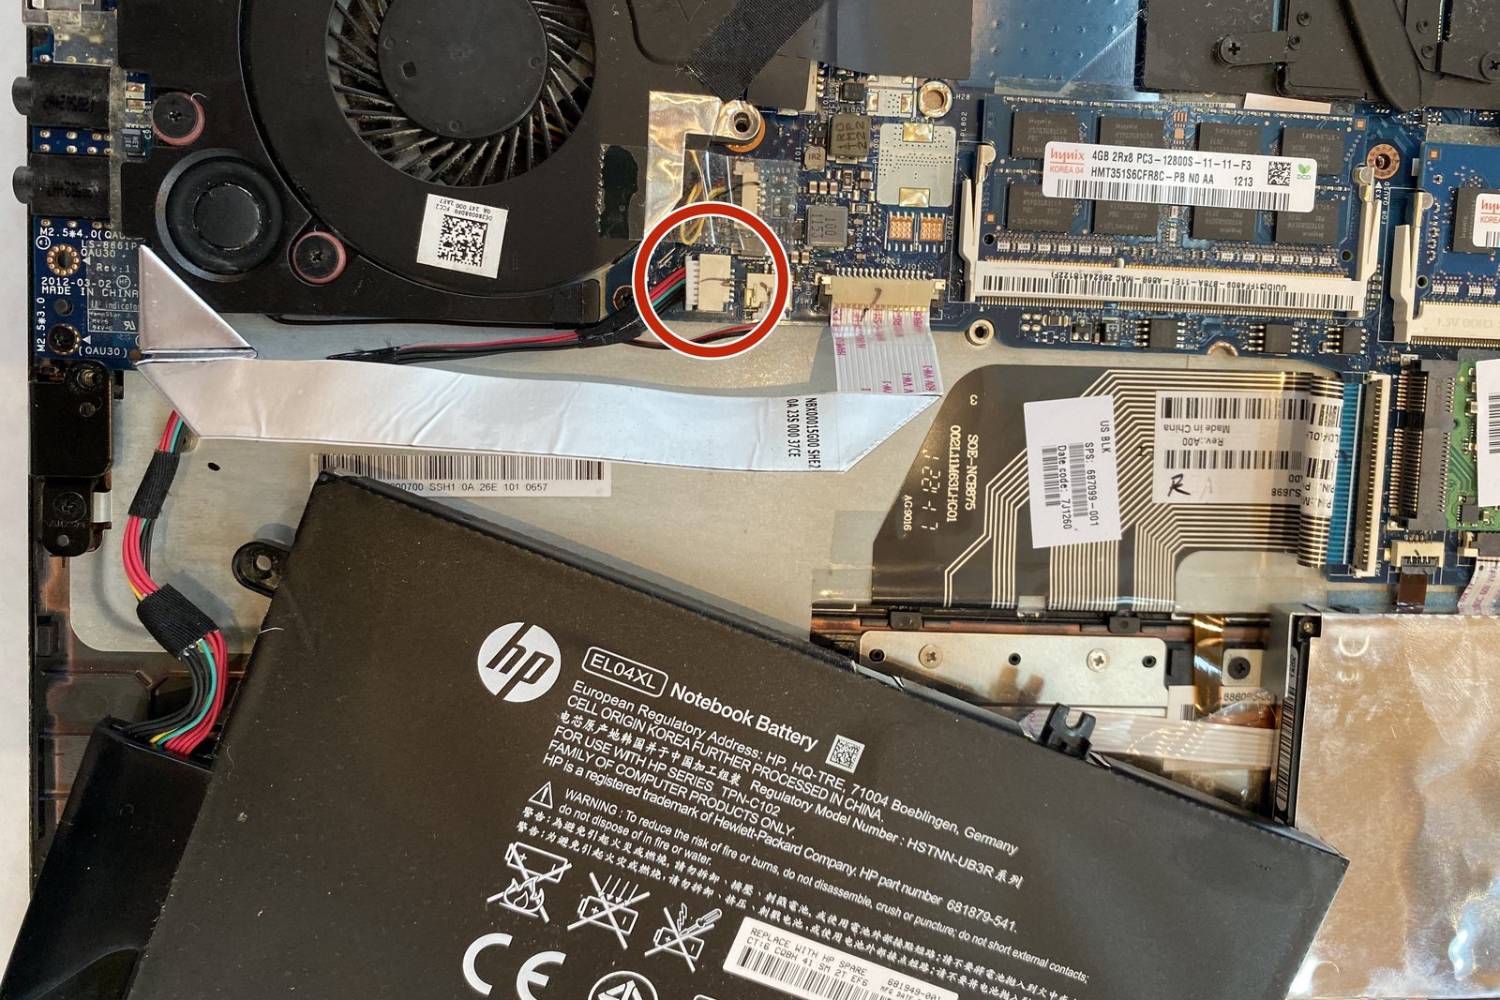
Step 3: Remove the battery from the Ultrabook
Before you start disassembling the keyboard of your HP Ultrabook, it’s important to remove the battery. This step ensures your safety and prevents any accidental damage to the internal components. Here’s how you can remove the battery:
1. Refer to the manufacturer’s instructions: Different HP Ultrabook models may have varying methods for removing the battery. It’s crucial to consult your laptop’s user manual or visit the manufacturer’s website for specific instructions.
2. Power off the Ultrabook (if not already done): Make sure the Ultrabook is powered off completely before attempting to remove the battery. Refer to Step 2 for instructions on how to power off the device.
3. Locate the battery release button or latch: Depending on your Ultrabook model, there may be a battery release button or latch that secures the battery in place. It is typically located on the bottom of the device or near the battery compartment.
4. Press the battery release button or slide the latch: Gently press the battery release button or slide the latch in the designated direction as indicated by the arrow or instructions next to it. This action should unlock the battery from its position.
5. Remove the battery: Once the battery is unlocked, carefully lift it out of its compartment using your fingertips. Take care not to tug or pull forcefully, as this may damage the battery or Ultrabook.
By removing the battery, you ensure that there is no power running through the Ultrabook, minimizing the risk of electrical shock or damage during the keyboard replacement process. Keep the battery in a safe place during the procedure, as you will need to reinsert it later. Now that you’ve successfully removed the battery, you can proceed to the next step: locating and removing the screws securing the keyboard.
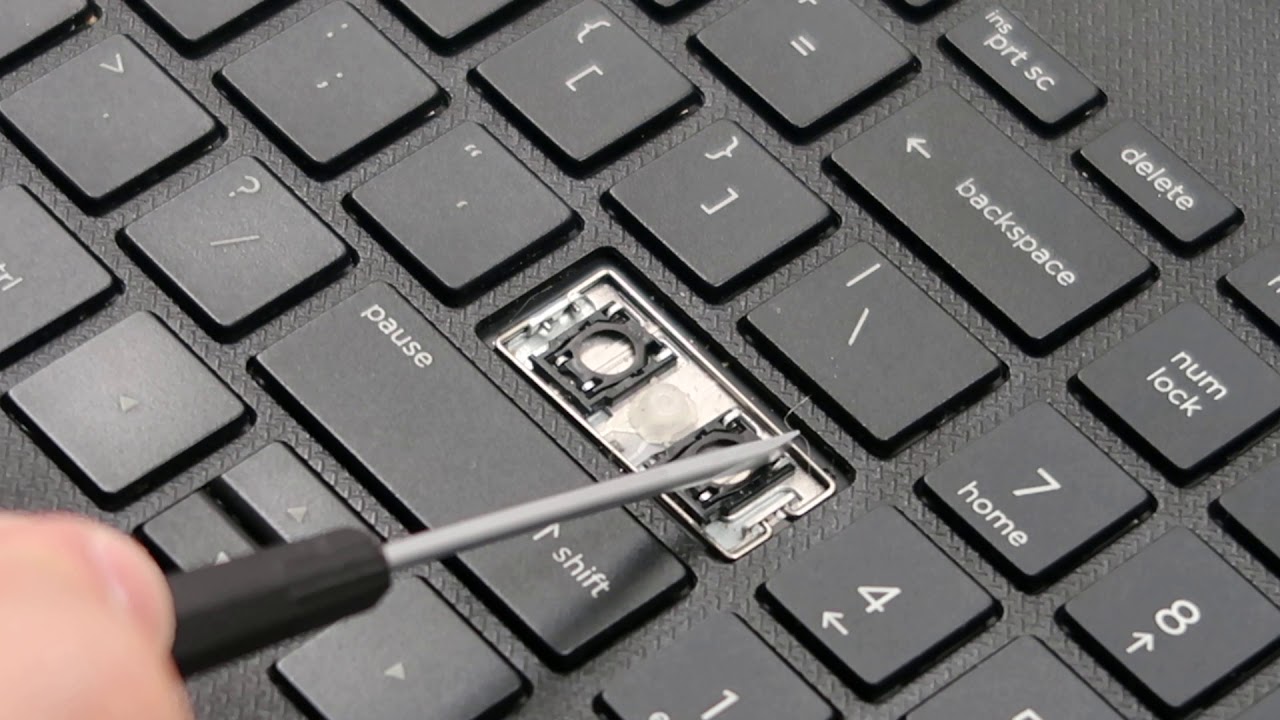
Step 4: Locate and remove the screws securing the keyboard
With the battery removed, it’s time to locate and remove the screws that secure the keyboard in place. These screws ensure that the keyboard remains firmly attached to the Ultrabook. Follow these steps to proceed:
1. Examine the keyboard bezel: The keyboard bezel is the plastic frame that surrounds the keyboard. Carefully inspect the edges of the keyboard to locate any screws or fasteners that are holding it in place. The number and placement of screws may vary depending on your Ultrabook model.
2. Remove the screws: Using a small Phillips head screwdriver, unscrew the screws that are securing the keyboard. Place the screws in a container or magnetic tray to keep them organized and prevent them from getting lost. It’s important to keep track of which screw goes where, as different screws may have different lengths or threading.
3. Keep an eye out for hidden screws: Some Ultrabook models may have hidden screws or fasteners that are not immediately visible. These may be located under stickers or rubber feet near the keyboard bezel. Carefully peel back any stickers or remove the rubber feet to reveal hidden screws and remove them as well.
4. Separate the keyboard bezel (if necessary): In some cases, the keyboard bezel may be attached to the top cover of the Ultrabook. If this is the case, gently pry the keyboard bezel away from the top cover using a plastic or nylon spudger tool. Take your time and apply even pressure to avoid damaging the plastic bezel or other components.
By locating and removing the screws securing the keyboard, you are one step closer to successfully replacing it. Make sure to keep the screws organized and take note of their placement for reassembly. In the next step, we will guide you through carefully lifting the keyboard and disconnecting the ribbon cable.
Step 5: Carefully lift the keyboard and disconnect the ribbon cable
Now that you have removed the screws securing the keyboard, it’s time to carefully lift the keyboard and disconnect the ribbon cable. Follow these steps to proceed:
1. Locate the ribbon cable connector: The ribbon cable is a flat, flexible cable that connects the keyboard to the motherboard. It is usually located near the center or bottom of the keyboard. Take a moment to locate the ribbon cable and its connector.
2. Gently lift the keyboard: Starting from one end of the keyboard, gently lift it up, applying even pressure along its length. Be careful not to lift it too forcefully or at an extreme angle, as this may damage the ribbon cable or its connector.
3. Disconnect the ribbon cable: With the keyboard lifted, you will now have access to the ribbon cable connector. Most ribbon cable connectors have a small latch or locking mechanism that secures the cable in place. Gently lift or slide the latch to unlock the ribbon cable. Once unlocked, carefully pull the ribbon cable connector away from its socket to disconnect it from the motherboard.
4. Set aside the old keyboard: Once the ribbon cable is detached, set aside the old keyboard on a soft cloth or towel to prevent any scratches or damage to the surface.
By carefully lifting the keyboard and disconnecting the ribbon cable, you have successfully separated the keyboard from the Ultrabook. Take extra care when handling the ribbon cable and its connector to avoid any damage. In the next step, we will guide you through aligning the new keyboard and connecting the ribbon cable.
Step 6: Align the new keyboard and connect the ribbon cable
Now that you have removed the old keyboard, it’s time to align the new keyboard and connect the ribbon cable. Follow these steps to proceed:
1. Inspect the new keyboard: Before installing the new keyboard, take a moment to inspect it and ensure that it matches the model and layout of your old keyboard. Check for any visible defects or damage.
2. Align the new keyboard: Carefully position the new keyboard in the designated area, ensuring that it aligns properly with the screw holes and the edges match up with the keyboard bezel. Take your time to ensure a precise fit.
3. Connect the ribbon cable: Locate the ribbon cable connector on the new keyboard and the corresponding socket on the motherboard. Align the ribbon cable connector with the socket, making sure it is facing the correct way. Gently push the connector into the socket until it is fully seated. You may need to apply slight pressure to ensure a secure connection.
4. Secure the ribbon cable: Most ribbon cable connectors have a latch or locking mechanism. Make sure the ribbon cable connector is securely locked in place by lowering or sliding the latch. This ensures that the ribbon cable remains connected during use and prevents any accidental disconnection.
By aligning the new keyboard and connecting the ribbon cable, you are one step closer to completing the replacement process. Take care to align the keyboard properly and ensure a secure connection with the ribbon cable. In the next step, we will guide you through securing the keyboard back into place with screws.
Step 7: Secure the keyboard back into place with screws
With the new keyboard and ribbon cable properly connected, it’s time to secure the keyboard back into place using screws. Follow these steps to proceed:
1. Retrieve the screws: Refer to the container or magnetic tray where you stored the screws removed earlier. Take note of the specific screws that were used to secure the keyboard, as different models may have different screw sizes or threading.
2. Align the screw holes: Carefully align the screw holes on the new keyboard with the corresponding holes on the Ultrabook’s top cover. Ensure that the keyboard sits flat and evenly against the surface, without any gaps or misalignment.
3. Insert the screws: Using a small Phillips head screwdriver, insert the screws into the designated screw holes, starting from one end and working your way to the other. Apply gentle pressure until the screw is securely in place, but avoid overtightening, as it can damage the threads or the keyboard itself.
4. Double-check the alignment: After inserting all the screws, double-check the alignment of the keyboard. Make sure it is still properly seated and securely attached to the top cover of the Ultrabook. Adjust the screws if necessary to achieve the desired alignment.
5. Perform a visual inspection: Take a moment to visually inspect the keyboard and surrounding area. Look for any loose screws or misalignment. If everything looks good, proceed to the next step.
By securing the keyboard back into place with screws, you ensure that it remains firmly attached to the Ultrabook’s top cover. Take care not to overtighten the screws, as this can cause damage. In the next step, we will guide you through reinserting the battery and reassembling the Ultrabook.
Step 8: Reinsert the battery and reassemble the Ultrabook
With the keyboard securely in place, it’s time to reinsert the battery and reassemble your HP Ultrabook. Follow these steps to proceed:
1. Retrieve the battery: If you removed the battery earlier, locate it in a safe place and ensure it is free from any dust or debris. Take note of the battery’s orientation, as it must be inserted correctly.
2. Align the battery: Carefully align the battery with the battery compartment in the Ultrabook, ensuring the connectors on the battery align with the corresponding ports in the compartment. Be gentle when inserting the battery to avoid bending any connectors or causing damage.
3. Insert the battery: Once properly aligned, gently slide the battery into the compartment until it is fully seated. It should fit snugly without any gaps. If your Ultrabook has a latch or locking mechanism for the battery, make sure it is securely locked in place.
4. Reassemble the Ultrabook: If you had to remove any components or accessories, such as rubber feet or stickers, during the disassembly process, reattach them to their original positions. Take care to ensure they are securely in place and do not interfere with the keyboard or other components.
5. Perform a visual inspection: Before powering on the Ultrabook, perform a visual inspection of the reassembled components. Check for any loose parts, misalignment, or anything that looks out of place. If everything appears in order, you are ready to move on to the next step.
By reinserting the battery and reassembling your Ultrabook, you are one step closer to completing the keyboard replacement process. Take your time to ensure that all components are properly aligned and securely in place. In the next step, we will guide you through powering on the Ultrabook and testing the new keyboard.
Step 9: Power on the Ultrabook and test the new keyboard
Now that you have reassembled your HP Ultrabook, it’s time to power it on and test the new keyboard. Follow these steps to complete the final stage of the replacement process:
1. Connect the power adapter: Plug in the power adapter to provide a power source for your Ultrabook. Ensure that it is securely connected to both the Ultrabook and a power outlet.
2. Power on the Ultrabook: Press the power button on your Ultrabook to turn it on. Wait for the device to boot up and reach the login screen or desktop. This may take a few moments.
3. Test the keyboard functionality: Begin by typing on the keyboard and observing the response. Test each key to ensure that it registers properly and functions as expected. Pay attention to any keys that may feel sticky, unresponsive, or produce unusual characters.
4. Test special keys and functions: Some Ultrabooks have special function keys or multimedia keys that perform specific functions like adjusting volume, brightness, or launching applications. Test these keys to ensure they are working correctly.
5. Observe any issues: If you encounter any issues with the new keyboard, such as keys not working or unusual behavior, double-check the ribbon cable connection and ensure it is securely seated in the motherboard socket. If problems persist, consult the manufacturer’s support or consider contacting a professional for assistance.
By power
Conclusion
Congratulations! You have successfully replaced the keyboard on your HP Ultrabook. By following the steps in this guide, you have learned how to gather the necessary tools and materials, power off the Ultrabook, remove the battery, locate and remove the screws securing the keyboard, lift the keyboard and disconnect the ribbon cable, align the new keyboard and connect the ribbon cable, secure the keyboard back into place with screws, reinsert the battery, and reassemble the Ultrabook. Finally, you powered on the Ultrabook and tested the new keyboard for functionality.
Replacing the keyboard on an HP Ultrabook can be a cost-effective solution that allows you to continue using your laptop with a fully functional keyboard. However, it is important to approach the process with caution and attention to detail. Take your time, follow the steps carefully, and exercise patience to avoid any accidental damage during the replacement process.
We hope that this guide has been helpful to you in replacing the keyboard on your HP Ultrabook. Remember, if you encounter any issues or difficulties, it is always recommended to consult the manufacturer’s support or seek assistance from a professional. With your newly installed keyboard, you can now resume using your Ultrabook with renewed productivity and convenience.