Introduction
Welcome to this guide on how to remove AirPods from your Apple ID. Apple AirPods are a popular wireless earbud option for many Apple users. When you connect your AirPods to your Apple ID, they become associated with your account and can be easily tracked through Find My iPhone app. However, there may be instances when you need to remove your AirPods from your Apple ID, such as when you want to sell or give them away, or if you encounter any issues with device synchronization.
Removing AirPods from your Apple ID is a straightforward process that can be done using your iPhone or a computer. In this article, we will walk you through three different methods to remove AirPods from your Apple ID: using your iPhone, using a computer, and using the Find My iPhone app. By following these steps, you can ensure that your AirPods are no longer associated with your Apple ID and are ready for a new user.
It is important to note that removing your AirPods from your Apple ID will not impact their functionality or any other features. It solely disconnects them from your Apple ID and removes them from the list of devices in your iCloud account.
Now, let’s dive into the different methods you can use to remove AirPods from your Apple ID and ensure a smooth transition for your wireless earbuds.
Method 1: Removing AirPods from Apple ID using your iPhone
If you have your iPhone handy, you can conveniently remove your AirPods from your Apple ID directly from your device. Follow the steps below:
- On your iPhone, open the “Settings” app from your home screen.
- Scroll down and tap on your Apple ID, which is located at the top of the Settings menu.
- In the Apple ID menu, tap on the “iCloud” option.
- Scroll down the iCloud settings page and find “AirPods” in the list of apps using iCloud.
- Tap on “AirPods” to access the options for your AirPods.
- On the AirPods settings page, you will see a list of all the AirPods connected to your Apple ID. Tap on the AirPods that you want to remove.
- A new screen will appear with detailed information about the selected AirPods. At the bottom, you will find the option to “Forget This Device”. Tap on it.
- A confirmation pop-up will appear. To confirm the removal of your AirPods from your Apple ID, tap on “Forget”.
After following these steps, your AirPods will be disconnected from your Apple ID and removed from the list of devices associated with your iCloud account. You can now pair them with a different device or give them to someone else without any worry of them being linked to your account.
Note that removing your AirPods from your Apple ID using this method does not unpair them from your iPhone or reset their settings. To completely unpair your AirPods from your iPhone, you can go to the Bluetooth settings and select “Forget This Device” for the specific AirPods.
Method 2: Removing AirPods from Apple ID using a computer
If you prefer to remove your AirPods from your Apple ID using a computer, you can do so by following these steps:
- Open a web browser on your computer and go to the iCloud website (www.icloud.com).
- Sign in to your iCloud account using your Apple ID and password.
- Once you are logged in, click on the “Account Settings” icon.
- In the Account Settings menu, scroll down and find the “My Devices” section. Look for the AirPods that you want to remove from your Apple ID.
- Click on the AirPods that you wish to remove.
- A new window will open with detailed information about the selected AirPods. At the bottom of the window, you will see an option to “Remove from Account”. Click on it.
- A confirmation pop-up will appear. To confirm the removal of your AirPods from your Apple ID, click on “Remove”.
After completing these steps, your AirPods will be successfully removed from your Apple ID. You can then connect them to a different device or give them to someone else, knowing that they are no longer associated with your iCloud account.
Remember that removing your AirPods from your Apple ID using this method will not unpair them from any connected devices. To unpair your AirPods from a specific device, you will need to do so directly from the Bluetooth settings on that device.
Using a computer to remove your AirPods from your Apple ID provides a convenient way to manage your devices and accounts, especially if you don’t have your iPhone readily available. Now, let’s explore an alternative method using the Find My iPhone app.
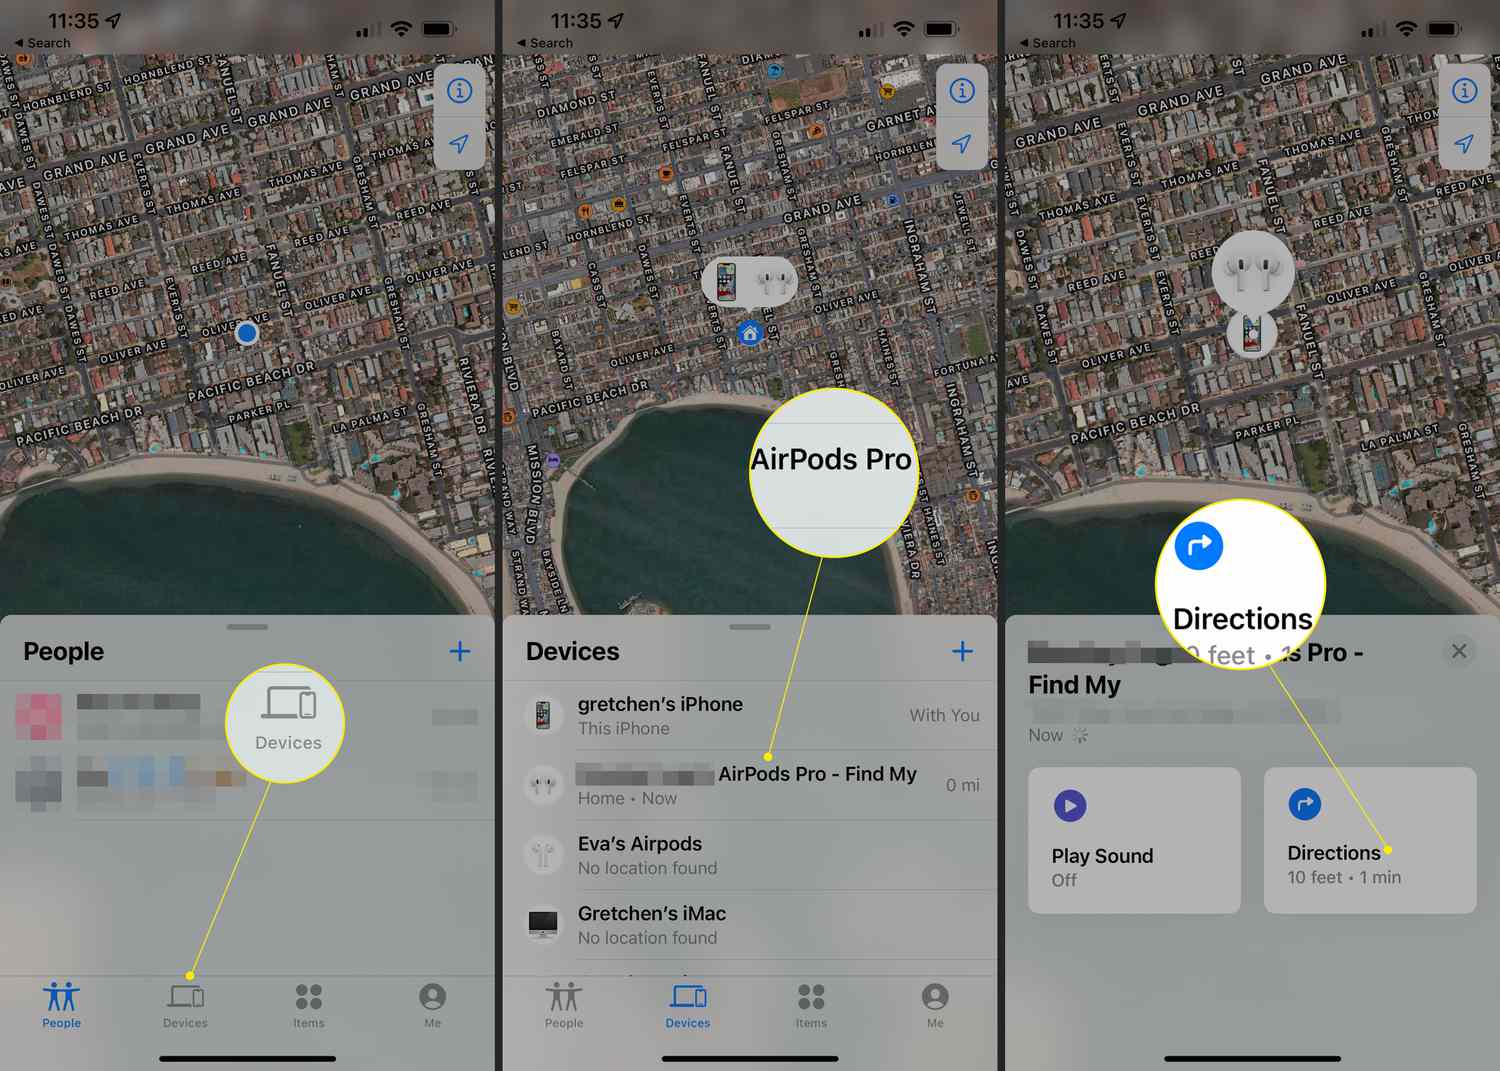
Method 3: Removing AirPods from Apple ID using Find My iPhone app
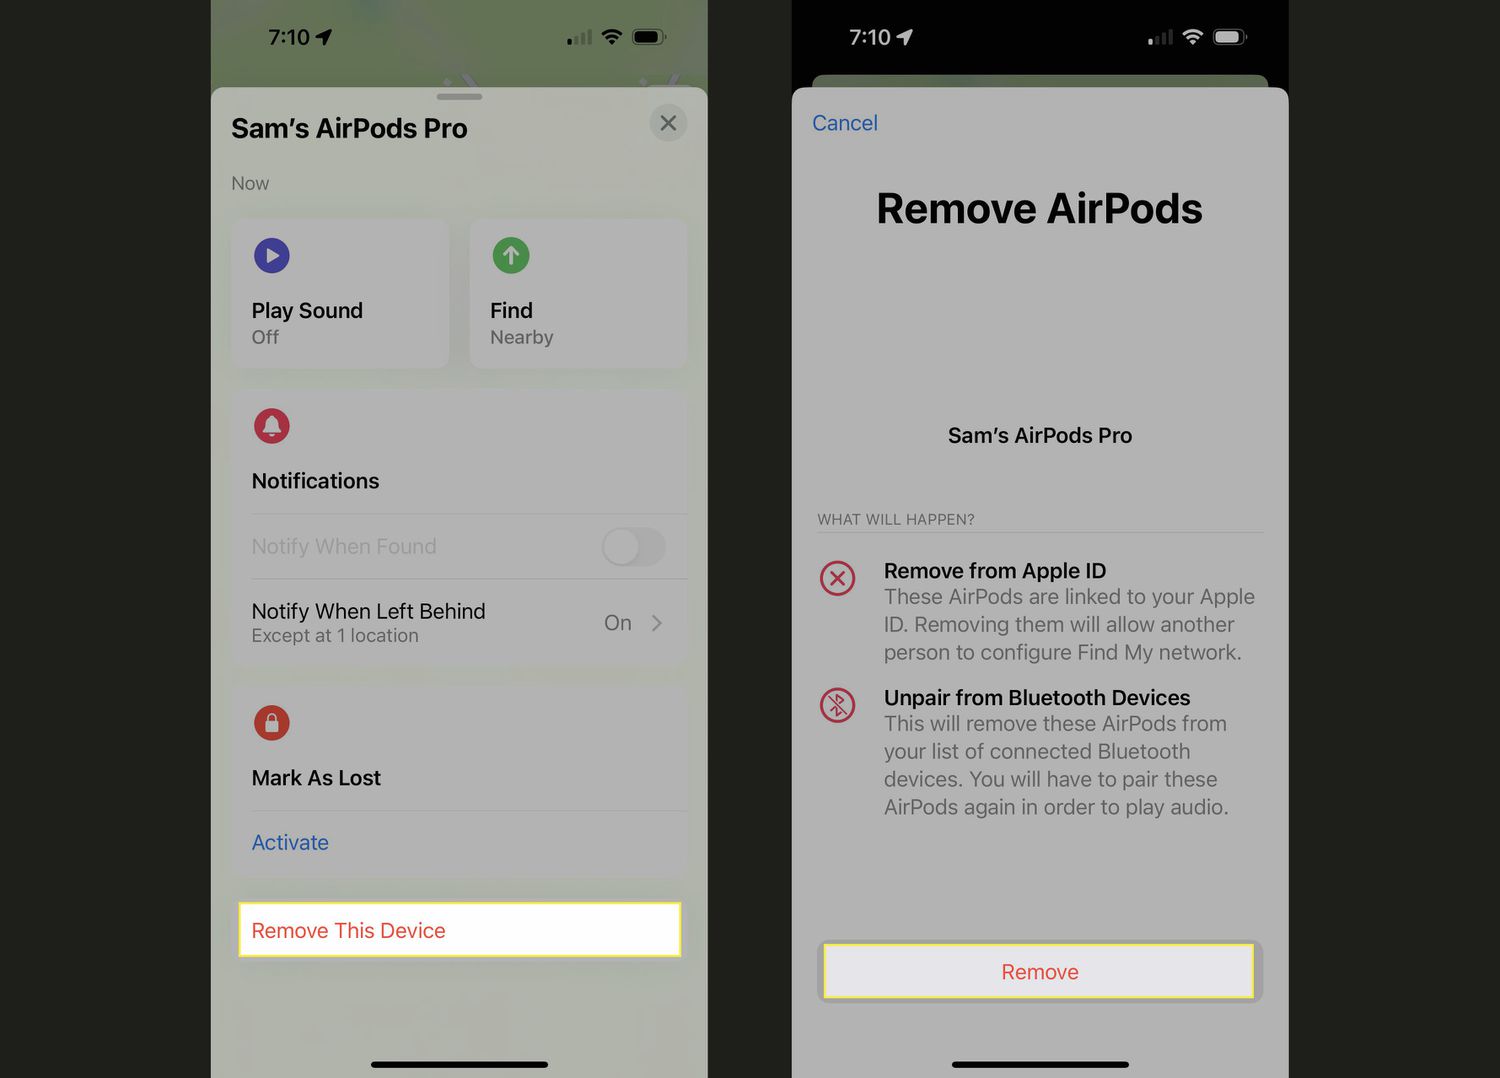
If you have the Find My iPhone app installed on your iPhone or iPad, you can use it to remove your AirPods from your Apple ID. Here’s how:
- Open the Find My iPhone app on your device.
- Sign in to your iCloud account using your Apple ID and password.
- Once you are logged in, you will see a list of your devices. Tap on the “AirPods” option in the list.
- In the AirPods settings page, you will find the option to “Remove This Device”. Tap on it.
- A confirmation pop-up will appear on the screen. To confirm the removal of your AirPods from your Apple ID, tap on “Remove”.
By following these steps, your AirPods will be disconnected from your Apple ID and removed from the list of devices associated with your iCloud account. This allows you to pair them with a different device or give them to someone else without any worry of them being linked to your account.
It’s worth noting that using the Find My iPhone app to remove your AirPods from your Apple ID also has the option to play a sound on your AirPods to help you locate them if they are nearby. This can be helpful if you have misplaced your AirPods and need assistance in finding them.
Now that you know how to remove your AirPods from your Apple ID using the Find My iPhone app, you have another convenient method at your disposal to manage your devices and accounts.
Conclusion
Removing your AirPods from your Apple ID is a simple process that can be done using your iPhone, a computer, or the Find My iPhone app. Whether you are looking to sell your AirPods, give them to someone else, or troubleshoot any connection issues, these methods provide you with the flexibility to manage your devices and accounts.
If you have your iPhone on hand, you can easily remove your AirPods from your Apple ID by accessing the iCloud settings. Alternatively, using a computer allows you to remove your AirPods through the iCloud website. Finally, the Find My iPhone app offers an easy and convenient way to remove your AirPods from your Apple ID, as well as locate them if they are nearby.
It’s important to note that removing your AirPods from your Apple ID does not impact their functionality or any other features. It simply disconnects them from your account and removes them from the list of devices associated with your iCloud account.
By following the steps outlined in this guide, you can ensure that your AirPods are no longer tied to your Apple ID and are ready for the next user. Whether you’re upgrading to a new pair of AirPods, sharing your AirPods with a family member, or parting ways with them altogether, removing them from your Apple ID is a necessary step.
Remember, if you wish to pair your AirPods with another device, you will need to follow the appropriate pairing process specific to that device.
Now that you are equipped with the knowledge on how to remove your AirPods from your Apple ID, you can confidently manage your devices and accounts with ease and efficiency.