Introduction
Welcome to this guide on how to reference a cell in another sheet in Google Sheets. Google Sheets is a powerful spreadsheet tool that allows you to organize and analyze data. One of its key features is the ability to reference cells, which enables you to perform calculations and manipulate data across different sheets within the same workbook. Whether you want to link data between sheets or perform complex calculations using data from multiple sheets, mastering this skill can greatly enhance your productivity.
Referencing a cell in another sheet can be useful in various scenarios. For instance, you may want to create a summary sheet that pulls data from multiple sheets, or you may need to perform calculations across different sheets. By referencing a cell in another sheet, you can easily update and manipulate the data without having to manually enter or copy it.
Throughout this guide, we will explore different methods you can use to reference a cell in another sheet in Google Sheets. These methods range from using the sheet name and cell reference to using the sheet ID and range reference. Each method has its advantages and can be used depending on your specific requirements. By the end of this guide, you will have a solid understanding of how to reference cells in different sheets and be able to leverage this knowledge in your own projects.
Method 1: Using the Sheet Name
One of the simplest ways to reference a cell in another sheet is by using the sheet name. Each sheet in Google Sheets has a unique name, which can be used to identify and reference the sheet in formulas.
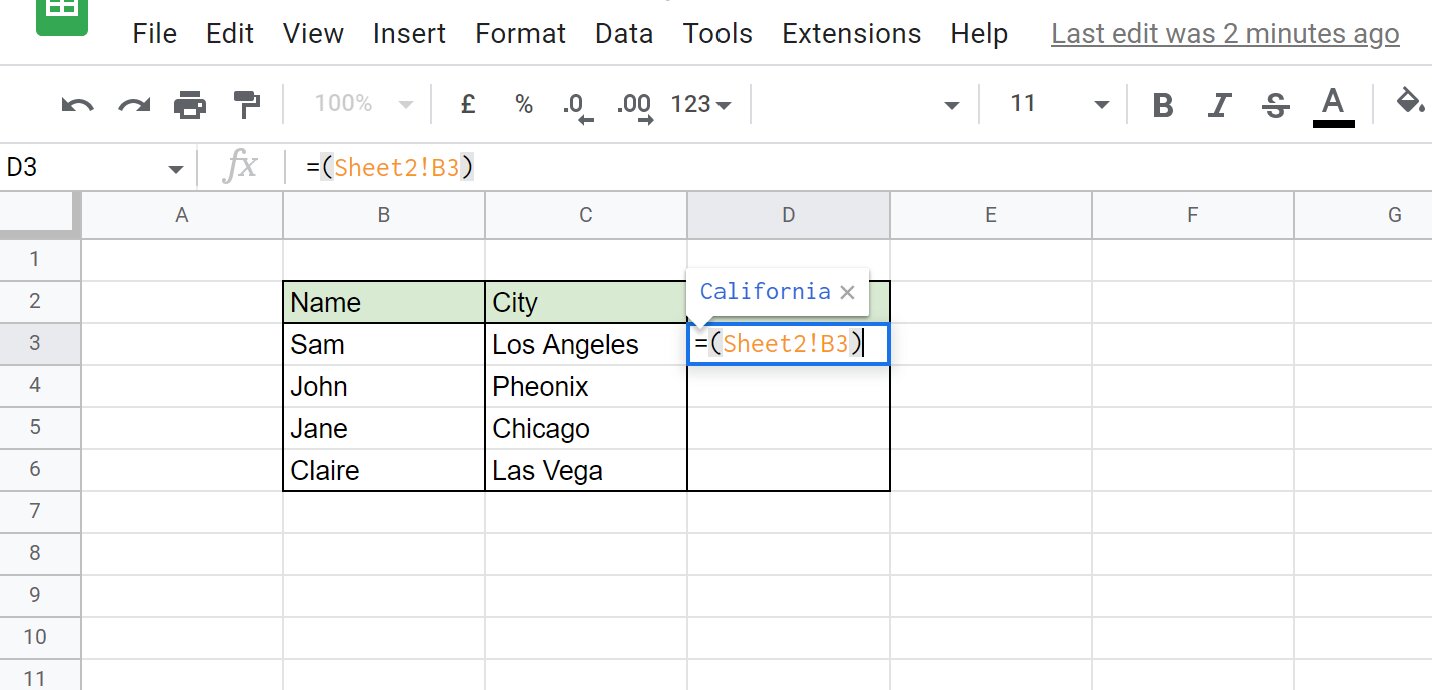
To reference a cell in another sheet using the sheet name, start by typing the sheet name followed by an exclamation mark (!), and then the cell reference.
For example, let’s say you have a sheet named “Sales” and you want to reference cell A1 in that sheet. In the cell where you want to display the reference, type =Sales!A1. This formula tells Google Sheets to fetch the value from cell A1 in the “Sales” sheet and display it in the current cell.
It’s important to ensure that you type the sheet name correctly, including any spaces or special characters. If the sheet name has spaces or special characters, you need to enclose it in single quotes. For example, if the sheet name is “Quarter 1 Sales”, the formula would be ='Quarter 1 Sales'!A1.
When using the sheet name, it’s important to note that if you change the sheet name, the cell references will automatically update to reflect the new name. This can be particularly helpful when you have multiple sheets with similar formulas and need to make changes across all of them.
This method is straightforward and easy to use, especially when you have a limited number of sheets to work with. However, as the number of sheets increases, it can become tedious to manually type the sheet names in formulas. In such cases, there are other methods available that can simplify the process and make it more efficient.
Method 2: Using the Sheet Name with a Single Quote
In some cases, the sheet name may contain spaces, special characters, or start with a number. To ensure the correct cell reference, you can enclose the sheet name in single quotes.
When using the sheet name with a single quote, simply place a single quote before and after the sheet name, following the exclamation mark (!). This ensures that Google Sheets recognizes the sheet name as a single entity, even if it contains spaces or special characters.
For example, let’s say you have a sheet named “Quarter 1 Sales” and you want to reference cell A1 in that sheet. The formula would be 'Quarter 1 Sales'!A1. By enclosing the sheet name in single quotes, Google Sheets will correctly identify and reference the cell in the designated sheet.
Using the sheet name with a single quote can be particularly useful when dealing with sheet names that contain spaces, special characters, or start with a number. It ensures that the cell reference is accurate and allows you to work seamlessly with any type of sheet name.
Remember to use the exact sheet name, including any spaces, special characters, or capitalization, when using the single quote method. Google Sheets is case-insensitive when it comes to sheet names, so you don’t need to worry about matching the case precisely.
This method provides flexibility and allows you to reference cells in sheets with complex or unconventional names. It ensures the accuracy of the cell reference and simplifies the process of working with sheets that have unique names.
Method 3: Using the Sheet Name and Cell Reference
In addition to referencing a specific cell in another sheet, you can also reference a cell range by specifying both the sheet name and the range of cells.
To reference a cell range in another sheet using the sheet name and cell reference, start by typing the sheet name followed by an exclamation mark (!), and then the range of cells separated by a colon (:). For example, if you want to reference cells A1 to B5 in a sheet named “Sales”, the formula would be =Sales!A1:B5.
This method allows you to pull data from a specific range of cells in another sheet, which can be extremely useful for creating summaries or performing calculations across multiple sheets. By specifying the range of cells, you can easily manipulate and analyze data from different sheets without having to manually enter or copy it.
Just like with the previous methods, it’s crucial to ensure that you type the sheet name correctly, including any spaces or special characters. If needed, enclose the sheet name in single quotes to maintain accuracy.
Using the sheet name and cell reference method is ideal when you want to work with a range of cells from another sheet. It allows you to extract and manipulate data efficiently, making complex calculations and analysis much easier to perform.
By leveraging this method, you can harness the full potential of Google Sheets’ data manipulation capabilities and create dynamic and interactive spreadsheets.
Method 4: Using the Sheet Name and Range Reference
In Method 3, we learned how to reference a specific cell range in another sheet. In Method 4, we will explore how to reference a named range in another sheet by using the sheet name and range name.
In Google Sheets, you have the option to create named ranges, which are user-defined names given to a specific cell range. By using named ranges, you can easily reference and manipulate data across sheets without having to remember or type in the cell references each time.
To reference a named range in another sheet using the sheet name and range name, start by typing the sheet name followed by an exclamation mark (!), and then the range name. For example, if you have a named range called “Expenses” in a sheet named “Budget”, the formula would be =Budget!Expenses.
By using the sheet name and range reference method, you can easily access and utilize named ranges from different sheets. This method simplifies the process of working with complex data sets and allows for seamless collaboration, as each sheet can have its own set of named ranges.
It’s important to note that named ranges are specific to each individual sheet. Therefore, if you create a named range in one sheet, it cannot be directly accessed in another sheet unless you reference it using the sheet name along with the range name.
This method provides a convenient way to work with named ranges in different sheets, allowing you to organize and analyze data effectively. By leveraging named ranges, you can enhance the readability and maintainability of your formulas, making it easier to manage complex datasets within Google Sheets.
Method 5: Using the Sheet ID
In addition to referencing a cell or range in another sheet using the sheet name, Google Sheets provides the option to reference a sheet using its unique ID. The sheet ID is a system-generated identifier assigned to each sheet in a Google Sheets workbook.
To reference a cell or range in another sheet using the sheet ID, start by typing the sheet ID followed by an exclamation mark (!), and then the cell reference or range.
For example, if you have a sheet with the ID “1234567890” and you want to reference cell A1, the formula would be =1234567890!A1. Similarly, if you want to reference a range of cells such as A1 to B5, the formula would be =1234567890!A1:B5.
The sheet ID provides a unique identifier for each sheet, making it useful when you want to reference a specific sheet without relying on the sheet name. This can be particularly helpful in scenarios where the sheet names may change or if you are working with multiple sheets that have similar names.
Keep in mind that the sheet ID remains the same, even if the sheet name is modified. This ensures that your formulas retain their functionality, even if the sheet name is updated.
To find the sheet ID, you can refer to the URL of your Google Sheets document. The sheet ID can be found after the “/d/” part of the URL and before the next slash (“/”).
Using the sheet ID method allows for precise referencing, especially in situations where sheets may have similar names or if you want to ensure that formulas remain accurate even if sheet names are changed.
Method 6: Using the Sheet ID and Cell Reference
In Method 5, we learned how to reference a sheet using its unique ID. In Method 6, we will explore how to reference a specific cell in another sheet by combining the sheet ID with the cell reference.
To reference a specific cell in another sheet using the sheet ID and cell reference, start by typing the sheet ID followed by an exclamation mark (!), and then the cell reference. For example, if you have a sheet with the ID “1234567890” and you want to reference cell A1, the formula would be =1234567890!A1.
This method provides a reliable way to reference cells in different sheets, especially when the sheet names are subject to change or if you are working with multiple sheets that have similar names. By using the sheet ID in combination with the cell reference, you can ensure accuracy and precision in your formulas.
Using the sheet ID and cell reference method also comes in handy when you need to replicate formulas across multiple sheets with similar structures. Instead of typing the sheet names individually, you can simply copy and paste the formulas, modifying only the sheet ID and cell reference as necessary.
When using the sheet ID, it’s vital to remember that each sheet in your Google Sheets workbook has a unique identifier. Make sure to use the correct sheet ID for the desired sheet to ensure accurate cell referencing.
The sheet ID can be found in the URL of your Google Sheets document. Look for the part of the URL after “/d/” and before the next slash (“/”) to locate the sheet ID.
By leveraging the sheet ID and cell reference method, you can confidently reference cells in other sheets, even if their names change or if you are working with numerous sheets that have similar names.
Method 7: Using the Sheet ID and Range Reference
In Method 6, we explored how to reference a specific cell in another sheet using the sheet ID. In Method 7, we will delve into referencing a cell range in another sheet by combining the sheet ID with the range reference.
To reference a cell range in another sheet using the sheet ID and range reference, start by typing the sheet ID followed by an exclamation mark (!), and then the range reference separated by a colon (:). For example, if you have a sheet with the ID “1234567890” and you want to reference cells A1 to B5, the formula would be =1234567890!A1:B5.
This method allows you to extract data from a specific range in another sheet, similar to Method 3. The significant difference lies in using the sheet ID instead of the sheet name for referencing.
Using the sheet ID and range reference method provides a practical solution when working with multiple sheets that have similar names. It eliminates the possibility of errors caused by identical sheet names or accidental modifications to sheet names.
Similar to previous methods, it’s crucial to ensure that the sheet ID is accurate when using this method. Consult the URL of your Google Sheets document to locate the unique sheet ID assigned to each sheet. The sheet ID can be found after the “/d/” part of the URL and before the next slash (“/”).
By leveraging the sheet ID and range reference method, you can efficiently reference cell ranges in different sheets, ensuring data accuracy and streamlining your formulas. This method is particularly useful when dealing with complex datasets and when precise referencing is critical.
Conclusion
Referencing cells in other sheets is a valuable skill to have when working with Google Sheets. It allows you to organize and analyze data across different sheets, improving your ability to perform calculations, create summaries, and work with complex datasets. Throughout this guide, we explored seven methods to reference cells in another sheet: Using the Sheet Name, Sheet Name with a Single Quote, Sheet Name and Cell Reference, Sheet Name and Range Reference, Sheet ID, Sheet ID and Cell Reference, and Sheet ID and Range Reference.
Each method provides its own advantages and can be used based on your specific requirements. Whether you prefer using the sheet name for simplicity or the sheet ID for precise referencing, understanding these methods empowers you to efficiently navigate and manipulate data in Google Sheets.
Remember to ensure accuracy when referencing cells in other sheets, whether by double-checking the sheet name, employing single quotes for sheet names with special characters or spaces, or using the correct sheet ID. Utilizing the correct method for referencing will ensure accurate calculations and prevent errors in your formulas.
By mastering the different methods discussed in this guide, you can harness the full potential of Google Sheets and optimize your productivity. Whether you’re creating financial reports, inventory management sheets, or project tracking documents, these techniques will enable you to seamlessly reference cells and ranges across sheets, leading to more efficient and effective data analysis.
Take the time to familiarize yourself with these methods, experiment with different scenarios, and explore how they can be applied to your specific projects. With practice, you will become adept at referencing cells in other sheets and be able to leverage this skill to enhance your data management and analysis capabilities in Google Sheets.