Introduction
Welcome to our guide on how to RAM preview in After Effects. If you’re a video editor or motion graphics artist, you’re likely familiar with After Effects and its powerful tools for creating stunning visual effects and animations. One of the essential features of After Effects is the ability to preview your compositions in real-time using the RAM (Random Access Memory). RAM preview allows you to see how your project will look and perform before you render the final output.
RAM previewing is crucial for fine-tuning your work and ensuring a smooth and polished final result. In this article, we will walk you through the process of RAM previewing a composition in After Effects, as well as share some helpful tips and tricks for optimizing your workflow and troubleshooting common issues.
Whether you’re working on a short video clip or a complex animation sequence, understanding how to effectively use RAM preview will greatly improve your efficiency and productivity. By previewing your compositions in real-time, you can make adjustments, experiment with different effects, and perfect the timing of your animations, all without the need for lengthy render times.
In the following sections, we’ll cover everything you need to know about RAM previewing in After Effects. We’ll start by explaining what RAM preview is and how it differs from standard previewing methods. Then, we’ll guide you through the steps to perform a RAM preview and show you how to adjust the relevant settings to optimize the process. Additionally, we’ll share some valuable tips and tricks to help you improve your RAM preview workflow.
So, if you’re ready to take your After Effects skills to the next level and master the art of RAM previewing, let’s dive in and get started!
What is RAM Preview?
RAM preview is a feature in Adobe After Effects that allows you to preview your compositions in real-time using the computer’s RAM memory. Unlike the standard preview option, which renders frames on-the-fly, RAM preview utilizes cached frames in the available RAM to play back the composition smoothly and at full speed.
When you initiate a RAM preview, After Effects pre-renders a specified number of frames and stores them in the RAM for instant playback. This enables you to see an accurate representation of your composition, including animations, effects, and transitions, without the need for time-consuming rendering.
RAM previewing offers several benefits for video editors and motion graphics artists. Firstly, it allows you to quickly assess the overall look and timing of your composition, making it easier to spot any errors or areas that need adjustment. It provides a more accurate preview than the default wireframe preview, allowing you to see the final result with all the visual effects intact.
Furthermore, RAM previewing helps in refining the timing and synchronization of different elements within the composition. By previewing in real-time, you can fine-tune your animation timing, check the flow of effects, and make any necessary changes to create a cohesive and visually appealing result.
The length of the RAM preview depends on the available RAM and the duration of your composition. Depending on your system’s resources, you may be able to preview several seconds or even minutes of your composition in real-time. However, if the RAM is limited, you may have to render smaller segments or use the preview shortcuts to focus on specific sections.
It’s important to note that RAM preview only stores the frames in memory temporarily. Once you initiate another RAM preview or make changes to the composition, the previously cached frames will be discarded and new frames will be rendered and stored in the RAM. If you need a longer and more stable preview, you can render the composition to a video file or image sequence.
In the next section, we will guide you through the steps to perform a RAM preview in After Effects and explore the different settings that you can adjust to optimize the preview process.
How to RAM Preview a Composition
Performing a RAM preview in After Effects is a straightforward process. Here’s a step-by-step guide to help you get started:
- Select the composition you want to preview by clicking on it in the Project panel or Timeline.
- Go to the Composition menu and choose the “RAM Preview” option, or use the keyboard shortcut “0” (zero) on the numeric keypad.
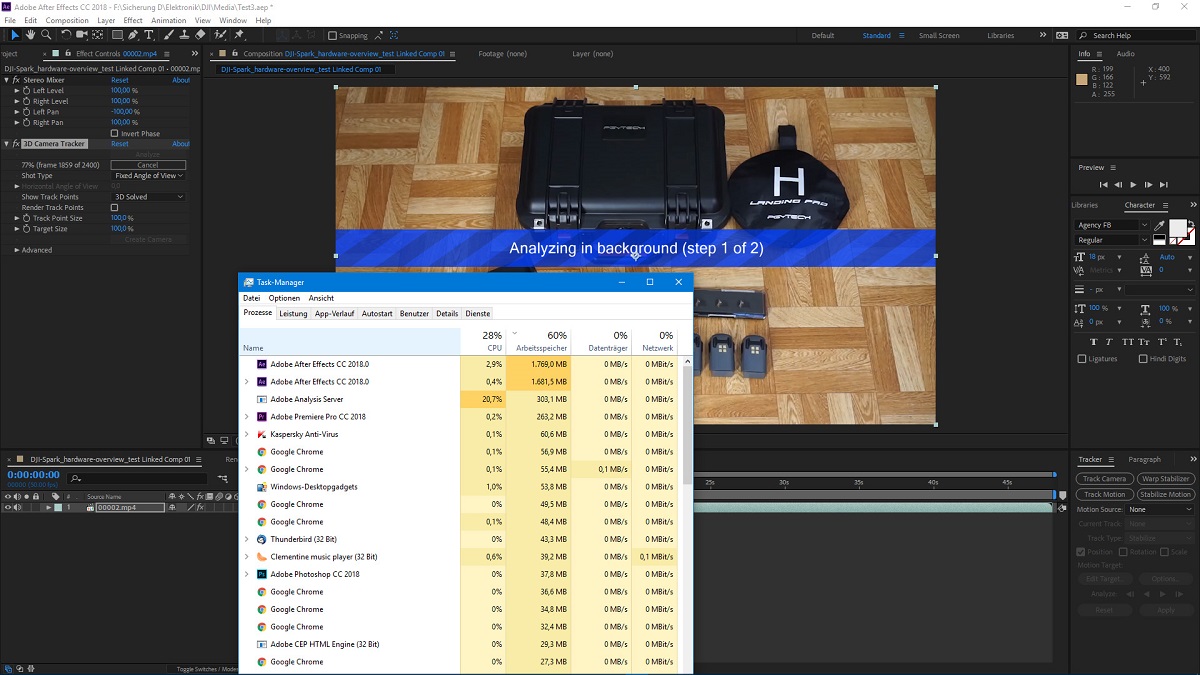
- After Effects will start rendering and caching frames in the RAM. The preview will play automatically in the Composition panel or in a separate Preview panel if you have it opened.
- While the RAM preview is playing, you can pause and resume playback by pressing the spacebar.
- To stop the RAM preview, press the “Esc” key or click anywhere outside the Composition panel.
It’s important to note that the first RAM preview may take some time, especially if you have a complex composition or limited system resources. After Effects needs to cache the frames before playback can start. Once the initial preview is completed, subsequent previews will be faster as long as the frames are still cached in the RAM.
By default, After Effects will play the RAM preview at a reduced resolution to improve playback performance. However, you can change the preview settings to play at full resolution or adjust other parameters to fit your specific needs. We will cover these settings in detail in the next section.
Remember to save your work regularly, especially if you are making changes to the composition while RAM previewing. Any unsaved changes may be lost if you encounter a system error or need to force quit After Effects.
Now that you know how to perform a basic RAM preview, let’s explore the various settings and options you can adjust to optimize your preview workflow in After Effects.
Adjusting the RAM Preview Settings
To enhance your RAM preview experience and tailor it to your specific needs, After Effects offers various settings that you can adjust. Here are the key settings you should be aware of:
- Resolution: By default, After Effects plays the RAM preview at a reduced resolution to improve performance. However, you can change this setting to play the preview at full resolution, allowing you to see the fine details of your composition. To adjust the resolution, go to the Preview panel or click on the “Resolution/Down Sample Factor” dropdown menu in the Composition panel. Choose the desired resolution option that suits your project’s requirements.
- Duration: The duration of the RAM preview determines how many frames are rendered and cached in the RAM. By default, After Effects previews a duration of 5 seconds. You can change this value to a specific time range by right-clicking on the Composition panel or going to the Composition menu and selecting “Composition Settings.” Adjust the duration to match the section you want to preview.
- Preview Range: If you only want to preview a specific section of your composition, you can set the preview range to focus on that area. To do this, highlight the desired range in the Timeline panel and go to the Edit menu. Choose the “Set Preview Range” option, and then perform the RAM preview. After Effects will only cache the frames within the specified range, allowing you to save time and resources.
- Preview Framerate: The preview framerate determines how many frames are played per second during the RAM preview. By default, it matches the composition’s frame rate. However, you can adjust the preview framerate in the Preview panel or by right-clicking on the Composition panel. This can be useful if you want to preview your composition in slow motion or fast motion.
- Cached Frames: After Effects displays the number of cached frames in the RAM during the RAM preview. This information can help you monitor the available RAM and understand the playback performance. If the RAM is running low or you need to free up resources, you can clear the cache by going to the Edit menu and selecting “Purge > All Memory & Disk Cache.”
Experimenting with these settings will allow you to optimize your RAM preview workflow and ensure the best possible preview performance. Depending on the complexity of your composition and the resources of your computer, you may need to adjust these settings accordingly.
Now that you’re familiar with the RAM preview settings in After Effects, let’s delve into some useful tips and tricks to help you maximize your efficiency and productivity during the preview process.
Tips and Tricks for Efficient RAM Previewing
Mastering the art of RAM previewing in After Effects involves not just understanding the process, but also implementing some tips and tricks to enhance your efficiency. Here are some valuable techniques to make your RAM previews more efficient:
- Trimming the Work Area: Before performing a RAM preview, consider trimming the work area to include only the specific part of the composition you want to preview. This helps in focusing on the relevant sections and saves time by avoiding unnecessary rendering and caching of frames outside the work area.
- Use Keyboard Shortcuts: Utilize keyboard shortcuts to speed up your workflow. Learn the shortcuts for RAM previewing (e.g., “0” on the numeric keypad) and other essential commands like pausing, resuming, and stopping the preview. This will help you avoid unnecessary mouse movements and perform tasks more efficiently.
- Preview with Draft Mode: If you need to preview a long composition or multiple complex effects, consider using the Draft mode during RAM preview. This temporarily reduces the quality of previews to conserve resources and improve playback performance. You can enable Draft mode by going to the Preview panel or Composition panel and selecting “Draft 3D” or “Draft 2D” options.
- Disable Unnecessary Effects: If your composition contains resource-intensive effects, consider disabling them temporarily during the RAM preview. This can help reduce the strain on your system and improve the playback performance. You can do this by toggling the visibility of individual effects or by using adjustment layers to control the appearance of multiple effects.
- Adjust Resolution as Needed: While RAM previewing, if you need to focus on specific details or refine the visual elements, you can temporarily increase the resolution. Just remember to switch back to a lower resolution for the final preview or rendering to maintain optimal performance.
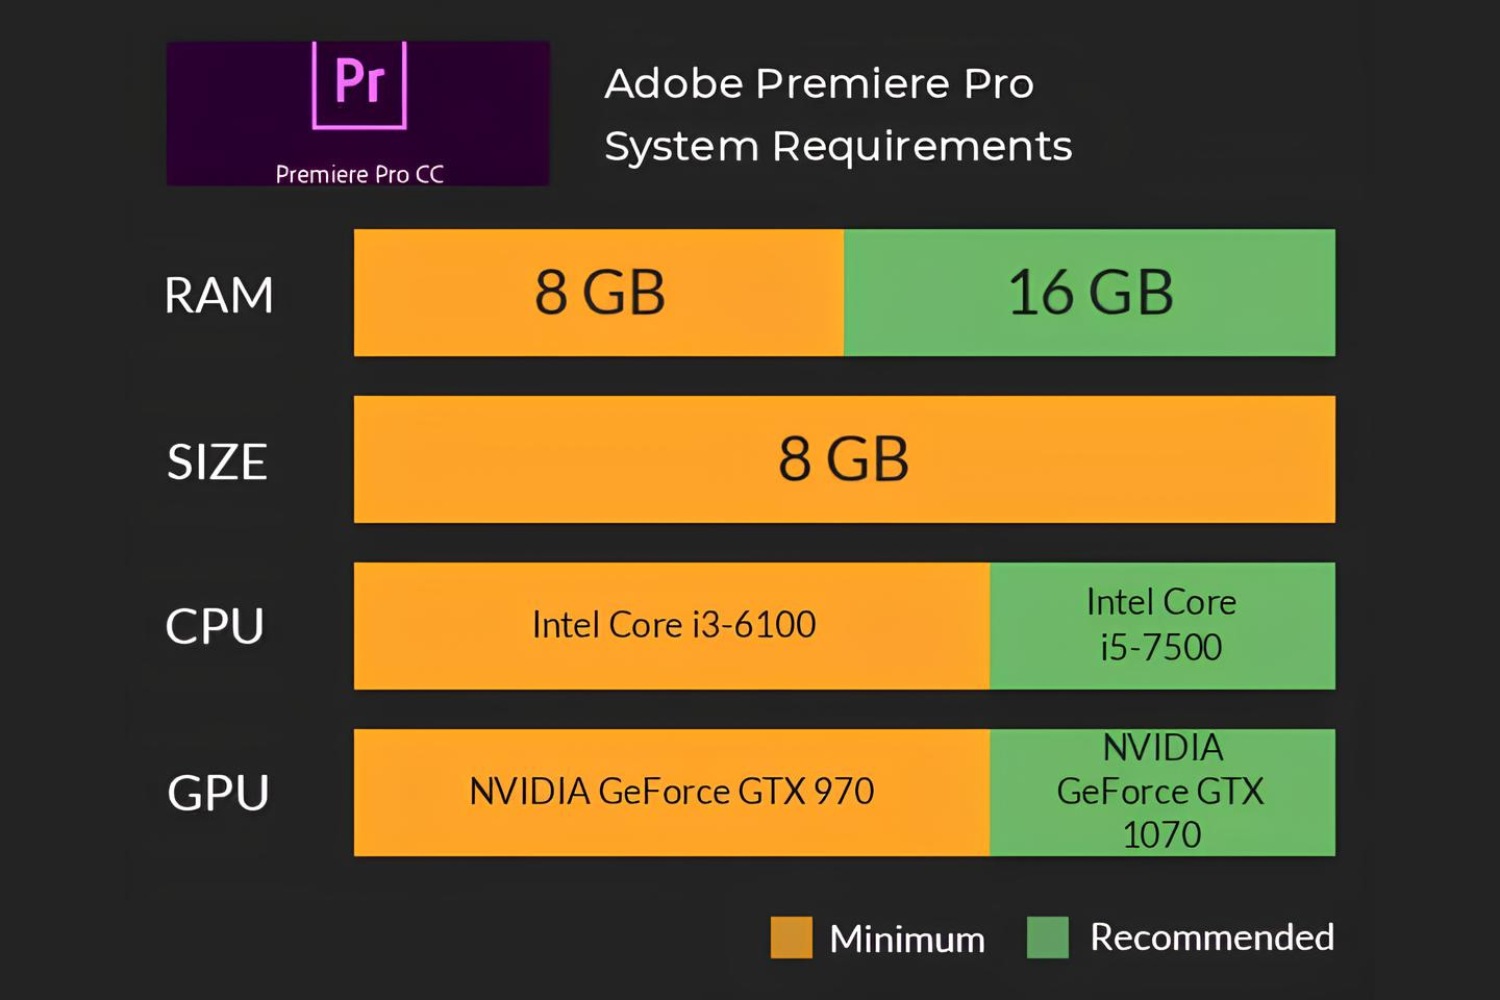
- Optimize System Resources: Ensure that your computer has sufficient resources for RAM previewing. Close any unnecessary background applications, free up disk space, and consider increasing the RAM allocation to After Effects if possible. This will help prevent lags and slowdowns during the preview process.
By implementing these tips and tricks into your RAM preview workflow, you can enhance your efficiency and make the most out of your available resources. Remember to experiment with different settings and techniques to find what works best for your specific projects and system configuration.
Now that you have a solid understanding of RAM previewing and some valuable tips, let’s explore common issues that you may encounter during the process and how to troubleshoot them.
Common Issues and Troubleshooting
While RAM previewing in After Effects, you may encounter some common issues that can disrupt your workflow. Here are a few common problems and their potential solutions:
- Stuttering or Choppy Playback: If your RAM preview is not playing smoothly and appears choppy or stuttering, it could be due to limited system resources. Try reducing the resolution of the preview, disabling unnecessary effects, or closing any other resource-intensive applications running in the background. Additionally, consider allocating more RAM to After Effects in the preferences settings.
- Freezing or Crashing: If After Effects freezes or crashes during the RAM preview, it may be caused by several factors, including insufficient RAM, incompatible plug-ins, or corrupt project files. Try purging the memory and disk cache, updating your software and plug-ins, or opening the project on a different computer if possible.
- Render Time Exceeds Preview Time: If your RAM preview takes longer to render than the actual playback time, it could be due to complex effects, high-resolution assets, or system limitations. Consider reducing the complexity of the effects, optimizing the assets, or rendering specific sections to speed up the process.
- Out of Memory Error: If After Effects displays an “Out of memory” error message during RAM previewing, it typically indicates that your system does not have enough available RAM. Try closing other applications, purging the memory and disk cache, or upgrading your computer’s RAM if possible.
- Playback Lag or Delay: If you experience a lag or delay between pressing the spacebar and the actual playback during a RAM preview, it may be caused by background processes or insufficient RAM. Make sure to close unnecessary applications, optimize system resources, and consider adjusting the preview settings to improve playback performance.
If you encounter any other issues while performing a RAM preview, refer to the Adobe After Effects documentation or online forums for more specific troubleshooting steps. Remember to save your work regularly to avoid losing any unsaved changes in case of unexpected errors or crashes.
By troubleshooting these common issues and implementing the necessary solutions, you can ensure a smooth and efficient RAM previewing experience in After Effects.
Conclusion
RAM previewing is an essential feature in Adobe After Effects that allows video editors and motion graphics artists to preview their compositions in real-time, making it easier to fine-tune and perfect their work. By understanding how to effectively use RAM preview, you can optimize your workflow, save time, and achieve better results.
In this guide, we covered the basics of RAM previewing, including what it is and how it differs from standard previewing methods. We explored the steps to perform a RAM preview in After Effects, as well as the various settings that can be adjusted to optimize the process for your specific needs.
We also shared valuable tips and tricks for efficient RAM previewing, including techniques to trim the work area, utilize keyboard shortcuts, and adjust resolution. These techniques will help you streamline your workflow and improve your productivity when working with RAM previews.
Additionally, we discussed common issues that you may encounter during RAM previewing and provided troubleshooting suggestions to overcome them. By understanding and addressing these issues, you can avoid unnecessary disruptions and maintain a smooth previewing experience in After Effects.
Remember, mastering the art of RAM previewing takes practice and experimentation. As you become more familiar with the process and explore different settings and techniques, you’ll be able to optimize your previews and achieve the desired results.
Now that you have a comprehensive understanding of RAM previewing in After Effects, you’re ready to take your video editing and motion graphics projects to the next level. So, go ahead and start utilizing the power of RAM preview to bring your creative vision to life!