Introduction
Adding subtitles to your YouTube videos can have numerous benefits. It not only allows your content to reach a wider audience, but it also improves accessibility for viewers who are deaf or hard of hearing. If you want to expand your video’s reach to Spanish-speaking viewers, adding Spanish subtitles to your YouTube videos is a crucial step.
Spanish is one of the most widely spoken languages in the world, with a large number of YouTube viewers who prefer Spanish-language content. By providing Spanish subtitles, you can engage with this audience and make your content more inclusive.
Fortunately, YouTube offers a user-friendly platform that allows you to easily add subtitles to your videos. Whether you are a content creator wanting to expand your viewership or a business looking to target a Spanish-speaking audience, this guide will walk you through the step-by-step process of adding Spanish subtitles to your YouTube videos.
In the following sections, we will explore the essential steps to make your videos accessible and enjoyable for Spanish-speaking viewers. From accessing your YouTube video manager to publishing the subtitles, we will cover everything you need to know to successfully add Spanish subtitles to your YouTube videos.
So, if you are ready to connect with a wider audience and enhance the viewer experience of your YouTube videos, let’s dive into the step-by-step process of adding Spanish subtitles!
Step 1: Access your YouTube video manager
The first step in adding Spanish subtitles to your YouTube videos is to access your YouTube video manager. To do this, follow the steps below:
- Go to the YouTube website and log in to your account. If you don’t have an account, create one for free.
- Once you are logged in, click on your profile picture in the top right corner of the screen. A dropdown menu will appear.
- From the dropdown menu, select “YouTube Studio.” This will take you to the YouTube Studio dashboard, where you can manage your videos.
- In the left sidebar, click on “Videos.” This will display a list of all your uploaded videos.
- Select the video to which you want to add Spanish subtitles by clicking on the video’s thumbnail or title.
By following these steps, you will be able to access your YouTube video manager and prepare to add Spanish subtitles to the selected video. Make sure you have the appropriate video selected before proceeding to the next step.
Step 2: Select the video you want to add Spanish subtitles to
Once you have accessed your YouTube video manager, the next step is to select the video to which you want to add Spanish subtitles. Follow these simple instructions:
- From the list of videos displayed in the YouTube Studio dashboard, locate the video you want to add Spanish subtitles to.
- Click on the video’s thumbnail or title to open the video editor.
Take a moment to ensure that you have chosen the correct video for adding Spanish subtitles. Double-check the title and content of the video to avoid any confusion.
If you have a large number of videos in your YouTube account, you can use the search bar at the top of the page to quickly find the desired video. Simply type in the title or keywords related to the video you wish to add subtitles to, and YouTube will filter the results accordingly.
By following these steps, you will be able to select the specific video that you want to add Spanish subtitles to. Once you have confirmed that you have chosen the correct video, you can move on to the next step of the process.
Step 3: Click on the “Subtitles” tab
After selecting the video you want to add Spanish subtitles to, the next step is to navigate to the “Subtitles” tab in the YouTube video editor. Follow these instructions:
- In the video editor for the selected video, you will find a row of tabs just above the preview of your video. Look for the “Subtitles” tab and click on it.
By clicking on the “Subtitles” tab, you are accessing the section of the YouTube video editor where you can manage and edit the subtitles for your video.
It’s important to note that if you have not added any subtitles to your video before, this tab may be initially empty or show an option to add new subtitles. However, if you have already added subtitles in other languages, you will see a list of the existing subtitles on this tab.
If you have multiple videos and are unable to locate the “Subtitles” tab in the video editor, make sure you have selected the correct video. It’s also worth checking if the video you are editing is eligible for subtitles. Some videos, such as live streams or videos that violate YouTube’s content policies, may not support subtitles.
Once you have successfully clicked on the “Subtitles” tab, you can proceed to the next step of the process and continue adding Spanish subtitles to your YouTube video.
Step 4: Click on “Add new subtitles or CC”
After accessing the “Subtitles” tab in the YouTube video editor, the next step is to click on the “Add new subtitles or CC” button. Follow these instructions:
- Look for the “Add new subtitles or CC” button, which is usually located at the top of the “Subtitles” tab. Click on it.
By clicking on the “Add new subtitles or CC” button, you are initiating the process of adding new subtitles to your YouTube video.
It’s important to note that if you have already added subtitles in other languages, you may see a list of the existing subtitles along with the option to add new ones. In this case, locate the “Add new subtitles or CC” button among the available options.
Additionally, if you have previously started the process of adding subtitles but haven’t completed it, you may have an option that says “Continue editing” instead of “Add new subtitles or CC.” In this case, simply click on “Continue editing” to resume the subtitle creation process.
If you are unable to locate the “Add new subtitles or CC” button, double-check that you are in the correct tab within the YouTube video editor. Sometimes, due to changes in the YouTube interface, the location of buttons and options may vary.
Once you have successfully clicked on the “Add new subtitles or CC” button, you can move on to the next step and continue adding Spanish subtitles to your YouTube video.
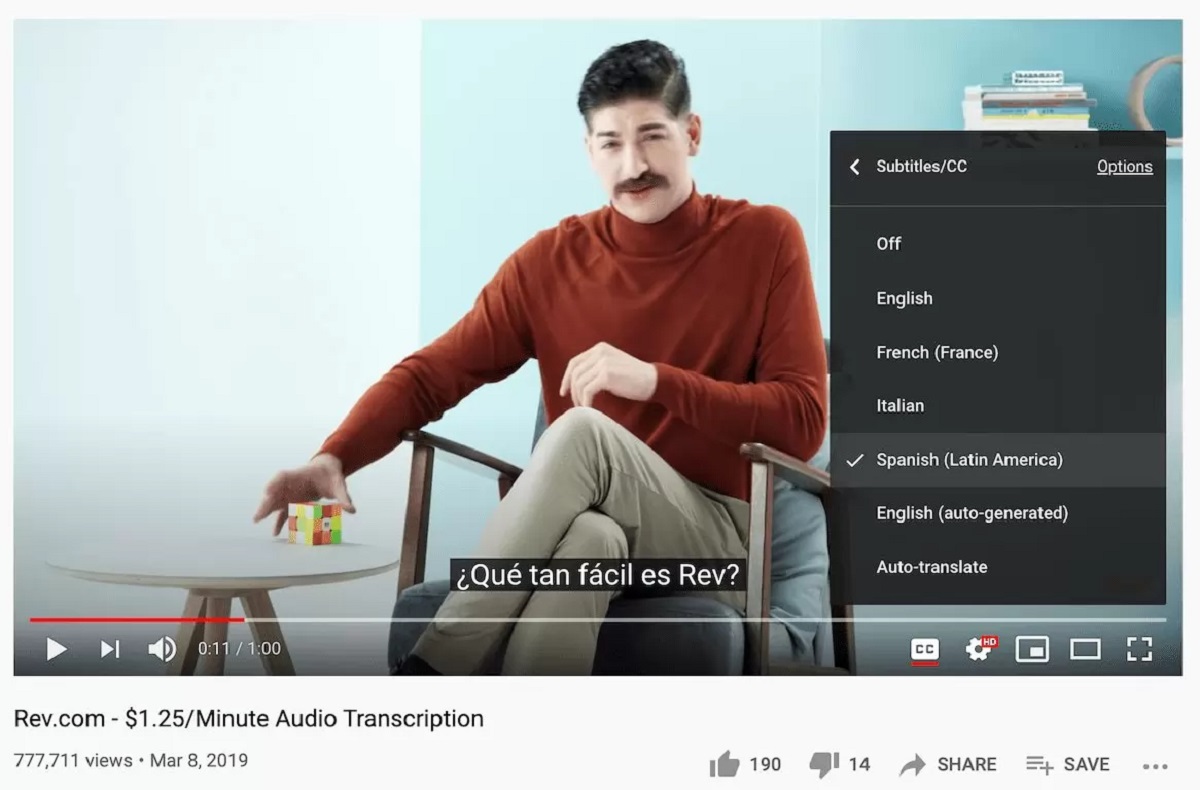
Step 5: Choose the language for your subtitles
After clicking on the “Add new subtitles or CC” button, the next step is to choose the language for your subtitles. Follow these instructions:
- In the “Select language” dropdown menu, choose “Spanish” as the language for your subtitles.
By choosing “Spanish” as the language for your subtitles, you are indicating that the subtitles you will be adding are in the Spanish language.
If you do not see “Spanish” as an available language option, double-check that you are in the correct dropdown menu. Sometimes, the language selection menu may be categorized differently or have a different name, such as “Select subtitle language” or “Choose language.”
If “Spanish” is not available as an option, it is possible that YouTube does not currently support subtitles in the Spanish language for your specific video. In some cases, YouTube may limit subtitle options for certain videos or regions.
Once you have successfully chosen “Spanish” as the language for your subtitles, you can proceed to the next step and continue adding Spanish subtitles to your YouTube video.
Step 6: Select “Transcribe and auto-sync” option
After choosing the language for your subtitles, the next step is to select the “Transcribe and auto-sync” option. Follow these instructions:
- Under the “Method” section, select the “Transcribe and auto-sync” option.
By selecting the “Transcribe and auto-sync” option, you are choosing a convenient method to add subtitles to your YouTube video. This method will automatically generate a transcript of your video’s audio and synchronize it with the video’s timeline.
It’s important to note that selecting the “Transcribe and auto-sync” option relies on YouTube’s automatic speech recognition technology to generate the initial subtitles. While this can save you time, it’s essential to review and edit the generated subtitles for accuracy and clarity before publishing them.
If you prefer to create the subtitles manually, you can choose the “Create new subtitles or CC” option instead. This allows you to manually type or upload a pre-existing subtitles file.
Keep in mind that the availability of the “Transcribe and auto-sync” option may depend on your YouTube account status and the specific video you are adding subtitles to.
Once you have successfully selected the “Transcribe and auto-sync” option, you can move on to the next step and proceed with the process of adding Spanish subtitles to your YouTube video.
Step 7: Using YouTube’s automatic captioning tool
After selecting the “Transcribe and auto-sync” option, you can now utilize YouTube’s automatic captioning tool to generate initial subtitles for your video. Follow these instructions:
- Click on the “Set timings” button to initiate the automatic captioning process.
Once you click on the “Set timings” button, YouTube will start analyzing the audio of your video and generating the initial subtitles. This process may take a few moments, depending on the length and complexity of your video.
During this automatic captioning process, YouTube’s speech recognition technology will transcribe the audio into text and attempt to match it with the corresponding timestamps in the video. The generated subtitles will appear in the subtitle editor for you to review and make any necessary adjustments.
It’s important to keep in mind that automatic captioning may not be 100% accurate. Factors such as background noise, accents, and speech patterns can affect the accuracy of the generated subtitles. Therefore, it is crucial to review and edit the subtitles for accuracy and clarity.
Once the automatic captioning process is complete, you will see the initial subtitles displayed in the subtitle editor. You can play the video to preview the subtitles and make any necessary adjustments to ensure they are synchronized with the audio and accurately reflect the content.
By utilizing YouTube’s automatic captioning tool, you can save time in the initial creation of the subtitles and focus more on editing and refining them for improved accuracy and readability.
Once you are satisfied with the initial subtitles generated by the automatic captioning tool, you can proceed to the next step and continue editing and refining the subtitles to ensure they accurately represent the Spanish language.
Step 8: Edit and refine the automatic captions
After the automatic captioning process is complete, the next step is to edit and refine the initial subtitles generated by YouTube’s automatic captioning tool. Follow these instructions:
- Review the generated subtitles in the subtitle editor and make any necessary edits to improve accuracy, grammar, and formatting.
- Ensure that the subtitles properly convey the intended meaning of the spoken words and are synchronized with the audio.
- Pay attention to punctuation, capitalization, and line breaks to enhance the readability of the subtitles.
- Check for any errors in the transcriptions, such as incorrect words, spelling mistakes, or missing text.
- Make sure that the subtitles are concise and easy to read, avoiding long sentences or overwhelming viewers with too much text on the screen at once.
Additionally, you have the flexibility to enhance the subtitles by adding relevant information, such as speaker names or sound descriptions, to provide a more comprehensive viewing experience for your audience.
To edit the subtitles, you can simply click on the corresponding subtitle line in the subtitle editor and make the necessary changes. You can also adjust the timing of the subtitles by dragging and dropping them along the timeline if needed.
It’s essential to spend time carefully reviewing and editing the subtitles to ensure they accurately represent the spoken words and effectively convey the content in the Spanish language. This step helps to improve accessibility, comprehension, and engagement for Spanish-speaking viewers.
Once you have thoroughly edited and refined the subtitles, you can proceed to the next step and save your changes.
Step 9: Save and publish your Spanish subtitles
After editing and refining the subtitles, the final step is to save and publish your Spanish subtitles to make them available for viewers. Follow these instructions:
- Click on the “Save” button to save your changes and finalize the subtitles.
- Once you have saved the subtitles, click on the “Publish” button to make them visible to viewers.
By saving and publishing your Spanish subtitles, you are ensuring that they are properly stored and displayed alongside your YouTube video. This makes it accessible for Spanish-speaking viewers to enable and view the subtitles while watching your video.
After publishing the subtitles, viewers can easily enable them by clicking on the “CC” icon (Closed Captions) at the bottom-right corner of the YouTube player. They will then have the option to choose the language, including Spanish, and the subtitles will be displayed accordingly.
It’s important to note that after publishing the subtitles, you can continue to make edits or updates to them if needed. Simply access the “Subtitles” tab in the YouTube video editor and select the appropriate language and subtitles to make any changes.
Regularly reviewing and updating your subtitles can help maintain accuracy and improve the overall viewing experience for your Spanish-speaking audience.
Now that you have saved and published your Spanish subtitles, you have successfully added the necessary accessibility and expanded the reach of your YouTube video to a wider Spanish-speaking audience.
Conclusion
Adding Spanish subtitles to your YouTube videos is a valuable strategy to increase accessibility and connect with a broader audience. By following the step-by-step process outlined in this guide, you can effectively add Spanish subtitles to your videos and enhance the viewing experience for Spanish-speaking viewers.
From accessing your YouTube video manager to saving and publishing your subtitles, each step plays a crucial role in making your content more inclusive and engaging. By providing subtitles in Spanish, you open your videos to a wider audience, improve accessibility for viewers who are deaf or hard of hearing, and potentially attract more Spanish-speaking viewers who prefer to consume content in their native language.
Remember to review and edit the automatic captions generated by YouTube’s speech recognition technology to ensure accuracy and clarity. Fine-tune the subtitles, making necessary grammar and formatting adjustments, and optimizing the timing of the text to match the audio.
With the subtitles saved and published, viewers can easily enable them and select the Spanish language to enjoy your content with clear and accurate translations in real-time. Regularly reviewing and updating your subtitles will help maintain their quality and relevance over time.
So, start adding Spanish subtitles to your YouTube videos today to connect with a wider audience, improve accessibility, and enhance the viewer experience. By making your videos accessible and inclusive, you will foster a greater sense of engagement and establish a stronger connection with your audience.
Expand your reach, break language barriers, and make a lasting impact with the power of Spanish subtitles on YouTube.