Introduction
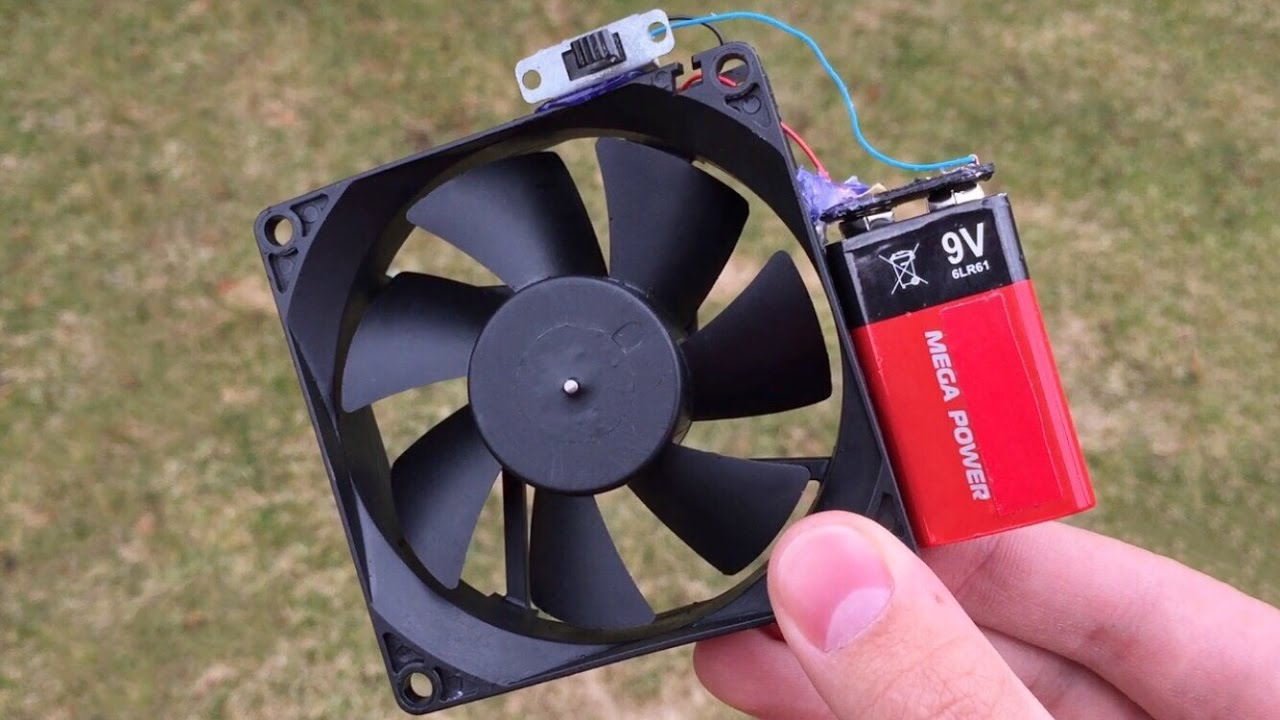
Welcome to our comprehensive guide on how to power a case fan with a battery. If you’re a computer enthusiast or someone looking for alternative ways to cool your system, this article is for you. Case fans play a critical role in maintaining the optimal temperature inside your computer case, preventing overheating and ensuring optimal performance.
While case fans are typically powered by the computer’s power supply unit (PSU) or motherboard, there are instances where you may want to power them using a battery. This can be useful in situations where you need to provide extra cooling in areas with limited access to power outlets, such as outdoor setups or temporary environments.
However, it’s important to note that powering case fans with a battery requires careful planning and consideration of several factors. In this guide, we’ll walk you through the process step by step, ensuring that you understand the necessary tools and equipment, choose the right battery, and properly connect and manage the power supply.
Whether you’re a beginner or an experienced computer aficionado, this guide is designed to provide you with all the information you need to successfully power your case fans with a battery. So, let’s dive in and explore the world of battery-powered cooling solutions for your computer!
Understanding Case Fans
Before we delve into the process of powering case fans with a battery, it’s important to have a solid understanding of how these cooling components work. Case fans are designed to circulate air inside the computer case, dissipating heat generated by various components such as the CPU, GPU, and hard drives.
Case fans come in different sizes, typically measured in millimeters, and the most common sizes are 80mm, 120mm, and 140mm. The size of the fan determines its airflow capacity, with larger fans generally capable of moving more air at lower speeds, resulting in quieter operation. Additionally, case fans can be either intake or exhaust fans, depending on their placement and purpose within the case.
The rotation speed of case fans is measured in revolutions per minute (RPM), which determines how quickly the fan blades spin. Higher RPM generally results in increased airflow and cooling performance, but it also leads to more noise. Many case fans come with adjustable speed settings, allowing you to strike a balance between performance and noise levels.
When choosing case fans, you may also come across terms such as static pressure and airflow. Static pressure refers to the fan’s ability to overcome resistance, making it ideal for scenarios that require pushing air through filters or radiators. On the other hand, airflow measures the amount of air moved by the fan, making it crucial for overall airflow within the case.
Understanding these concepts will help you make informed decisions when selecting case fans for your setup. Whether you’re aiming for high-performance cooling or a quieter operation, knowing the specifications and characteristics of the fans will allow you to fine-tune your system’s airflow and temperature management.
Now that we have a solid understanding of case fans, let’s move on to the next step in our guide: choosing the right battery to power your fans.
Choosing the Right Battery
Powering case fans with a battery requires selecting the appropriate battery that can provide the necessary voltage and capacity to run the fans effectively. Here are some factors to consider when choosing the right battery:
- Voltage: The first step is to identify the voltage requirement of your case fans. Most case fans operate at either 12V or 5V. Ensure that the battery you choose can supply the required voltage. Using a battery with the wrong voltage can damage the fans or cause them to operate inefficiently.
- Capacity: The capacity or the amount of charge a battery can store is measured in milliampere-hours (mAh). The capacity you need will depend on the power consumption of your case fans and how long you want to run them. Consider the power draw of each fan and estimate the total runtime you require to select a suitable battery capacity.
- Battery Type: There are various types of batteries available, such as lithium-ion, nickel-metal hydride, and lead-acid. Lithium-ion batteries are commonly used for portable electronics due to their high energy density and long life. Consider the specific requirements of your case fans and choose a battery type accordingly.
- Physical Size: Take into account the physical dimensions of the battery and ensure that it can fit comfortably within your setup. Consider the available space and any constraints you may have before selecting a battery.
- Rechargeable or Disposable: Decide if you want a rechargeable battery that can be reused or a disposable one that you can discard once it runs out of charge. Rechargeable batteries can be more cost-effective and environmentally friendly in the long run, but disposable batteries offer convenience.
Once you have considered these factors, you can start browsing for batteries that meet your requirements. Check the specifications and reviews of various battery options to ensure they are reliable and suitable for your needs.
Choosing the right battery is crucial to ensure the safe and efficient operation of your case fans. Take the time to research and compare different options before making a decision. Now that you have a good understanding of battery selection, we can move on to the next step: gathering the necessary tools and equipment.
Step 1: Gather the Necessary Tools and Equipment
Before you can begin powering your case fans with a battery, it’s important to gather all the tools and equipment you’ll need for the task. Here’s a list of what you’ll need:
- Case Fans: Ensure that you have the case fans you want to power with the battery. Make sure they are in good working condition and that you have the necessary adapters or connectors if needed.
- Battery: Choose the battery that you carefully selected in the previous step. Ensure it is fully charged and ready to use. If you are using a rechargeable battery, make sure you have the appropriate charger as well.
- Wires and Connectors: Depending on the specific connectors on your case fans, you may need wires and connectors to establish the connection between the battery and the fans. Ensure that you have the appropriate connectors or adapters to fit the fan’s power input.
- Wire Cutters and Strippers: These tools will be handy for cutting and stripping the wires to the appropriate lengths, ensuring a clean connection between the battery and the case fans.
- Electrical Tape or Heat Shrink Tubing: These materials help insulate and protect the exposed wiring connections, reducing the risk of short circuits or damage to the wires.
- Pliers or Screwdrivers: These tools may be needed to secure the wires and connectors in place or open up the case if necessary.
- Mounting Hardware: If you plan to mount the battery or secure the wires in a particular position, you may need mounting brackets, adhesive clips, or zip ties to keep everything neat and secure.
- Electrical Tape or Heat Shrink Tubing: These items will help insulate and protect the exposed wire connections, reducing the risk of short circuits or wire damage.
- Protective Gear: While not essential, it’s a good idea to wear protective gear such as gloves and safety glasses when handling wires and working with electrical components.
Once you have gathered all the necessary tools and equipment, you’re ready to move on to the next step: identifying the power requirements of your case fans.
Step 2: Identify the Fan’s Power Requirements
Before you can connect the battery to your case fan, it’s crucial to identify the power requirements of the fan. This step ensures that you understand the voltage and current specifications of the fan, allowing you to choose the appropriate battery and make the necessary connections safely. Here’s how to identify the fan’s power requirements:
- Check the Fan’s Specifications: Refer to the manufacturer’s documentation or check the label on the fan itself to find the voltage and current requirements. Most case fans operate at 12V, but it’s always essential to double-check.
- Measure the Fan’s Amperage: If the fan’s current requirements are not explicitly stated, you can measure the amperage using a multimeter. Set the multimeter to measure amps and carefully connect it in series with the fan’s power supply. This will give you an accurate reading of the fan’s current draw.
- Calculate the Power Consumption: Once you have the voltage and current measurements, multiply them together to calculate the fan’s power consumption. Power (in watts) equals voltage (in volts) multiplied by current (in amps).
- Consider Multiple Fans: If you plan to power multiple case fans with the same battery, add up the power consumption of all the fans. Ensure that the battery you choose has enough capacity to handle the combined power requirements.
- Double-Check Connector Compatibility: While identifying the power requirements, also pay attention to the fan’s connector type. Ensure that the connectors on the fan and the battery or wiring setup are compatible. If not, you may need to use adapters or splice the wires together.
By understanding the power requirements of your case fan, you can make informed decisions when choosing a suitable battery and ensure a safe and efficient connection. With this information in hand, you’re now ready to move on to the next step: connecting the battery to the fan.
Step 3: Connect the Battery to the Fan
With the necessary tools, equipment, and knowledge of the fan’s power requirements, you’re now ready to connect the battery to the case fan. Follow these steps to ensure a secure and successful connection:
- Prepare the Wires: Cut two lengths of wire, ensuring that they are long enough to reach from the battery to the fan. Strip about half an inch of insulation from each end of the wires.
- Identify the Polarity: Look for markings or color coding indicating the positive (+) and negative (-) terminals on the fan and the battery. It’s crucial to connect the wires correctly to avoid damaging the fan or the battery.
- Connect the Wires to the Battery: Attach one wire to the positive terminal of the battery and securely tighten any screws or clamps. Connect the other wire to the negative terminal in the same manner.
- Connect the Wires to the Fan: Attach the wire connected to the positive terminal of the battery to the positive terminal of the fan, ensuring a secure connection. Repeat this step for the negative terminal of the battery and the negative terminal of the fan.
- Secure the Connections: Use electrical tape or heat shrink tubing to insulate and protect the exposed wires and connections. This step helps prevent any accidental contact or short circuits.
- Test the Connection: Once you have connected the wires to the battery and the fan, it’s time to test the connection. Check that the fan spins smoothly and that it is receiving power from the battery.
- Ensure Stability: Secure any loose wires or connections using cable ties, adhesive clips, or other suitable methods. This step ensures that the wires won’t accidentally get pulled or disconnected during operation.
It’s essential to double-check the connections to ensure that they are secure and properly aligned with the fan’s power requirements. Taking the time to make a clean and reliable connection will prevent any potential damage or electrical issues.
Now that you have successfully connected the battery to the fan, it’s time to move on to step 4: securing the components and testing the connection.
Step 4: Secure the Components and Test the Connection
After connecting the battery to the case fan, it’s important to secure the components and ensure that the connection is functioning correctly. Follow these steps to secure the components and test the connection:
- Mount or Position the Battery: Depending on the size and type of battery you are using, find a suitable location to mount or position it. Consider factors such as stability, accessibility, and airflow to ensure the battery is secure and won’t interfere with other components.
- Secure the Wiring: Use cable ties, adhesive clips, or other suitable methods to secure the wiring. Organize the wires neatly and ensure they are kept away from any moving parts or sharp edges that could damage them.
- Test the Connection: Power on the battery and observe if the fan starts spinning. Confirm that the fan is receiving power from the battery and operating as expected. If the fan fails to spin or exhibits any issues, double-check the wiring and make any necessary adjustments.
- Monitor Temperature and Performance: Keep an eye on the temperature levels inside your computer case to ensure that the battery-powered fan is effectively cooling the components. Use monitoring software or physical temperature sensors to gauge the effectiveness of the fan.
- Regular Maintenance: Regularly check the battery’s charge level and ensure it is properly maintained. Recharge or replace the battery as necessary to ensure continuous and reliable operation.
By securing the components and testing the connection, you can ensure that the battery-powered fan is functioning correctly and providing the desired cooling effect. This step will not only ensure optimal performance but also help identify any potential issues early on.
With the components secured and the connection tested, you’re almost there! The final step is to establish a power management plan to ensure efficient usage and longevity of the battery.
Step 5: Establish a Power Management Plan
Now that your case fan is successfully powered by the battery, it’s important to establish a power management plan to optimize the usage and prolong the battery’s lifespan. Follow these steps to create an efficient power management plan:
- Set Fan Speed: If your case fan has adjustable speed settings, experiment with different speeds to find the optimal balance between cooling performance and power consumption. Lower speeds may help conserve battery power, while higher speeds provide enhanced cooling.
- Use Fan Controllers: Consider using fan controllers or temperature-based fan speed controls to automatically adjust the fan speed based on the temperature inside the computer case. This helps optimize cooling and reduces unnecessary power consumption.
- Implement Power Schedules: Determine when it is necessary to power on the battery-powered fan. If you don’t require constant cooling, create a schedule to power on the fan during periods of high system activity or when the temperatures inside the case reach a certain threshold.
- Monitor Battery Levels: Keep track of the battery’s remaining charge to ensure you have enough power for the desired duration of fan operation. Recharge or replace the battery as necessary to maintain uninterrupted cooling.
- Consider Battery Backup: Implement a battery backup system or have spare batteries available as a contingency plan. This ensures that you can continue to power the case fan even if the primary battery runs out of charge.
- Regular Maintenance: Periodically inspect the wiring, connectors, and battery to ensure they are in good condition. Clean any dust or debris that may accumulate on the fan blades, as it can reduce airflow efficiency and strain the battery.
By implementing a power management plan, you can optimize the usage of the battery-powered fan, reduce unnecessary power consumption, and extend the lifespan of the battery. Regular maintenance and monitoring will help you identify any potential issues and ensure reliable cooling performance.
Congratulations! You have successfully established a power management plan for your battery-powered case fan. With a well-managed power setup, you can now enjoy efficient and effective cooling without relying solely on the computer’s power supply.
Troubleshooting Common Issues
While powering a case fan with a battery can provide effective cooling, there may be some common issues that you might encounter along the way. Here are a few troubleshooting tips to help you address these issues:
- Fan Not Spinning: If the fan is not spinning, double-check the connections between the battery and the fan. Ensure that the wires are securely connected and that the polarities are correct. Also, check the battery’s charge level to ensure it has enough power.
- Insufficient Cooling: If you find that the fan is not providing adequate cooling, check if the fan speed is appropriately set. Adjust the fan speed settings according to your needs. You may also need to reposition the fan to optimize airflow within the case.
- Fan Noise: If the fan is producing excessive noise, consider adjusting the speed settings to a lower level. Additionally, ensure that the fan is clean and free from any obstructions that might cause vibrations and noise.
- Poor Battery Life: If you notice that the battery is draining quickly, check for any power-hungry components or excessive power consumption settings. Optimize your power management plan, such as reducing the fan speed or implementing a power schedule, to extend the battery life.
- Overheating or Heat Build-up: In some cases, powering a case fan with a battery may not be sufficient to prevent overheating or heat build-up. Consider adding additional case fans or using alternative cooling methods, such as liquid cooling, to effectively dissipate heat in your system.
- Electrical Issues: If you experience any electrical issues or short circuits, double-check all the connections, ensuring that there are no exposed wires or loose connections. Insulate the connections using electrical tape or heat shrink tubing to minimize the risk of electrical problems.
If you encounter any persisting issues or are unsure about troubleshooting, it’s always a good idea to consult a professional for assistance. They can provide further guidance and expertise in resolving specific issues related to powering case fans with a battery.
With these troubleshooting tips, you can effectively address common issues and ensure that your battery-powered case fan operates smoothly, providing optimal cooling for your system.
Conclusion
Congratulations! You have learned how to power a case fan with a battery, providing a versatile cooling solution for your computer system. By following the steps outlined in this guide, you now have the knowledge and tools to confidently connect a battery to your case fans, ensuring efficient cooling even in scenarios where access to power outlets is limited.
Through understanding case fans and their power requirements, choosing the right battery, gathering the necessary tools, and correctly connecting the battery to the fan, you have successfully created a battery-powered cooling setup. Establishing a power management plan further allows you to optimize power usage and maximize the battery’s lifespan, ensuring reliable cooling performance.
Remember to regularly maintain and monitor the connections, battery charge levels, and fan performance to address any potential issues and ensure consistent cooling. Troubleshooting common problems can help you identify and resolve issues related to fan operation, cooling efficiency, or electrical concerns.
By implementing these techniques, you can enjoy efficient and effective cooling for your computer system, whether you’re in an outdoor setup or a temporary environment without easy access to power outlets. Be sure to always prioritize safety and follow proper electrical guidelines when working with batteries and electrical components.
We hope this guide has been helpful in empowering you to create a battery-powered cooling solution for your case fans. Enjoy the flexibility and convenience of cooling your system with a battery while maintaining optimal performance and temperature regulation. Stay cool!


