Introduction
When it comes to optimizing the performance and organization of your SSD (Solid State Drive), partitioning is a crucial step that shouldn’t be overlooked. Partitioning involves dividing your SSD into separate sections, or partitions, that function independently and can be used to store different types of data. It essentially creates virtual drives within your SSD, allowing you to better manage your files and increase overall efficiency.
With the rising popularity of SSDs and their superior speed and reliability compared to traditional hard drives, partitioning an SSD has become a common practice among tech-savvy individuals and professionals. Whether you’re a casual user looking to enhance your system’s performance or a business professional in need of an efficient data storage solution, understanding the process and benefits of partitioning is essential.
In this article, we will explore the reasons why you should consider partitioning your SSD and the steps involved in doing so. We will also discuss the important factors to consider before partitioning, the tools you can use, and precautions you should take to ensure a smooth and error-free partitioning process.
Partitioning your SSD can bring several advantages, such as improved organization, enhanced data security, flexibility in managing multiple operating systems, and optimized performance. By creating separate partitions, you can allocate specific areas for your operating system, applications, personal files, and even reserve space for future system backups or virtual machines.
However, it’s important to note that partitioning an SSD is a task that requires careful planning and execution. It’s not something you should rush into without proper understanding and consideration of your specific needs and requirements. But fear not, as we will guide you through the process step by step, making partitioning your SSD a hassle-free experience.
So, whether you’re a novice user or an experienced tech enthusiast, let’s delve into the world of SSD partitioning and discover the benefits and techniques to make the most out of your storage device.
What is Partitioning?
Partitioning refers to the act of dividing a storage device, such as an SSD, into separate sections or partitions. Each partition functions as an independent entity, acting like a virtual drive within the SSD. It allows you to logically separate and allocate space for different types of data, such as the operating system, applications, documents, media files, and more.
Think of partitioning as creating different compartments or rooms within your SSD, each with its own designated purpose and storage capacity. Each partition acts as a separate entity, with its own file system and allocation of space. This means that if one partition becomes corrupted or inaccessible, the others remain unaffected, ensuring the safety and integrity of your data.
By establishing partitions, you can organize and manage your data more efficiently. For example, you can keep your operating system and program files separate from your personal files and media, making it easier to maintain and optimize your system’s performance. Additionally, partitioning allows you to better categorize and locate your files, reducing clutter and simplifying the data retrieval process.
Furthermore, partitioning an SSD enables you to install multiple operating systems on a single drive. This is particularly useful for those who want to dual-boot or have different operating systems for specific tasks or compatibility reasons. By assigning different partitions to different operating systems, you can easily switch between them without the need for separate physical drives.
Partitioning also offers advantages in terms of data security. By separate partitions, you can isolate your sensitive files and protect them from unauthorized access or potential malware infections. This improves the overall security of your data and minimizes the risk of data loss or compromise.
It’s important to note that partitioning an SSD should be done carefully, as it can impact the overall performance and storage capacity of the drive. It’s essential to properly plan and allocate the sizes of the partitions based on your needs and the specific requirements of your operating system and applications.
In the next sections, we will explore why partitioning an SSD is beneficial and the factors to consider before embarking on the partitioning process. We will also provide step-by-step instructions on how to partition your SSD, ensuring that the process is done smoothly and effectively.
Why Partition an SSD?
Partitioning an SSD offers several compelling benefits that make it a worthwhile endeavor for both casual users and professionals alike. Let’s delve into the reasons why you should consider partitioning your SSD:
1. Organization and Efficiency: By creating separate partitions, you can better organize your data and optimize the efficiency of your SSD. You can allocate specific partitions for your operating system, applications, personal files, and even reserve space for future system backups or virtual machines. This ensures that each category of data is logically separated, making it easier to find and manage your files.
2. Improved Performance: Partitioning can have a positive impact on the overall performance of your SSD. By separating the operating system and program files from your personal files and media, you can reduce fragmentation, which can lead to faster read and write speeds. This can result in quicker boot times, smoother application launches, and overall snappier system performance.
3. Security and Data Protection: Partitioning provides an added layer of security for your data. By creating separate partitions, you can isolate your sensitive files and encrypt them if needed. This helps protect your confidential information from unauthorized access, malware infections, or accidental deletion. If one partition becomes corrupted or infected, the others remain unaffected, minimizing the risk of data loss or compromise.
4. Multiple Operating Systems: Partitioning allows you to install and run multiple operating systems on a single SSD. This is particularly useful for those who want to dual-boot or have different operating systems for specific tasks or compatibility reasons. Each operating system can have its own designated partition, allowing you to switch between them easily without the need for separate physical drives.
5. Flexibility and Future Expansion: Partitioning provides flexibility for future expansion and changes. If your storage needs evolve over time, you can resize or create new partitions to accommodate those changes. This flexibility allows you to adapt to new requirements without the need to reinstall your operating system or format the entire SSD.
6. Easy Troubleshooting and Maintenance: Partitioning simplifies troubleshooting and maintenance tasks. If you encounter an issue with one partition, you can focus on troubleshooting that specific partition without affecting the others. This makes it easier to identify and resolve issues, reducing potential downtime.
With these compelling reasons in mind, it’s evident that partitioning an SSD can have a significant positive impact on your overall computing experience. Now that we understand the benefits, let’s explore the important factors you should consider before embarking on the partitioning process.
Things to Consider Before Partitioning an SSD
Before diving into the partitioning process, there are several factors you should carefully consider. These considerations will help you make informed decisions and ensure a successful partitioning experience. Let’s explore the key things to keep in mind:
1. Data Backup: Before proceeding with any partitioning activities, it’s crucial to back up all your important data. Partitioning involves making changes to the file system and disk structure, which carries a degree of risk. Having a backup ensures that even if something goes wrong during the partitioning process, you won’t lose your valuable files and documents.
2. Available Free Space: Check the amount of free space on your SSD. Partitioning requires unallocated space on the drive, so make sure you have enough free space to create the desired partitions without impacting the overall performance of your SSD.
3. Partition Sizes: Consider the sizes of the partitions you want to create. Think about the specific needs of your system and allocate sufficient space to each partition accordingly. Ensure that the partition sizes are suitable for the data you plan to store, and leave room for future expansion if needed.
4. File System Compatibility: Ensure that the file system you choose for your partitions is compatible with your operating system and any other systems you plan to use on the SSD. Different operating systems may have different file system preferences, so make sure to choose the most appropriate option to avoid any compatibility issues.
5. OS and Application Requirements: Take into account the requirements of your operating system and applications. Some operating systems and programs require specific partition configurations or need to be installed on specific partitions. Check the system requirements and recommended partitioning guidelines for your particular operating system and applications to ensure optimal performance and compatibility.
6. Data Accessibility: Consider how you want to access and manage your data within the partitions. Take into account factors such as ease of navigation, convenience, and the frequency with which you access different types of files. Design your partitioning scheme to optimize your workflow and simplify the process of finding and managing your files.
7. Long-Term Goals: Think about your long-term storage goals. Consider how your storage needs might change in the future and whether you might need additional partitions or more storage space. Planning ahead will help you create a partitioning scheme that accommodates your future needs without the need for major restructuring.
By carefully considering these factors, you can make well-informed decisions and ensure a successful partitioning process. Now that you’re equipped with the knowledge of what to consider, let’s move on to the step-by-step guide to partitioning your SSD.
Steps for Partitioning an SSD
Partitioning your SSD may seem like a complex task, but with the right tools and guidance, it can be a straightforward process. Follow these step-by-step instructions to successfully partition your SSD:
Step 1: Choose the Right Partitioning Tool: There are various partitioning tools available, both free and paid. Some popular options include EaseUS Partition Master, MiniTool Partition Wizard, and AOMEI Partition Assistant. Research and select a tool that suits your needs and download it from a trusted source.
Step 2: Back Up Important Data: Before making any changes to your SSD, it’s crucial to back up all your important data. This ensures that even if something goes wrong during the partitioning process, your files will remain safe and intact. Use an external hard drive, cloud storage, or any other backup method you prefer.
Step 3: Defragment the SSD (optional): If your SSD is heavily fragmented, you may choose to defragment it to optimize the partitioning process. However, it’s important to note that SSDs don’t benefit from defragmentation as much as traditional hard drives, so this step is optional. If you decide to defragment, use a reputable defragmentation tool like Defraggler or the built-in defragmentation utility in your operating system.
Step 4: Launch the Partitioning Tool: Open the partitioning tool you downloaded and installed in Step 1. Ensure that you have administrative privileges to carry out the partitioning tasks.
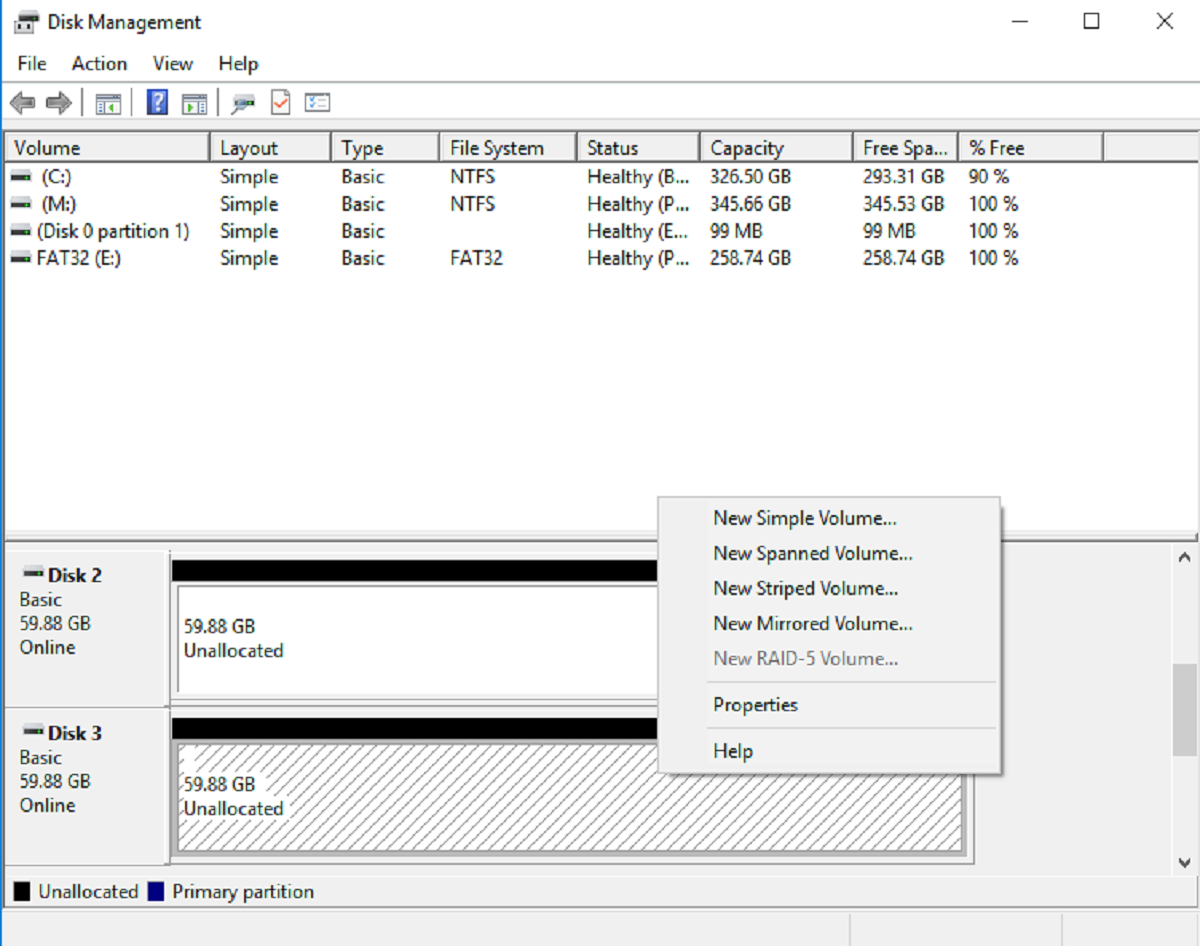
Step 5: Identify the SSD and Unallocated Space: Within the partitioning tool, locate your SSD and identify any unallocated space on the drive. Unallocated space is the free space on the SSD that can be used to create new partitions.
Step 6: Create a New Partition: Select the unallocated space on the SSD and choose the option to create a new partition. Specify the size of the partition, allocate a drive letter or mount point, and choose the desired file system (such as NTFS, FAT32, or exFAT). Customize any advanced options if needed, such as cluster size or partition label.
Step 7: Resize or Delete Existing Partitions (optional): If you want to resize or delete existing partitions on your SSD, use the partitioning tool’s features to perform these actions. Be cautious when resizing or deleting partitions, as it can result in data loss if not done correctly. Always back up your data before making any changes to existing partitions.
Step 8: Apply the Changes: After you have created, resized, or deleted partitions according to your requirements, double-check all the settings and changes you have made. Once you are confident with your partitioning setup, apply the changes through the partitioning tool. The tool will initiate the process, and it may take some time depending on the size and complexity of the operations.
Step 9: Verify the Partitioning: After the partitioning process is complete, reboot your system and ensure that the new partitions are visible and functioning correctly. Check that your data is intact and that the partitions are accessible as intended. If you encounter any issues, refer to the documentation of your partitioning tool or seek assistance from its support channels.
By following these steps, you can successfully partition your SSD according to your specific needs and preferences. Remember to always proceed with caution and back up your data before making any changes to the disk structure. Now you can enjoy the benefits of a well-organized and optimized SSD storage space.
Choosing the Right Partitioning Tool
When it comes to partitioning your SSD, selecting the right partitioning tool is crucial for a smooth and successful process. With numerous options available, it’s important to consider several factors before making your decision. Here are some key points to keep in mind:
1. Features and Functionality: Look for a partitioning tool that offers a comprehensive range of features and functionalities. This includes the ability to create, resize, delete, and format partitions, as well as options for advanced settings like cluster size and file system selection. Consider your specific partitioning needs and choose a tool that can accommodate them.
2. User-Friendliness: Opt for a partitioning tool that is user-friendly and easy to navigate. A well-designed interface and intuitive controls can greatly simplify the partitioning process, especially if you are new to these tools. Look for tools that provide clear instructions and guidance throughout the process and avoid ones that are overly complex or difficult to understand.
3. Reliability and Reputation: Ensure that the partitioning tool you choose has a solid reputation for reliability and stability. Check user reviews, online forums, and tech communities to gauge the experiences of other users with the tool. Look for tools that have been in the market for some time and have a track record of positive feedback.
4. Compatibility: Verify that the partitioning tool is compatible with your specific operating system and version. Some tools may be tailored for specific operating systems, while others are more versatile and support multiple platforms. Check the system requirements and download the appropriate version of the tool for your operating system.
5. Technical Support: Consider the availability and quality of technical support provided by the partitioning tool’s developer. Should you encounter any issues or need assistance during the partitioning process, it’s beneficial to have access to reliable customer support services. Look for tools that offer documentation, user guides, FAQs, and responsive support channels.
6. Pricing and Licensing: Determine whether the partitioning tool is free or requires a paid license. Some tools offer basic functionality for free, while advanced features may be available as part of a paid version. Evaluate your budget and the features you require to make an informed decision on whether to opt for a free or paid tool.
7. Regular Updates: Look for partitioning tools that receive regular updates from the developer. Software updates ensure compatibility with the latest operating systems, fix bugs, and improve overall stability. Regular updates indicate the developer’s commitment to ongoing improvement and support for their product.
8. Recommendations and Expert Advice: Seek recommendations and expert opinions from trusted sources, such as tech experts, forums, or IT professionals. Their insights and experiences can help guide you towards the right partitioning tool that aligns with your specific needs.
Considering these factors will help you choose the right partitioning tool for your SSD. Remember to prioritize functionality, user-friendliness, reliability, compatibility, support, pricing, and regular updates. By selecting the appropriate tool, you can streamline the partitioning process and ensure a successful outcome.
Backing Up Important Data
Before embarking on any partitioning activities for your SSD, it is crucial to back up all of your important data. This step is essential to safeguard your files and ensure that they are protected throughout the partitioning process. Here are some key points to consider when backing up your data:
1. Determine What Data to Back Up: Take the time to identify the important files, documents, photos, videos, and any other data that you want to protect. Consider the data that is irreplaceable or holds significant value to you. This will help you prioritize your backup process and focus on the most critical information.
2. Choose the Backup Method: Select a backup method that suits your needs and preferences. There are several options available, including using an external hard drive, a network-attached storage (NAS) device, cloud storage services, or even creating disk images. Evaluate the pros and cons of each method and choose the one that best fits your requirements.
3. External Hard Drive Backup: An external hard drive provides a reliable and convenient option for backing up your data. Connect the external hard drive to your computer and use backup software or copy and paste the essential files and folders to the drive. Ensure that the external hard drive has sufficient storage capacity to accommodate all of your important data.
4. Cloud Backup: Cloud storage services, such as Google Drive, Dropbox, or Microsoft OneDrive, offer secure and accessible offsite backups. Upload your files and folders to your preferred cloud storage provider, ensuring that you have enough storage space available. Regularly sync your data to keep it up to date, and embrace encryption features provided by the cloud service for added security.
5. Disk Image Backup: Creating a disk image is a comprehensive backup method that captures an exact copy of your entire SSD, including the operating system, applications, and files. This backup method allows for easy system recovery in case of any partitioning mishaps. Use reliable disk imaging software, such as Macrium Reflect or Acronis True Image, and save the image to an external storage device.
6. Scheduling Regular Backups: Establish a regular backup schedule to ensure your data remains protected in the long term. Regularly backing up your data will help you stay organized and maintain the most up-to-date copies of your files. Consider setting up automatic backup routines or reminders to ensure consistency and minimize the risk of data loss.
7. Verify Backup Integrity: After completing the backup process, verify the integrity of your backups. Ensure that your data has been successfully copied and that you can access and restore the files if necessary. Regularly check your backups and perform test restores to validate that your important data is recoverable.
8. Store Backups Safely: Store your backups in a safe location, protected from physical damage, theft, or unauthorized access. For physical backups, consider using a fireproof and waterproof storage container. If you opt for cloud backups, enable two-factor authentication and use a strong, unique password to secure your account.
9. Maintain Multiple Backup Copies: It’s advisable to maintain multiple backup copies, especially for critical data. This ensures redundancy and protects against the failure of a single backup medium. Consider having at least one offsite backup in case of any catastrophic events or emergencies.
By following these guidelines and backing up your important data before partitioning your SSD, you can ensure the safety and availability of your files. Remember, data backup is an essential step to guarantee peace of mind during the partitioning process.
Defragmenting the SSD
Defragmentation is a process for optimizing the storage of data on traditional hard drives by rearranging fragmented files. However, it is important to note that defragmentation is not necessary or recommended for SSDs. Unlike traditional hard drives, SSDs store information on flash memory chips, which have no moving parts. Consequently, the performance benefits gained from defragmenting a traditional hard drive do not apply to SSDs. In fact, unnecessary defragmentation can lead to reduced performance and decreased lifespan of the SSD.
SSDs have their own internal mechanisms, such as wear leveling and TRIM technology, that manage data storage efficiently. TRIM, in particular, helps the SSD maintain optimal performance by proactively deleting unnecessary data and preparing cells for future use. These mechanisms, combined with the inherent fast access times, negate the need for defragmentation.
Furthermore, repeated defragmentation can result in unnecessary write operations, which can contribute to wear and reduce the lifespan of the SSD. SSDs have a finite number of write cycles, so minimizing write operations is crucial for prolonging the lifespan of the drive.
It’s important to mention that modern operating systems, such as Windows 10 and macOS, are aware of the nature of SSDs and automatically disable defragmentation for these drives. This ensures that the system does not attempt to defragment the SSD, saving you from potential performance degradation and unnecessary wear on the drive.
However, keep in mind that occasional disk cleanup activities, such as removing temporary files and clearing browser caches, can help maintain optimal performance on your SSD. These tasks can free up space and ensure that the SSD operates efficiently.
In summary, defragmentation is not recommended or necessary for SSDs. Unlike traditional hard drives, SSDs do not suffer from fragmentation-related performance issues. In fact, the built-in mechanisms of SSDs, such as wear leveling and TRIM technology, ensure efficient data storage and optimal performance. By avoiding unnecessary defragmentation, you can preserve the performance and lifespan of your SSD.
Creating a New Partition
Creating a new partition on your SSD allows you to separate your storage space into distinct sections, providing organization and flexibility. This process involves allocating a portion of your SSD’s unallocated space to the new partition. Follow these steps to create a new partition:
Step 1: Launch the Partitioning Tool: Open the partitioning tool you have selected and installed on your computer. Ensure that you have administrative privileges to perform disk management tasks.
Step 2: Locate and Select the SSD: Within the partitioning tool, find and select your SSD from the list of available drives. Pay close attention to avoid accidentally selecting the wrong drive, as partitioning can lead to data loss if not done correctly.
Step 3: Identify Unallocated Space: Look for unallocated space on your SSD. This is the free space on the drive that is not currently assigned to any partition. Depending on your SSD’s current setup, you may have unallocated space available, or you may need to create it by resizing existing partitions.
Step 4: Choose the New Partition Size: Select the unallocated space and choose the option to create a new partition. Specify the size of the partition you want to create. You can allocate the entire unallocated space to the new partition or designate a specific size depending on your needs.
Step 5: Assign a Drive Letter or Mount Point: Assign a drive letter or mount point to the new partition to facilitate easy access and data transfer. A drive letter helps identify the partition in the file explorer, while a mount point allows you to assign the partition to an empty folder on an existing drive.
Step 6: Choose the File System: Select the file system for the new partition. The most common file systems for Windows are NTFS and exFAT. NTFS is recommended for system partitions and partitions that will store large files, while exFAT is suitable for partitions that need to be compatible with both Windows and macOS.
Step 7: Customize Advanced Options (if needed): Depending on the partitioning tool you are using, there may be advanced options available for customization. These options include choosing the cluster size, setting a partition label, enabling encryption or compression, or specifying other attributes. Customize these options according to your requirements.
Step 8: Review and Apply the Changes: Double-check all the settings and changes you have made in the partition setup. Verify that the new partition size, drive letter or mount point, and file system selection are correct. Make sure you have selected the appropriate SSD and that no important data will be lost. Once you are confident with your choices, proceed to apply the changes through the partitioning tool.
Step 9: Confirm and Wait for the Partition Creation: The partitioning tool will initiate the process to create the new partition on your SSD. The time required for the partition creation may vary depending on the size of the partition and the performance of your SSD. It is important to be patient and allow the tool to complete the task without interruptions.
Step 10: Verify the New Partition: After the partition creation process is complete, reboot your system and ensure that the new partition is visible and functioning correctly. Check that the drive letter or mount point is assigned to the new partition, and verify that you can access and store files within it. If you encounter any issues, consult the documentation of your partitioning tool or seek assistance from their support channels.
By following these steps, you can easily create a new partition on your SSD, allowing you to effectively organize and utilize your storage space based on your specific needs and preferences.
Resizing or Deleting Existing Partitions
Resizing or deleting existing partitions on your SSD can help you optimize your storage space and better accommodate your changing needs. Whether you want to adjust the size of a partition or remove unused partitions altogether, follow these steps to resize or delete existing partitions:
Step 1: Launch the Partitioning Tool: Open the partitioning tool you have installed on your computer. Ensure that you have administrative privileges to perform disk management tasks.
Step 2: Locate and Select the SSD: Within the partitioning tool, find and select your SSD from the list of available drives. Be careful to choose the correct drive to avoid accidental data loss.
Step 3: Identify the Partitions: Look for the existing partitions on your SSD. The partitioning tool will display a list of partitions along with their sizes and file systems. Identify the partition(s) you want to resize or delete.
Step 4: Resizing a Partition: If you want to resize a partition to free up space or allocate more space to it, select the partition and choose the option to resize it. Adjust the partition’s size by entering the desired value or dragging the partition boundary to the desired location. Make sure you have enough unallocated space available to accommodate the resizing operation.
Step 5: Deleting a Partition: To delete a partition that is no longer needed, select the partition and choose the option to delete it. Confirm the deletion when prompted. Be cautious as this action will permanently remove all data stored within the partition. Ensure you have a backup of any important files before proceeding.
Step 6: Review and Apply the Changes: Double-check the changes you have made in the partition setup. Verify that the resize operation or the deletion of the partition is the intended action. Confirm that no critical data will be lost as a result. Once you have confirmed the changes, proceed to apply them through the partitioning tool.
Step 7: Confirm and Wait for the Changes to Take Effect: The partitioning tool will initiate the process to resize or delete the selected partitions on your SSD. The time required for the operation to complete will depend on the size of the partition and the performance of your SSD. Allow the tool to finish the task without interruption.
Step 8: Verify the Partition Changes: After the partitioning tool completes the resize or deletion process, restart your system and ensure that the changes are reflected. Check that the partition has been resized to the desired size or that the deleted partition is no longer visible. Verify that your system and data remain accessible and functional.
Step 9: Check for File System Integrity (if applicable): If you resized a partition, consider checking the file system integrity using the appropriate tools provided by your operating system. This will ensure that the file system structure within the resized partition is sound and that your data remains intact and accessible.
Note: It is essential to back up your important data before resizing or deleting partitions on your SSD. While these operations can typically be performed without data loss when executed properly, there is always a risk of accidental data loss or corruption. Having a backup ensures you can restore your valuable files if any issues arise during the process.
By following these steps, you can resize or delete existing partitions on your SSD, allowing you to better utilize your storage space and adapt to changing storage needs.
Conclusion
Partitioning your SSD can greatly enhance your storage management, organization, and overall system performance. By dividing your SSD into separate partitions, you can allocate space for different types of data, streamline access to files, and optimize the way your system operates. However, it is important to consider a few factors before embarking on the partitioning process.
Before partitioning your SSD, ensure that you back up all important data to avoid any potential loss or corruption. Take into account the available free space on your SSD, and carefully plan and allocate sizes for each partition based on your specific needs. Additionally, consider the compatibility of file systems and the requirements of your operating system and applications.
Choose a reliable and user-friendly partitioning tool that meets your requirements, and be sure to follow proper procedures when creating, resizing, or deleting partitions. Take caution to protect your data and ensure that you have verified your backups before making any changes to your SSD.
Lastly, remember that defragmentation is not necessary or recommended for SSDs. Unlike traditional hard drives, SSDs do not suffer from fragmentation-related performance issues. They have internal mechanisms, such as wear leveling and TRIM technology, that manage data storage efficiently, eliminating the need for defragmentation.
By implementing the steps outlined in this guide and understanding the benefits and considerations involved in partitioning your SSD, you can optimize your storage space, improve system performance, and effectively manage your data.
As with any modification to your system, it is vital to proceed with caution and take appropriate measures to safeguard your data. With careful planning and execution, partitioning your SSD can be a valuable step towards achieving a more organized and efficient computing experience.