Introduction
Welcome to this guide on how to configure a solid-state drive (SSD) to the GPT (GUID Partition Table) partitioning scheme. If you’re new to the world of computer storage, or if you’ve been using traditional hard disk drives (HDDs) and are considering upgrading to an SSD, this article will provide you with the necessary knowledge to make the transition smoothly.
SSDs have revolutionized the storage industry with their faster speeds, improved reliability, and enhanced performance compared to HDDs. With their ability to read and write data at lightning-fast speeds, SSDs have become the preferred choice for many computer users, from casual users to professionals who rely on high-performance systems.
However, configuring an SSD to the correct partitioning scheme is crucial to fully realize its potential. GPT, the modern partitioning scheme, offers several advantages over the legacy Master Boot Record (MBR) partitioning scheme. GPT allows for larger storage capacities, better performance, and improved data integrity.
In this article, we will walk you through the step-by-step process of configuring an SSD to GPT. We will cover everything from checking drive compatibility to installing the operating system on the newly formatted GPT drive. Whether you’re setting up a new SSD or upgrading an existing one, this guide will ensure you have the necessary knowledge to do it right.
Before we dive into the details, it’s important to note that configuring a drive to GPT involves modifying the drive’s partitioning scheme, which can result in data loss. Therefore, it’s recommended to back up any important data before proceeding with the process. Also, keep in mind that the instructions provided in this guide may vary slightly depending on your specific hardware and operating system.
So, if you’re ready to optimize your SSD’s performance and unlock its full potential, let’s get started with the process of configuring a solid-state drive to the GPT partitioning scheme.
Overview of Solid State Drives (SSDs)
Before we delve deeper into configuring an SSD to the GPT partitioning scheme, let’s first understand what a solid-state drive is and why it has become the preferred choice for storage in modern computing.
A solid-state drive (SSD) is a type of storage device that uses flash memory to store data, unlike traditional hard disk drives (HDDs) that use spinning disks and magnetic platters. By utilizing semiconductor technology, SSDs offer many advantages over HDDs, making them a popular choice among computer users.
One of the main advantages of SSDs is their superior speed. Since they don’t have moving parts like HDDs, SSDs can access data almost instantly, resulting in significantly faster boot times and file transfers. This faster performance translates into enhanced system responsiveness, allowing applications and programs to load quickly.
In addition to speed, SSDs also provide better durability and reliability. Because they lack mechanical components, SSDs are more resistant to shock, vibration, and physical wear and tear. This makes them ideal for portable devices such as laptops, where durability is crucial.
Another significant advantage of SSDs is their energy efficiency. Compared to HDDs, SSDs consume less power, resulting in longer battery life for laptops and lower electricity bills for desktop computers. The absence of moving parts in SSDs also contributes to a quieter computing experience.
Furthermore, SSDs offer increased storage capacity options. With advancements in memory technology, SSDs are now available in various capacities, ranging from a few hundred gigabytes to several terabytes. This allows users to choose the storage capacity that best suits their needs, whether it’s for personal use or professional applications.
Overall, SSDs have revolutionized the way we store and access data. Their speed, durability, energy efficiency, and storage capacity options make them a worthy investment for anyone looking to enhance their computing experience.
Now that we have a solid understanding of what SSDs are and their advantages over traditional HDDs, let’s move on to exploring the GPT partitioning scheme and why it’s beneficial to configure an SSD to GPT.
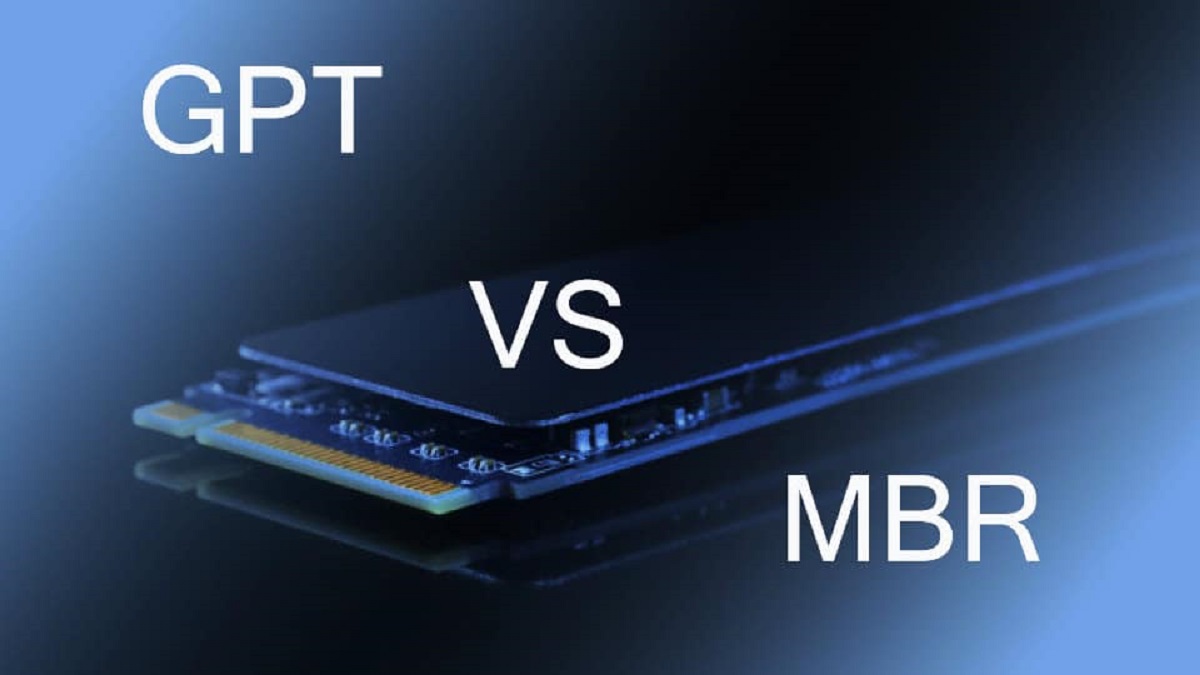
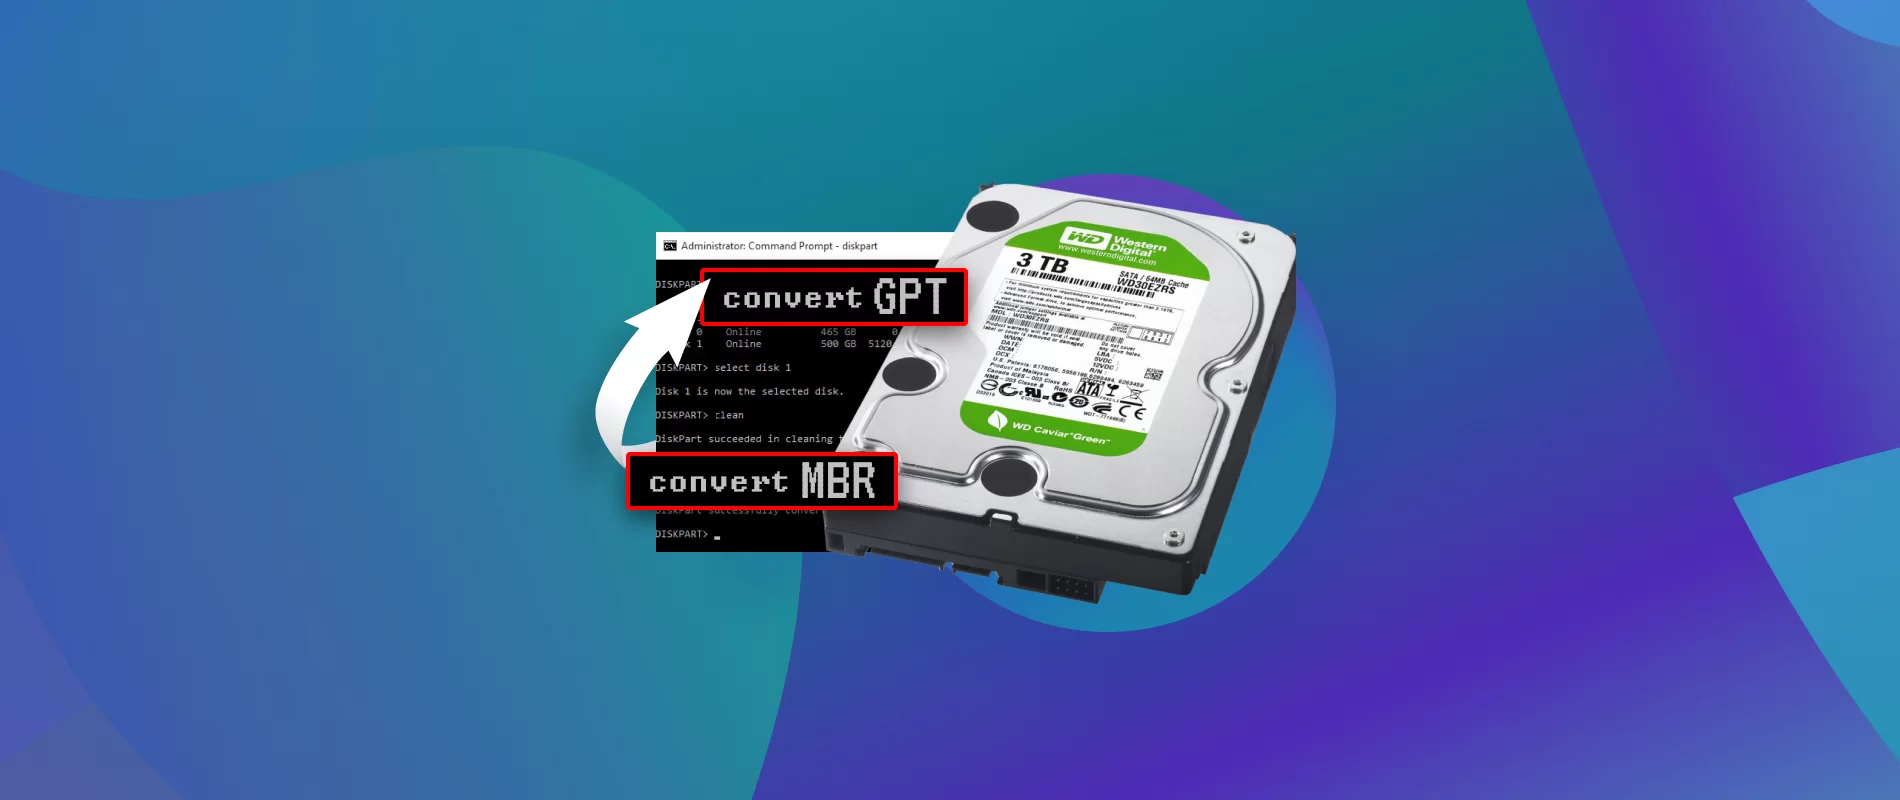
Understanding GPT and MBR Partitioning Schemes
The partitioning scheme of a storage device plays a critical role in how the data is organized and accessed. Two commonly used partitioning schemes are the GPT (GUID Partition Table) and MBR (Master Boot Record) schemes. Understanding the differences between these two schemes will help us appreciate the benefits of configuring an SSD to the GPT partitioning scheme.
The MBR partitioning scheme has been in use for many years and is compatible with both old and new systems. It uses a 32-bit table called the Master Boot Record to manage the partitions on the disk. However, there are limitations to the MBR scheme. It supports a maximum of four primary partitions or three primary partitions and one extended partition. This limitation can be restrictive for users who require more than four partitions or who want to take advantage of the latest technologies.
In contrast, the GPT partitioning scheme, introduced with the UEFI (Unified Extensible Firmware Interface) standard, offers several advantages over MBR. GPT uses a 64-bit table structure called the GUID Partition Table, which can support up to 128 partitions by default. Furthermore, GPT allows for larger individual partition sizes, making it suitable for high-capacity drives.
One of the key advantages of GPT is its improved data integrity. It includes a backup of the partition table at the end of the disk, reducing the risk of data corruption. GPT also supports CRC (Cyclic Redundancy Check) protection for partition entries, which can detect and repair errors during booting.
Another notable feature of GPT is its compatibility with modern systems. UEFI, the firmware standard used by most modern computers, supports booting from GPT partitions. This enables the system to take advantage of advanced features such as faster boot times and secure boot options. However, it’s important to note that systems with legacy BIOS may not support booting from GPT partitions. In such cases, enabling legacy boot options is necessary.
It’s worth mentioning that GPT is not exclusive to SSDs. It can be used with both HDDs and SSDs, providing the advantages mentioned earlier for any storage device. Additionally, GPT is compatible with multiple operating systems, including Windows, macOS, and Linux.
Understanding the differences between the GPT and MBR partitioning schemes is essential when configuring an SSD. The GPT scheme offers more flexibility, increased partitioning options, improved data integrity, and compatibility with modern systems. In the next section, we will explore the specific benefits of configuring an SSD to the GPT partitioning scheme.
Benefits of Configuring a Solid State Drive to GPT
Configuring a solid-state drive (SSD) to the GPT (GUID Partition Table) partitioning scheme offers several advantages that enhance the overall performance and functionality of the drive. Let’s delve into the specific benefits of configuring an SSD to GPT.
1. Enhanced Storage Capacity: GPT allows for larger individual partitions and a significantly higher number of partitions compared to the legacy MBR (Master Boot Record) partitioning scheme. This means you can make full use of the storage capacity of your SSD, especially if it’s a high-capacity drive.
2. Improved Performance: GPT provides faster boot times and improved data access speeds. With GPT, the operating system can take advantage of the latest technologies, such as UEFI (Unified Extensible Firmware Interface), which offers faster initialization and more efficient handling of system resources.
3. Increased Data Integrity: GPT includes built-in data protection mechanisms that enhance data integrity. The partition table is stored at the beginning and end of the disk, making it less prone to corruption caused by disk failures or user errors. Additionally, GPT uses CRC (Cyclic Redundancy Check) protection to detect and repair errors during booting, ensuring that your data remains safe and intact.
4. Compatibility with Modern Systems: GPT is fully compatible with UEFI firmware, which is the standard for most modern computers. By configuring your SSD to GPT, you ensure compatibility with the latest system technologies and features, such as secure boot, faster boot times, and advanced power management options.
5. Cross-Platform Compatibility: GPT is supported by multiple operating systems, including Windows, macOS, and various Linux distributions. This means you can easily use your SSD with different operating systems without any compatibility issues.
6. Future-Proofing: The GPT partitioning scheme is the modern standard for disk partitioning, and it offers more flexibility and scalability for future hardware advancements. By configuring your SSD to GPT, you ensure that your drive is ready to take advantage of upcoming technologies and advancements.
Overall, configuring your solid-state drive to the GPT partitioning scheme provides significant benefits in terms of storage capacity, performance, data integrity, compatibility, and future-proofing. Now that we understand the advantages of GPT, let’s move on to the next section, where we will explore the necessary considerations before configuring your SSD to GPT.
Checking Drive Compatibility and Backup Considerations
Before proceeding with the configuration of your solid-state drive (SSD) to the GPT (GUID Partition Table) partitioning scheme, it’s essential to ensure drive compatibility and take necessary backup considerations. Let’s explore these factors in more detail:
1. Drive Compatibility: Not all systems support booting from GPT partitions. It’s crucial to check your system’s compatibility before configuring your SSD to GPT. Most modern computers with UEFI (Unified Extensible Firmware Interface) firmware support GPT. However, some older systems that use the legacy BIOS (Basic Input/Output System) may not have native support for GPT. To determine if your system is compatible, access the BIOS/UEFI settings and look for GPT or UEFI options.
2. Backup Considerations: Modifying the partitioning scheme of a drive can lead to data loss. It’s essential to back up any important data before proceeding with the configuration process. Create a full backup of your SSD to an external storage device or cloud storage service. This ensures that even if something goes wrong during the configuration, you can restore your data and minimize potential loss.
3. Verify Firmware and Driver Updates: It’s advisable to check for any firmware and driver updates for your SSD and system before proceeding with the configuration. Manufacturers occasionally release updates to address bugs, improve compatibility, and enhance performance. Installing the latest firmware and driver updates can help ensure a smooth configuration process and optimal SSD performance.
4. Prepare Installation Media: Depending on your specific configuration requirements, you may need to prepare a bootable installation media for your operating system. This is necessary if you plan to perform a fresh installation of the operating system on the newly configured GPT drive. Ensure that you have a USB drive or DVD with the installation files or ISO image ready.
5. Consider Disk Cloning: If you already have an existing installation on your SSD, you may want to consider disk cloning as an alternative to a fresh installation. Disk cloning allows you to make an exact replica of your current SSD, including the operating system, applications, and data, onto the newly formatted GPT drive. This can save you time and effort in setting up your system from scratch.
By checking drive compatibility and taking necessary backup considerations, you can ensure a smooth and secure configuration process for your SSD to the GPT partitioning scheme. With these precautions in place, you are ready to proceed with the step-by-step guide for configuring your SSD to GPT, which we will explore in the following sections.
Step-by-Step Guide to Configuring a Solid State Drive to GPT
Now that you have checked drive compatibility and taken backup considerations, it’s time to proceed with the step-by-step guide for configuring your solid-state drive (SSD) to the GPT (GUID Partition Table) partitioning scheme. Follow these instructions carefully to ensure a successful configuration:
1. Preparing the SSD: Connect your SSD to your computer using the appropriate interface (SATA, NVMe, etc.). Ensure that the drive is recognized by the system.
2. Accessing the BIOS or UEFI Settings: Restart your computer and enter the BIOS or UEFI settings. The key to access these settings may vary depending on your system. Common keys include F2, F10, Del, or Esc.
3. Enabling or Disabling Legacy Boot Options: If your system supports both UEFI and legacy BIOS, you need to enable or disable the legacy boot options to ensure compatibility with GPT. This option may be located in the Boot or Security tab of the BIOS/UEFI settings.
4. Choosing the GPT Partitioning Scheme: Locate the option to change the partitioning scheme and select GPT. This option may be labeled as “Partition Style” or “Partition Table Type.” Save the settings and exit the BIOS/UEFI settings.
5. Formatting and Partitioning the SSD with GPT: If your SSD is empty or you want to start fresh, skip this step. Otherwise, backup the data on your SSD and format it using a partitioning tool, such as Disk Management on Windows or Disk Utility on macOS. Create the desired partitions on the SSD, ensuring they are set to the GPT partition style.
6. Installing the Operating System to the GPT Drive: If you are performing a fresh installation of the operating system, boot from the installation media you prepared earlier. Follow the on-screen instructions to install the operating system, selecting the GPT partitioned SSD as the target for the installation.
7. Verifying GPT Configuration in System Settings: After the installation is complete, boot into the operating system and go back to the BIOS or UEFI settings. Verify that the SSD is recognized as a GPT drive. Additionally, check the boot order to ensure that the correct SSD is set as the primary boot device.
Congratulations! You have successfully configured your solid-state drive to the GPT partitioning scheme. Your SSD is now optimized for performance, storage capacity, and data integrity. Enjoy the benefits of faster speeds, improved reliability, and enhanced system responsiveness that an SSD offers.
It’s important to note that these instructions may vary slightly depending on your specific hardware and operating system. Refer to your system’s documentation or manufacturer’s website for more detailed instructions if needed.
Preparing the SSD
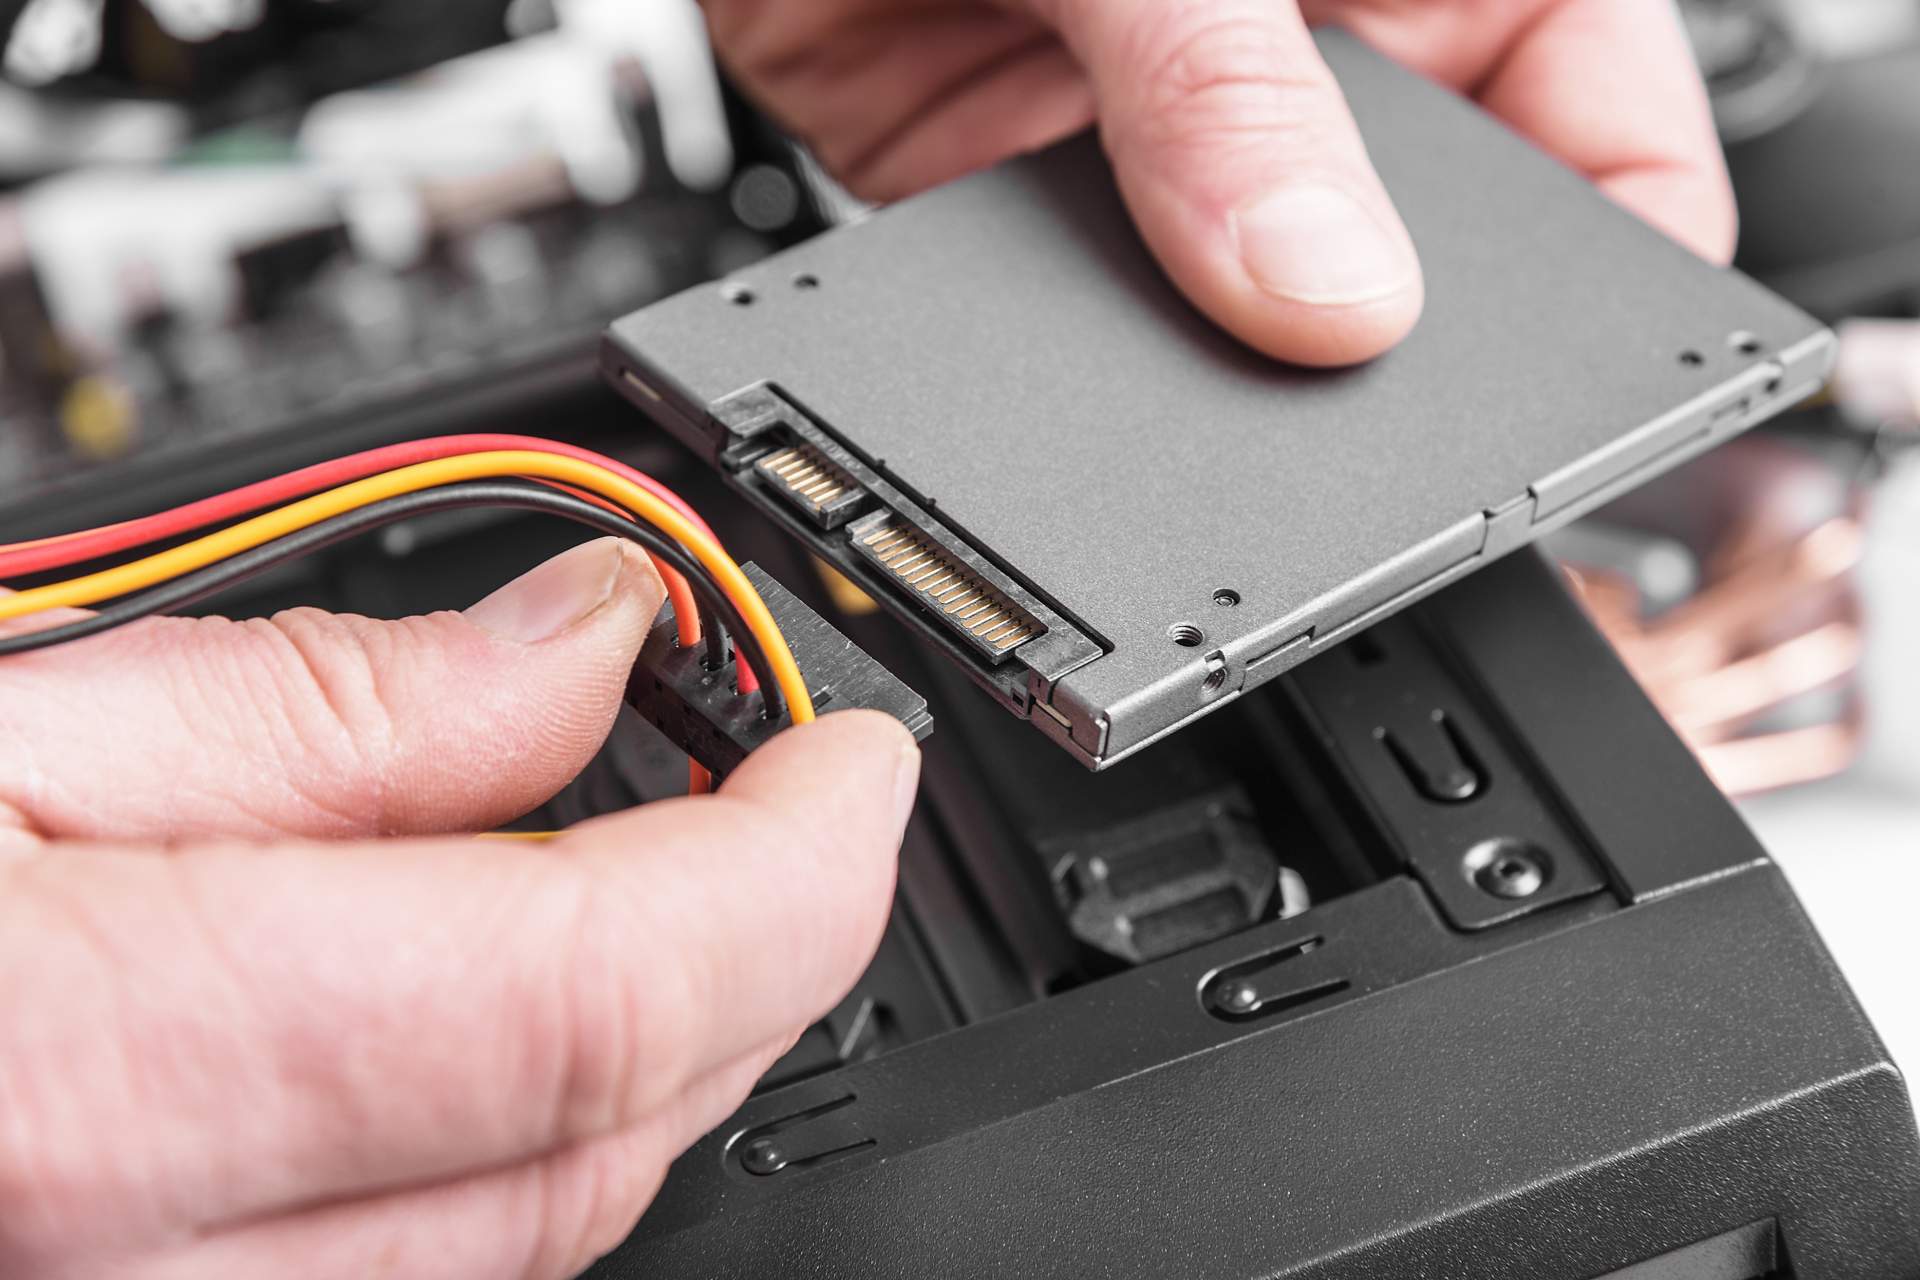
The first step in configuring your solid-state drive (SSD) to the GPT (GUID Partition Table) partitioning scheme is to prepare the SSD itself. This involves connecting the SSD to your computer and ensuring that it is recognized by the system. Follow these instructions to prepare your SSD:
1. Disconnect the Power: Before handling any internal components of your computer, make sure the power is turned off and the power cable is unplugged from the wall outlet. This will prevent any electrical accidents from occurring.
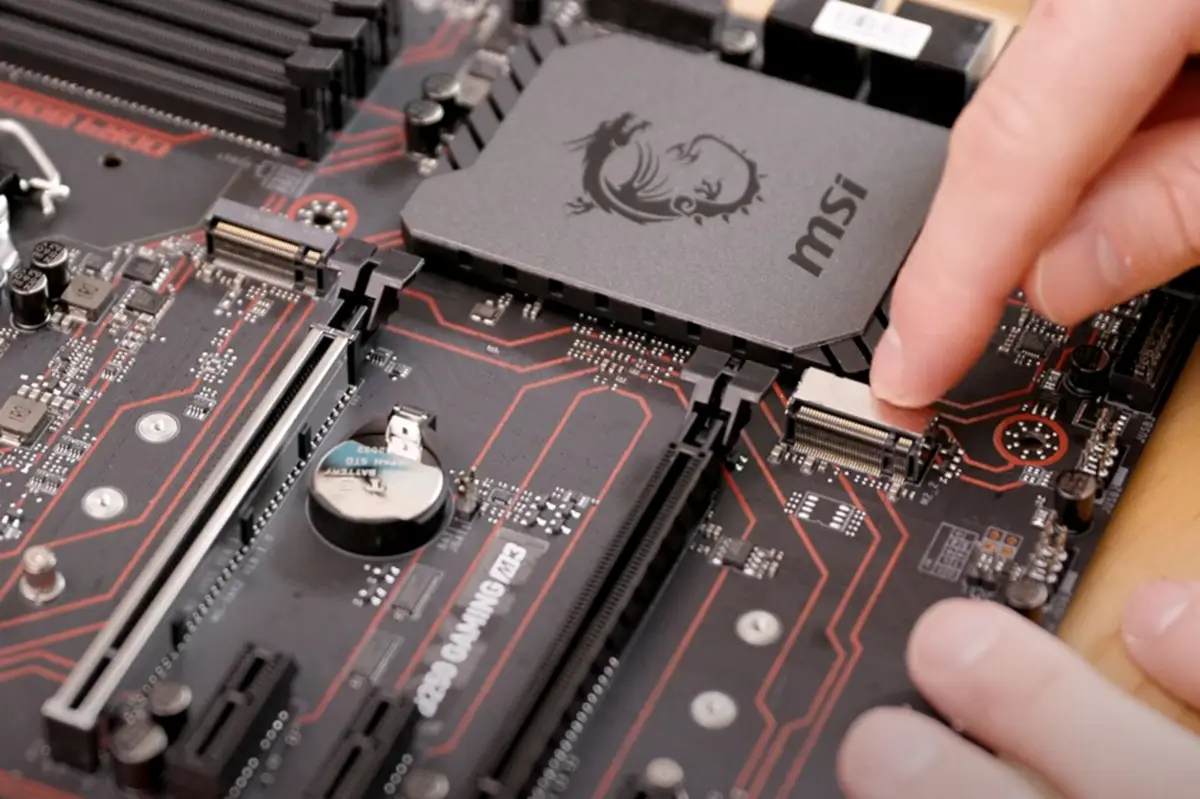
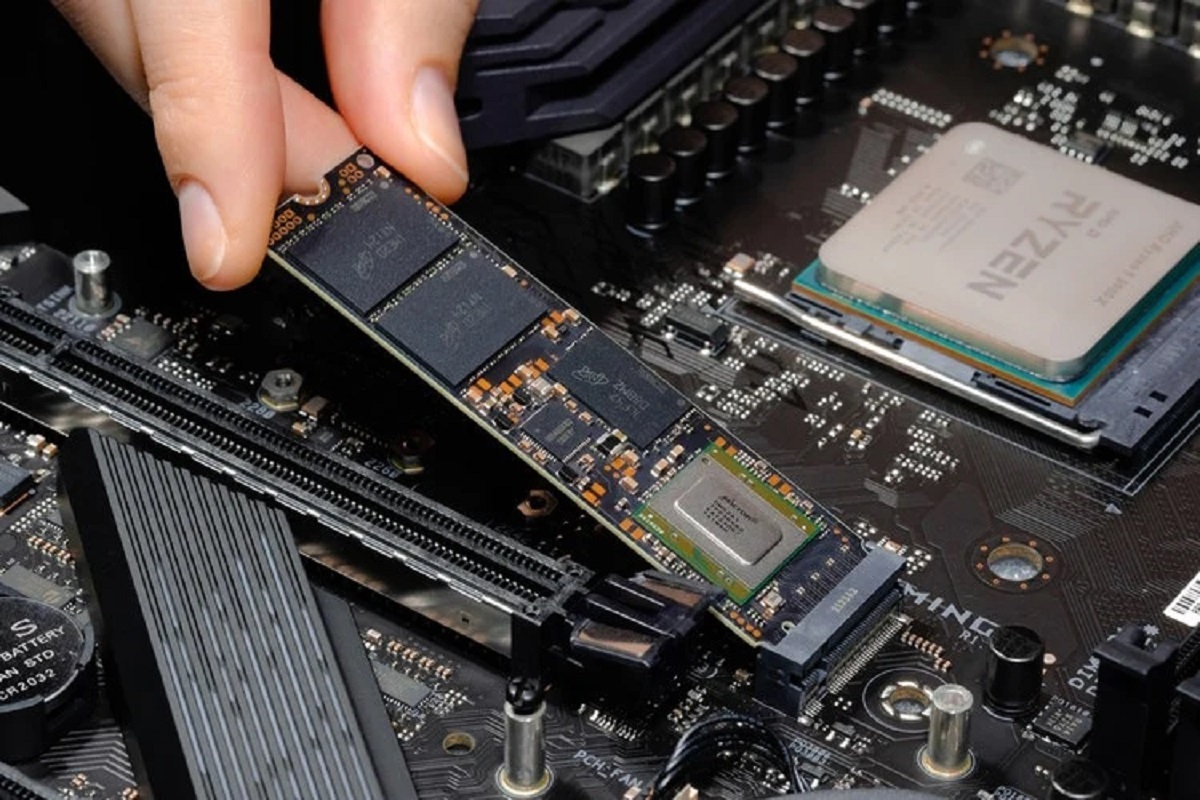
2. Choose the Appropriate Interface: Identify the appropriate interface for your SSD and locate the corresponding cables. Most modern SSDs use the SATA (Serial ATA) interface, while newer, high-performance SSDs may use the NVMe (Non-Volatile Memory Express) interface. Refer to your SSD and computer’s documentation to determine the appropriate interface.
3. Open Your Computer Case: If your SSD is going to be installed internally, you will need to open your computer case. Use a screwdriver to remove the screws that secure the case panel. Carefully remove the panel, taking note of any cautionary labels or instructions on the case itself.
4. Locate an Available Drive Bay: Identify an available drive bay in your computer case where the SSD can be installed. Most cases have designated drive bays with mounting brackets or trays to secure the SSD. If necessary, refer to your computer’s documentation to locate the appropriate drive bay.
5. Connect the SSD: Attach the SATA or NVMe cable from the appropriate interface on the SSD to the corresponding port on the motherboard. For SATA, connect the data cable to a SATA port on the motherboard, and connect the power cable to a SATA power connector from the power supply unit. For NVMe, insert the SSD into the appropriate M.2 slot on the motherboard.
6. Secure the SSD: Once the SSD is properly connected, secure it in the drive bay using the mounting brackets or trays provided. Use the screws provided or the ones already present in your computer case to secure the SSD in place. Ensure that the SSD is firmly and securely seated in the drive bay.
7. Close the Computer Case: Carefully reattach the computer case panel and secure it with the screws you removed earlier. Double-check that all connections and cables are properly secured before closing the case. This will help prevent any loose connections that could cause issues later on.
8. Power On and Check Recognition: Once your computer case is securely closed, plug in the power cable and turn on your computer. As the system boots up, enter the BIOS or UEFI settings to verify that the SSD is recognized by the system. Check the storage or drive configuration section to ensure that the SSD is listed as one of the connected drives.
With the SSD properly connected and recognized by the system, you have successfully completed the first step in preparing your SSD for configuration to the GPT partitioning scheme. Now, you can proceed to the next step of accessing the BIOS or UEFI settings, which will be covered in detail in the following section.
Accessing the BIOS or UEFI Settings
In order to configure your solid-state drive (SSD) to the GPT (GUID Partition Table) partitioning scheme, you will need to access the BIOS (Basic Input/Output System) or UEFI (Unified Extensible Firmware Interface) settings of your computer. These settings allow you to make changes to various hardware and system configurations. Follow these steps to access the BIOS or UEFI settings:
1. Restart Your Computer: Save any ongoing work and restart your computer. Alternatively, if your computer is already turned off, power it on by pressing the power button.
2. Identify the Key: While the computer is starting up, pay attention to the screen for a message that indicates the key or keys required to access the BIOS or UEFI settings. Common keys include F2, F10, Del, or Esc. The precise key may vary depending on your computer’s manufacturer and model.
3. Press the Key: Once you’ve identified the key, immediately press it repeatedly as soon as the computer starts up. Press the key before the operating system starts loading or as soon as you see the manufacturer’s logo on the screen. This will typically ensure that you enter the BIOS or UEFI settings.
4. Enter the BIOS or UEFI Settings: After pressing the correct key, you should see a blue or black screen with text-based prompts or a graphical interface displaying various settings. This is the BIOS or UEFI settings screen, where you can make changes to your system’s configurations.
5. Navigate the BIOS or UEFI Settings: Depending on your computer manufacturer and BIOS or UEFI version, you will navigate the settings using the arrow keys on your keyboard. Use the arrow keys to move through the menu options and press Enter to select a specific option.
6. Explore the Settings: Spend some time exploring the different settings available in the BIOS or UEFI. The specific layout and options may vary, but common settings include those related to boot order, system date and time, storage configurations, and advanced features. Take note of any settings that may be related to the partitioning scheme or compatibility mode.
7. Save and Exit: Once you have made the necessary changes or verified the existing settings, locate the option to save the changes and exit. This is typically done by pressing a designated key, such as F10, or selecting an option from the menu. Ensure that you save the changes before exiting the BIOS or UEFI settings.
8. Restart Your Computer: After saving and exiting the BIOS or UEFI settings, your computer will restart. Allow it to boot up normally, and it will continue with the next steps of the configuration process.
By following these steps, you can access the BIOS or UEFI settings of your computer, which is necessary for configuring your SSD to the GPT partitioning scheme. In the next section, we will discuss the process of enabling or disabling legacy boot options, which will ensure compatibility with GPT.
Enabling or Disabling Legacy Boot Options
When configuring your solid-state drive (SSD) to the GPT (GUID Partition Table) partitioning scheme, it’s important to ensure compatibility with GPT by enabling or disabling legacy boot options in the BIOS (Basic Input/Output System) or UEFI (Unified Extensible Firmware Interface) settings. This step ensures that your system can handle the GPT partitioning scheme correctly. Follow these instructions to enable or disable legacy boot options:
1. Access the BIOS or UEFI Settings: Refer to the previous section for instructions on how to access the BIOS or UEFI settings on your computer. Restart your computer and press the designated key repeatedly while the system starts up to access the settings.
2. Navigate to the Boot Options: Once you are in the BIOS or UEFI settings, navigate to the section that contains the boot options. The specific name and location of this section may vary depending on your computer manufacturer and BIOS or UEFI version.
3. Find the Legacy Boot Options: Look for an option related to legacy boot or legacy mode, which may be called “Legacy Boot Support,” “Legacy BIOS Compatibility,” or something similar. This option determines whether the system will support booting from legacy MBR (Master Boot Record) partitions.
4. Enable or Disable Legacy Boot: Depending on your system’s current settings, you may need to enable or disable legacy boot options. If you want to enable legacy boot, select the appropriate option and choose “Enabled” or “Legacy” as the setting. If you want to disable legacy boot, choose “Disabled” or “UEFI” as the setting.
5. Save and Exit: Once you have made the necessary changes, save the settings and exit the BIOS or UEFI settings by selecting the appropriate option or pressing the designated key (often F10) to save and exit.
6. Restart Your Computer: After saving and exiting the BIOS or UEFI settings, your computer will restart. Allow it to boot up normally, and it will continue with the remaining steps of the configuration process.
Enabling or disabling legacy boot options ensures that your system is compatible with the GPT partitioning scheme. If your computer is relatively new and uses UEFI firmware, it’s recommended to disable legacy boot options and use the UEFI mode. However, if you have an older system or certain hardware requirements, enabling legacy support may be necessary.
Remember that the specific steps and options may vary depending on your computer’s manufacturer and BIOS or UEFI version. Refer to your system’s documentation or manufacturer’s website for more detailed instructions if needed.
With the legacy boot options appropriately enabled or disabled, you are now ready to proceed with selecting the GPT partitioning scheme in the BIOS or UEFI settings, which will be covered in detail in the next section.
Choosing the GPT Partitioning Scheme
Choosing the GPT (GUID Partition Table) partitioning scheme is a crucial step in configuring your solid-state drive (SSD) to the GPT scheme. This is done in the BIOS (Basic Input/Output System) or UEFI (Unified Extensible Firmware Interface) settings and ensures that your system recognizes and supports the GPT partitioning scheme. Follow these instructions to select the GPT partitioning scheme:
1. Access the BIOS or UEFI Settings: Refer to the previous sections for instructions on how to access the BIOS or UEFI settings on your computer. Restart your computer and press the designated key repeatedly while the system starts up to access the settings.
2. Navigate to the Boot Options: Once in the BIOS or UEFI settings, navigate to the section that contains the boot options. The name and location of this section may vary depending on your computer manufacturer and BIOS or UEFI version.
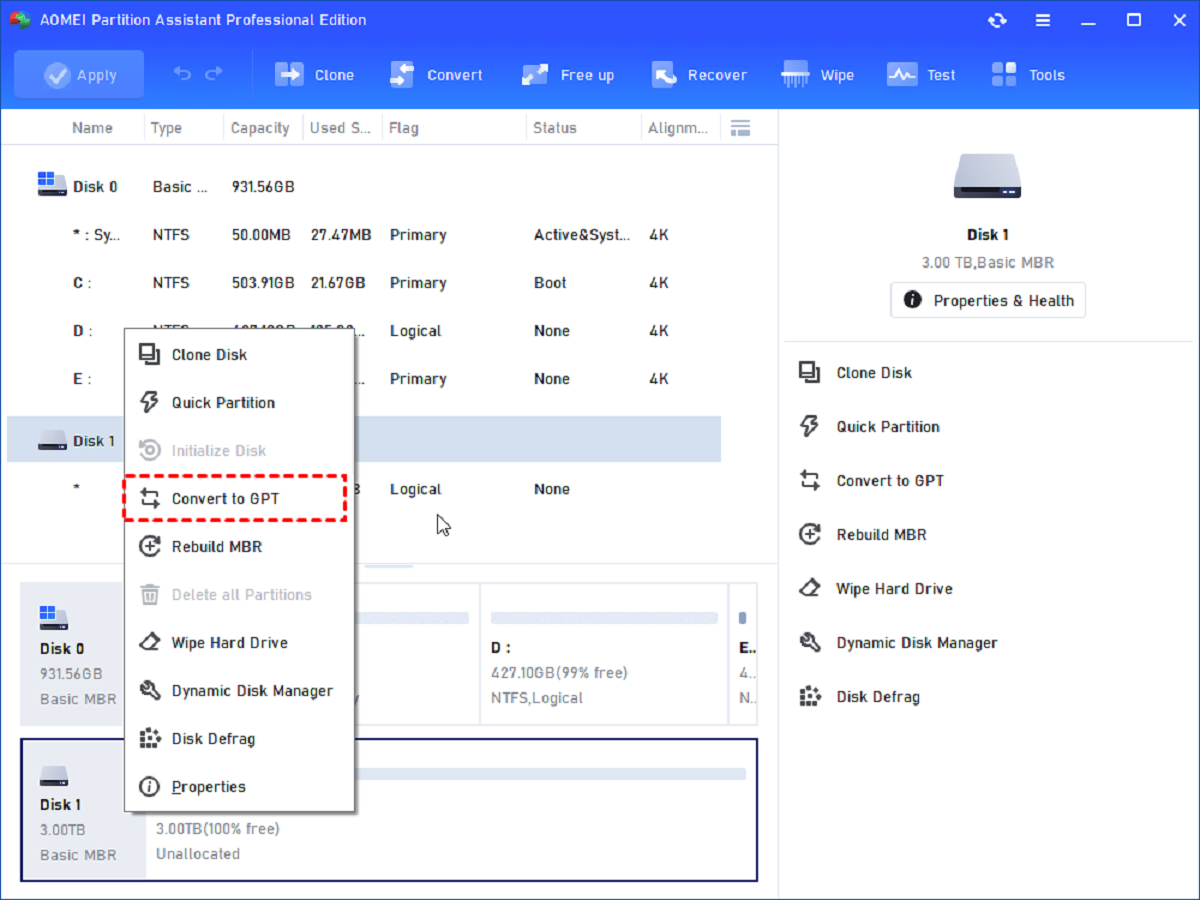
3. Find the Partitioning Scheme Option: Look for an option related to the partitioning scheme, which may be called “Partition Style,” “Partition Table Type,” or something similar. This option determines the type of partitioning scheme the system will use.
4. Set the Partitioning Scheme to GPT: Select the option related to the partitioning scheme and choose “GPT” from the available options. Some systems may only offer “MBR” (Master Boot Record) as the alternative option. Ensure that “GPT” is selected to configure your SSD with the appropriate partitioning scheme.
5. Save and Exit: Once you have selected the GPT partitioning scheme, save the settings and exit the BIOS or UEFI settings by selecting the appropriate option or pressing the designated key (often F10) to save and exit.
6. Restart Your Computer: After saving and exiting the BIOS or UEFI settings, your computer will restart. Allow it to boot up normally, and it will continue with the remaining steps of the configuration process.
By choosing the GPT partitioning scheme, you are ensuring that your system recognizes and supports the modern partitioning scheme required for your SSD. The GPT scheme allows for larger storage capacities, improved performance, and advanced data integrity features. Verify the partitioning scheme setting in the BIOS or UEFI settings before proceeding to the next steps of formatting and partitioning your SSD using the GPT scheme.
It’s important to note that the specific steps and options may vary depending on your computer’s manufacturer and BIOS or UEFI version. Refer to your system’s documentation or manufacturer’s website for more detailed instructions if needed.
Now that you have selected the GPT partitioning scheme, you can proceed to the next section, where we will discuss formatting and partitioning the SSD using the GPT scheme.
Formatting and Partitioning the SSD with GPT
After selecting the GPT (GUID Partition Table) partitioning scheme in the BIOS or UEFI settings, the next step in configuring your solid-state drive (SSD) is formatting and partitioning it using the GPT scheme. This process involves preparing the SSD for data storage and creating the desired partitions. Follow these instructions to format and partition your SSD with GPT:
1. Backup Your Data: Before proceeding with formatting and partitioning, ensure that you have backed up any important data on the SSD. This is a precautionary step to prevent the loss of data during the process.
2. Access Disk Management: On Windows, press Win + X and select “Disk Management” from the menu. On macOS, open “Disk Utility” from the Applications folder or search for it using Spotlight.
3. Identify the SSD: In Disk Management or Disk Utility, locate your SSD in the list of available disks. It should be labeled with the SSD’s manufacturer’s name or the assigned disk number.
4. Initialize the SSD: If it’s a new, unformatted SSD, you’ll be prompted to initialize it. Select the GPT partitioning scheme when prompted to ensure compatibility.
5. Format the SSD: Right-click (Windows) or Control-click (macOS) on the unallocated space of the SSD and select “Format” or “Erase.” Choose the desired file system (e.g., NTFS for Windows or APFS for macOS) and provide a name for the partition.
6. Create Partitions: After the formatting is complete, right-click (Windows) or Control-click (macOS) on the formatted partition and select “New Simple Volume” (Windows) or “Add Volume” (macOS). Follow the on-screen prompts to create additional partitions and assign them sizes.
7. Apply the Changes: Review the partition layout and configuration. Once you are satisfied, apply the changes to finalize the formatting and partitioning process. Be aware that this step is irreversible and will format and partition the SSD accordingly.
8. Verify the Partitions: After the process is complete, verify that the SSD has been successfully formatted and partitioned with the GPT scheme by checking the disk and partitions in Disk Management or Disk Utility.
By formatting and partitioning your SSD with the GPT scheme, you are ensuring compatibility with modern systems and unlocking the full capacity and features of your SSD. Ensure you have selected the GPT scheme during the formatting and partitioning process to avoid any compatibility issues.
Please note that the steps may slightly vary depending on the operating system and the specific tools used. Refer to the documentation of your operating system or seek additional resources for detailed instructions if needed.
Now that your SSD is properly formatted and partitioned, we can move on to the next step: installing the operating system on the newly configured GPT drive.
Installing the Operating System to the GPT Drive
With your solid-state drive (SSD) properly formatted and partitioned using the GPT (GUID Partition Table) scheme, the next step in configuring your SSD is to install the operating system onto the newly configured GPT drive. Follow these instructions to install the operating system to the GPT drive:
1. Prepare the Installation Media: Ensure that you have a bootable installation media for your operating system. This can be a USB drive or a DVD with the installation files or ISO image. If you don’t have one, create it by downloading the installation files from the official website of your operating system.
2. Configure Boot Priority: Access the BIOS or UEFI settings of your computer (see previous sections for instructions) and navigate to the boot options. Set the boot priority so that the installation media (USB drive or DVD) is the first boot device.
3. Boot from the Installation Media: Insert the installation media into your computer and restart it. Follow the on-screen instructions to boot from the installation media. Select the language, time zone, and other preferences as prompted.
4. Select the GPT Drive: During the installation process, you will reach a stage where you need to select the destination drive for the operating system installation. Choose the GPT partitioned SSD as the target drive. Ensure that you are not selecting any other drive or partition that you do not want to overwrite.
5. Follow the Installation Wizard: Proceed with the installation by following the instructions provided by the installation wizard. You may encounter additional prompts regarding partitioning options and formatting. Ensure that you do not accidentally format or delete any existing partitions that contain crucial data.
6. Complete the Installation: Once the installation process is complete, the computer will restart. Remove the installation media (USB drive or DVD) when prompted and allow the computer to boot from the SSD. Follow the on-screen instructions to set up the basic system configurations, including user accounts and preferences.
7. Install Device Drivers: After the operating system installation is complete, install any necessary device drivers specific to your hardware. These drivers ensure that your system functions properly and can take advantage of all the features and capabilities of the hardware components.
8. Update the Operating System: Finally, make sure to update the operating system to the latest version by installing official updates and patches. This ensures that your system is up to date with the latest security fixes, performance improvements, and driver updates.
By following these steps, you will successfully install the operating system onto the GPT drive and utilize the full potential of your SSD. It is worth noting that the specific steps and options may vary depending on the operating system you are installing and the version you are using.
Now that the operating system is installed, the next section will focus on verifying the GPT configuration in the system settings.
Verifying GPT Configuration in System Settings
Once you have successfully installed the operating system on your solid-state drive (SSD) configured with the GPT (GUID Partition Table) partitioning scheme, it’s important to verify the GPT configuration to ensure that everything is functioning correctly. Here’s how you can verify the GPT configuration in the system settings:
1. System Settings: Open the system settings on your operating system. In Windows, click on the Start menu and select “Settings.” On macOS, click on the Apple menu and select “System Preferences.”
2. Storage or Disk Management: Locate the storage or disk management section within the system settings. The location and name of this section may vary depending on the operating system you are using. In Windows, you can find it by searching for “Disk Management” in the Start menu. In macOS, it is available within the “System Preferences” under “Disk Utility.”
3. Identify the SSD: Look for your SSD in the list of connected storage devices. It should be labeled with the SSD’s manufacturer’s name or the assigned disk number.
4. Verify GPT: Check the information or details provided for the SSD. Look for confirmation that the partition style is GPT. This confirms that the SSD has been correctly configured with the GPT partitioning scheme.
5. Verify Partitions: Confirm that the partitions you created on the SSD are correctly displayed under the SSD’s details. Check the partition sizes, names, and file systems to ensure that they match the configuration you intended.
6. Additional Settings: Explore the system settings for any additional features or options related to your SSD or the GPT partitioning scheme. These may include options to enable or disable specific functionalities, adjust power or sleep settings, or configure advanced storage options.
7. Ensure Boot Order: Verify that the SSD is set as the primary boot device in the system settings. This ensures that the system boots from the SSD and utilizes the GPT configuration for the operating system startup.
8. Test System Functionality: After verifying the GPT configuration in the system settings, thoroughly test the system’s functionality to ensure that everything is working as expected. Open applications, access files, and perform tasks to ensure smooth operation and compatibility with the GPT partitioning scheme.
By following these steps, you can verify the GPT configuration in the system settings, confirming that your SSD is utilizing the GPT partitioning scheme correctly. This ensures optimal performance, stability, and compatibility with modern storage standards.
It’s important to note that the steps provided may vary slightly depending on the operating system and version you are using. Consult the documentation or seek additional resources specific to your operating system if needed.
With the GPT configuration successfully verified, your SSD is now fully optimized and ready for use. Enjoy the benefits of faster speeds, improved reliability, and advanced storage capabilities that the GPT partitioning scheme offers.
Troubleshooting Common GPT Configuration Issues
While configuring your solid-state drive (SSD) to the GPT (GUID Partition Table) partitioning scheme is typically a smooth process, there may be some common issues that can arise. Understanding and troubleshooting these issues can help you resolve them quickly and ensure a successful configuration. Here are some common GPT configuration issues and troubleshooting steps to address them:
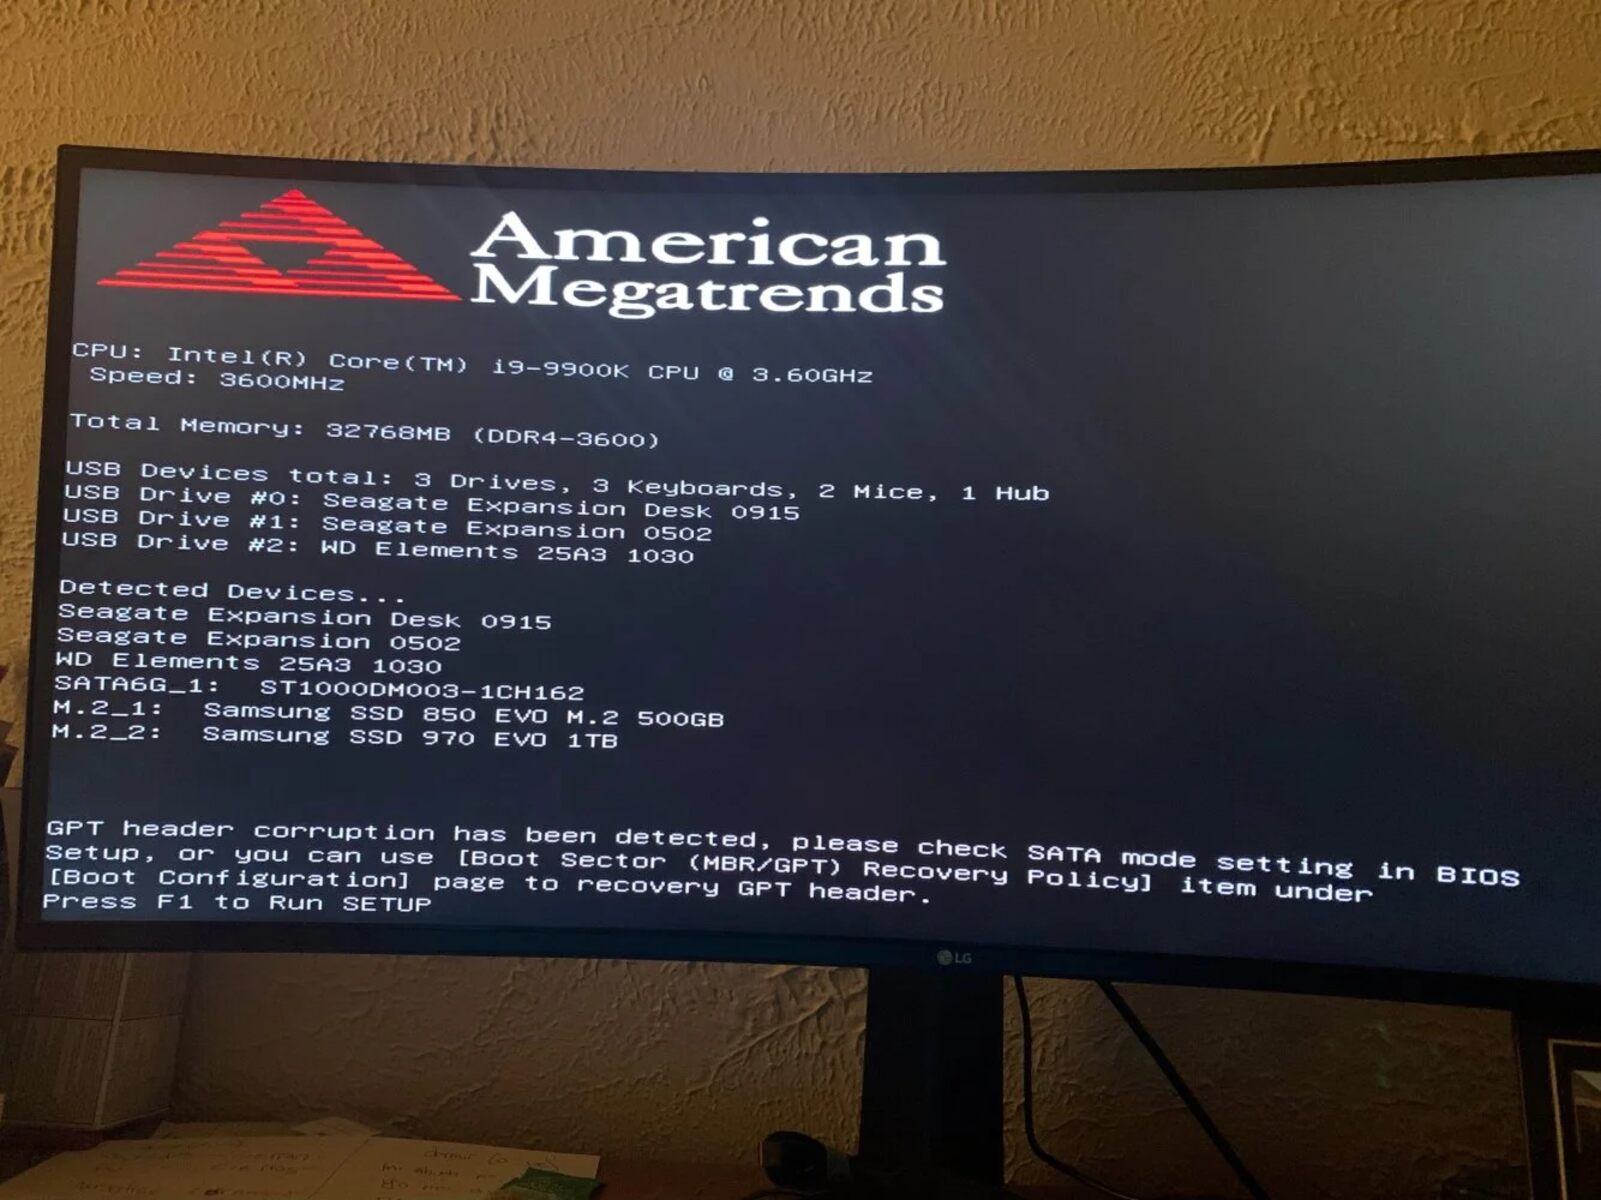
1. Incompatibility with Legacy BIOS: If you have an older system that uses the legacy BIOS (Basic Input/Output System) instead of UEFI (Unified Extensible Firmware Interface), it may not support booting from GPT partitions. In this case, you may need to enable legacy boot options or consider using the MBR partitioning scheme instead.
Troubleshooting Tip: Check your system’s documentation or contact the manufacturer to confirm if your system supports booting from GPT partitions. If not, review options for enabling legacy boot support or consider using MBR partitioning.
2. Data Loss during Partitioning: Incorrectly partitioning or formatting the SSD during the GPT configuration process can result in data loss. This can happen if you inadvertently format the wrong drive or delete important partitions.
Troubleshooting Tip: Always take precautions by backing up your data before proceeding with any partitioning or formatting. Double-check the SSD you are working on and carefully follow the steps to avoid accidentally formatting or deleting the wrong partitions.
3. Improper BIOS or UEFI Settings: Incorrect settings in the BIOS or UEFI firmware can prevent proper recognition of the GPT partitioning scheme or cause booting issues with the SSD.
Troubleshooting Tip: Verify that you have correctly selected the GPT partitioning scheme in the BIOS or UEFI settings. Ensure that you have disabled legacy boot options if using UEFI and vice versa. Review the settings related to storage or boot configuration to ensure they align with the GPT scheme.
4. Compatibility with Operating System: Some older operating systems may not support booting from GPT partitions, leading to compatibility issues during the installation process.
Troubleshooting Tip: Check the system requirements and compatibility of your operating system with the GPT partitioning scheme. If your operating system does not support GPT, consider using a compatible operating system or updating your current operating system to a newer version.
5. Incorrect Partition Alignment: Incorrect alignment of partitions on the SSD can result in decreased performance or compatibility issues with certain applications or operating systems.
Troubleshooting Tip: Use partitioning tools that automatically align partitions to the correct boundaries. If you have already partitioned the SSD and suspect alignment issues, you may need to reformat and recreate the partitions with proper alignment.
By troubleshooting these common GPT configuration issues, you can overcome any obstacles that may arise and ensure a successful configuration. It’s important to follow the proper steps, review system requirements, and take precautions to protect your data throughout the process.
If you encounter persistent issues or are unsure how to resolve them, it may be helpful to seek assistance from technical support or refer to specific documentation resources for your hardware or operating system.
Now that you are equipped with troubleshooting tips, you can confidently configure your SSD to the GPT partitioning scheme and enjoy the benefits it offers.
Conclusion
Configuring a solid-state drive (SSD) to the GPT (GUID Partition Table) partitioning scheme offers numerous benefits, including enhanced storage capacity, improved performance, increased data integrity, and compatibility with modern systems. By following the step-by-step guide provided in this article, you can successfully configure your SSD to GPT and optimize its functionality.
The process begins with preparing the SSD and accessing the BIOS or UEFI settings to enable or disable legacy boot options. Choosing the GPT partitioning scheme is essential, as it ensures your SSD is compatible with the latest technologies and supports larger storage capacities.
Furthermore, you need to format and partition the SSD using the GPT scheme, taking necessary precautions to back up your data and carefully following the steps to avoid data loss. Afterward, you can install the operating system on the GPT drive, followed by verifying the GPT configuration in the system settings.
It is important to be aware of and troubleshoot common issues that may arise during the configuration process, such as compatibility with legacy BIOS, potential data loss, incorrect BIOS or UEFI settings, operating system compatibility, and partition alignment problems. By understanding these issues and following the troubleshooting tips provided, you can overcome obstacles and ensure a successful configuration.
Remember to consult the documentation specific to your hardware and operating system for detailed instructions and seek assistance from technical support if needed. With the GPT configuration verified, your SSD is now fully optimized and ready for use, providing faster speeds, improved reliability, and advanced storage capabilities.
By configuring your SSD to the GPT partitioning scheme, you have taken a significant step toward maximizing the performance and functionality of your storage device. Enjoy the advantages of modern storage technology and unlock the full potential of your SSD for a seamless computing experience.