Introduction
When it comes to managing your computer’s storage, partitioning a hard disk drive is a crucial step that can greatly enhance your system’s performance and organization. But what exactly does it mean to partition a hard disk drive? In this article, we will explore the concept of hard disk partitioning, its benefits, different types of partitioning methods, and provide a step-by-step guide on how to partition a hard drive. So, whether you’re a tech enthusiast looking to optimize your storage space or a beginner wanting to learn more about computer hardware, this article will guide you through the fundamentals of hard disk drive partitioning.
A hard disk drive, commonly referred to as a hard drive, is the primary storage device in a computer system. It is where all your files, operating system, and applications are stored. When you partition a hard disk drive, you are essentially dividing it into separate sections or volumes to create multiple virtual drives. Each partition acts as an independent entity with its own file system and can be accessed and managed separately from the others.
Partitioning a hard disk drive offers numerous benefits. Firstly, it allows you to organize your data and programs more efficiently. By creating separate partitions, you can categorize your files and applications into logical groups, such as system files, personal data, and multimedia files. This organization not only makes it easier to locate and manage your data but also helps in optimizing system performance.
Another advantage of partitioning is improved data protection. If one partition becomes corrupted or infected with malware, the other partitions remain unaffected, reducing the risk of data loss. Additionally, partitioning can enhance system security by enabling the encryption of specific partitions, adding an extra layer of protection to sensitive data.
Furthermore, partitioning a hard drive can boost overall system performance. By distributing data across multiple partitions, you can minimize file fragmentation and improve read/write speeds. This can be particularly beneficial for activities such as video editing, gaming, and running software that requires large amounts of data access.
In the next sections of this article, we will delve into the different types of hard disk partitioning, discuss the differences between MBR and GPT partitioning methods, explain the distinction between partitioning and formatting, provide an overview of tools and software available for partitioning, and guide you through the step-by-step process of partitioning a hard disk drive. So, let’s embark on this journey to understand and master the art of hard disk drive partitioning!
Definition of Partitioning
Partitioning a hard disk drive refers to the process of dividing the drive into separate sections or volumes, essentially creating multiple virtual drives within a single physical drive. Each partition functions as an independent entity with its own file system, allowing for the organization and management of data in a more efficient and structured manner.
Think of partitioning as creating different compartments within a storage space. These compartments, or partitions, are created to serve specific purposes and hold specific types of data. By strategically allocating storage space to different partitions, you can better organize your files, applications, and operating systems.
Partitions are typically created using partitioning software or utilities, which are designed to handle the process of dividing the drive. When creating a partition, you specify criteria such as the size of the partition, the file system it will use, and any other specific settings or attributes that are relevant to your needs.
It’s important to note that while partitions divide the physical drive into separate sections, they do not physically separate the components of the hard drive. The drive itself remains a single unit, but the logical partitions provide an abstraction layer that allows for better management and utilization of storage space.
Each partition is assigned a unique identifier, known as a partition identifier or partition label, which distinguishes it from other partitions on the same drive. This identifier is used by the operating system to identify and access the specific partition.
Partitioning a hard disk drive is a common practice in various computing environments, including personal computers, servers, and even storage devices like external hard drives. It offers numerous benefits, such as improved organization, enhanced data protection, and optimized system performance.
In the next sections, we will explore the various types of hard disk partitioning, the differences between MBR and GPT partitioning methods, and provide you with a step-by-step guide on how to partition a hard disk drive. So, let’s dive deeper into the world of hard drive partitioning and unleash the potential of your storage space!
Benefits of Partitioning a Hard Disk Drive
Partitioning a hard disk drive offers several advantages that can greatly improve the organization, performance, and data protection of your computer system. Let’s explore some of the key benefits of partitioning:
1. Enhanced Organization: By dividing a hard drive into separate partitions, you can create a more structured and organized system for storing your files, applications, and operating systems. Each partition can be dedicated to a specific purpose or category, such as system files, personal data, or multimedia files. This not only streamlines the process of locating and managing your data but also allows for easier backup and recovery.
2. Improved Data Protection: When you partition a hard drive, you create isolated sections that act as independent entities. This means that if one partition becomes corrupted or infected with malware, the other partitions remain unaffected. By separating your data across multiple partitions, you can minimize the risk of complete data loss in the event of a system failure or malware attack.
3. Optimized System Performance: Partitioning can contribute to improved system performance by reducing file fragmentation and enhancing read/write speeds. Fragmentation occurs when files are scattered across the entire hard drive, leading to slower access times. By allocating specific partitions for different types of data, you can minimize fragmentation and ensure faster retrieval of files. Additionally, partitioning allows you to dedicate separate partitions for resource-intensive tasks, such as video editing or gaming, which can boost their performance.
4. Flexibility and Compatibility: Partitioning a hard drive provides flexibility when it comes to managing different operating systems or file systems. For example, you can create a separate partition for installing and running a different operating system, allowing you to have a dual-boot setup. Partitioning also facilitates compatibility with older systems that may not support larger partitions or specific file systems.
5. Enhanced Security: Partitioning can contribute to improved data security. By encrypting specific partitions, you can protect sensitive data from unauthorized access. Even if someone gains access to one partition, the encrypted data in other partitions remains secure. Partitioning can, therefore, add an extra layer of protection to your personal or confidential information.
Overall, partitioning a hard disk drive offers numerous benefits that can significantly improve the functionality and efficiency of your computer system. Whether it’s achieving better organization, enhancing data protection, optimizing performance, or adding flexibility, the advantages of partitioning make it a valuable practice for both personal and professional use.
In the following sections, we will explore the different types of hard disk partitioning methods, explain the differences between MBR and GPT partitioning, and provide you with a step-by-step guide on how to partition a hard disk drive. So, let’s continue our journey to discover more about the world of hard drive partitioning.
Different Types of Hard Disk Partitioning
There are two major types of hard disk partitioning methods: MBR (Master Boot Record) and GPT (GUID Partition Table). Each method has its own characteristics, limitations, and compatibility, so understanding the differences between them is essential when partitioning your hard disk drive. Let’s explore these two partitioning methods in detail:
MBR Partitioning: MBR partitioning has been the traditional method used in older computer systems. It uses the Master Boot Record located in the first sector of the hard drive to store the partition information. MBR supports a maximum of 4 primary partitions or 3 primary partitions and 1 extended partition. The extended partition can then be further divided into logical partitions. MBR has certain limitations, such as the maximum partition size of 2 terabytes (TB) and the inability to boot from disks larger than 2.2 TB. Despite these limitations, MBR remains widely used and preferred for compatibility reasons, especially with older operating systems and some disk management tools.
GPT Partitioning: GPT partitioning is a newer method that overcomes the limitations of MBR. It uses the GUID Partition Table scheme, which is located at the beginning and end of the disk, to store partition information. GPT supports up to 128 primary partitions, making it more suitable for advanced storage needs. It also allows for larger partition sizes, with a maximum capacity of 9.4 zettabytes (ZB). GPT partitioning is recommended for modern systems, especially those using UEFI (Unified Extensible Firmware Interface) instead of the older BIOS (Basic Input/Output System). It provides better support for larger disks, improved data redundancy and integrity through the use of backup copies of the partition table, and enhanced protection against partition table corruption.
When deciding which partitioning method to use, it’s important to consider the compatibility of your system and the specific requirements of your operating system and applications. Most modern systems support both MBR and GPT partitioning, but it’s best to check your system specifications or consult the manufacturer’s guidelines if you’re unsure.
It’s worth noting that converting from one partitioning method to another can be a complex process and may involve data loss. Therefore, it’s advisable to choose the appropriate partitioning method from the beginning based on your system and storage requirements.
In the next section, we will dive deeper into the workings of MBR partitioning, explore the differences between MBR and GPT partitioning methods, and provide you with insights to help you make an informed decision about which method to choose for your hard disk drive.
MBR Partitioning: How It Works
MBR (Master Boot Record) partitioning is the traditional method used in older computer systems to divide a hard disk drive into multiple partitions. It relies on a small data structure called the Master Boot Record, which is located in the first sector (usually sector 0) of the hard drive.
The MBR contains essential information for the system to boot, as well as the partition table, which defines the layout of the partitions on the disk. The partition table holds entries, known as partition records, that describe the starting and ending locations of each partition and their corresponding file systems.
One of the key features of MBR partitioning is the support for up to four primary partitions, or three primary partitions and one extended partition. An extended partition acts as a container for logical partitions, allowing you to create additional partitions beyond the limit of four primaries.
When the computer starts, the system BIOS (Basic Input/Output System) reads the MBR and transfers control to the bootloader stored within it. The bootloader then loads the operating system, which in turn recognizes and accesses the partitions based on the information stored in the partition table.
However, MBR partitioning has certain limitations. The most notable limitation is the maximum partition size of 2 terabytes (TB). This means that if you have a hard drive larger than 2 TB, you cannot create a single partition that utilizes the entire disk space using MBR.
Additionally, MBR partitioning has limitations when it comes to booting from disks larger than 2.2 TB and supports a maximum of four primary partitions or three primary partitions and one extended partition.
Despite these limitations, MBR partitioning remains widely used and compatible with various operating systems, including older ones. Many disk management tools and utilities also support MBR partitioning, making it a practical choice for compatibility purposes.
It’s important to note that if you have a hard drive larger than 2 TB or you require more than four primary partitions, you should consider using GPT (GUID Partition Table) partitioning, which we will discuss in the next section. Converting from MBR to GPT can be a complex process and may involve data loss, so it’s best to choose the appropriate partitioning method based on your needs from the beginning.
In the next section, we will explore GPT partitioning, its advantages over MBR, and the differences between the two methods to help you make an informed decision about which partitioning method is best suited for your hard disk drive.
GPT Partitioning: How It Differs from MBR
GPT (GUID Partition Table) partitioning is a newer method of partitioning a hard disk drive that offers several advantages over MBR (Master Boot Record) partitioning. GPT incorporates a more advanced partitioning scheme that overcomes the limitations of MBR and provides greater flexibility and functionality.
One of the key differences between GPT and MBR partitioning is the way they store partition information. GPT uses a GUID (Globally Unique Identifier) Partition Table, which is located at the beginning and end of the disk. This table contains all the partition entries and critical information required to identify and manage the partitions.
An important advantage of GPT partitioning is its support for larger capacity drives. While MBR partitioning has a limitation of 2 terabytes (TB) for partition size, GPT allows for significantly larger partition sizes—up to 9.4 zettabytes (ZB). This makes GPT more suitable for modern storage needs, especially with the increasing availability of high-capacity hard drives and solid-state drives.
Another distinguishing feature of GPT partitioning is its ability to support up to 128 primary partitions. This is a significant increase compared to the maximum of four primary partitions supported by MBR. The larger number of primary partitions allows for more granular control over data organization and allocation, making GPT ideal for complex storage configurations.
GPT partitioning also offers improved data redundancy and integrity. It stores backup copies of the partition table at the beginning and end of the disk, ensuring that the partition information can be recovered in case of a single point of failure or corruption. This added protection minimizes the risk of partition table corruption and enhances data security and recoverability.
Additionally, GPT partitioning supports modern firmware systems, such as Unified Extensible Firmware Interface (UEFI), which is becoming increasingly common in newer computers. UEFI firmware provides a more advanced and feature-rich platform for booting and managing systems, offering advantages over the legacy BIOS (Basic Input/Output System) used with MBR partitioning.
It’s important to note that while GPT partitioning offers numerous advantages, it does have some limitations as well. GPT partitioning might not be fully compatible with older operating systems or older disk management utilities that only support MBR. Therefore, it’s important to ensure that your system and tools are compatible with GPT before adopting this partitioning method.
Before choosing between GPT and MBR partitioning, consider the specific requirements of your system, the size of your hard drive, and the compatibility of your operating system and software. Evaluating these factors will help you make an informed decision and select the partitioning method that best suits your needs.
In the next section, we will discuss the differences between partitioning and formatting, helping you better understand the distinction between these two crucial aspects of managing your hard disk drive.
Partitioning vs Formatting: Understanding the Difference
Partitioning and formatting are two distinct processes that are essential for managing a hard disk drive, but they serve different purposes and have different functionalities. Let’s explore the differences between partitioning and formatting:
Partitioning: Partitioning refers to the process of dividing a hard disk drive into separate sections or volumes, called partitions. Each partition acts as an independent entity with its own file system and allocated storage space. Partitioning allows you to organize and manage your data more efficiently by creating logical divisions within the physical disk. Think of it as creating different compartments within a storage space to allocate and manage your files, applications, and operating systems.
Formatting: Formatting, on the other hand, is the process of preparing a partition or a storage device to store data. It involves setting up the file system on a partition or a disk, which determines how data is organized, stored, and accessed. Formatting creates the necessary structures, such as the file allocation table, master file table, or inode table, depending on the file system used. Formatting essentially prepares the partition or disk to receive and store files, making it usable for data storage.
In simpler terms, partitioning deals with dividing the disk into separate sections, while formatting deals with the file system and the internal structure of those sections.
It’s important to note that partitioning and formatting are often performed together when setting up a new hard disk drive or when reconfiguring an existing one. When you partition a hard drive, you typically format each partition to create the file system necessary for storing files and data within that partition.
When formatting a partition, you have the option to choose from different file system formats, such as NTFS, FAT32, exFAT, or ext4, depending on the operating system and the specific requirements of your intended usage. Each file system has its own advantages and limitations in terms of file size support, compatibility, security features, and more.
It’s important to emphasize that formatting a partition erases all existing data within that partition. Therefore, it’s crucial to take appropriate backups before formatting a partition, especially if you have important data stored on it.
In summary, partitioning involves dividing the hard disk drive into separate sections, while formatting sets up the file system within those partitions to prepare them for storing data. Understanding the distinction between partitioning and formatting is essential for effectively managing your hard disk drive and optimizing data storage.
In the next section, we will discuss the various tools and software available for partitioning hard disk drives, providing you with options to choose from when configuring your storage system.
Tools and Software for Partitioning Hard Drives
When it comes to partitioning hard drives, there are various tools and software available that can simplify the process and provide you with the necessary functionality to manage your storage efficiently. Let’s explore some of the popular tools and software options:
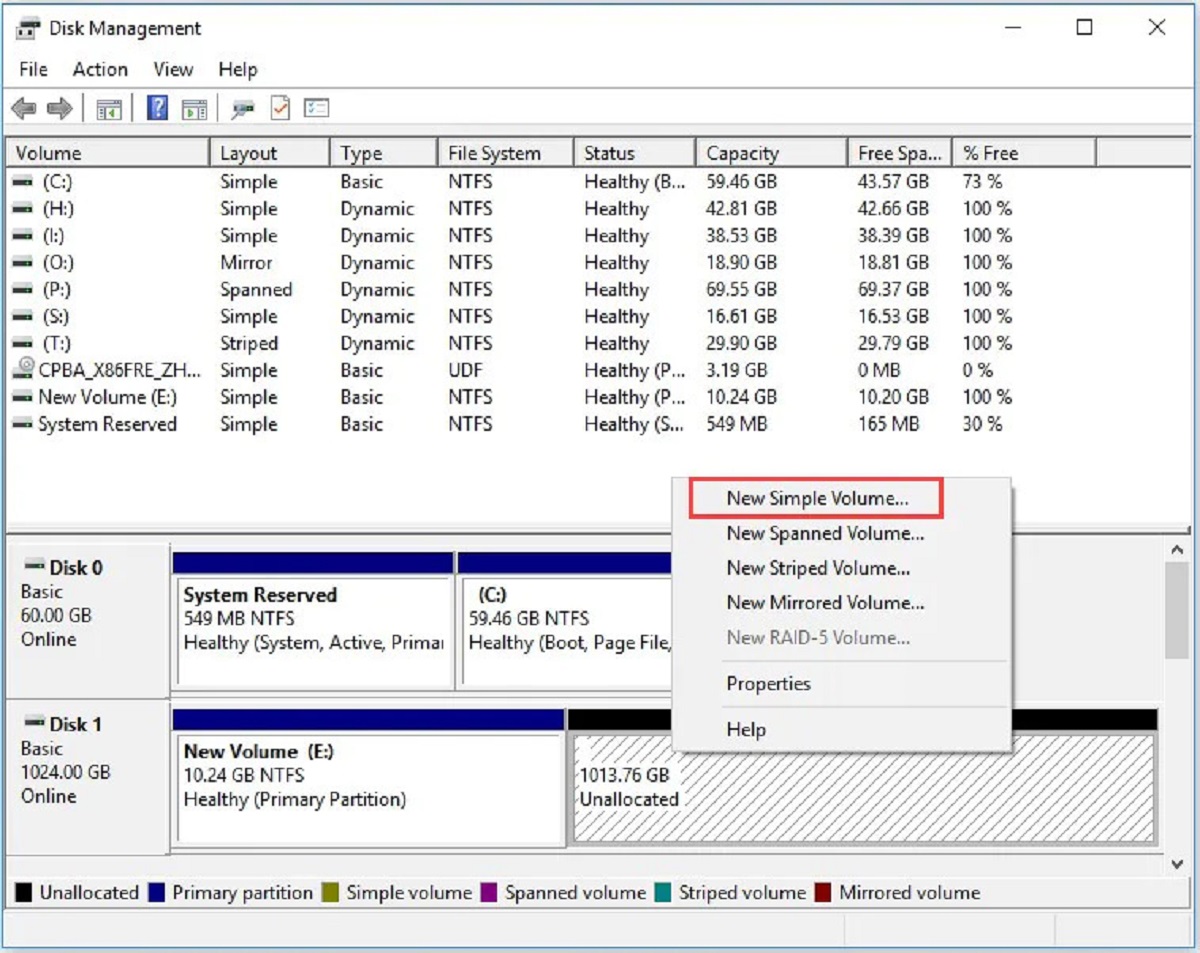
1. Disk Management (Windows): Windows operating systems, such as Windows 10, offer built-in disk management tools that allow you to partition and manage your hard drives. You can access the Disk Management utility by typing “diskmgmt.msc” in the Run dialog box. This tool provides basic partitioning features, including the ability to create, delete, resize, and format partitions.
2. Disk Utility (Mac): Mac users can utilize the Disk Utility application, which is built into macOS. This tool enables partitioning, formatting, and managing hard drives on Mac computers. You can access Disk Utility by navigating to “Applications” > “Utilities” > “Disk Utility”. It provides a user-friendly interface for partitioning and managing storage devices.
3. GParted: GParted is a free and open-source partition editor that works across different operating systems, including Windows, Mac, and Linux. It offers advanced partition management features such as creating, resizing, moving, and deleting partitions. GParted provides a graphical interface and is often used for more complex partitioning operations.
4. EaseUS Partition Master: EaseUS Partition Master is a comprehensive partition management software for Windows. It offers a wide range of features, including partition creation, resizing, merging, copying, and conversion between different partition formats. EaseUS Partition Master provides a user-friendly interface and is suitable for both novice and advanced users.
5. Paragon Partition Manager: Paragon Partition Manager is another popular software for partition management in Windows systems. It offers a range of features, including partition resizing, copying, merging, and converting partitions between different formats. Paragon Partition Manager includes advanced tools for data migration and secure disk wiping.
These are just a few examples of the many tools and software available for partitioning hard drives. Depending on your specific needs and preferences, you can choose the most suitable option. Before using any partitioning software, ensure that you have a backup of your important data, as partitioning operations can potentially lead to data loss if not executed correctly.
In addition to these dedicated partitioning tools, some operating systems also provide command-line utilities, such as fdisk and parted, which offer more advanced partition management capabilities at the command-line level.
Before proceeding with any partitioning operation, it’s important to familiarize yourself with the instructions and guidelines provided by the software or tool you choose. This will help you perform the partitioning process accurately and avoid any potential risks or data loss.
In the next section, we will provide you with a step-by-step guide on how to partition a hard disk drive, walking you through the process and ensuring a smooth partitioning experience.
How to Partition a Hard Disk Drive: Step-by-Step Guide
Partitioning a hard disk drive is a straightforward process that requires careful planning and execution. Follow these step-by-step instructions to partition your hard drive:
Step 1: Backup Your Data
Before you begin partitioning, it is crucial to back up all your important data. Partitioning may involve modifying disk structures, which can potentially lead to data loss if not done correctly.
Step 2: Choose the Right Partitioning Tool
Select a partitioning tool that fits your specific operating system and requirements. Choose from the options mentioned earlier, such as Disk Management (Windows), Disk Utility (Mac), GParted, EaseUS Partition Master, or Paragon Partition Manager.
Step 3: Launch the Partitioning Tool
Open the selected partitioning tool on your computer. Depending on the tool, you may need administrative privileges to perform partitioning operations.
Step 4: Identify the Hard Disk Drive
Select the hard disk drive you wish to partition from the list of available disks. Ensure that you choose the correct disk to avoid accidental partitioning or data loss.
Step 5: Choose the Partitioning Method
Determine the partitioning method you want to utilize: MBR or GPT. Consider your system’s compatibility, disk size, and other requirements before making a decision.
Step 6: Create a New Partition
Click on the option to create a new partition. Specify the size and location of the partition according to your needs. You may also be prompted to choose the file system format for the partition.
Step 7: Repeat if Necessary
If you want to create multiple partitions, repeat the previous step for each new partition you desire. Allocate the desired size and adjust the location accordingly.
Step 8: Modify Partition Properties (if applicable)
If the partitioning tool offers additional options or settings for the partitions, such as assigning a drive letter, adjusting the partition label, or setting the partition as active, configure these properties as needed.
Step 9: Review and Confirm
Double-check the partition layout, sizes, and configurations to ensure everything is set up correctly. Confirm your selections before proceeding with the partitioning process.
Step 10: Apply and Execute
Apply the changes and execute the partitioning process. The tool will initiate the partition creation and modification according to your specifications.
Step 11: Verify the Partition Changes
After the partitioning process is complete, verify the changes by checking the disk management tool or utility. Ensure that the partitions are created as intended and appear in the correct sizes and configurations.
Congratulations! You have successfully partitioned your hard disk drive. The new partitions are ready to be utilized for data storage, organization, and other purposes as per your requirements.
Remember to re-install your backed-up data into the appropriate partitions and configure your system to use them effectively.
In the next section, we will discuss some of the common mistakes to avoid when partitioning a hard drive to ensure a smooth and error-free process.
Common Mistakes to Avoid When Partitioning a Hard Drive
Partitioning a hard drive is a critical process that requires careful attention to detail to avoid potential errors and data loss. Here are some common mistakes to avoid when partitioning a hard drive:
1. Not backing up important data: Failing to back up your important data before partitioning is a significant mistake. Partitioning involves modifying disk structures, which can result in data loss if not done correctly. Always create a backup of your files to ensure their safety.
2. Partitioning the wrong disk: Choosing the wrong disk to partition is a common mistake that can lead to accidental data loss. Double-check the disk’s identity and verify that you have selected the correct one before proceeding with any partitioning operations.
3. Incorrectly setting partition sizes: Misjudging the appropriate partition sizes is a common mistake. It’s crucial to allocate enough space to each partition based on the intended usage. Consider future needs as well, as resizing partitions can be a complex and time-consuming process.
4. Formatting instead of partitioning: Confusing formatting with partitioning is another mistake to avoid. Formatting erases all data on a partition, while partitioning creates the logical divisions for organizing and managing data. Be cautious when selecting the appropriate operation to perform.
5. Not considering compatibility: Failing to consider the compatibility of partitioning methods and file systems with your operating system and applications can lead to issues. Ensure that the chosen partitioning method and file system are supported by your system for seamless functionality.
6. Ignoring the limitations of MBR: If you choose MBR partitioning, it’s essential to be aware of its limitations. These include the maximum partition size of 2 terabytes (TB) and the limitation of four primary partitions (or three primary partitions and one extended partition).
7. Not properly allocating partitions: Carelessly allocating partitions without considering the specific purposes or categories of the data can lead to disorganization and inefficiency. Plan the partition layout based on how you intend to use your data and applications.
8. Rushing through the process: Partitioning requires careful planning and execution. Rushing through the process can result in mistakes and errors. Take your time to read instructions, understand the partitioning tool’s features, and double-check your choices before proceeding.
9. Not updating or using outdated partitioning tools: Using outdated partitioning tools or not keeping them updated can lead to compatibility issues or missing out on new features and improvements. Always use the latest versions of reliable partitioning software.
10. Not testing the new partitions: After partitioning, it’s essential to verify that the new partitions are functioning correctly. Check if they appear as intended and test read and write operations on each partition to ensure their usability.
By avoiding these common mistakes, you can ensure a smooth and error-free partitioning process, minimizing the risk of data loss and maximizing the efficiency and organization of your storage system.
In the next section, we will address some frequently asked questions (FAQs) related to partitioning a hard disk drive, providing further clarity on common concerns and queries.
Frequently Asked Questions (FAQs)
Here are some frequently asked questions (FAQs) about partitioning a hard disk drive:
Q: Can I partition my hard drive without losing data?
A: Partitioning a hard drive typically involves modifying disk structures, which can result in data loss. It’s crucial to back up your important data before partitioning to ensure its safety.
Q: How many partitions can I create on my hard drive?
A: The number of partitions you can create depends on the partitioning method you choose. MBR partitioning supports up to four primary partitions or three primary partitions and one extended partition, while GPT partitioning allows for up to 128 primary partitions.
Q: Can I change the size of a partition after it is created?
A: Yes, it is possible to change the size of a partition after it is created. However, resizing partitions can be a complex process that may involve moving data and can potentially result in data loss. It’s recommended to back up your data before attempting any resizing operations.
Q: What is the difference between a primary partition and a logical partition?
A: A primary partition is a partition that can be used to install an operating system and is recognized as a separate entity by the system’s boot loader. On the other hand, a logical partition is a partition created within an extended partition and is primarily used to organize and manage data.
Q: Can I convert a partition from MBR to GPT (or vice versa)?
A: Converting a partition from MBR to GPT or vice versa is a complex process and often involves data loss. It’s recommended to back up your data and consult professional guidance or reliable software tools specifically designed for such conversions.
Q: Can I use a partitioned hard drive with different operating systems?
A: Yes, you can use a partitioned hard drive with multiple operating systems by creating separate partitions for each operating system. This allows for a dual-boot or multi-boot setup, where you can choose which operating system to boot into when starting your computer.
Q: Can I remove a partition and reclaim the space?
A: Yes, you can remove a partition and reclaim the space by deleting the partition. However, this process will result in data loss, so it’s crucial to back up any important data before performing such an operation.
These are just a few common questions related to partitioning a hard disk drive. If you have specific concerns or queries about partitioning, it’s always recommended to consult manufacturer guidelines, software documentation, or seek professional assistance.
In the next section, we will conclude our article on partitioning a hard disk drive, summarizing the key points discussed and providing some final insights.
Conclusion
Partitioning a hard disk drive is a fundamental process that allows for efficient organization, improved data protection, and optimized performance of your computer system. By dividing your hard drive into separate partitions, you can better manage your files, applications, and operating systems, ensuring easy access and streamlined data storage.
In this article, we explored the concept of partitioning, the benefits it offers, and the different partitioning methods available. We discussed MBR and GPT partitioning methods, their characteristics, and compatibility considerations. We also highlighted the distinction between partitioning and formatting, emphasizing the importance of understanding their differences.
Furthermore, we provided a step-by-step guide to help you partition your hard disk drive accurately. We covered common mistakes to avoid during the partitioning process and recommended backing up your data to prevent potential data loss.
We also mentioned various tools and software available for partitioning, such as Disk Management, Disk Utility, GParted, EaseUS Partition Master, and Paragon Partition Manager, catering to different operating systems and user preferences.
Lastly, we addressed frequently asked questions related to partitioning, clarifying common concerns and providing insights into managing partitions effectively.
By understanding the concepts, considering compatibility, backing up data, and following best practices, you can successfully partition your hard disk drive and leverage the benefits it offers. Whether you’re organizing your personal files or configuring a complex storage system, the ability to partition a hard drive is a valuable skill that can enhance your computer experience.
Remember to always consider the specific requirements of your operating system and applications, as well as the limitations and capacities of your hard drive. Regularly review and adjust your partition configurations as your needs evolve.
We hope this article has provided you with the knowledge and confidence to effectively partition your hard disk drive and optimize your storage management. Happy partitioning!