Introduction
The Samsung Galaxy S6 is a high-performance smartphone that has captured the hearts of tech enthusiasts around the world. Whether you are a novice or experienced user, knowing how to open the Samsung Galaxy S6 can be a valuable skill to possess. Whether you are looking to replace a damaged component or simply want to explore the inner workings of your device, this guide will take you through the step-by-step process of disassembling and reassembling your Galaxy S6.
Before we dive into the instructions, it is important to note that opening your smartphone may void any remaining warranty. It is always wise to check with the manufacturer or a professional technician if your device is still covered under warranty. Additionally, proceed with caution and take your time when handling delicate components to avoid causing any unintended damage.
Ways that knowing how to open the Samsung Galaxy S6 can benefit you:
- Replace a cracked or damaged screen
- Repair or replace a faulty charging port
- Replace a worn-out battery for improved performance
- Upgrade or replace internal components
Now that we have covered these important points, let’s move on to the tools and steps you’ll need to successfully open your Samsung Galaxy S6.
Tools Needed
Before you begin the process of opening your Samsung Galaxy S6, it is important to gather the necessary tools. Having the right tools on hand will make the disassembly and reassembly process much smoother. Here are the tools you will need:
1. Phillips screwdriver: You will need a small Phillips screwdriver to unscrew and remove the screws holding the device together.
2. Suction cup: A suction cup is useful for lifting and removing the back cover of the Galaxy S6 without causing any damage.
3. Plastic prying tool: This tool is used to safely pry open the device’s housing and separate the components.
4. Tweezers: Tweezers will come in handy when handling small screws, connectors, or delicate components.
5. Spudger: A spudger is a non-conductive tool that can be used to disconnect cables and connectors without causing damage.
6. Heat gun or hairdryer (optional): If you encounter any difficulty in removing the back cover, you can use a heat gun or hairdryer on low heat to soften the adhesive.
7. Anti-static wrist strap (optional): This aids in grounding yourself and preventing static electricity from damaging sensitive components.
It is recommended to gather all the necessary tools before you start the disassembly process. This will help you avoid delays or interruptions during the procedure. Once you have collected the tools mentioned above, you are ready to proceed with opening your Samsung Galaxy S6.
Step 1: Power Off the Device
Before you begin disassembling your Samsung Galaxy S6, it is essential to power off the device. This step ensures your safety and prevents any potential damage to the internal components. Here’s how to power off your Galaxy S6:
1. Locate the power button on the right side of your device. It is typically situated below the volume buttons.
2. Press and hold the power button until the power menu appears on the screen.
3. On the power menu, tap “Power off” to initiate the shutdown process.
4. The Galaxy S6 will display a confirmation prompt. Tap “OK” to confirm the power-off action.
5. Wait for the device to completely power down. You can verify this by ensuring that the screen is blank and no LED lights are lit.
It is crucial to power off your device before proceeding with any repair or disassembly work. This prevents any accidental data loss or damage to internal components. Take your time to ensure that the device is completely powered off before moving on to the next step.
Remember, safety should be your priority throughout the entire process. Powering off the device may seem like a simple step, but it is necessary to protect both yourself and your device from harm. With your Galaxy S6 powered off, you are now ready to move on to the next step of the disassembly process.
Step 2: Remove the SIM Card Tray
Before you can proceed with opening your Samsung Galaxy S6, you need to remove the SIM card tray. This is necessary to access the internal components of the device. Follow these steps to remove the SIM card tray:
1. Locate the SIM card tray slot on the top edge of your Galaxy S6. This slot is usually situated on the right side of the device.
2. Insert the SIM card removal tool (or a small paperclip) into the small hole next to the SIM card tray slot.
3. Apply gentle pressure to push the tool into the hole until the tray pops out slightly.
4. Pull out the SIM card tray using your fingers or gently remove it with the tool.
5. Once the tray is removed, take out the SIM card and set it aside in a safe place for later use.
It is important to handle the SIM card tray with care to avoid any damage. Be gentle when inserting or removing it to prevent bending or breaking the tray or the connectors inside the device.
Removing the SIM card tray is a straightforward and crucial step in the disassembly process. With the tray safely removed, you can now proceed to the next step of opening your Samsung Galaxy S6 and accessing its internal components.
Step 3: Remove the Back Cover
With the SIM card tray removed, you can now move on to removing the back cover of your Samsung Galaxy S6. The back cover houses the internal components and provides protection to the device. Follow these steps to safely remove the back cover:
1. Place your Galaxy S6 face down on a clean and flat surface. This will prevent any scratches or damage to the screen.
2. Locate the small notch on the bottom left corner of the device’s back cover. This is where you will start the removal process.
3. Insert a suction cup near the notch, ensuring a strong seal between the suction cup and the back cover.
4. Apply steady pulling pressure on the suction cup while simultaneously using a plastic prying tool to gently separate the back cover from the device.
5. Slowly work your way around the edges of the device, releasing the adhesive that holds the back cover in place. Take your time and be patient, as excessive force may damage the cover or other components.
6. Once the back cover is loosened, lift it off the device completely and set it aside.
It is common for the back cover to be held in place with adhesive tape or adhesive strips. Gently sliding the prying tool underneath the cover can help to separate it from the device. Take care not to damage any of the small ribbon cables that may be attached to the cover.
Removing the back cover is an important step in accessing the internal components of your Samsung Galaxy S6. Once the back cover is successfully removed, you can proceed to the next step and continue disassembling your device.
Step 4: Disconnect the Battery
With the back cover removed, you now have access to the internal components of your Samsung Galaxy S6. Before proceeding further, it is crucial to disconnect the battery to ensure safety and prevent any accidental damage to the device. Follow these steps to disconnect the battery:
1. Locate the battery connector, which is a thin cable connected to the motherboard near the center of the device.
2. Carefully use a plastic prying tool or tweezers to gently lift the connector upwards. Be cautious not to apply excessive force to avoid damaging the connector or the motherboard.
3. Once the connector is lifted, it will detach from the motherboard, disconnecting the battery from the device.
4. Gently set the disconnected battery connector aside.
By disconnecting the battery, you eliminate the risk of accidentally short-circuiting the device while working on the internal components. It is vital to ensure that the battery is disconnected throughout the disassembly and reassembly process to prevent any electrical mishaps.
Remember to exercise caution when handling the battery connector and avoid touching any exposed metal parts to prevent any electrical shock. Once you have successfully disconnected the battery, you are ready to proceed to the next step of opening your Samsung Galaxy S6.
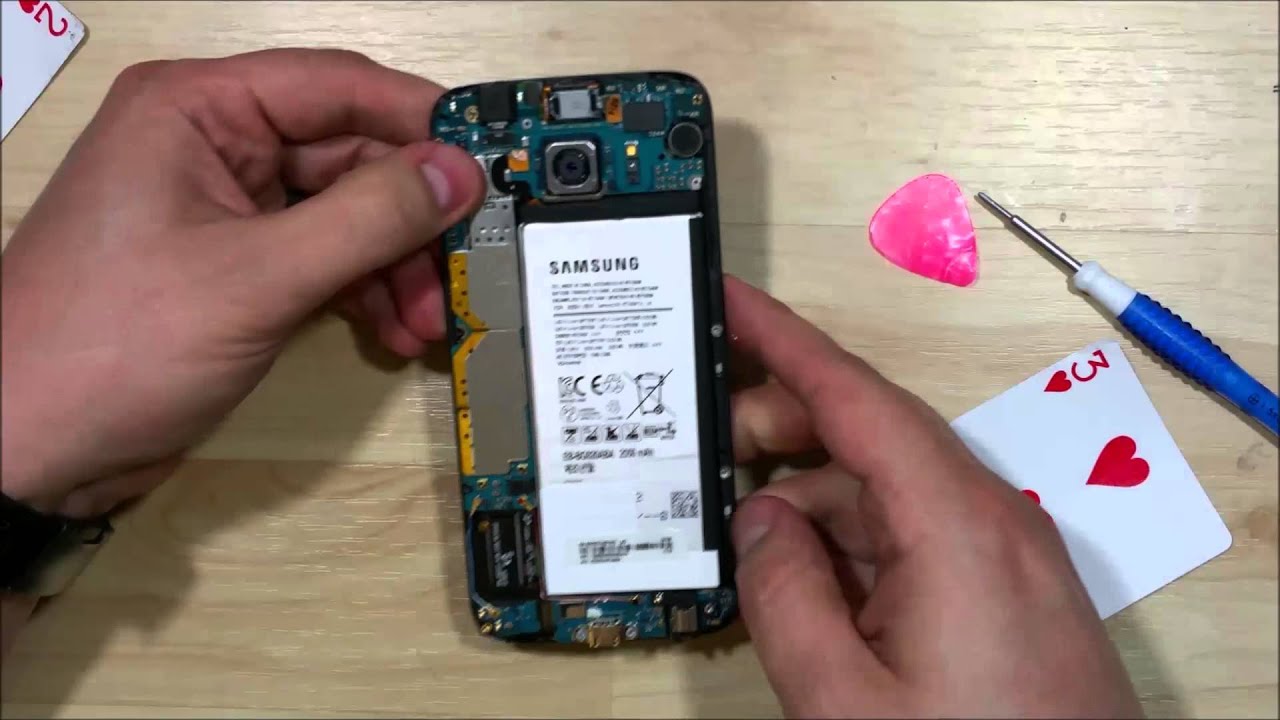
Step 5: Remove the Rear Camera
The next step in opening your Samsung Galaxy S6 is to remove the rear camera. This component is essential for capturing photos and videos, and it needs to be disconnected before further disassembly. Follow these steps to remove the rear camera:
1. Locate the rear camera module, which is positioned on the back of the device.
2. Depending on the model of your Galaxy S6, you may need to unscrew a retaining bracket that secures the camera in place. Use a Phillips screwdriver to loosen and remove any screws if necessary.
3. Once the retaining bracket is removed, carefully disconnect the camera’s ribbon cable by gently lifting the connector with a plastic prying tool.
4. If there are any adhesive strips securing the camera, carefully peel them off or gently use a plastic prying tool to release the camera from the adhesive.
5. Slowly lift the rear camera module out of its housing, taking care not to damage any of the delicate components.
It is crucial to handle the rear camera module with care as it contains sensitive optics and delicate electronic components. Avoid applying excessive force or twisting motions that may cause damage.
Removing the rear camera allows you to access other components of your device and proceed with any necessary repairs or replacements. With the rear camera successfully removed, you can now move on to the next step and continue disassembling your Samsung Galaxy S6.
Step 6: Remove the Motherboard
As you continue to disassemble your Samsung Galaxy S6, the next step is to remove the motherboard. The motherboard is the main circuit board of the device, housing various important components. Follow these steps to remove the motherboard:
1. Locate the motherboard, which is the large rectangular board that the other components are connected to.
2. Carefully disconnect any ribbon cables or connectors attached to the motherboard. Use a plastic prying tool or tweezers to gently lift the connectors away from their sockets.
3. If there are screws securing the motherboard in place, use a Phillips screwdriver to loosen and remove them. Take note of the screw locations as they may differ depending on the device model.
4. Once all the connectors and screws are removed, gently lift the motherboard out of its housing. Be cautious of any adhesive or clips that may still be holding the motherboard in place.
5. Set the motherboard aside in a safe location to prevent any damage or static electricity discharge.
When handling the motherboard, it is essential to be gentle and avoid applying excessive force. The motherboard is a delicate and sensitive component, and mishandling it can result in irreparable damage.
Removing the motherboard allows you to access other internal components or proceed with repairs. With the motherboard successfully removed, you are now ready to move on to the next step in opening your Samsung Galaxy S6.
Step 7: Accessing the Charging Port
In this step, we will focus on accessing the charging port of your Samsung Galaxy S6. The charging port is a crucial component that allows you to charge your device and connect it to other devices. Follow these steps to access the charging port:
1. Locate the charging port, which is usually positioned at the bottom of your device.
2. If there is a plastic cover or protective flap over the charging port, gently lift or remove it using a plastic prying tool or your fingernail.
3. Inspect the charging port for any dust, lint, or debris that may have accumulated over time. Use a small brush or a toothbrush with soft bristles to gently clean out any obstructions. Be careful not to damage the pins or connector inside the charging port.
4. If you suspect that the charging port is faulty and needs to be replaced, you will need to disconnect any cables or connectors attached to it. Use a plastic prying tool or tweezers to gently lift the connectors away from their sockets. Take note of the connections and the order in which they are attached.
5. Once the necessary cables or connectors are disconnected, you can remove the charging port assembly by unscrewing any screws or unclipping any clips that may be holding it in place. Again, take note of their locations as they may differ depending on the device model.
6. Carefully lift and remove the charging port assembly from the device, ensuring that no other components are inadvertently pulled or damaged.
Pay close attention to the connectors and pins when cleaning or disconnecting the charging port. Excessive force or mishandling can result in damage to the device or the charging port itself.
By accessing and inspecting the charging port, you can ensure that it is clean and functioning properly. If necessary, you can also proceed with replacing the charging port assembly. With the charging port accessed, you are now ready to move on to the final step of reassembling your Samsung Galaxy S6.
Step 8: Reassembling the Device
After completing the necessary repairs or replacements, it’s time to reassemble your Samsung Galaxy S6. Follow these steps to carefully put the device back together:
1. Begin by aligning the motherboard into its housing. Make sure all connectors and cables are properly connected to their respective sockets.
2. If you removed any screws during the disassembly process, reinsert them into their original positions using a Phillips screwdriver. Take care not to overtighten the screws.
3. Gently place the rear camera module back into its housing, ensuring that any connectors are properly aligned and seated.
4. Align the back cover with the edges of the device and carefully press it down to reattach it. Ensure it is sitting flush without any gaps or misalignment.
5. If necessary, apply slight pressure to the back cover to ensure the adhesive properly sticks to the device.
6. Reinsert the SIM card tray into its slot, pushing it until it locks securely in place.
7. Double-check that all connections are secure, and there are no loose components or cables.
8. Finally, power on your Samsung Galaxy S6 by pressing and holding the power button until the device turns on.
Take your time during the reassembling process to ensure that everything is properly aligned and securely in place. Be cautious not to force any components together, as this can lead to damage or malfunctioning.
Once you have successfully reassembled your Samsung Galaxy S6, test its various functionalities, including the charging port, camera, and display, to ensure everything is working correctly. If any issues persist, double-check the connections and make necessary adjustments.
By following these steps and being patient, you can successfully reassemble your Samsung Galaxy S6 and have it ready for use once again.
Conclusion
Congratulations! You have successfully learned how to open the Samsung Galaxy S6. By following the step-by-step instructions and using the necessary tools, you were able to disassemble and reassemble your device. Whether you needed to replace a faulty component, perform a repair, or simply explore the internal workings of your smartphone, this guide has provided you with the knowledge and guidance to do so.
Throughout the process, it is essential to exercise caution and take your time to prevent any accidental damage to the device or its components. Remember to power off the device, gather the required tools, and handle the delicate components with care. It is always recommended to consult a professional or refer to the manufacturer’s guidelines if you are unsure or uncomfortable with the disassembly process.
Knowing how to open the Samsung Galaxy S6 can be a valuable skill, allowing you to perform repairs or upgrades and save money on professional services. However, it is important to note that opening your smartphone may void the warranty, so it is always wise to check with the manufacturer or a certified technician if your device is still covered.
By successfully opening and reassembling your Samsung Galaxy S6, you can gain a deeper understanding of your device and have the ability to address common issues such as a cracked screen, faulty charging port, or worn-out battery. Always remember to proceed with caution and prioritize safety throughout the process.
We hope this guide has been helpful to you in your journey of opening and exploring the Samsung Galaxy S6. Happy repairing and experimenting with your device!