Introduction
Welcome to this guide on how to make the SD card the default storage on your Android device. With the increasing use of smartphones for various tasks, storage space can quickly become limited. Fortunately, most Android devices have the capability to use external storage in the form of an SD card.
In this article, we will explore various reasons why you might want to make the SD card the default storage on your Android device, as well as provide step-by-step instructions on how to do so. By the end of this guide, you will have a clear understanding of how to effectively manage your device’s storage and free up valuable internal space.
One of the main advantages of using an SD card as your default storage is the ability to store more files, such as photos, videos, and apps. This is particularly beneficial if your device has limited internal storage capacity. By utilizing the SD card, you can increase your device’s storage space without having to delete any important data.
In addition to providing more storage, using an SD card can also improve the performance of your Android device. When the internal storage becomes full, it can slow down the device’s overall speed and functionality. By offloading files to the SD card, you can alleviate the burden on the internal storage and experience a smoother and more efficient performance.
It’s important to note that not all Android devices support the use of an SD card as the default storage. Therefore, before attempting to make the SD card the default storage, it’s crucial to check if your device is compatible. This can typically be done by accessing your device’s settings and looking for the “Storage” or “Memory” options.
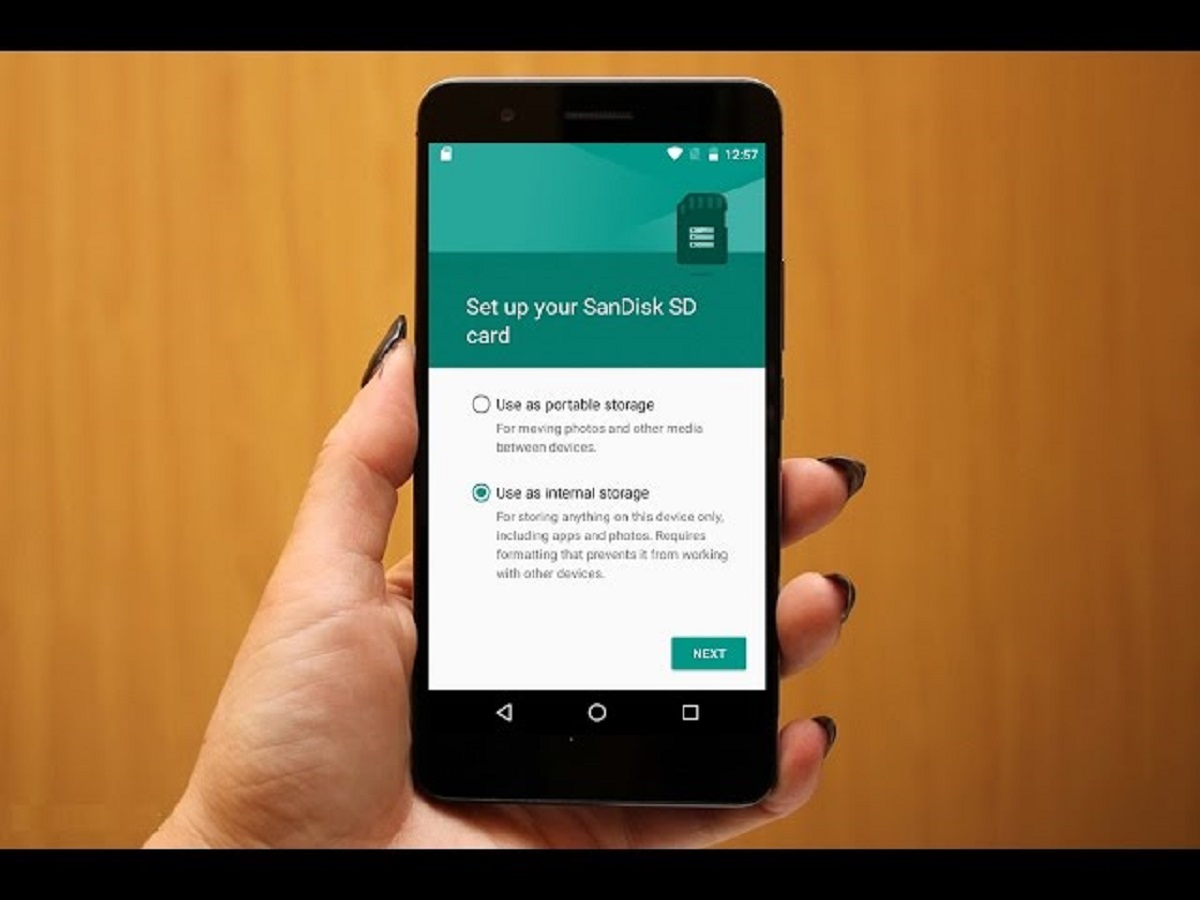
If your device is compatible with an SD card, the next step is to format the SD card. This will prepare it for use and ensure that it is functioning properly with your Android device. Once the formatting is complete, you will be ready to proceed with making the SD card the default storage.
By following the steps outlined in this guide, you will be able to take full advantage of the SD card’s potential and effectively manage your device’s storage. So, let’s get started!
Reasons to Make SD Card the Default Storage on Android
There are several compelling reasons why you might consider making the SD card the default storage on your Android device. Let’s explore some of these reasons below:
- Increased Storage Capacity: One of the primary benefits of using an SD card as the default storage is the ability to significantly increase your device’s storage capacity. Most Android devices come with a limited amount of internal storage, which can quickly fill up with apps, photos, videos, and other files. By utilizing an SD card, you can expand your device’s storage space and store more files without the need to constantly delete or move data to free up space.
- Improved Performance: When your device’s internal storage becomes full, it can negatively impact its performance, resulting in slower app launches, overall sluggishness, and decreased responsiveness. By offloading files to the SD card, you can alleviate the burden on the internal storage, freeing up resources and enhancing the overall performance and speed of your Android device.
- Flexibility and Portability: An SD card provides greater flexibility and portability compared to internal storage. You can easily transfer the SD card between different devices, allowing you to access your files on multiple devices seamlessly. Additionally, if you upgrade to a new Android device, you can simply insert your SD card into the new device and instantly have access to all your files and data.
- Preserving Internal Storage for System Apps: System apps and operating system updates typically require a significant amount of internal storage space to function properly. By moving your personal files, such as photos, videos, and music, to the SD card, you can ensure that the internal storage is primarily reserved for essential system files and apps.
- Backup and Security: Storing files on an SD card provides an additional layer of backup and security. If something were to happen to your device, such as accidental damage or loss, your files on the SD card will remain intact. Additionally, encrypted SD cards offer enhanced security for sensitive files and data.
By making the SD card the default storage on your Android device, you can enjoy increased storage capacity, improved performance, flexibility, and better security. Now that we understand the benefits, let’s proceed to the next steps to check SD card compatibility and format it for use.
Checking for SD Card Compatibility
Before proceeding with making the SD card the default storage on your Android device, it’s essential to verify if your device supports the use of an SD card. Here’s how you can check for SD card compatibility:
- Access Settings: Open the Settings app on your Android device. You can usually find it in the app drawer or by swiping down from the top of the screen and tapping on the gear icon.
- Find Storage or Memory: In the Settings menu, search for options related to storage or memory. The location of this option may vary depending on your device’s manufacturer and Android version.
- External Storage or SD Card: Within the storage or memory settings, check for an option labeled “External storage” or “SD card.” If you see this option, it indicates that your device supports the use of an SD card as external storage.
- Confirm Capacity Limit: Note that some devices may have limitations on the maximum capacity of the SD card they can support. Refer to your device’s documentation or consult the manufacturer’s website to determine the maximum size SD card your device can accommodate.
- Ensure SD Card Slot: Physically check your device for an SD card slot. Depending on the device model, the SD card slot may be located on the side, under a removable back panel, or hidden behind a tray.
If you have successfully identified an SD card option in the storage settings and have a compatible SD card slot on your device, congratulations! You can proceed with the next steps to format the SD card for use. However, if your device does not support the use of an SD card or does not have an SD card slot, you may need to consider alternative methods to manage your device’s storage space.
Once you have confirmed the compatibility of your device, it’s time to format the SD card to ensure its proper functioning and prepare it for use as the default storage on your Android device.
Formatting the SD Card
Before making the SD card the default storage on your Android device, it’s crucial to format the card to ensure optimal performance and compatibility. Here’s a step-by-step guide to formatting the SD card:
- Backup Important Data: Before proceeding with the formatting process, it’s important to back up any important data stored on the SD card. Formatting the card will erase all existing data, so make sure to transfer any files you want to keep to a computer or another storage device.
- Access Storage Settings: Open the Settings app on your Android device and navigate to the storage or memory settings. The exact location of these settings can vary depending on your device’s manufacturer and Android version.
- Select SD Card: In the storage settings, locate the SD card option and tap on it. You may see additional options or settings related to the SD card.
- Tap Format: Once you have selected the SD card, look for the “Format” or “Format SD Card” option. Tap on it to initiate the formatting process.
- Confirm Formatting: A confirmation prompt will appear, informing you that all data on the SD card will be erased. Ensure that you have backed up any important data and then tap “Format” to proceed.
- Wait for Formatting: The formatting process may take a few minutes, depending on the size of the SD card. Avoid removing the SD card or interrupting the formatting process to prevent any potential issues.
- Formatting Complete: Once the formatting is complete, your SD card will be ready for use. You can now proceed to make the SD card the default storage on your Android device.
By formatting the SD card, you have ensured that it is properly prepared for use as the default storage on your Android device. Now that your SD card is ready, let’s move on to the next section to learn how to make it the default storage.
Making SD Card the Default Storage on Android
Now that you have formatted your SD card, it’s time to make it the default storage on your Android device. By following these steps, you can ensure that all new apps, media files, and downloads are automatically saved to the SD card:
- Access Settings: Open the Settings app on your Android device.
- Navigate to Storage Settings: Look for the storage or memory settings within the Settings menu. The location of these settings may vary depending on your device’s manufacturer and Android version.
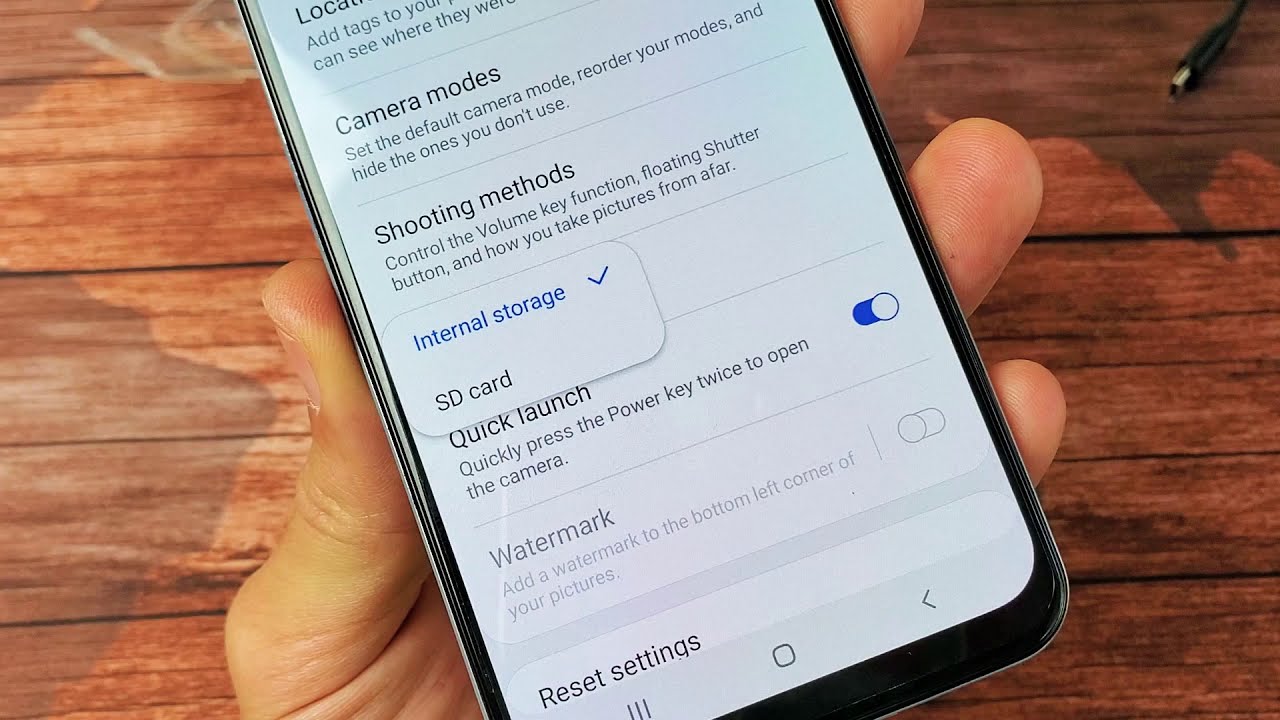
- Select SD Card: In the storage settings, find the option that allows you to set the default storage location. This option may be labeled as “Default storage” or “Storage location.”
- Choose SD Card: Tap on the option to select the default storage location and choose the SD card as the preferred storage.
- Confirm Selection: A confirmation dialog may appear, informing you about the consequences of changing the default storage. Read the information carefully and tap “Confirm” or “OK” to proceed.
- Restart Your Device: After making the SD card the default storage, it’s recommended to restart your device to ensure that the changes take effect.
Once you have completed these steps, your Android device will start using the SD card as the default storage for new apps, media files, and downloads. This means that any new photos you take, videos you record, or apps you download will be stored directly on the SD card rather than the internal storage.
It’s important to note that setting the SD card as the default storage does not automatically move existing data from the internal storage to the SD card. To free up space on the internal storage and optimize storage management, you will need to manually move or transfer existing files to the SD card.
In the next section, we will discuss how to move existing data to the SD card for effective storage management.
Moving Existing Data to SD Card
After making the SD card the default storage on your Android device, it’s time to move existing data from the internal storage to the SD card. This will help free up space on the internal storage and make better use of the expanded storage capacity provided by the SD card. Here’s how you can move existing data to the SD card:
- Access File Manager: Open the file manager app on your Android device. If your device doesn’t have a pre-installed file manager, you can download a third-party file manager app from the Google Play Store.
- Navigate to Internal Storage: In the file manager, navigate to the internal storage directory. This is typically labeled as “Internal Storage,” “Phone Storage,” or “Device Storage.”
- Select Files or Folders: Tap and hold on the file or folder you want to move. You can select multiple files or folders by tapping on each one.
- Choose Move or Cut: Once you have selected the files or folders, look for the option to move or cut them. This option is usually represented by an icon or a menu item with the label “Move” or “Cut.”
- Navigate to SD Card: Next, navigate to the SD card directory in the file manager. This is typically labeled as “SD Card,” “External Storage,” or with the manufacturer’s name.
- Paste Files or Folders: Once you are in the SD card directory, tap on the option to paste the files or folders. This option is usually represented by an icon or a menu item with the label “Paste.”
- Verify Transfer: After pasting the files or folders to the SD card, double-check to ensure that they have been successfully transferred. You can navigate to the SD card directory and look for the files or folders you moved.
- Repeat for Additional Data: If you have more files or folders you want to move to the SD card, repeat the same process for each of them.
By moving existing data from the internal storage to the SD card, you can free up valuable space and optimize your device’s storage utilization. It’s important to note that some apps may not allow their data to be moved to the SD card, as this depends on the app’s design and developer’s settings. In such cases, it’s worth checking the app settings to see if there are any options to change the storage location for that particular app.
With your data successfully moved to the SD card, you can now enjoy the benefits of increased storage capacity and efficient storage management. In the next section, we will discuss how you can effectively manage storage on the SD card.
Managing Storage on the SD Card
Once you have made the SD card the default storage on your Android device and moved existing data to it, it’s important to effectively manage the storage on the SD card to ensure optimal performance and organization. Here are some tips for managing storage on the SD card:
- Regularly Review and Clean Up Files: Periodically review the files stored on the SD card and delete any unnecessary or redundant files. This can help free up space and keep your storage organized.
- Move Apps to the SD Card: If your Android device allows it, consider moving apps from the internal storage to the SD card. This can further free up space on the internal storage and utilize the SD card’s capacity.
- Use a Storage Analyzer App: Install a storage analyzer app from the Google Play Store to get a detailed breakdown of the files and their sizes on your SD card. These apps can help identify large files or folders that can be deleted or moved to optimize storage usage.
- Backup SD Card Data: Regularly back up the data stored on your SD card to prevent loss in case of accidental damage or loss of the card. You can back up the files to a computer, cloud storage, or another external storage device.
- Format SD Card if Issues Arise: If you encounter any performance issues or errors with the SD card, formatting it can often resolve the problem. However, keep in mind that formatting will erase all data on the card, so make sure to back it up beforehand.
- Avoid Exceeding Storage Capacity: Keep track of the available space on the SD card and avoid filling it up completely. Leaving some free space ensures smooth functionality and prevents potential issues when saving new files or installing apps.
- Protect Your SD Card: Handle your SD card with care and protect it from physical damage, extreme temperatures, and moisture. Storing it in a proper case or holder can help avoid accidental damage.
By implementing these storage management practices, you can effectively utilize the SD card, ensure optimal performance, and maintain a well-organized storage system on your Android device.
Now that you are equipped with the knowledge to manage storage on the SD card, you can make the most out of the additional storage capacity it provides. In the next section, we will wrap up this guide with some final thoughts.
Conclusion
Congratulations! You have successfully learned how to make the SD card the default storage on your Android device. By doing so, you have expanded your device’s storage capacity, improved its performance, and gained flexibility in managing files and apps. Let’s summarize the key points we covered in this guide:
We began by discussing the reasons for making the SD card the default storage, including increased storage capacity, improved performance, flexibility, and preserving internal storage for system apps. We then guided you through the process of checking for SD card compatibility and formatting the SD card to ensure optimal functionality.
Next, we provided step-by-step instructions on making the SD card the default storage on your Android device. This involved accessing the storage settings, selecting the SD card as the default storage location, and restarting your device to apply the changes.
Furthermore, we explained how to move existing data from the internal storage to the SD card, freeing up space and optimizing storage usage. It’s essential to periodically review and clean up files, move apps to the SD card (if supported), and use storage analyzer apps to manage and organize your storage effectively.
Lastly, we emphasized the importance of backing up SD card data, formatting the card if issues arise, avoiding exceeding storage capacity, and protecting the SD card from physical damage.
By following the steps and tips outlined in this guide, you can harness the power of the SD card, maximize your Android device’s storage capabilities, and enjoy a seamless user experience.
Thank you for using this guide to learn how to make the SD card the default storage on your Android device. We hope you find it helpful in managing your device’s storage and optimizing its performance. Feel free to refer back to this guide anytime you need a refresher. Enjoy your expanded storage capacity!