Introduction
With the advancement of technology, staying connected with friends, family, and colleagues has become easier than ever. One popular platform for staying in touch is iMessage, the default messaging app for Apple devices. Not only does iMessage allow you to send text and multimedia messages, but it also provides the functionality to create groups. Group chats on iMessage are a convenient way to have conversations with multiple contacts simultaneously, making it ideal for coordinating plans, discussing projects, or simply catching up with a group of friends.
In this article, we will guide you through the process of creating a group in iMessage, adding contacts to the group, giving it a name, customizing group settings, managing group members, and sending messages to the entire group. Whether you’re new to iMessage or just need a refresher, this step-by-step guide will ensure that you can easily set up and manage your own iMessage group.
So, if you’re ready to connect with multiple contacts at once and streamline your communication, let’s dive into the world of iMessage groups and discover how to create and manage them with ease.
Step 1: Opening iMessage
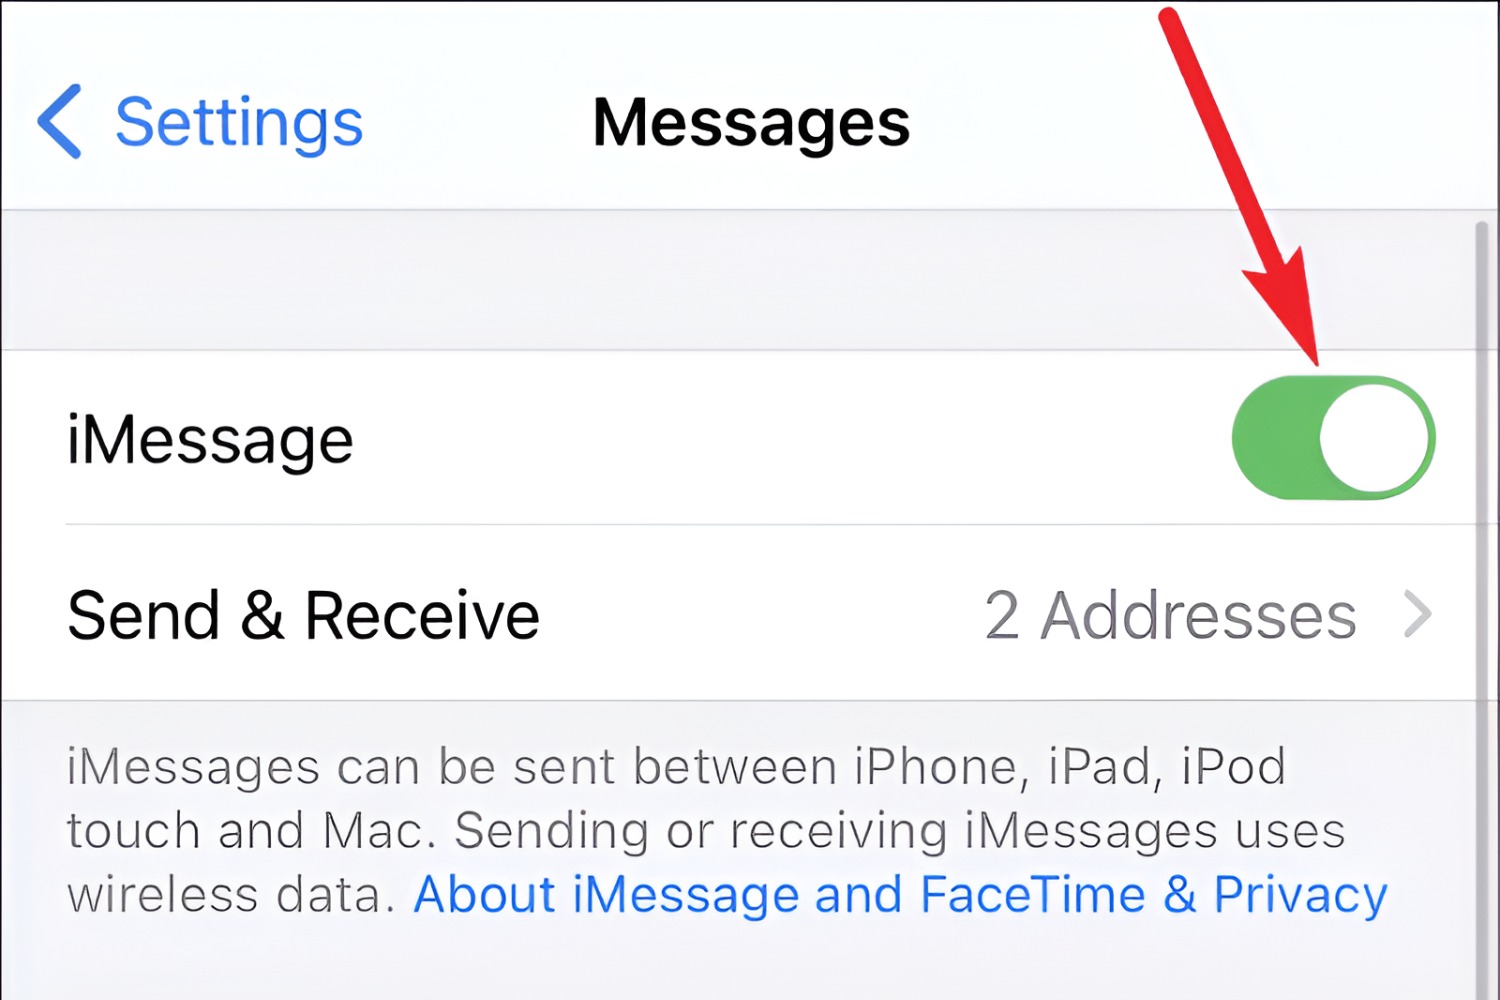
The first step in creating a group in iMessage is to open the iMessage app on your Apple device. Look for the green speech bubble icon with a white messaging icon inside it. Tap on the icon to open the app.
iMessage comes pre-installed on all Apple devices, including iPhones, iPads, and Macs. If you’re using an iPhone or iPad, you can find the iMessage app on your home screen. Simply tap on the icon to launch it. If you’re using a Mac, you can find iMessage in the Applications folder or by searching for it using Spotlight.
Once you’ve opened iMessage, you’ll be greeted with your list of conversations. This is where you can see your individual chats and any existing group conversations you may already have. If you don’t have any group chats, don’t worry! We’ll show you how to create one in the following steps.
Now that you’ve opened iMessage and familiarized yourself with the interface, let’s move on to the next step and create a new group.
Step 2: Creating a new group
Now that you have iMessage open, it’s time to create a new group. Follow these steps to get started:
- Tap on the “Compose” button or the “+” icon, usually located in the top right corner of the screen. This will open a new message window.
- In the “To:” field, start typing the names or phone numbers of the contacts you want to add to the group. As you type, iMessage will suggest contacts from your address book. Tap on the contacts you want to include in the group. You can add as many contacts as you like.
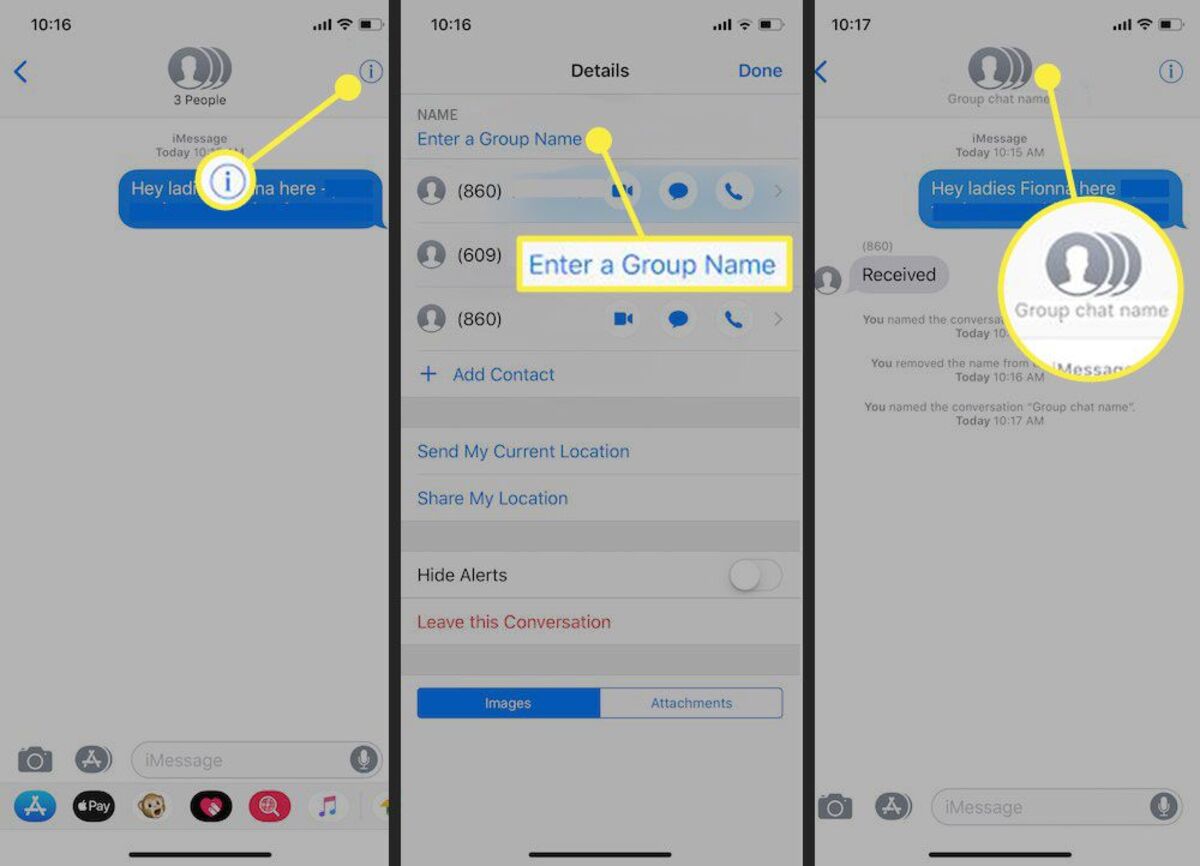
- Once you’ve selected all the contacts you want to add to the group, tap on the “i” icon or “Details” button, usually located next to the group name field at the top of the screen.
- On the next screen, you’ll see various options to customize the group. This includes giving the group a name, choosing an emoji to represent the group, and even adding or removing contacts from the group.
- To give the group a name, tap on the “Enter a Group Name” field and type in the desired name. This name will be visible to all members of the group.
- Once you’ve customized the group name and settings, tap on the “Done” button in the top right corner of the screen to save your changes.
That’s it! You’ve successfully created a new group in iMessage. Now let’s move on to the next step and start adding contacts to the group.
Step 3: Adding contacts to the group
Once you have created a new group in iMessage, the next step is to add contacts to the group. Follow these simple steps to add contacts:
- Open the group chat by tapping on it in your list of conversations. This will take you to the group conversation screen.
- At the bottom of the screen, you’ll see a text input box where you can compose messages. Tap on the field to bring up the keyboard.
- In the text input box, type the name or phone number of the contact you want to add to the group. As you type, iMessage will suggest contacts from your address book.
- Tap on the contact you want to add to the group.
- The contact will now be added to the group, and their name will appear in the list of group members at the top of the screen.
- Repeat steps 3-5 to add more contacts to the group. You can add as many contacts as you like.
It’s important to note that when you add a contact to the group, they will receive an invitation to join the group. Once they accept the invitation, they will be able to see and participate in the group conversation.
Adding contacts to the group allows you to have seamless communication with multiple individuals all at once. Let’s move on to the next step and give the group a name to make it even more personalized.
Step 4: Giving the group a name
Now that you have added contacts to your iMessage group, it’s time to give it a name. Adding a name to your group makes it easier to identify and adds a personal touch to your conversations. Follow these steps to give your group a name:
- Open the group chat by tapping on it in your list of conversations.
- Once you are in the group conversation screen, tap on the “i” icon or “Details” button at the top right corner of the screen. This will open the group details screen.
- On the group details screen, you will see various options to customize your group. Look for the “Group Name” field and tap on it.
- A text input box will appear where you can enter the desired name for your group. Type in a name that reflects the purpose or theme of the group.
- After entering the group name, tap on the “Done” button to save your changes.
Once you have given your group a name, it will be visible to all members of the group. They will also be able to see the name when they receive notifications and messages from the group.
Remember, the group name can be changed at any time by following the same steps. Giving your group a name adds a personal touch and makes it easier to keep track of your conversations. Let’s move on to the next step and explore how to customize group settings.
Step 5: Customizing group settings
After giving your iMessage group a name, you have the option to customize various settings to enhance your group chat experience. Here’s how you can customize the group settings:
- Open the group chat by tapping on it in your list of conversations.
- Tap on the “i” icon or “Details” button at the top right corner of the screen to access the group details.
- On the group details screen, you will find a range of options to customize your group.
- One of the settings you can customize is the group photo or emoji. To change the group photo, tap on the existing photo or tap on the “Edit” button next to it. You can choose a new photo from your device’s photo library or take a new one. If you prefer using an emoji to represent the group, tap on the emoji icon and select the desired emoji.
- Beneath the group photo or emoji, you may find additional options such as “Hide Alerts.” Enabling this option will prevent you from receiving notifications for new messages in the group. This can be useful in reducing interruptions when you’re busy or need some quiet time.
- Depending on your device and iOS version, you may also have options like “Share Name and Photo” and “Mute Conversation.” These options allow you to control how your group information is shared with others and manage your notifications.
- Take some time to explore the various settings and customize them to suit your preferences. Once you’re done customizing, tap on the “Done” button to save your changes.
Customizing the group settings allows you to personalize your iMessage group and tailor it to your specific needs. Whether it’s changing the group photo, enabling or disabling notifications, or managing sharing preferences, these settings can enhance your overall group chat experience. Let’s move on to the next step and learn how to manage group members.
Step 6: Managing group members
As the creator or administrator of an iMessage group, you have the ability to manage the members of the group. Whether you want to add new members, remove existing ones, or promote someone to be an administrator, here’s how you can manage group members:
- Open the group chat by tapping on it in your list of conversations.
- Tap on the “i” icon or “Details” button at the top right corner of the screen to access the group details.
- On the group details screen, you will see the list of current group members.
- To add new members to the group, scroll down to the “Add Members” section. Tap on the “+” icon or “Add Contact” button, and select the contacts you want to add from your address book. Once selected, tap on “Add” to include them in the group.
- If you want to remove a member from the group, swipe left on their name in the list of members. This will reveal the “Remove” option. Tap on “Remove” to delete them from the group.
- As the group creator, you also have the ability to promote members to be group administrators. To do this, tap on the name of the member in the group details and enable the “Make Admin” option. Admins have additional privileges, such as the ability to add or remove members and customize group settings.
- Additionally, you can also limit the ability to modify the group settings to only the administrators by enabling the “Allow Only Admins to Edit Group Info” option.
- Once you have made the necessary changes to the group members, tap on the “Done” button to save the updates.
Managing group members gives you control over who can participate in the conversation and ensures that the group stays organized and relevant to its intended purpose. It’s important to communicate any changes with the group members to avoid confusion or misunderstandings. Let’s move on to the final step and learn how to send messages to the entire group.
Step 7: Sending messages to the group
Now that you have set up and organized your iMessage group, it’s time to start sending messages to the entire group. Here’s how to effectively communicate with your group:
- Open the group chat by tapping on it in your list of conversations.
- In the text input box at the bottom of the screen, tap to bring up the keyboard and compose your message.
- Once you’ve typed your message, tap on the send button (usually represented by a paper airplane icon) to send it.
- Your message will be instantly delivered to all members of the group. They will be able to see and respond to your message in the group conversation.
- Feel free to send text messages, photos, videos, or any other supported media to share with the group. You can also use the built-in features like emojis, stickers, and digital touch to liven up your messages.
- Remember that all group members will be able to see the messages sent in the group chat. Make sure to keep your communication respectful and considerate of others.
Sending messages to the group allows for easy and efficient communication among all members. It’s a great way to share updates, coordinate plans, or engage in group discussions. Keep the conversations flowing and enjoy the convenience of having all your group members in one place.
Congratulations! You have successfully learned how to create, manage, and communicate with an iMessage group. By following these steps, you can utilize the power of iMessage to stay connected with multiple people all at once. Now, go ahead and start creating your own iMessage groups to streamline your communication and enhance your messaging experience.
Conclusion
Creating and managing a group in iMessage can greatly simplify and enhance your communication with multiple contacts at once. Whether you want to plan an event, discuss a project, or simply stay connected with a group of friends, iMessage groups provide a convenient platform to do so.
In this article, we have covered the step-by-step process of creating a group, adding contacts, giving the group a name, customizing settings, managing group members, and sending messages to the group. By following these instructions, you can easily set up and manage your own iMessage groups.
Remember to utilize the customization options available to you, such as adding a group photo or emoji, enabling or disabling notifications, and managing sharing preferences. These features allow you to personalize your group and tailor it to your specific needs.
Furthermore, by actively managing group members and their roles, you can ensure that your group remains organized and relevant. Promoting or removing members and limiting editing privileges to administrators are effective ways to maintain a cohesive and focused group dynamic.
With the ability to send messages, photos, videos, and more to the entire group, iMessage groups provide a seamless platform for group communication. Enjoy the convenience of having all your conversations in one place and the ease of sharing updates, coordinating plans, and engaging in group discussions.
Now that you have learned how to create and manage iMessage groups, it’s time to put this knowledge into practice and enjoy the benefits of streamlined group communication. Start creating your own iMessage groups today and experience the power and convenience of staying connected with multiple contacts effortlessly.