Introduction
Have you always wanted to link your Battle.net account to your PlayStation? If you’re an avid gamer, having your accounts linked can provide numerous benefits and enable seamless gameplay across different platforms. Whether you want to access your favorite games, unlock exclusive content, or join your friends on different platforms, linking your Battle.net and PlayStation accounts is the way to go.
By linking your Battle.net account to your PlayStation Network account, you can enjoy shared progress, achievements, and in-game items across platforms. It also allows you to play multiplayer games with friends on either platform, expanding your gaming experience. In this article, we will guide you through the steps necessary to link your Battle.net account to your PlayStation Network account.
While the process may seem daunting at first, rest assured that it’s relatively straightforward. All you need is a Blizzard account, which you can easily create if you don’t have one already. Once you have your Blizzard account, you’ll be able to link it to your PlayStation Network account and start reaping the benefits of cross-platform gaming.
So, if you’re ready to take your gaming to the next level and link your Battle.net account to your PlayStation Network account, let’s dive into the step-by-step process. Follow along, and you’ll be enjoying cross-platform gameplay in no time!
Step 1: Create a Blizzard Account
Before you can link your Battle.net account to your PlayStation Network account, you need to have a Blizzard account. A Blizzard account is the gateway to all of Blizzard Entertainment’s games, including World of Warcraft, Overwatch, Diablo, and more.
If you don’t have a Blizzard account, don’t worry! Creating one is quick and easy. Just follow these steps:
- Go to the official Blizzard website.
- Click on the “Create a Free Account” or “Sign Up” button.
- Fill in your details, including your email address and a strong password.
- Read and accept the terms of service and privacy policy.
- Complete the captcha or security verification, if prompted.
- Click on the “Create Account” button.
Once you’ve completed these steps, you will receive a confirmation email from Blizzard. Open the email and click on the verification link to activate your account. Congratulations! You now have a Blizzard account.
It’s essential to choose a unique and secure password for your Blizzard account to ensure the safety of your personal information and gaming progress. Make sure to use a combination of letters, numbers, and special characters to create a strong password that cannot be easily guessed.
Having a Blizzard account not only enables the linking process but also gives you access to other features, such as managing your game licenses, participating in the Blizzard community, and receiving important updates and notifications.
Now that you have a Blizzard account, we can move on to the next step: linking your PlayStation Network account to your Blizzard account. Let’s dive in!
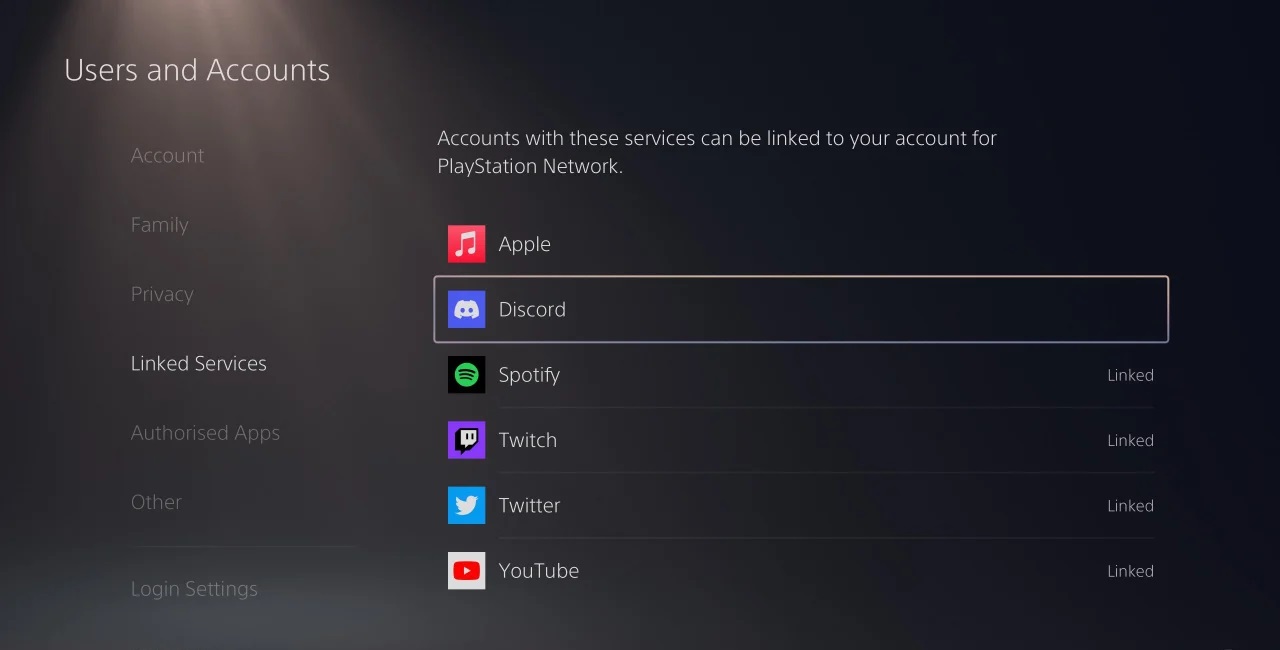
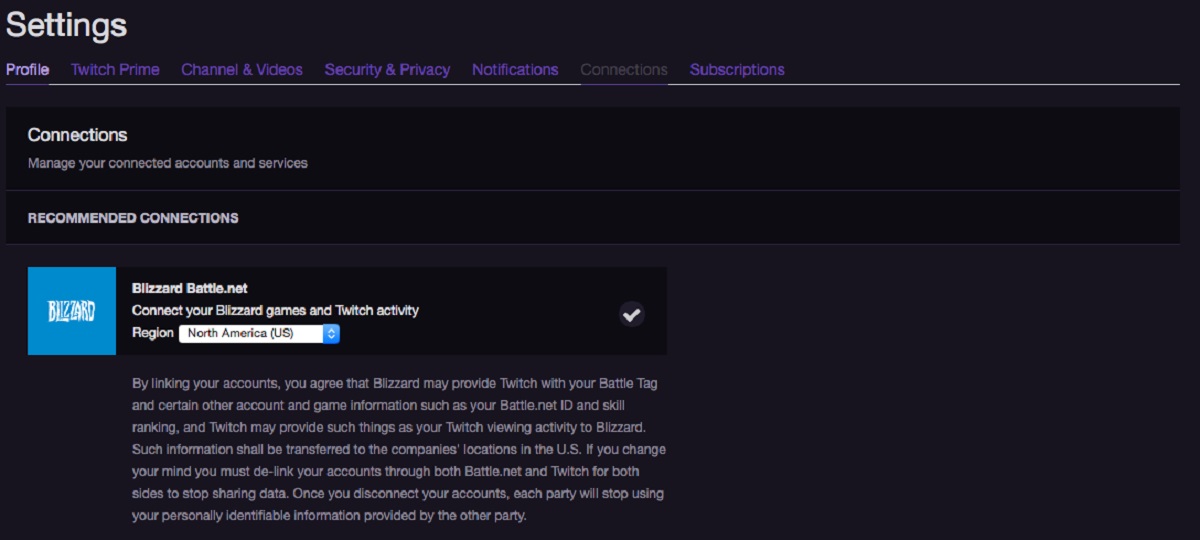
Step 2: Link PlayStation Network Account to Blizzard Account
In order to link your Battle.net account to your PlayStation Network account, you’ll need to connect your PlayStation Network (PSN) account to your Blizzard account. This process allows for seamless integration and synchronization of your gaming progress across platforms. Follow the steps below to link your accounts:
- Visit the official Blizzard website and log in to your Blizzard account.
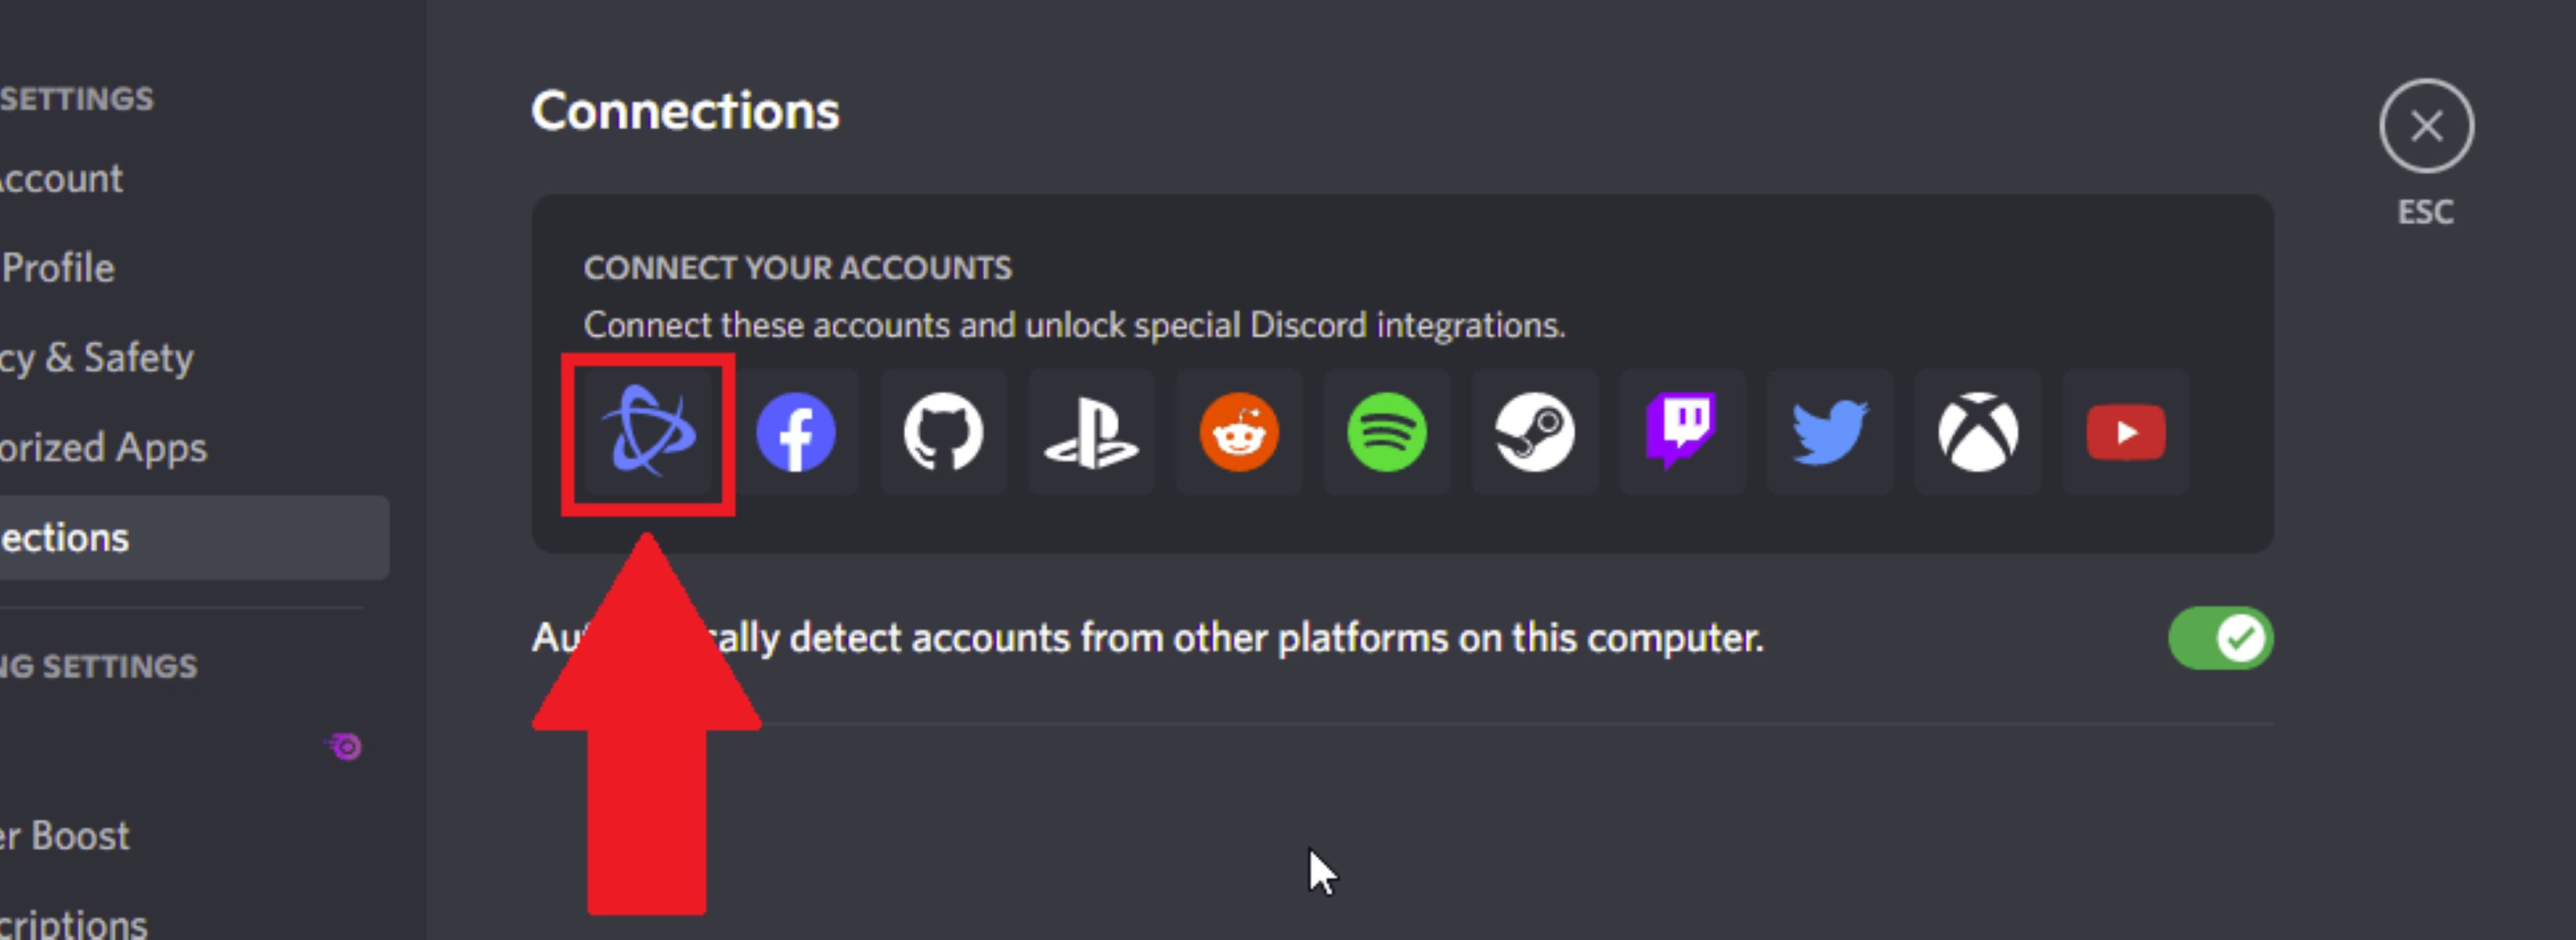
- Navigate to the “Account Settings” or “Account Management” section of your Blizzard account.
- Look for the “Connections” or “Linked Accounts” tab.
- Click on the option to link your PlayStation Network account.
- You will be redirected to the PlayStation Network login page. Enter your PSN login credentials and sign in.
- Review and accept the permissions requested by Blizzard to access your PSN account details.
- Once you have successfully linked your accounts, you will receive a confirmation message.
By linking your PlayStation Network account to your Blizzard account, you enable cross-platform functionality and allows for smooth progression and interaction across different gaming platforms. This means that your achievements, inventory, and in-game purchases will be shared between your Battle.net and PlayStation accounts.
Linked accounts also open up the possibility of cross-platform chatting and playing with friends who are on different platforms. Whether you want to join forces in World of Warcraft or team up in Overwatch, linking your accounts allows you to play and communicate seamlessly with friends, regardless of their chosen platform.
Now that your PlayStation Network account is linked to your Blizzard account, it’s time to move on to the next step: generating a cross-save code to import your progress. Let’s proceed!
Step 3: Generate a Cross-Save Code
With your PlayStation Network account successfully linked to your Blizzard account, the next step is to generate a cross-save code. This code will allow you to import your progress from your PlayStation account to your Battle.net account. Here’s how you can generate a cross-save code:
- Access the game that you want to import progress from on your PlayStation console.
- Navigate to the settings or options menu within the game.
- Look for the cross-save or account linking section.
- Select the option to generate a cross-save code.
- Note down the generated code or take a screenshot of it.
Generating the cross-save code is essential as it allows you to transfer your progress, including character data, achievements, and in-game items, from your PlayStation account to your Battle.net account. This means you can continue your adventures seamlessly across different platforms.
It’s important to keep in mind that the availability of cross-save functionality may vary depending on the game you’re playing. Some games may not support cross-save feature, so make sure to check the game’s official website or documentation for specific instructions regarding cross-saving.
Now that you have your cross-save code, let’s move on to the next step: entering the code in the game to import your progress to your Battle.net account.
Step 4: Enter the Cross-Save Code in the Game
Now that you’ve generated the cross-save code on your PlayStation console, it’s time to enter the code in the game you want to import progress to. This step ensures that your progress, character data, and in-game items are transferred from your PlayStation account to your Battle.net account. Here’s how you can enter the cross-save code:
- Launch the game on your PC or other supported platform.
- Access the account settings or options menu within the game.
- Look for the cross-save or account syncing section.
- Select the option to enter the cross-save code.
- Enter the code you generated on your PlayStation console.
- Follow any additional prompts or instructions given by the game.
Entering the cross-save code is crucial as it triggers the transfer of your progress from your PlayStation account to your Battle.net account. Ensure that you enter the code accurately to avoid any issues or discrepancies during the transfer process.
Keep in mind that each game may have slight variations in the steps to enter the cross-save code, so it’s essential to refer to the game’s official documentation or support resources for specific instructions tailored to your game.
Once you’ve successfully entered the cross-save code, the game will initiate the transfer process, importing your progress to your Battle.net account. Depending on the amount of data being transferred, this process may take some time. However, once the transfer is complete, you’ll be able to access your saved progress, achievements, and items from your PlayStation account on your Battle.net account.
Now that you’ve entered the cross-save code, let’s move on to the final step of confirming the account linking.
Step 5: Confirm the Account Linking
After entering the cross-save code in the game, the final step is to confirm the account linking between your Battle.net and PlayStation Network accounts. This step ensures that the transfer of progress and data is complete and that your accounts are successfully linked. Here’s how you can confirm the account linking:
- Access your game’s settings or options menu.
- Look for the account or profile section.
- Verify that the account information displayed corresponds to your linked Battle.net and PlayStation Network accounts.
- Check if your progress, character data, and in-game items have been successfully transferred from your PlayStation account to your Battle.net account.
- Test the cross-platform functionality by accessing the game on your PlayStation or other supported platform.
- Ensure that your progress is synchronized and consistent across all platforms.
Confirming the account linking serves as a final check to guarantee that your Battle.net and PlayStation Network accounts are properly connected. It allows you to verify that the transfer of progress and data was successful and that you can seamlessly access your saved progress on different platforms.
If you encounter any issues during the confirmation process, it’s recommended to consult the game’s official support resources or contact customer service for assistance. They will be able to provide guidance and resolve any potential issues you may face.
Now that you have successfully confirmed the account linking, you can enjoy the advantages of cross-platform gaming. Explore your favorite games, enjoy multiplayer features, and continue your gaming adventures across Battle.net and PlayStation Network platforms.
Conclusion
Linking your Battle.net account to your PlayStation Network account opens up a world of possibilities for cross-platform gaming. By following the step-by-step process outlined in this guide, creating a Blizzard account, linking your PlayStation Network account, generating a cross-save code, entering the code in the game, and confirming the account linking, you can seamlessly transfer your progress, achievements, and in-game items between platforms.
Having your accounts linked allows you to enjoy shared progress, multiplayer functionality, and access to exclusive content across Battle.net and PlayStation Network platforms. You can now play with friends who are on different platforms, chat with them, and experience your favorite games with enhanced flexibility and convenience.
While the process may vary slightly depending on the game you’re playing, the general steps outlined in this guide provide a solid foundation for linking your accounts. It’s always recommended to refer to the official documentation or support resources provided by the game developers for specific instructions tailored to your game.
So, what are you waiting for? Take the plunge and link your Battle.net and PlayStation Network accounts today for a truly immersive and cross-platform gaming experience!