Introduction
Google Sheets is a powerful tool for creating and managing spreadsheets, whether for personal or professional use. One of the common tasks when working with data in Google Sheets is indenting cells or rows to make the data more visually appealing and organized. Indenting can help differentiate sections, create hierarchy, and improve readability in your spreadsheet.
Indentation refers to the space between the border of a cell and the content within it. By default, Google Sheets aligns text to the left side of a cell and does not apply any indentation. However, you can easily change the indentation level to suit your needs. In this article, we will explore five different methods to indent on Google Sheets, allowing you to choose the one that works best for you.
Whether you’re a beginner or an experienced Google Sheets user, learning how to indent will enhance your ability to create professional-looking spreadsheets. So, let’s dive in and discover how to indent on Google Sheets using various methods.
Method 1: Using the Increase Indent button
If you want to quickly indent a cell or row in Google Sheets, the Increase Indent button is a handy tool. Here’s how you can use it:
- Select the cell(s) or row(s) that you want to indent. You can do this by clicking and dragging the cursor over the desired cells or clicking the row number to select the entire row.
- Locate the toolbar at the top of the Google Sheets interface. In the toolbar, you will find several formatting options, including the Increase Indent button. It resembles a right-facing arrow pointing to a horizontal line.
- Click on the Increase Indent button once to apply a single level of indentation. Each click will increase the indentation by one level.
- Observe the selected cells or rows. You will notice that the content within them has shifted towards the right, creating an indented effect. The more times you click on the Increase Indent button, the further the content will move to the right.
Using the Increase Indent button is a quick and straightforward method to indent cells or rows in Google Sheets. However, keep in mind that this method only allows for a limited number of indentation levels. For more advanced indentation options, you may consider exploring other methods.
Method 2: Using the keyboard shortcut
An efficient way to indent cells or rows in Google Sheets is by using a keyboard shortcut. Keyboard shortcuts can save you time and effort, allowing you to perform tasks with a few simple key presses. Here’s how you can use a keyboard shortcut to indent in Google Sheets:
- Select the cell(s) or row(s) that you want to indent. You can do this by clicking and dragging the cursor over the desired cells or clicking the row number to select the entire row.
- Once the cells or rows are selected, press the Tab key on your keyboard. This will apply a single level of indentation to the selected content.
- If you want to increase the indentation further, press the Tab key again. Each press of the Tab key will add an additional level of indentation.
- To decrease the indentation, press Shift + Tab on your keyboard. Each press of the Shift + Tab key combination will reduce the indentation level by one.
Using the keyboard shortcut allows for quick and seamless indentation in Google Sheets. This method gives you more control over the number of indentation levels compared to the Increase Indent button. It is especially useful when you need to indent multiple cells or rows simultaneously.
Remember, keyboard shortcuts may vary depending on your operating system and browser, so be sure to consult the official Google Sheets documentation or keyboard shortcut guides for accurate information on the shortcut specific to your configuration.
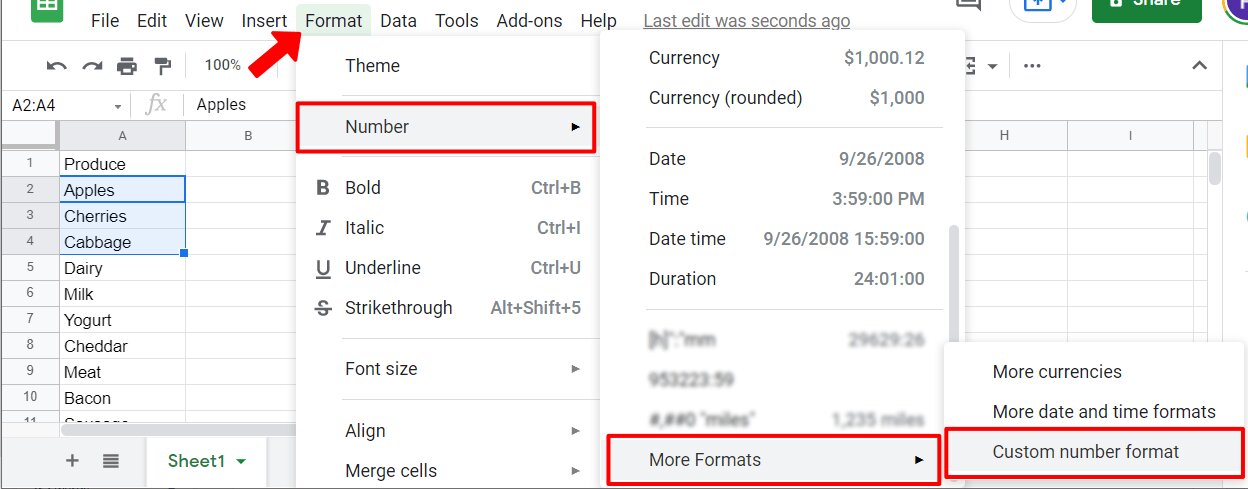
Method 3: Using the Format menu
If you prefer using menu options instead of keyboard shortcuts or buttons, you can leverage the Format menu in Google Sheets to indent cells or rows. Here’s how:
- Select the cell(s) or row(s) that you want to indent. You can do this by clicking and dragging the cursor over the desired cells or clicking the row number to select the entire row.
- In the menu bar at the top of the Google Sheets interface, click on the “Format” option.
- From the dropdown menu, hover over the “Align” option and then select “Indentation” from the subsequent sub-menu.
- A dialog box will appear, allowing you to choose the indentation options. You can customize the left indent, right indent, and the first-line indent.
- Enter the desired indentation values in the respective input fields or use the arrows to adjust the values.
- Click “Apply” to apply the indentation settings to the selected cells or rows.
Using the Format menu is a visual and intuitive method to indent in Google Sheets. This approach provides more control and flexibility in terms of customizing the indentation levels and allows you to fine-tune the appearance of your spreadsheet.
Experiment with different indentation values in the dialog box to achieve the desired indentation style. You can also combine this method with other formatting options available in the Format menu to further enhance the visual presentation of your spreadsheet.
Method 4: Using the sidebar formatting options
Another way to indent cells or rows in Google Sheets is by using the sidebar formatting options. The sidebar provides quick access to various formatting tools, including indentation. Here’s how you can utilize the sidebar for indentation:
- Select the cell(s) or row(s) that you want to indent. You can do this by clicking and dragging the cursor over the desired cells or clicking the row number to select the entire row.
- In the Google Sheets interface, click on the “Format” tab located at the top of the sidebar menu on the right side of the screen.
- Scroll down the sidebar menu until you locate the “Text wrapping” section. Under this section, you will find the indentation options.
- Click on the decrease or increase indentation icons to adjust the indentation level of the selected cells or rows. Each click will increment or decrement the indentation level respectively.
- Observe the changes in the selected cells or rows as you adjust the indentation. The content will shift to the right or left accordingly, creating an indented appearance.
The sidebar formatting options provide a convenient and efficient way to modify indentation in Google Sheets. With a few simple clicks, you can apply different indentation levels to your desired cells or rows.
Additionally, the sidebar menu offers various other formatting options that you can explore to further enhance the appearance of your spreadsheet. Take advantage of these tools to create visually appealing and well-organized worksheets.
Method 5: Using the Google Sheets mobile app
If you prefer to work on your spreadsheets on the go, you can also indent cells or rows using the Google Sheets mobile app. The mobile app provides a user-friendly interface and allows you to perform various formatting tasks easily. Here’s how you can indent using the Google Sheets mobile app:
- Open the Google Sheets mobile app on your smartphone or tablet and navigate to the spreadsheet where you want to indent cells or rows.
- Select the cell(s) or row(s) that you want to indent by tapping and holding on the desired cells or swiping your finger over the row numbers.
- Once the cells or rows are selected, tap on the “Format” icon, usually represented by a brush or paint roller symbol.
- In the formatting options menu that appears, look for the “Text alignment” or “Indentation” option. The exact placement may vary depending on your device and app version.
- Tap on the indentation option and choose the desired level of indentation. You may have options like “Increase Indent” or “Decrease Indent” to apply the desired indentation style.
- Observe the selected cells or rows to see the changes in indentation. The content will shift accordingly, creating the indented effect.
The Google Sheets mobile app provides a convenient way to indent cells or rows even when you’re on the move. Whether you’re using an Android or iOS device, you can easily navigate through the app’s intuitive interface and apply indentation to your spreadsheets.
Additionally, the mobile app offers a range of other features to help you work effectively with your spreadsheets. Explore the mobile app’s capabilities to make the most out of your Google Sheets experience on your mobile device.
Conclusion
Indenting cells or rows in Google Sheets can significantly enhance the organization and visual appeal of your spreadsheets. Whether you’re working on a personal project, collaborating with team members, or presenting data to clients, using indentation can make your information easier to read and understand.
In this article, we explored five methods to indent on Google Sheets: using the Increase Indent button, utilizing keyboard shortcuts, accessing the Format menu, leveraging the sidebar formatting options, and utilizing the Google Sheets mobile app.
Each method offers a different approach to indenting, allowing you to choose the one that suits your preference and workflow. The Increase Indent button and keyboard shortcut options are ideal for quick and simple indentation, while the Format menu and sidebar formatting options provide more customization and fine-tuning capabilities. Finally, the Google Sheets mobile app enables you to indent cells or rows on the go.
By mastering these indenting techniques, you can showcase your data in a more visually appealing and organized manner. Whether you’re highlighting important information, creating a hierarchical structure, or making your spreadsheet more readable, proper indentation can significantly improve the overall effectiveness of your worksheets.
Experiment with these methods, combine them with other formatting options available in Google Sheets, and find the indentation style that best suits your needs. With the ability to indent cells or rows, you can create professional-looking spreadsheets that are easier to navigate and comprehend.
So, start indenting your cells or rows today and take your Google Sheets skills to the next level!