Introduction
Welcome to the ultimate guide on how to get unlimited Google Photos storage! In this digital age, we capture countless moments through our smartphones and cameras, resulting in a storage overload. Fortunately, Google Photos offers a convenient solution for storing, organizing, and accessing our precious memories. However, there is a limit to the free storage provided by Google, which can quickly fill up if you are a prolific photographer.
But don’t worry! In this guide, we will explore various methods and strategies that can help you maximize your Google Photos storage capacity without breaking the bank. From utilizing Google Pixel phones to compressing photos and utilizing multiple Google accounts, we will cover it all. So, let’s dive in and discover how you can make the most out of Google Photos and never worry about running out of storage space again!
It is important to note that while these methods can help you gain extra storage space, there may be some limitations or trade-offs. Some methods might require additional expenses, while others might involve compressing your photos. It is essential to weigh the pros and cons of each method to find the one that best suits your needs. With that said, let’s explore the steps you can take to get unlimited Google Photos storage!
Step 1: Backup Photos with High Quality Option
One of the simplest and most effective ways to get unlimited Google Photos storage is to backup your photos using the “High quality” option. By default, Google Photos offers free unlimited storage for photos and videos if they are uploaded using the “High quality” option, which compresses the files slightly. This compression does not significantly affect the visual quality of the photos and videos for most users, making it an ideal choice for saving storage space.
To enable the “High quality” option, follow these steps:
- Open the Google Photos app on your smartphone or access it through the web version.
- Tap on the menu icon (three horizontal lines) in the top-left corner of the screen.
- Select “Settings” from the menu.
- Go to the “Backup & sync” option.
- Under the “Upload size” section, choose “High quality.”
Once you enable the “High quality” option, all the photos and videos you upload will be compressed slightly, allowing you to save storage space without compromising the overall visual quality. However, it is important to note that if you choose to upload photos and videos in their original quality, they will count towards your Google storage limit. So, unless you have specific requirements for preserving the original quality, the “High quality” option is the way to go.
Remember that even though the files are compressed, your photos and videos will still be accessible in high quality, and you can easily view and share them with friends and family. Additionally, Google Photos provides a handy option to recover the original file quality if needed, although this may count towards your storage limit.
With the “High quality” option enabled, you can effectively store an unlimited number of photos and videos on Google Photos without worrying about running out of storage space. So, make sure to take advantage of this feature and back up your precious memories without any storage limitations!
Step 2: Use Google Pixel Phone
If you’re looking for a seamless way to get unlimited Google Photos storage, consider using a Google Pixel phone. Google offers Pixel phone users the advantage of unlimited storage for photos and videos, even at their original quality. This means that all your high-resolution pictures and videos can be backed up to Google Photos without taking up any of your Google storage space.
When you set up a Google Pixel phone, you’ll have the option to enable “Original quality” backup. By selecting this option, all the photos and videos you capture with your Pixel phone will be stored in their original quality without any compression or quality loss. This is a significant benefit for photography enthusiasts or anyone who wants to preserve the highest level of detail and clarity in their images.
To take advantage of the unlimited Google Photos storage on a Google Pixel phone, follow these steps:
- Set up your Google Pixel phone and sign in with your Google account.
- Open the Camera app on your Pixel phone.
- Tap the Menu icon (three horizontal lines) to access the camera settings.
- Select “Settings” from the menu.
- Scroll down and find the “Backup & sync” option.
- Enable “Back up photos and videos” and choose “Original quality.”
Once you’ve enabled the “Original quality” option, you can start capturing photos and videos without worrying about storage limitations. All your media files will be automatically backed up to Google Photos, without using any of your Google storage quota. This is a fantastic feature exclusive to Google Pixel phones and provides convenience and peace of mind for avid photographers.
Keep in mind that if you decide to switch to a different phone in the future, your photos and videos captured on a Google Pixel phone in “Original quality” may still be accessible and will count towards your storage limit. However, the photos and videos backed up at “High quality” will not count towards your quota, regardless of the device you use.
By using a Google Pixel phone, you can take full advantage of unlimited Google Photos storage for your high-quality photos and videos. So, if capturing stunning visuals is your passion, consider investing in a Pixel phone to ensure your memories are securely stored without worrying about running out of storage space.
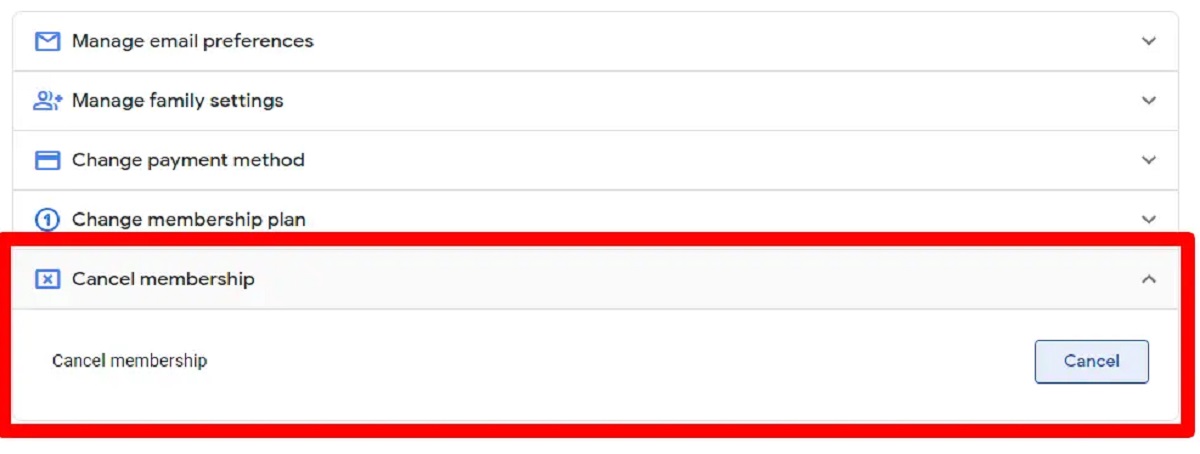
Step 3: Buy Additional Google Storage
If you require more storage space for your Google Photos and don’t mind making a small investment, buying additional Google storage is a viable option. Google offers various storage plans at affordable prices, allowing you to expand your storage capacity and continue storing your photos and videos without limitations.
Here’s how you can buy additional Google storage:
- Sign in to your Google account and go to the Google One website (one.google.com).
- Click on the “Upgrade Storage” option or the “Upgrade” button.
- Choose the storage plan that suits your needs best.
- Follow the instructions to complete the purchase.
Google offers different storage plans, ranging from 100 GB to 30 TB, depending on your requirements. By increasing your storage quota, you can continue uploading photos and videos to Google Photos without worrying about running out of space.
Moreover, buying additional storage not only provides you with more space for your Google Photos but also grants you extra storage for other Google services, such as Gmail and Google Drive. This means you can store more files, emails, and documents while keeping your digital life organized and accessible.
Remember that the cost of the additional Google storage varies based on the size of the plan you choose. Take some time to evaluate your storage needs and budget to determine the most suitable plan. You can always upgrade or downgrade your storage plan as your needs change in the future.
By purchasing additional Google storage, you can enjoy the flexibility and peace of mind that comes with having ample space for your growing collection of photos and videos. So, if you’re willing to invest a small amount each month or year, this option allows you to continue using Google Photos to its fullest potential.
Step 4: Utilize Google Drive Storage
Another effective method to expand your storage options for Google Photos is to utilize Google Drive. Google Photos and Google Drive are intimately connected, and any photos or videos you upload to Google Photos can also be accessed and managed through Google Drive.
By storing your photos and videos in Google Drive, you can effectively free up space in your Google Photos storage and take advantage of the storage space available in your Google Drive account. Here’s how you can utilize Google Drive storage for Google Photos:
- Open Google Drive on your computer or mobile device.
- Create a new folder specifically for your Google Photos uploads.
- Go to the Google Photos app or website and select the photos and videos you want to move to Google Drive.
- Tap the share button and choose “Save to Drive” or “Move to Drive.”
- Select the folder you created in Google Drive to save your photos and videos.
By following these steps, your selected photos and videos will be saved in Google Drive, freeing up space in your Google Photos storage quota. It’s important to note that moving photos and videos to Google Drive will not affect their accessibility in Google Photos. You can still view and manage them as usual, but they will now be stored in Google Drive, which offers additional storage space.
This method is especially useful if you have plenty of storage space in your Google Drive account but are running out of space in your Google Photos storage. By leveraging the storage capabilities of Google Drive, you can continue to organize and access your photos and videos seamlessly, without any compromises.
However, keep in mind that any photos and videos stored in Google Drive will count towards your Google Drive storage quota. If you already have a significant amount of files stored in Google Drive, it’s important to assess your storage needs and plan accordingly.
By utilizing Google Drive storage for your Google Photos, you can effectively expand your storage options and ensure that you have enough space to store your precious memories. So, take advantage of the integration between Google Photos and Google Drive to maximize your storage capacity and keep your photos and videos safely backed up.
Step 5: Utilize Other Cloud Storage Services
If you’re looking for additional storage options for your Google Photos beyond Google’s offerings, you can consider utilizing other cloud storage services. There are several reputable cloud storage providers available that can provide you with additional storage space for your photos and videos, giving you more flexibility and peace of mind.
Here are a few popular cloud storage services you can explore:
- Dropbox: Dropbox is a widely recognized cloud storage service that offers various plans, including options for individuals and businesses.
- Microsoft OneDrive: OneDrive is Microsoft’s cloud storage service and integrates well with both Windows and Office applications.
- Amazon Drive: Amazon Drive provides storage options for Amazon Prime members, allowing them to store their photos and videos securely.
- iCloud: iCloud is Apple’s cloud storage service, which seamlessly syncs photos and videos across all Apple devices.
Each of these services offers different storage plans and pricing, so it’s important to consider your storage needs and budget before choosing the most suitable option. Many cloud storage providers also offer integration with Google Photos, allowing you to easily transfer and backup your photos and videos to their platforms.
To utilize other cloud storage services for your Google Photos, follow these general steps:
- Sign up for the cloud storage service of your choice.
- Install the relevant app or software on your device.
- Configure the app or software to automatically backup your Google Photos to the cloud storage service.
- Ensure that your photos and videos are securely uploaded and accessible on the cloud storage platform.
By using other cloud storage services in conjunction with Google Photos, you can diversify and expand your storage options. This approach can help alleviate the burden of limited storage and provide you with additional flexibility and peace of mind.
However, it’s important to note that using third-party cloud storage services may involve additional costs or limitations compared to Google Photos. Make sure to read the terms and conditions of each service and understand their storage policies before committing to a specific plan.
By utilizing other cloud storage services, you can effectively enhance your storage capacity for Google Photos and ensure that your photos and videos are securely stored in multiple locations. So, explore the various options available and find the right cloud storage service that meets your needs and preferences.
Step 6: Compress Photos before Uploading
If you’re looking to save storage space on Google Photos without compromising the overall visual quality of your photos, consider compressing them before uploading. Image compression is the process of reducing the file size of an image by removing unnecessary data without significantly impacting the image’s resolution or clarity.
Compressing your photos can help you free up valuable storage space on Google Photos while still maintaining a satisfactory level of image quality. Here are a few methods to compress your photos before uploading:
- Use Image Compression Software: There are various image compression software available that allow you to reduce the file size of your photos while preserving their quality. These software programs typically provide options to adjust the level of compression according to your needs.
- Resize and Optimize Images: If your photos have large dimensions or high resolution, resizing them to a smaller size can significantly reduce the file size. Additionally, optimizing the images by removing unnecessary metadata can further reduce their size without noticeable quality loss.
- Utilize Online Image Compression Tools: There are many online tools available that can compress your images without the need to install any software. These tools allow you to upload your photos and automatically compress them, providing you with optimized and smaller file sizes.
Before compressing your photos, it’s essential to strike a balance between the desired reduction in file size and maintaining an acceptable level of image quality. It’s recommended to make a backup of your original photos before applying any compression, as the process is irreversible and may result in a slight loss of visual fidelity.
Once you have compressed your photos, you can proceed to upload them to Google Photos. The reduced file size will help you conserve more storage space without compromising the overall viewing experience of your images.
It’s important to note that if you are using the “High quality” option in Google Photos, the compression applied by Google may already reduce the file size of your images to some extent. In such cases, compressing your photos before uploading may not provide significant additional benefits.
By compressing your photos before uploading them to Google Photos, you can effectively save storage space while maintaining satisfactory image quality. Experiment with different compression methods and find the one that works best for you, ensuring you strike the right balance between file size reduction and visual fidelity.
Step 7: Use Multiple Google Accounts
If you are running low on storage space on a single Google account, a practical solution is to utilize multiple Google accounts to expand your storage capacity for Google Photos. By distributing your photos and videos across different accounts, you can effectively double or triple your storage allowance without having to purchase additional storage.
Here’s a step-by-step guide on how to use multiple Google accounts for Google Photos:
- Create additional Google accounts if you don’t already have them.
- Sign in to each Google account on your device.
- Open the Google Photos app or website.
- On each account, enable the “Backup & sync” feature within the app’s settings.
- Organize your photos and videos across different accounts based on your preference and storage needs.
By utilizing multiple Google accounts for Google Photos, you can segregate your photo and video collections into different accounts, effectively expanding your storage capacity across these accounts. This method allows you to take advantage of the default storage allocation for each account, providing you with more space to store and manage your media files.
However, it’s important to note that managing multiple Google accounts can be challenging, especially when it comes to organizing and accessing your photos and videos. Keeping track of which account contains specific photos or videos may require additional effort and could potentially result in confusion.
Consider using a consistent system to organize your media files across your different Google accounts. This could involve assigning specific account roles for different types of photos or creating a naming convention to easily identify photos or videos stored in each account.
Another important aspect to consider is privacy and sharing. If you want to share your photos and videos with others, ensure that you grant the necessary permissions and access to the relevant accounts. It’s recommended to keep the sharing process clear and communicate with individuals about which account contains the shared media.
Using multiple Google accounts for Google Photos can be a practical solution for expanding your storage capacity without having to invest in additional storage plans. However, managing multiple accounts and organizing your media files across them can be more complex. Evaluate your storage needs and consider this method if you are comfortable with the extra management required.
Step 8: Utilize Shared Libraries Feature
If you want to save space on your own Google Photos account while still having access to your photos and videos, consider utilizing the Shared Libraries feature. This feature allows you to share your entire photo library or select albums with another Google account, effectively offloading some of your storage requirements to the shared account.
Here’s how you can utilize the Shared Libraries feature in Google Photos:
- Open the Google Photos app or website on your device.
- Tap on the menu icon (three horizontal lines) in the top-left corner of the screen.
- Select “Settings” from the menu.
- Navigate to “Shared libraries.”
- Choose the account you want to share your library with or invite someone to share their library with you.
- Select the photos or albums you want to share or specify sharing conditions, such as sharing everything, sharing photos of specific people, or sharing photos taken before a certain date.
- Confirm the settings and start sharing your photo library.
By utilizing the Shared Libraries feature, your photos and videos will be accessible in both your account and the shared account. This allows you to keep a copy of your media in your own account while reducing the storage space usage on your own account by sharing the library with another account.
It’s important to note that the shared account will have access to view, edit, and delete the shared media, so make sure to choose a trusted account for sharing. Additionally, any changes made to the shared library, such as deleting photos, will reflect in both accounts.
If you want to stop sharing your library or remove specific photos or albums from the shared library, you can easily adjust the settings in the Shared Libraries section of Google Photos.
Utilizing the Shared Libraries feature is a great way to save space on your own Google Photos account while still retaining access to your photos and videos. Whether you’re sharing with another personal account or a trusted friend or family member, this feature provides a convenient option to diversify your storage needs and reduce the storage burden on your own Google account.
Step 9: Delete Unwanted Photos and Videos
One of the simplest and most effective ways to free up storage space on Google Photos is to delete unwanted photos and videos. Over time, our photo libraries accumulate a mix of memorable moments and unnecessary duplicates, screenshots, or low-quality images. By regularly cleaning up and removing these unwanted files, you can ensure that your storage space is optimized and reserved for the photos and videos that truly matter.
To delete unwanted photos and videos from Google Photos, follow these steps:
- Open the Google Photos app on your device or access it through the web version.
- Navigate to the photo or video you want to delete.
- Tap the three-dot menu icon (vertical ellipsis) or the trash bin icon.
- Select “Delete” or “Move to trash” to remove the item permanently.
If you have a large number of photos or videos to delete, you can perform bulk actions by selecting multiple items at once and deleting them in one go.
It’s essential to review your photo library periodically and remove any duplicates or redundant copies of the same photo. Google Photos has a built-in feature called “Duplicates” that can help you easily find and delete duplicate photos.
When deleting photos and videos, ensure that you have a backup of the files if needed. It’s recommended to have a separate backup system or cloud storage solution to safeguard your important memories.
Deleting unwanted photos and videos not only helps you reclaim storage space but also allows for better organization and easier navigation within your Google Photos library. It ensures that you can quickly find and enjoy the meaningful photos and videos without clutter or distraction.
By regularly decluttering and deleting unwanted photos and videos, you can optimize your storage space on Google Photos, making room for new memories and ensuring a more streamlined and efficient photo management experience.
Step 10: Utilize Photo Compression Apps
Another effective method to save storage space on Google Photos is to utilize photo compression apps. These apps are specifically designed to reduce the file size of your photos without compromising the image quality significantly. By compressing your photos before uploading them to Google Photos, you can maximize your storage capacity while still retaining satisfactory visual quality.
Here are a few popular photo compression apps you can consider:
- Photo Compress 2.0 (Android)
- JPEGmini (Android and iOS)
- Compress Photos (iOS)
- Photo & Picture Resizer (Android)
These apps generally offer compressing options such as selecting the level of compression and choosing the desired file size. Some apps also provide batch compression capabilities, allowing you to compress multiple photos simultaneously.
To utilize photo compression apps, follow these general steps:
- Download and install the photo compression app of your choice from the app store.
- Open the app and select the photos you want to compress.
- Adjust the compression settings according to your preferences.
- Initiate the compression process, and the app will generate compressed versions of your photos.
Once the photos have been compressed, you can proceed to upload them to Google Photos. The reduced file size will help you save storage space while still maintaining acceptable image quality.
It’s important to note that different photo compression apps have varying algorithms and capabilities. It’s recommended to test out different apps and compare the results to find the one that best suits your needs.
Remember to keep a backup of your original uncompressed photos, as the compression process is irreversible and may result in a slight loss of visual detail or clarity.
By utilizing photo compression apps, you can effectively optimize the storage space on Google Photos by reducing the file sizes of your photos. This method allows you to save space without compromising the overall viewing experience of your images. Experiment with different apps and compression settings to find the right balance between file size reduction and image quality for your specific needs.
Conclusion
Managing storage space on Google Photos can be a challenge, especially when our collection of photos and videos continues to grow. However, with the various methods and strategies outlined in this guide, you can effectively maximize your storage capacity and continue storing your precious memories without limitations.
From utilizing the “High quality” option and Google Pixel phones to buying additional storage and utilizing other cloud storage services, there are several avenues to explore. Additionally, compressing photos before uploading, using multiple Google accounts, and leveraging the Shared Libraries feature can further optimize your storage options.
Regularly deleting unwanted photos and videos and utilizing photo compression apps are also practical solutions to reclaim storage space while maintaining satisfactory image quality. These methods allow you to streamline your Google Photos library and ensure that it remains focused on the photos and videos that truly matter to you.
It’s important to assess your storage needs and consider the trade-offs of each method. Some solutions may involve additional expenses or slightly compromising image quality, but they provide the freedom to continue using Google Photos without the fear of running out of storage space.
Remember to create backups of your photos and videos, especially before applying any compression or deleting files, to ensure the safety and availability of your precious memories.
By implementing these steps and strategies, you can make the most out of Google Photos and enjoy unlimited storage options. So, start decluttering, organizing, and optimizing your storage space today, ensuring that you always have room for new memories. Happy photo storing!