Introduction
Google Photos is a popular cloud-based photo storage and sharing platform that offers a range of features and benefits to its users. From unlimited storage to advanced editing tools, it has become an essential app for many photography enthusiasts. However, there may come a time when you no longer require the Google Photos subscription and want to cancel it.
If you find yourself in this situation, you have come to the right place. In this article, we will guide you through the steps on how to cancel your Google Photos subscription, ensuring a hassle-free process. Whether you are looking to switch to a different photo storage service or simply want to free up some space on your device, cancelling your subscription can be done quickly and easily.
Before we dive into the process, it is important to note that cancelling your Google Photos subscription will remove any additional benefits associated with it. This includes features like advanced editing tools and unlimited storage. However, your existing photos and videos will still remain in your account, and you will be able to access them through the Google Photos app or website.
Now, let’s get started with the step-by-step guide on how to cancel your Google Photos subscription.
Step 1: Open Google Photos App
The first step in the process of cancelling your Google Photos subscription is to open the Google Photos app on your mobile device. Make sure you have a stable internet connection before proceeding.
If you haven’t already installed the app, you can download it from the App Store (for iOS users) or the Google Play Store (for Android users). Once installed, locate the Google Photos app on your home screen or in your app drawer, and tap on it to open.
Once the app is open, you will be prompted to sign in to your Google account, if you haven’t done so already. Enter your login credentials and tap the Sign In button to proceed.
After signing in, you will be greeted with a user-friendly interface that displays your photos and albums. Take a moment to familiarize yourself with the app’s layout and features.
Now that you have successfully opened the Google Photos app, you are ready to move on to the next step in the cancellation process.
Step 2: Go to Settings
Once you have opened the Google Photos app, the next step is to access the Settings menu. This is where you will find the option to manage your subscriptions and cancel the Google Photos subscription.
To access the Settings menu, look for the three-line icon in the top-left corner of the app. Tap on this icon to open the navigation menu.
In the navigation menu, you should see a list of options. Look for the “Settings” option and tap on it to proceed.
Upon tapping the “Settings” option, a new screen will appear. This screen contains various settings and options related to the Google Photos app.
Scroll down the screen until you find the “Subscriptions” section. This section is where you can manage your subscriptions, including the Google Photos subscription.
Now that you have successfully navigated to the Settings menu and located the Subscriptions section, you are ready to proceed to the next step.
Step 3: Tap on Manage Subscriptions
After accessing the Settings menu in the Google Photos app, the next step is to tap on the “Manage Subscriptions” option. This will allow you to view and control your subscriptions, including the Google Photos subscription.
Scroll down the Settings screen until you find the “Subscriptions” section. Within this section, you will see an option labeled “Manage Subscriptions.” Tap on this option to proceed.
By selecting the “Manage Subscriptions” option, you will be taken to a new screen that displays all of your active subscriptions, including the Google Photos subscription. This screen provides you with an overview of your current subscription status and options to modify or cancel your subscriptions.
Take a moment to review the information displayed on this screen. Ensure that you are selecting the Google Photos subscription for cancellation and not any other subscriptions you may have.
Now that you have successfully accessed the “Manage Subscriptions” screen, you are ready to move on to the next step in the cancellation process.
Step 4: Select the Google Photos Subscription
When you have reached the “Manage Subscriptions” screen in the Google Photos app, it’s time to select the Google Photos subscription that you want to cancel. This step ensures that you are targeting the correct subscription for cancellation.
On the “Manage Subscriptions” screen, you will see a list of all your active subscriptions. Locate the Google Photos subscription from the list.
The Google Photos subscription will typically be labeled as “Google Photos” or something similar. It may also display the subscription duration and pricing information.
Once you have identified the Google Photos subscription, tap on it to select it. This action will highlight the subscription and provide you with additional options for managing it.
Double-check that you have selected the correct subscription before proceeding to the next step. Confirm that you are indeed selecting the Google Photos subscription for cancellation and not any other subscriptions you may have.
Now that you have successfully selected the Google Photos subscription, you are ready to proceed to the next step in the cancellation process.
Step 5: Cancel Subscription
After selecting the Google Photos subscription to cancel, the next step is to proceed with the cancellation. This step finalizes the process and ensures that your Google Photos subscription will no longer be active.
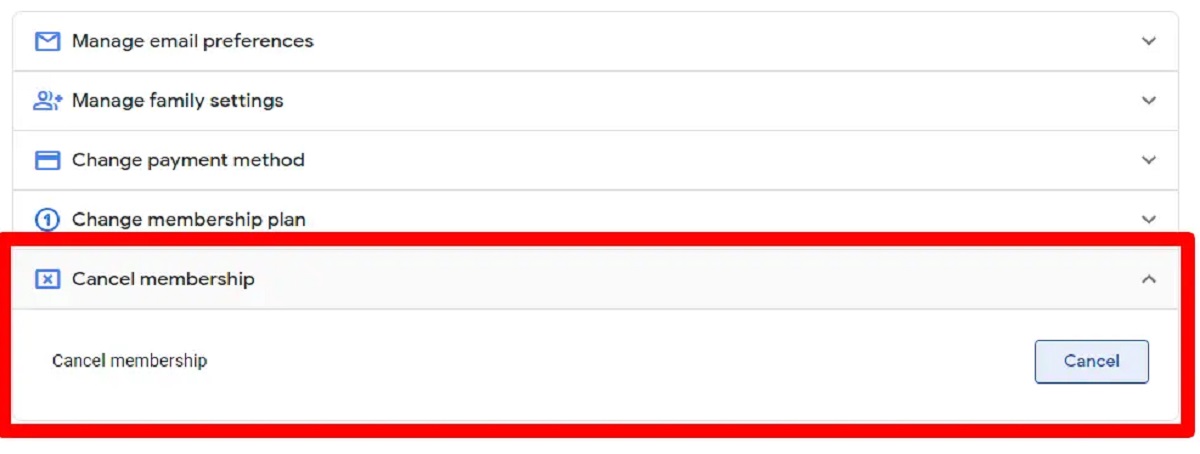
On the screen where you have selected the Google Photos subscription, look for an option that says “Cancel Subscription” or something similar. Tap on this option to initiate the cancellation process.
At this point, you may be prompted to provide a reason for canceling your subscription. The reason may be optional or mandatory depending on the specific app version or your region.
Follow the on-screen prompts or instructions to complete the cancellation process. You may be required to confirm your cancellation decision or provide additional information.
Take note that canceling your Google Photos subscription will result in the removal of any additional benefits associated with it. This includes features like advanced editing tools, live photo updates, and unlimited storage.
Once you have completed the cancellation process, you will receive a confirmation message or email confirming the cancellation of your Google Photos subscription. Keep this confirmation for your records.
Now that you have successfully canceled your Google Photos subscription, you are ready for the final step in the process.
Step 6: Confirm Cancellation
After successfully completing the cancellation process, the final step is to confirm the cancellation of your Google Photos subscription. This step ensures that the cancellation is officially processed and that your subscription will no longer be active.
Upon canceling your Google Photos subscription, you may be prompted to confirm your decision. This confirmation step is essential to prevent accidental cancellations and to ensure that you are certain about your cancellation.
Read the confirmation message or prompt carefully to ensure that it accurately reflects your cancellation request. Look for a button or option that says “Confirm,” “Yes, Cancel,” or something similar, and tap on it to finalize the cancellation.
Once you have confirmed the cancellation, you will typically receive a confirmation message or email confirming the cancellation of your Google Photos subscription. This confirmation serves as proof that your subscription has been successfully canceled.
Keep the confirmation message or email for your records, as it may be useful to refer back to it in the future if needed.
After confirming the cancellation, your Google Photos subscription will no longer be active. However, your existing photos and videos will still be accessible through the Google Photos app or website.
Congratulations! You have successfully completed the cancellation process for your Google Photos subscription.
Conclusion
Cancelling your Google Photos subscription may seem like a daunting task, but with the step-by-step guide provided in this article, it becomes a straightforward process. By following the steps outlined in this guide, you can easily cancel your subscription and free up space or explore other photo storage options.
Remember, when canceling your Google Photos subscription, you will lose access to additional features such as unlimited storage and advanced editing tools. However, your existing photos and videos will still remain accessible through the Google Photos app or website.
It’s important to note that canceling your Google Photos subscription does not delete your photos or videos. They will remain in your account unless you choose to delete them separately.
If, in the future, you decide to resubscribe to Google Photos or switch to another photo storage service, you can easily do so by following the appropriate steps provided by the respective service.
We hope that this guide has been helpful in assisting you with canceling your Google Photos subscription. By following the steps outlined, you can smoothly navigate through the process and make the necessary changes to meet your photo storage needs.
Thank you for reading, and we wish you all the best in your digital photo organization journey!