Introduction
When it comes to formatting a Solid State Drive (SSD), one of the available options is to format it to the FAT32 file system. FAT32 stands for File Allocation Table 32-bit and is a widely used file system for external storage devices. While newer file systems like NTFS and exFAT have emerged, there are still several reasons why you might want to format your SSD to FAT32.
Firstly, FAT32 has excellent compatibility. It can be read and written by a wide range of operating systems, including Windows, macOS, and Linux. This means that if you plan to use the SSD with different computers or operating systems, formatting it to FAT32 ensures cross-platform compatibility without any hassle.
Secondly, FAT32 supports a maximum file size of 4GB and a maximum partition size of 8TB. While these limitations may not be ideal for large files or partitions, they are more than sufficient for most everyday usage scenarios. Additionally, FAT32 has a relatively simple and efficient structure, which allows for faster read and write access compared to other file systems.
In this article, we will provide you with a step-by-step guide on how to format your SSD to FAT32. We will explore three options: using Windows Disk Management, using the Command Prompt, and using third-party software. Each method has its advantages and considerations, so you can choose the one that best suits your needs and preferences.
Before we delve into the formatting process, it’s important to note that formatting your SSD will erase all the data on it. Therefore, it’s crucial to have a backup of any important files or data that you want to preserve. Once you’ve made the necessary preparations, let’s move on to the step-by-step guide on formatting your SSD to FAT32.
What is FAT32?
FAT32 is a file system that was introduced by Microsoft in 1996 as an extension of the older FAT file system. It is the successor to the FAT16 file system and is widely used for formatting external storage devices like USB flash drives and SD cards.
The acronym FAT stands for File Allocation Table, which refers to the data structure used by the file system to keep track of the location of each file on the disk. The “32” in FAT32 indicates that it uses a 32-bit file allocation table entry, allowing for a larger number of clusters and better efficiency in managing disk space compared to its predecessor.
One of the significant advantages of FAT32 is its compatibility. It is supported by multiple operating systems, including Windows, macOS, and Linux. This cross-platform compatibility means you can easily access a FAT32-formatted device on different computers without worrying about compatibility issues.
FAT32 has a maximum single file size limit of 4GB, which may be a limitation for certain use cases like working with large video files. However, for most everyday usage scenarios, this limit is more than sufficient. Additionally, FAT32 also has a maximum partition size limit of 8 terabytes (TB), which allows you to create larger storage volumes on your devices.
Another advantage of FAT32 is its relatively simple and efficient structure. It uses a straightforward organization scheme, which enables fast read and write operations. This simplicity also contributes to its wide compatibility, as older or simpler devices may not support more advanced file systems like NTFS or exFAT.
However, it’s important to note that FAT32 does have some limitations. Due to its age and design, it may not be the optimal choice for certain scenarios, particularly when working with large files or needing advanced file permission settings. In such cases, more modern file systems like NTFS or exFAT are usually recommended.
Now that we have a better understanding of what FAT32 is and its advantages and limitations, let’s proceed to explore why you may consider formatting your SSD to FAT32.
Why format SSD to FAT32?
There are several reasons why you might consider formatting your SSD to the FAT32 file system. Let’s explore some of the primary motivations behind this decision:
1. Cross-platform compatibility: FAT32 is supported by multiple operating systems, including Windows, macOS, and Linux. By formatting your SSD to FAT32, you ensure that it can be easily accessed and used on different computers and devices without any compatibility issues. This is particularly beneficial if you frequently work across various platforms or share files with others who use different operating systems.
2. Versatility: FAT32 offers excellent versatility, allowing you to use your SSD for a wide range of purposes. Whether you want to store documents, multimedia files, or software installers, formatting your SSD to FAT32 ensures that it can handle different types of files. This versatility makes it ideal for everyday usage scenarios, such as data transfer, file backup, or portable storage.
3. File size and partition compatibility: While FAT32 has limitations, such as a maximum file size limit of 4GB, it is still suitable for most common file types. If you primarily work with smaller files or don’t require handling extremely large files, formatting your SSD to FAT32 won’t pose any significant challenges. Additionally, the maximum partition size limit of 8TB allows you to create sizable storage volumes on your SSD.
4. Performance: FAT32 has a relatively simple and efficient file system structure, resulting in faster read and write access compared to more complex file systems. This means that accessing and transferring files on a FAT32-formatted SSD can be quicker, especially when dealing with numerous small files. If performance is a critical factor for you, formatting your SSD to FAT32 can be a viable option.
5. Compatibility with other devices: In addition to computers, FAT32-formatted SSDs can be easily connected to various other devices, such as gaming consoles, media players, and smart TVs. This compatibility allows you to store and play multimedia files directly from your SSD on these devices, enhancing your entertainment options and convenience.
6. Legacy system support: If you are using an older computer or operating system that does not support more modern file systems like NTFS or exFAT, formatting your SSD to FAT32 ensures that it can be recognized and utilized by your system. This is particularly relevant if you have legacy hardware or software that relies on FAT32 compatibility.
Considering these reasons, formatting your SSD to the FAT32 file system can be a practical and advantageous choice for many users. However, before proceeding with the formatting process, it’s essential to understand the steps involved. In the next section, we will provide a step-by-step guide on how to format your SSD to FAT32 using different methods.
Step-by-step guide to format SSD to FAT32
Formatting your SSD to the FAT32 file system can be done through various methods depending on the operating system you are using. In this section, we will provide you with a step-by-step guide on how to format your SSD to FAT32 using different options.
Option 1: Using Windows Disk Management:
- Connect your SSD to your computer.
- Right-click on the Windows Start menu and select “Disk Management”.
- Locate your SSD in the list of disks, right-click on it, and select “Format”.
- Choose “FAT32” as the file system and adjust any other relevant settings.
- Click “OK” or “Apply” to start the formatting process.
Option 2: Using the Command Prompt:
- Connect your SSD to your computer.
- Press the Windows key + R to open the Run dialog box.
- Type “cmd” and press Enter to open the Command Prompt.
- Type “diskpart” and press Enter to launch the DiskPart utility.
- Type “list disk” to display a list of available disks and identify your SSD.
- Type “select disk X” (replace X with the appropriate disk number) to select your SSD.
- Type “clean” to remove any existing partitions on the SSD.
- Type “create partition primary” to create a new primary partition on the SSD.
- Type “format fs=fat32 quick” to format the partition to FAT32.
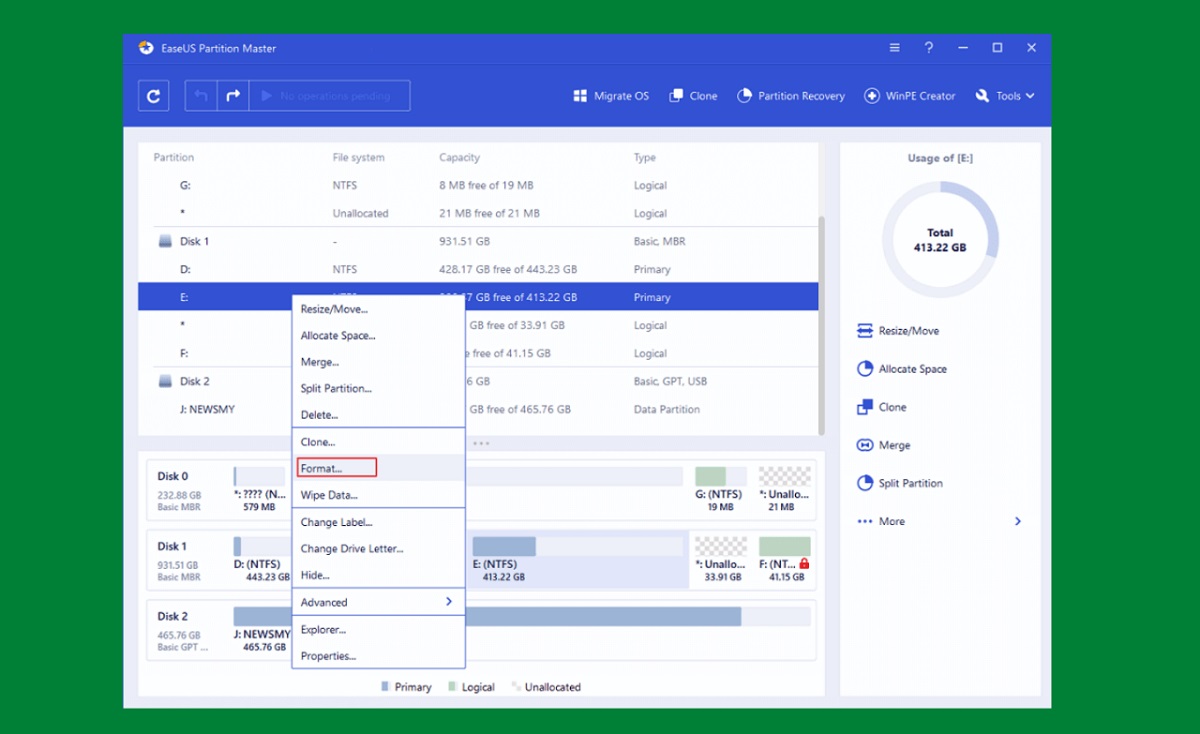
Option 3: Using third-party software:
- Connect your SSD to your computer.
- Download and install a reliable third-party disk formatting tool that supports FAT32 formatting.
- Launch the software and select your SSD from the list of available drives.
- Choose the FAT32 file system option.
- Adjust any other relevant settings if necessary.
- Start the formatting process and wait for it to complete.
Remember that formatting your SSD will erase all the data on it, so it’s crucial to back up any important files beforehand. Additionally, ensure that you select the correct drive when formatting to avoid accidentally formatting the wrong storage device.
Now that you have a step-by-step guide on formatting your SSD to FAT32 using different methods, you can choose the option that suits your preferences and operating system. Before proceeding with the formatting process, make sure to take any necessary precautions and double-check your data backups.
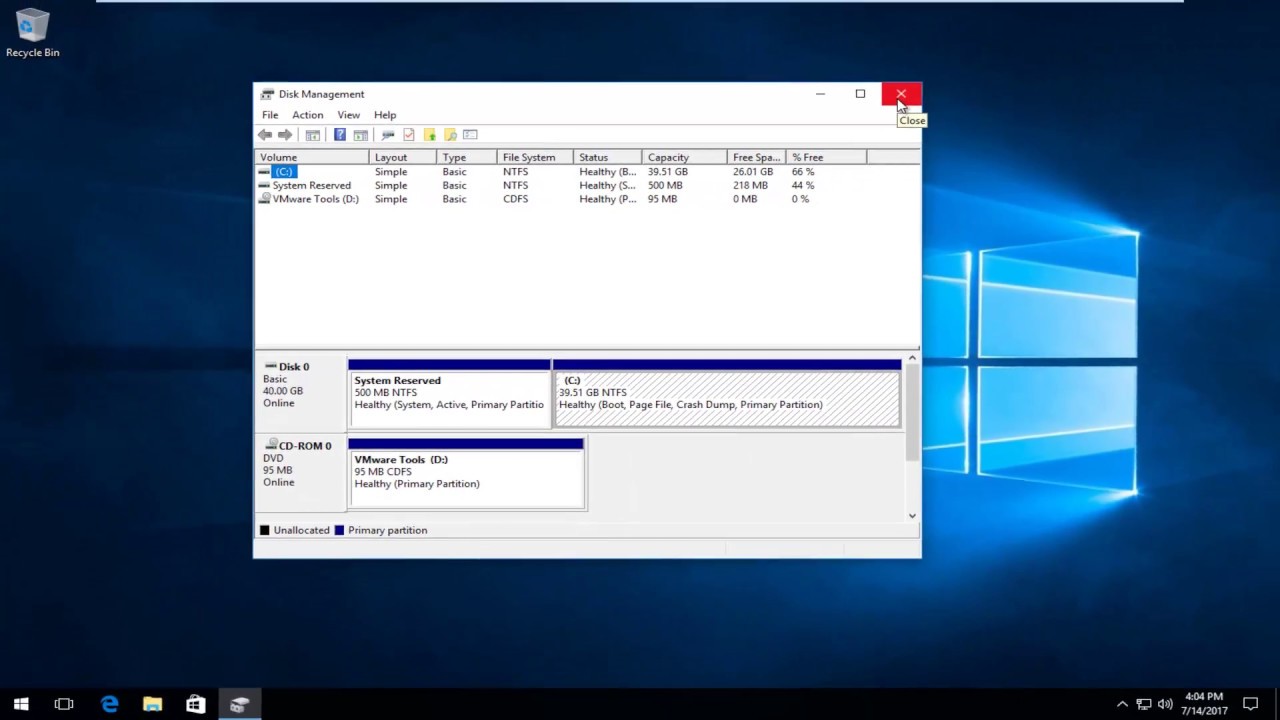
Option 1: Using Windows Disk Management
Windows Disk Management is a built-in utility that allows you to manage disk partitions and format storage devices. Here is a step-by-step guide on how to format your SSD to FAT32 using Windows Disk Management:
- Connect your SSD to your computer.
- Right-click on the Windows Start menu and select “Disk Management”.
- Locate your SSD in the list of disks. It should be labeled with the appropriate storage capacity and drive letter.
- Right-click on your SSD and select “Format”.
- A window will appear where you can configure the formatting options.
- Select “FAT32” as the file system.
- You can also choose to assign a volume label to the SSD.
- Ensure that the “Quick Format” option is checked if you want to expedite the formatting process. Keep in mind that this option will not perform a thorough disk check.
- Click “OK” to start the formatting process.
- You will be prompted to confirm the formatting. Click “OK” to proceed.
- Wait for the formatting process to complete. The time it takes will depend on the size of your SSD.
- Once the formatting is finished, you will see a message indicating the successful completion.
- Your SSD is now formatted to FAT32 and ready for use.
Windows Disk Management provides a straightforward and user-friendly method for formatting your SSD to FAT32. However, it’s worth noting that there may be some limitations depending on the Windows version and the specific capabilities of your SSD.
Remember to back up any important data before formatting your SSD, as the process will erase all existing files on the drive. Additionally, ensure that you select the correct SSD to avoid formatting the wrong storage device.
Now that you know how to format your SSD to FAT32 using Windows Disk Management, you can follow these steps to easily configure your SSD for cross-platform compatibility and versatile usage.
Option 2: Using the Command Prompt
The Command Prompt is a powerful tool that allows you to execute commands and perform various tasks on your computer, including formatting storage devices. Here’s a step-by-step guide on how to format your SSD to FAT32 using the Command Prompt:
- Connect your SSD to your computer.
- Press the Windows key + R to open the Run dialog box.
- Type “cmd” and press Enter to open the Command Prompt.
- In the Command Prompt window, type “diskpart” and press Enter to launch the DiskPart utility.
- Type “list disk” and press Enter to display a list of available disks connected to your computer. Identify your SSD based on its size.
- Type “select disk X” (replace X with the appropriate disk number of your SSD) and press Enter. This selects your SSD as the target for the following commands.
- Before formatting, it’s important to note that this process will erase all data on the SSD. Therefore, consider making a backup of any important files beforehand.
- Type “clean” and press Enter. This command removes any existing partitions on the SSD.
- Type “create partition primary” and press Enter. This command creates a new primary partition on the SSD.
- Type “format fs=fat32 quick” and press Enter. This command formats the partition to the FAT32 file system, using the quick option for a faster format.
- Wait for the formatting process to complete. The time taken will depend on the size of your SSD.
- Once the formatting is finished, you will see a message indicating the successful completion.
- Your SSD is now formatted to FAT32 and ready for use.
Using the Command Prompt provides a more advanced and flexible method for formatting your SSD to FAT32. However, it’s essential to exercise caution and ensure that you select the correct disk to avoid formatting the wrong storage device.
Remember to back up any important data on your SSD before proceeding with the format, as all existing files will be permanently erased during the process.
Now that you know how to format your SSD to FAT32 using the Command Prompt, you can follow these steps to configure your SSD for cross-platform compatibility and optimal usage.
Option 3: Using third-party software
If you prefer a more user-friendly and feature-rich approach to format your SSD to FAT32, you can utilize third-party software specifically designed for disk management. Here’s a step-by-step guide on how to format your SSD to FAT32 using third-party software:
- Connect your SSD to your computer.
- Download and install a reputable third-party disk formatting tool that supports FAT32 formatting.
- Launch the software and select your SSD from the list of available drives.
- Choose the option to format the SSD, which may be labeled as “Format” or “Format/Reformat”.
- Select “FAT32” as the desired file system for your SSD.
- Ensure that any necessary settings, such as the allocation unit size or volume label, are configured according to your preferences.
- Verify that the software is set to perform a quick format if you want a faster formatting process.
- Double-check that you have selected the correct SSD for formatting, as the process will erase all existing data on the drive.
- Click “Start” or “Format” to begin the formatting process.
- Wait for the software to format your SSD to FAT32. The duration may vary depending on the size of your SSD.
- Once the formatting is complete, you will receive a confirmation message.
- Your SSD is now successfully formatted to FAT32 and can be utilized for your preferred purposes.
Third-party software offers additional features and flexibility over built-in tools, making the formatting process more user-friendly and customizable. However, it’s important to choose a reliable and trustworthy software from reputable sources to ensure the safety of your data.
Remember to back up any important files stored on your SSD before initiating the formatting process, as it will result in the permanent deletion of all data.
With third-party software, you can quickly and easily format your SSD to FAT32, optimizing its compatibility and performance with different operating systems.
Precautions to Take Before Formatting
Before you proceed with formatting your SSD to FAT32, it is important to take a few precautions to ensure a smooth and hassle-free process. Here are some important precautions to keep in mind:
1. Backup Your Data: Formatting your SSD will erase all the data stored on it. Before formatting, make sure you have backed up any important files, documents, or media to a separate storage device or cloud storage. This ensures that you can restore your data after the formatting process is completed.
2. Verify Drive Selection: Double-check that you have selected the correct SSD for formatting. Formatting the wrong drive can result in the loss of important data. Take caution when choosing the drive in disk management tools or command line interfaces. Ensure that you have correctly identified your SSD based on its size, label, or other identifying information.
3. Understand the Consequences: Formatting your SSD will remove all existing partitions and data from the drive. It is irreversible, and the deleted data cannot be recovered easily. Ensure that you have made a thorough review of the data stored on the SSD, so you can make an informed decision about formatting it.
4. Check for Hidden Partitions: Some SSDs may contain hidden partitions that are used for system recovery or other purposes. Before formatting, verify if your SSD has any hidden partitions. If you are not sure, it is advisable to consult the user manual of your SSD or the manufacturer’s website for guidance.
5. Update Firmware (if necessary): It is recommended to check for any available firmware updates for your SSD before formatting. Firmware updates can provide performance improvements and bug fixes, ensuring that your SSD functions optimally. Follow the instructions provided by the SSD manufacturer to update the firmware safely.
6. Choose the Right File System: Consider whether FAT32 is the most suitable file system for your SSD based on your specific requirements. While FAT32 offers compatibility, there may be situations where other file systems, such as exFAT or NTFS, are more suitable due to their features or limitations. Research and assess your needs before settling on a file system for your SSD.
7. Disconnect Unnecessary Drives: To avoid any accidental formatting of other drives, disconnect any unnecessary external drives or storage devices from your computer. This reduces the risk of formatting the wrong drive and losing data unintentionally.
8. Follow Formatting Instructions: When using third-party software or command line tools, make sure to follow the instructions provided by the software or the documentation to ensure a successful formatting process. Carefully review the steps and settings to ensure that you are formatting your SSD correctly.
By taking these precautions, you can minimize the risk of data loss and ensure a smooth formatting process for your SSD. Remember to back up your data and double-check your actions to avoid any irreversible mistakes.
Conclusion
In conclusion, formatting your SSD to the FAT32 file system can provide several benefits, including cross-platform compatibility, versatility, and efficient performance. Whether you choose to use Windows Disk Management, the Command Prompt, or third-party software, each method offers a viable solution for formatting your SSD to FAT32.
When formatting your SSD, it is essential to take precautions to protect your data. Remember to back up all important files before proceeding with the format, as the process will erase all existing data on the drive. Verify that you have selected the correct SSD to avoid accidental formatting of the wrong storage device.
Consider your specific needs when choosing a file system for your SSD. While FAT32 offers broad compatibility, there may be instances where other file systems like exFAT or NTFS are more appropriate due to their features or limitations.
By following the step-by-step guides provided in this article and taking the necessary precautions, you can successfully format your SSD to FAT32 and optimize its usage across different operating systems and devices.
Remember, formatting your SSD is a one-way process that cannot be undone easily. Take a cautious approach, understand the consequences of formatting, and make informed decisions before proceeding. If you have any doubts or concerns about formatting your SSD, it is advisable to consult the documentation provided with your SSD or seek assistance from the manufacturer or a professional technician.
With the right approach and proper preparation, you can format your SSD to FAT32 and enjoy seamless compatibility, improved versatility, and efficient performance for your storage needs.