Introduction
Welcome to the world of digital storage and memory cards! If you’re a tech enthusiast or someone who relies heavily on portable devices like cameras and smartphones, you’re probably familiar with SD cards. These small, compact storage devices are used to store photos, videos, and other files.
However, formatting an SD card, especially a 64GB one, can sometimes be a bit tricky. One popular file system used for SD cards is FAT32, which is compatible with various operating systems, including Windows, Mac, and Linux.
In this article, we will guide you through the process of formatting a 64GB SD card to the FAT32 file system. We’ll take you step by step, explaining how to back up your data, choose the right formatting tool, and confirm the format, among other things. By the end of this article, you’ll have a formatted 64GB SD card ready to use.
Whether you’re preparing your SD card for use with a camera, smartphone, or any other device, formatting it correctly ensures smooth operation, maximum compatibility, and efficient storage usage. So, without further ado, let’s dive into the process of formatting a 64GB SD card to FAT32!
Understanding the 64GB SD Card and FAT32
Before diving into the formatting process, it’s important to understand the basics of the 64GB SD card and the FAT32 file system.
An SD card is a small, portable storage device commonly used in digital cameras, smartphones, and other electronic devices. The capacity of an SD card is measured in gigabytes (GB), with 64GB being a popular size. This offers ample space for storing thousands of photos, hours of videos, and other types of files.
FAT32, or File Allocation Table 32, is a file system commonly used for SD cards and other portable storage devices. It was introduced by Microsoft in the 1990s and has become a widely supported file system due to its compatibility with various operating systems.
One advantage of FAT32 is its ability to be read and written to by multiple devices, such as Windows, Mac, and Linux systems. This makes it an ideal choice for users who frequently switch between different platforms.
However, there are a few limitations to keep in mind when using the FAT32 file system. One of the main drawbacks is its maximum supported file size, which is 4GB. This means that if you’re planning to store large individual files, such as high-definition videos, on your SD card, you may encounter difficulties.
Additionally, the FAT32 file system allocates storage space in cluster sizes. The larger the cluster size, the less efficient the storage usage becomes, especially when dealing with small files. Optimal cluster sizes may vary depending on the specific device and usage scenario.
Now that we have a basic understanding of the 64GB SD card and the FAT32 file system, let’s move on to the step-by-step process of formatting your SD card to FAT32.
Step 1: Backing Up Your Data
Before proceeding with the formatting process, it is crucial to back up all the data on your 64GB SD card. Formatting erases all the data on the card, so it’s essential to create a backup to avoid losing any valuable files.
There are several methods you can use to back up your data. One option is to connect your SD card to a computer using an SD card reader. Insert the SD card into the reader, and then connect it to your computer’s USB port. Your computer will recognize the SD card as a removable storage device.
Next, navigate to the SD card on your computer, and manually copy and paste the files and folders to a designated location on your computer’s hard drive. This can be a folder on your desktop or an external hard drive.
If you have a large amount of data on your SD card, this process may take some time. Be patient and ensure that all files are successfully copied before proceeding.
Alternatively, you can use third-party software to back up your data. There are many reliable data backup tools available, both free and paid, that can simplify the process and automate the backup process.
Once you have successfully backed up your data, double-check to ensure that all files are safely stored in the backup location. This step is crucial because formatting the SD card will erase all the data, and you won’t be able to recover it unless you have a backup.
With your data securely backed up, you’re ready to move on to the next step: choosing the right formatting tool.
Step 2: Choosing the Right Formatting Tool
Once you have backed up your data, the next step in formatting your 64GB SD card to FAT32 is selecting the right formatting tool. There are several options available, each with its own advantages and limitations.
The first option is to use the built-in formatting feature of your operating system. If you’re using a Windows computer, you can right-click on the SD card drive under “My Computer” or “This PC” and select the “Format” option. From there, you can choose FAT32 as the file system and proceed with the formatting process.
Mac users can utilize the Disk Utility tool to format the SD card. Simply open Disk Utility, select the SD card from the list of drives, click on the “Erase” tab, and choose the FAT32 file system. Click on the “Erase” button to format the SD card.
While the built-in formatting tools can get the job done, they may not provide advanced options or flexibility. For more robust features, you can consider using third-party formatting tools such as EaseUS Partition Master, SD Card Formatter, or MiniTool Partition Wizard.
These third-party tools offer additional features like cluster size adjustment and automated formatting processes. They are especially useful if you need to format multiple SD cards or if you want more control over the formatting options.
Before selecting a formatting tool, it is important to research and choose a reputable and reliable one. Read reviews, check the software’s compatibility with your operating system, and ensure that it supports formatting to the FAT32 file system.
Now that you have chosen the right formatting tool for your needs, it’s time to move on to the next step: installing and launching the formatting tool.
Step 3: Installing and Launching the Formatting Tool
With your chosen formatting tool in hand, it’s time to install and launch it on your computer. The exact installation process may vary depending on the tool you’ve selected, but generally, it follows a straightforward procedure.
First, visit the official website of the formatting tool and locate the download page. Look for the appropriate version of the tool compatible with your operating system. Most tools provide both Windows and Mac versions.
Once you’ve downloaded the installation file, locate it in your computer’s download folder or the location where you save your downloads. Double-click on the file to initiate the installation process.
Follow the on-screen instructions provided by the installation wizard. It usually involves accepting the terms and conditions, choosing the installation location, and selecting any additional features or options you want to install.
After completing the installation, locate the newly installed formatting tool in your computer’s applications or programs folder. Double-click on the tool’s icon to launch it.
Upon launching the tool, you should see a user-friendly interface that provides various options for formatting storage devices. Some tools may automatically detect the connected SD card, while others may require you to manually select the device.
If using a third-party tool, take a moment to familiarize yourself with the interface and explore any additional features or settings it offers. This will ensure you have a smooth formatting process and allow you to customize the format to your preferences.
Now that you have successfully installed and launched the formatting tool, you’re ready to move on to the next step: selecting the 64GB SD card for formatting.
Step 4: Selecting the 64GB SD Card
Once you have launched the formatting tool, the next step in the process is to select the 64GB SD card that you want to format to FAT32. Depending on the tool you are using, the SD card may be automatically detected or require manual selection.
If the tool automatically detects the connected SD card, you will see it listed in the device or drive selection menu. The SD card’s name or model number is usually displayed alongside its storage capacity. Double-check to ensure that the correct SD card is selected before proceeding with the formatting process.
Alternatively, if the tool does not automatically detect the SD card, you may need to manually select it from a list of available devices. Look for an option within the tool’s interface that allows you to browse or select the desired SD card.
Before selecting the SD card, ensure that it is properly connected to your computer. If you are using an external SD card reader, make sure it is securely plugged into a USB port. If the SD card is inserted into a built-in card slot on your computer, verify that it is inserted correctly and making a proper connection.
If the formatting tool supports multiple SD cards simultaneously, ensure that you select the correct 64GB SD card for formatting. Double-check the storage capacity or model number to identify the correct SD card.
It is essential to be cautious during this step, as selecting the wrong SD card for formatting can result in the loss of data on the selected card. Take your time to verify and double-check the SD card selection before proceeding to the next step.
Once you have successfully selected the 64GB SD card, you’re ready to move on to the next step: choosing the FAT32 file system for formatting.
Step 5: Choosing the FAT32 File System
After selecting the 64GB SD card, the next step in the formatting process is to choose the FAT32 file system. The file system determines how the data is organized and stored on the SD card.
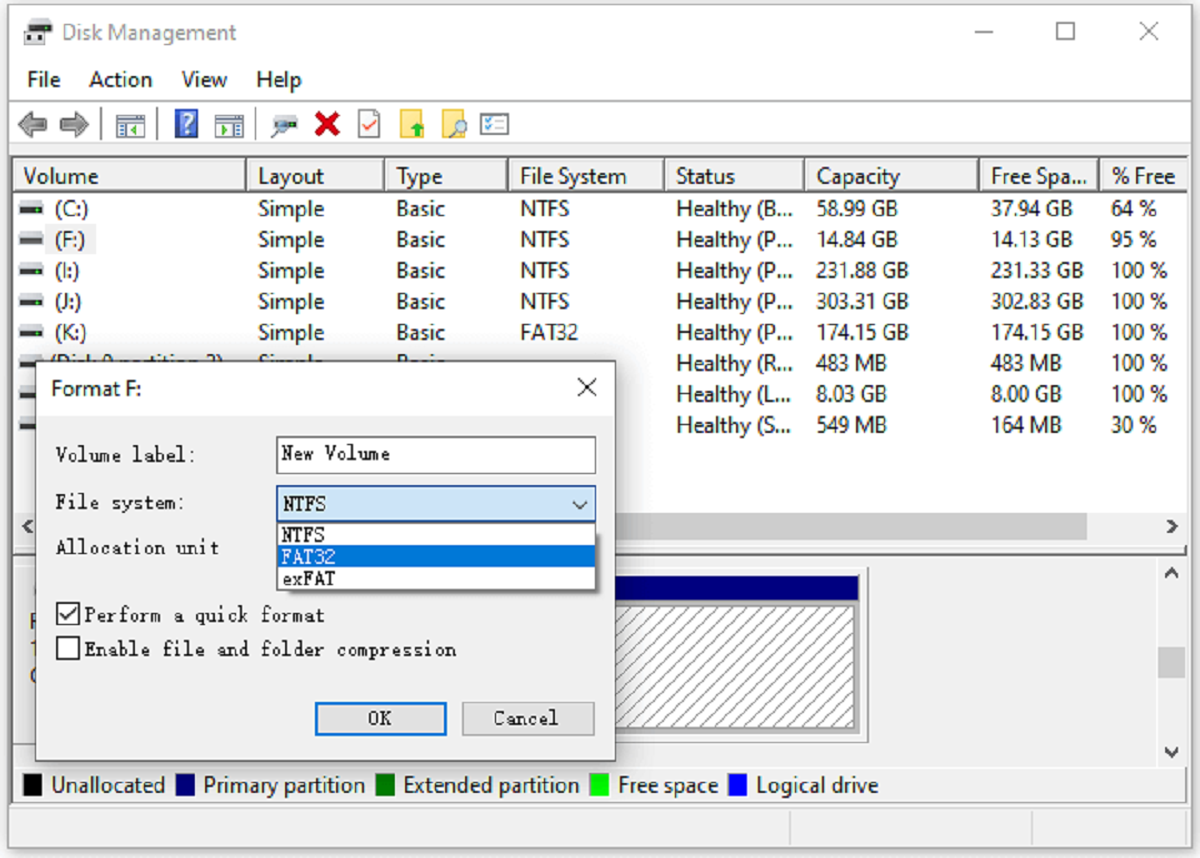
Within the formatting tool’s interface, you will typically find a section or dropdown menu that allows you to select the file system. Look for options such as “File System” or “Format As” to find the appropriate settings.
In this step, you want to make sure to choose FAT32 as the file system for your SD card. This ensures maximum compatibility with a wide range of devices and operating systems, including Windows, Mac, and Linux.
It is important to note that some formatting tools may have additional file system options available, such as exFAT or NTFS. While these file systems have their advantages, especially for larger file sizes or specific use cases, they may not be as widely supported as FAT32.
To format the SD card to FAT32, select the FAT32 file system from the available options. If the formatting tool has additional settings related to the file system, such as cluster size or allocation unit size, you can keep them at their default values, as they generally work well for most scenarios.
Choosing FAT32 as the file system ensures that the SD card can be read and written to by various devices without any compatibility issues. It provides a reliable and versatile file system option for your 64GB SD card.
Once you have selected the FAT32 file system, you are ready to move on to the next step: confirming the format and initiating the formatting process.
Step 6: Confirming the Format
After choosing the FAT32 file system for your 64GB SD card, the next step is to confirm the format before initiating the formatting process. This step ensures that you have the correct settings in place and gives you a final opportunity to review your choices.
Within the interface of the formatting tool, you will typically find a confirmation or summary screen that displays the selected SD card, file system, and any additional options you have chosen. Take a moment to carefully review these settings to ensure they align with your intentions.
Check the SD card information to verify that the correct 64GB SD card is selected for formatting. Confirm that the file system is indeed set to FAT32. If there are any additional options related to the format, such as quick format or file optimization, ensure they are also set according to your preferences.
This step is crucial in preventing any mistakes or accidental formatting of the wrong storage device. Take your time to inspect the confirmation screen and double-check all the settings to avoid any potential data loss.
If you are satisfied with the format settings and everything looks correct, you can proceed to the next step and initiate the formatting process. However, if you notice any discrepancies or need to make changes, look for options within the formatting tool to go back or modify the settings before proceeding.
It’s always better to be cautious and double-check your choices before formatting the SD card. Once the formatting process begins, the data on the card will be erased, and it cannot be easily recovered. Taking the time to confirm the format ensures a smoother and error-free process.
With the format confirmed, you are now ready to move on to the next step: waiting for the formatting process to complete.
Step 7: Waiting for the Formatting Process to Complete
Once you have confirmed the format settings for your 64GB SD card, it’s time to initiate the formatting process and patiently wait for it to complete. The time it takes for the formatting process to finish will vary depending on the size of the SD card and the speed of your computer.
When you initiate the formatting process, the formatting tool will start erasing the existing data on the SD card and prepare it to be formatted with the chosen file system. You will typically see a progress bar or status indicator within the interface of the formatting tool, indicating the formatting progress.
During this stage, it’s important not to interrupt the formatting process. Any interruption, such as unplugging the SD card or closing the formatting tool, can lead to an incomplete format or potential data corruption.
While waiting for the process to complete, you can use this time to do other tasks, catch up on work, or take a short break. Just ensure that your computer remains powered on and uninterrupted during the formatting process.
It’s worth noting that larger storage capacities, such as the 64GB SD card, may take longer to format compared to smaller capacities. This is because the formatting tool needs to erase and reorganize a larger amount of data on the SD card.
Be patient and give the formatting process ample time to complete. Avoid attempting to access the SD card or make any changes to the formatting tool while it is still in progress. Rushing or interrupting the process may lead to incomplete or corrupted formatting.
Once the formatting process is complete, you will typically receive a notification or see a confirmation message within the formatting tool. This indicates that the SD card has been successfully formatted to the FAT32 file system.
Now that you have patiently waited for the formatting process to complete, it’s time to move on to the next step: verifying the formatted SD card.
Step 8: Verifying the Formatted SD Card
After the formatting process is complete, it is crucial to verify the formatted SD card to ensure that the formatting was successful and the file system is set to FAT32. This step ensures that the SD card is ready to be used and all data can be reliably stored and accessed.
To verify the formatted SD card, first, safely remove it from your computer or card reader. On a Windows computer, you can do this by right-clicking the SD card drive and selecting the “Eject” option. On a Mac, you can drag the SD card icon to the Trash, and it will automatically eject.
Once the SD card has been safely ejected, re-insert it into the card reader or device in which you plan to use it. Make sure the SD card is securely inserted to establish a proper connection.
Next, navigate to the SD card on your computer or device and check the file system. Right-click on the SD card drive and select “Properties” on Windows, or click on the SD card icon and select “Get Info” on Mac. Look for the file system information, and it should display as FAT32.
Additionally, you can create a new folder or copy a small test file onto the SD card to ensure that data can be successfully written and read. If you can create a new folder or copy a file onto the SD card without any errors, it confirms that the formatting was successful, and the SD card is ready for use.
If you encounter any issues during the verification process, such as errors or inability to write or read data, it may indicate a problem with the formatting. In such cases, you may need to repeat the formatting process or seek further assistance to troubleshoot the issue.
By verifying the formatted SD card, you can have confidence that the formatting process was completed correctly, and the SD card is now ready to be used for storing and accessing data.
Congratulations! You have successfully formatted your 64GB SD card to the FAT32 file system. Enjoy using your newly formatted SD card and take advantage of its ample storage capacity for all your digital needs.
Conclusion
Formatting a 64GB SD card to the FAT32 file system might seem like a daunting task, but with the right steps and tools, it can be a straightforward process. By following the steps outlined in this guide, you can successfully format your SD card and ensure its compatibility with various devices and operating systems.
We started by understanding the 64GB SD card and the FAT32 file system, highlighting their features and limitations. Then, we walked through the step-by-step process, beginning with the importance of backing up your data to avoid any potential loss. We then discussed how to choose the right formatting tool, install and launch it, and select the 64GB SD card for formatting.
Next, we dived into the crucial step of choosing the FAT32 file system, which offers compatibility across multiple platforms. We emphasized the significance of confirming the format settings before starting the formatting process and patiently waiting for it to complete. Finally, we concluded by highlighting the importance of verifying the formatted SD card to ensure its successful formatting.
Remember, while the steps outlined in this guide provide a general approach to formatting a 64GB SD card to FAT32, it’s essential to adapt them to the specific formatting tool and operating system you are using. Each tool may have slight variations in options and interface, so be sure to refer to the documentation provided by the formatting tool’s manufacturer for additional guidance if needed.
By correctly formatting your 64GB SD card to the FAT32 file system, you can enjoy smooth data storage, easy file transfer, and seamless compatibility across a wide range of devices. Whether you’re using the SD card for your camera, smartphone, or another portable device, following these steps will help ensure efficient storage utilization and optimal performance.
Now that you have the knowledge and understanding of how to format a 64GB SD card to FAT32, go ahead and apply these steps with confidence. Safely organize your files, capture memorable moments, and make the most of your portable storage device. Happy formatting!