Introduction
Welcome to our guide on how to fix the HDMI port on your Xbox One. The HDMI port is a crucial component that allows you to connect your console to your TV or monitor, enabling you to enjoy high-quality graphics and immersive gaming experiences. Unfortunately, HDMI ports can sometimes experience issues, resulting in a lack of video or audio output.
If you’re encountering problems with your Xbox One’s HDMI port, don’t worry! In this guide, we’ll take you through a series of troubleshooting steps to help you diagnose and resolve the issue. Whether you’re experiencing a blank screen, distorted graphics, or no audio, we’ve got you covered.
Before we dive into the troubleshooting steps, it’s important to note that we’ll be focusing on fixing common issues that can be resolved without the need for professional assistance. However, if you’ve tried our methods and still can’t get your HDMI port working, you may need to reach out to Xbox Support or consider seeking professional repair services.
By following the steps outlined in this guide, you’ll have a better understanding of how to identify and resolve HDMI port issues on your Xbox One. So, let’s get started and get you back to enjoying your gaming sessions in no time!
Required Tools and Materials
Before we begin troubleshooting your Xbox One HDMI port, it’s important to gather a few tools and materials that will assist you in the process. Here’s what you’ll need:
- A small soft-bristle brush or a can of compressed air
- Isopropyl alcohol (preferably 90% or higher concentration) and cotton swabs
- A different HDMI cable (if available)
- A secondary TV or monitor for testing
- An internet-connected device to check for system updates (e.g., PC, smartphone, tablet)
The soft-bristle brush or compressed air will be used to clean the HDMI port, removing any dust or debris that may be causing connectivity issues. The isopropyl alcohol and cotton swabs will help in case there is any residue or corrosion on the port. Additionally, having a spare HDMI cable handy can help determine if the issue lies with the cable itself. Testing the Xbox One on a different TV or monitor will help identify whether the problem is with the console or the current display setup. Lastly, checking for system updates is crucial as software updates often address known HDMI port issues.
Having these tools and materials ready will ensure that you can troubleshoot your Xbox One HDMI port efficiently and effectively. Remember to ensure the console is turned off and disconnected from any power source before proceeding with the troubleshooting process.
Step 1: Check for Loose Connections
The first step in troubleshooting your Xbox One HDMI port is to check for any loose connections. Sometimes, the issue may be as simple as a loose cable or an improperly inserted HDMI connector. Follow these steps to ensure all connections are secure:
- Turn off your Xbox One and unplug it from the power source.
- Inspect the HDMI cable at both ends. Check for any visible signs of damage or kinks in the cable that could affect the signal.
- Unplug and firmly reconnect the HDMI cable at both ends, ensuring a snug fit.
- If you’re using an HDMI adapter or converter, disconnect and reconnect it as well.
- If you have an HDMI switch or receiver, ensure that all cables are properly connected to the device.
- Plug your Xbox One back into the power source and turn it on.
- Verify if there’s any video output on your TV or monitor. If not, proceed to the next step.
By checking for loose connections, you might be able to resolve the issue without any further troubleshooting. Sometimes, a loose cable or a poorly inserted connector can disrupt the HDMI signal and result in a no-display or distorted display problem. Ensure all connections are secure before moving on to the next step.
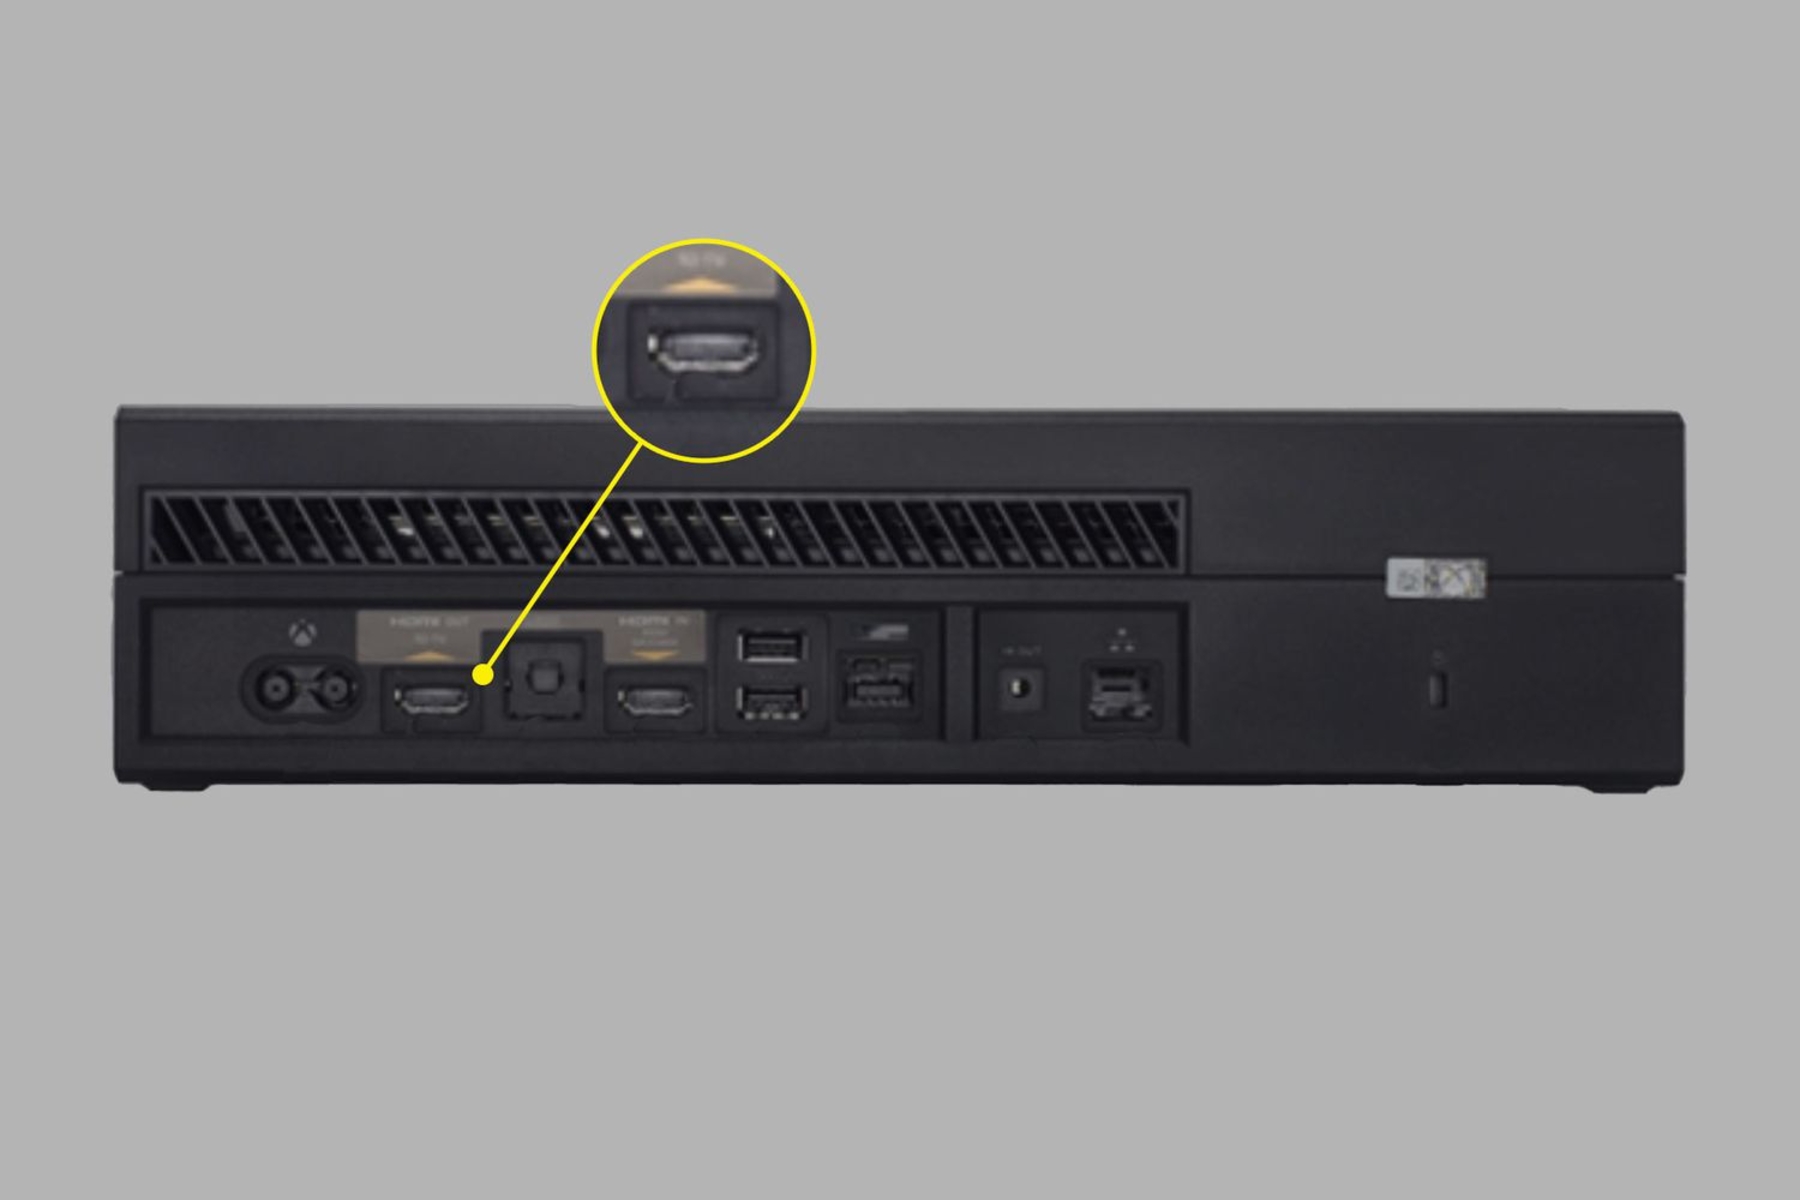
Step 2: Clean the HDMI Port
If you’re still experiencing HDMI port issues on your Xbox One after checking for loose connections, the next step is to clean the HDMI port. Over time, the port can accumulate dust, dirt, or other debris, hindering the proper transmission of the HDMI signal. Cleaning the port can often resolve connectivity problems. Here’s how:
- Turn off your Xbox One and unplug it from the power source.
- Using a small soft-bristle brush or a can of compressed air, gently remove any visible dust or debris from the HDMI port.
- If the port appears dirty or has residue, dampen a cotton swab with isopropyl alcohol (preferably 90% or higher concentration).
- Gently rub the cotton swab against the edges and inside of the HDMI port to remove any dirt or corrosion.
- Allow the HDMI port to dry completely before reconnecting the HDMI cable.
- Plug your Xbox One back into the power source and turn it on.
- Check if the video output is now working on your TV or monitor. If not, move on to the next step.
Cleaning the HDMI port can often help restore a stable connection and resolve display issues. Be careful not to apply excessive force or use sharp objects that can damage the port. If the port appears to be severely damaged or corroded, it may be necessary to seek professional repair services or contact Xbox Support for further guidance.
Step 3: Reset the Display Settings
If cleaning the HDMI port did not resolve the issue with your Xbox One HDMI port, the next step is to reset the display settings. Sometimes, incorrect display settings can lead to compatibility issues, resulting in no video output or distorted display. Follow these steps to reset the display settings:
- Turn on your Xbox One and wait until it fully boots up.
- Press the Xbox button on your controller to open the guide.
- Navigate to the “System” tab and select “Settings”.
- In the Settings menu, choose “Display & sound”.
- Select “Video output” and then click on “Resolution”.
- Choose a lower resolution option that is compatible with your TV or monitor.
- Once the resolution is changed, select “Test display”.
- If the display appears normal, go back to the video output settings and switch to your preferred resolution.
- If the issue persists, repeat the process and select different resolution options until you find one that works.
Resetting the display settings can help establish a proper connection between your Xbox One and the TV or monitor. By using a lower resolution, you can troubleshoot whether the issue lies with the chosen resolution or other display settings. If none of the resolution options provide a stable display, continue to the next step for further troubleshooting.
Step 4: Try a Different HDMI Cable
If you’re still encountering HDMI port issues with your Xbox One after resetting the display settings, it’s time to try using a different HDMI cable. Sometimes, cables can become faulty or damaged, resulting in a loss of signal or inconsistent output. Follow these steps to test with a different HDMI cable:
- Turn off your Xbox One and unplug it from the power source.
- Disconnect the current HDMI cable from both the console and the TV or monitor.
- Connect a different HDMI cable to both the console and the TV or monitor.
- Plug your Xbox One back into the power source and turn it on.
- Check if there’s any video output on your TV or monitor. If the issue persists, proceed to the next step.
By using a different HDMI cable, you can determine if the problem lies with the original cable you were using. It’s possible that the old cable may have developed a fault or is incompatible with your devices. If the video output works with the new HDMI cable, consider replacing the faulty one for a better and stable connection.
If using a different HDMI cable doesn’t resolve the issue, continue to the next step for further troubleshooting.
Step 5: Test on a Different TV or Monitor
If you’re still experiencing HDMI port issues on your Xbox One after trying a different HDMI cable, the next step is to test the console on a different TV or monitor. This step will help determine whether the problem lies with your current display or with the Xbox One itself. Here’s how you can proceed:
- Turn off your Xbox One and unplug it from the power source.
- Disconnect the HDMI cable from your current TV or monitor and connect it to a different TV or monitor.
- Plug your Xbox One back into the power source and turn it on.
- Check if there’s any video output on the different TV or monitor. If the display works fine, the issue may be with the original TV or monitor settings.
By testing your Xbox One on a different TV or monitor, you can ascertain if the problem lies with your console or with the current display setup. If the video output works fine on the secondary display, you may need to adjust the settings or troubleshoot the original TV or monitor. Refer to the user manual or contact the manufacturer for assistance in adjusting the settings on your display device.
If the issue persists even on a different TV or monitor, proceed to the next step for further troubleshooting.
Step 6: Check for System Updates
If you’re still facing HDMI port issues on your Xbox One, it’s essential to check for any available system updates. Xbox regularly releases updates that include bug fixes and improvements, which can address known HDMI port issues. Follow these steps to check for system updates:
- Turn on your Xbox One and ensure it’s connected to the internet.
- Press the Xbox button on your controller to open the guide.
- Navigate to the “System” tab and select “Settings”.
- In the Settings menu, choose “System” and then click on “Updates”.
- Select “Check for updates” and wait for the console to search for any available updates.
- If an update is detected, follow the on-screen instructions to download and install it.
- Once the update is installed, restart your Xbox One and test the HDMI port to see if the issue has been resolved.
Checking for system updates is crucial as they often include fixes for various hardware and software issues, including HDMI port connectivity problems. Wpdating your Xbox One to the latest firmware can provide a potential solution to the HDMI port issues you’re experiencing. If there are no updates available or if updating doesn’t resolve the problem, proceed to the final step for further troubleshooting.
Step 7: Contact Xbox Support for Further Assistance
If you have followed all the previous steps and are still encountering HDMI port issues on your Xbox One, it may be time to seek further assistance from Xbox Support. They have a dedicated team of experts who can provide more advanced troubleshooting steps or guide you through the process of submitting your console for repair if necessary. Here’s how you can reach out to Xbox Support:
- Visit the Xbox Support website and sign in with your Microsoft account.
- Navigate to the “Contact Us” or “Support” section, which can usually be found at the bottom of the page.
- Select the appropriate category for your issue, such as “Hardware” or “Xbox One”.
- Choose the contact method that suits you best, whether it’s live chat, phone support, or submitting an online form.
- Provide detailed information about the problem you’re experiencing with your HDMI port.
- Follow the instructions provided by the Xbox Support representative to troubleshoot further or arrange for repair services.
Xbox Support is equipped to handle various hardware and software issues, including HDMI port problems. They can guide you through advanced troubleshooting steps or assist you in starting a repair process if needed. Be sure to describe the steps you’ve already taken to try and resolve the issue so that the support representative can provide the most relevant assistance.
Remember to consult Xbox’s warranty policy, as your console may still be covered for repairs or replacement if it’s within the warranty period. Xbox Support can provide further information on warranty coverage and repair options.
Conclusion
Dealing with HDMI port issues on your Xbox One can be frustrating, but by following the troubleshooting steps outlined in this guide, you can hopefully resolve the problem and get back to enjoying your gaming experience. Here’s a quick recap of the steps we covered:
- Check for loose connections.
- Clean the HDMI port.
- Reset the display settings.
- Try a different HDMI cable.
- Test on a different TV or monitor.
- Check for system updates.
- Contact Xbox Support for further assistance.
By systematically going through these steps, you can identify and address common HDMI port issues. Remember to gather the necessary tools and materials, such as a soft-bristle brush, isopropyl alcohol, and a spare HDMI cable, to facilitate the troubleshooting process. Additionally, reach out to Xbox Support if you’ve exhausted all troubleshooting options and need professional assistance.
While these steps should help resolve most HDMI port issues, it’s important to remember that there may be cases where the problem is more complex or requires professional repair. If your Xbox One is still under warranty, consult the warranty policy to determine if you qualify for free repair or replacement services.
We hope that this guide has been helpful in troubleshooting your Xbox One HDMI port issues. Whether it’s a loose connection, a dirty port, or a software-related glitch, utilizing these steps should increase the likelihood of restoring proper functionality to your HDMI port. Happy gaming!