Introduction
Welcome to our comprehensive guide on how to fix drone motors. Drones have become increasingly popular in recent years, offering users the opportunity to capture stunning aerial footage and embrace the thrill of flying. However, like any piece of machinery, drones can encounter issues, and one of the most common problems is a malfunctioning motor.
A faulty motor can significantly impact the performance and stability of your drone, so learning how to fix it is an essential skill for any drone enthusiast. Fortunately, with some basic tools and a little bit of know-how, you can troubleshoot and resolve motor issues yourself, saving you time and money on professional repairs.
In this guide, we will provide you with step-by-step instructions on how to fix drone motors, starting with an assessment of the problem and then delving into the necessary tools you’ll need. We’ll walk you through the entire process, from dismantling and inspecting the motor to identifying and fixing common issues.
Whether you’re a seasoned drone pilot or just starting out, this guide is designed to equip you with the knowledge and skills to tackle motor problems effectively. So, let’s dive in and get your drone back in the air!
Assessing the Problem
Before you can begin fixing a drone motor, it’s crucial to properly assess the problem. This will help you determine the root cause of the issue and guide you towards the appropriate solution. Here are some steps to follow when assessing a faulty drone motor:
- Listen for unusual sounds: Turn on your drone and listen carefully for any strange noises coming from the motor. Grinding, squeaking, or buzzing sounds could indicate a mechanical issue.
- Observe motor performance: Pay attention to how the motor operates. If it’s spinning slower than usual, pulsating, or not spinning at all, there may be an electrical malfunction.
- Check motor temperature: Touch the motor after it has been running for a few minutes. If it feels excessively hot to the touch, it could be a sign of overheating, which can cause motor failure.
- Inspect motor physically: Carefully inspect the motor for any visible damage such as dents, loose wires, or debris that may be obstructing the movement. Also, check the motor mount and propeller attachment to ensure they are secure.
By thoroughly assessing the problem, you can narrow down the potential causes and determine the appropriate course of action. It’s important to note that while some motor issues may be easily resolved, others may require more advanced troubleshooting or even the replacement of certain parts.
Now that you have assessed the problem, let’s move on to the tools you’ll need to fix your drone motor.
Basic Tools You’ll Need
Before you start fixing your drone motor, it’s essential to gather the necessary tools. Having the right equipment will make the process smoother and more efficient. Here are the basic tools you’ll need:
- Screwdriver Set: A screwdriver set with various sizes and types of screw heads is essential for disassembling your drone’s motor. Make sure it includes both Phillips and flathead screwdrivers.
- Tweezers: Tweezers come in handy for handling small parts and wires in a precise manner. They assist in carefully removing and reattaching connectors or other delicate components.
- Needle-nose Pliers: These pliers are useful for gripping and bending wires, as well as reaching tight spaces. They can help you manipulate connectors or possibly remove debris stuck in the motor.
- Multimeter: A multimeter is an electrical testing tool that allows you to measure voltage, current, and resistance. It’s useful for diagnosing electrical issues and ensuring proper connectivity.
- Wire Cutters and Strippers: These tools are essential for cutting wires to the desired length and removing insulation to expose the bare wire ends for proper soldering or reconnection.
- Soldering Iron: If you encounter a problem with soldered connections, a soldering iron will enable you to melt and reattach wires or components securely.
- Cleaner and Lubricant: It’s a good idea to have a cleaner and lubricant specifically designed for electronic components. These can help clean contacts and remove any debris, as well as lubricate moving parts for smooth operation.
By having these basic tools ready, you’ll be well-prepared to tackle most common drone motor issues. However, keep in mind that certain problems may require specialized tools or replacement parts. Now that you have your tools ready, let’s proceed to the step-by-step guide on fixing drone motors.
Step-by-Step Guide to Fixing Drone Motors
Now that you have assessed the problem and gathered the necessary tools, let’s dive into the step-by-step process of fixing your drone motor:
- Prepare a clean workspace: Find a well-lit, spacious area where you can work comfortably without any distractions. Lay down a soft cloth or towel to protect the surface and prevent small screws or parts from rolling away.
- Disconnect the power source: Turn off the drone and remove any battery or power source to ensure your safety and prevent accidental electrical shocks.
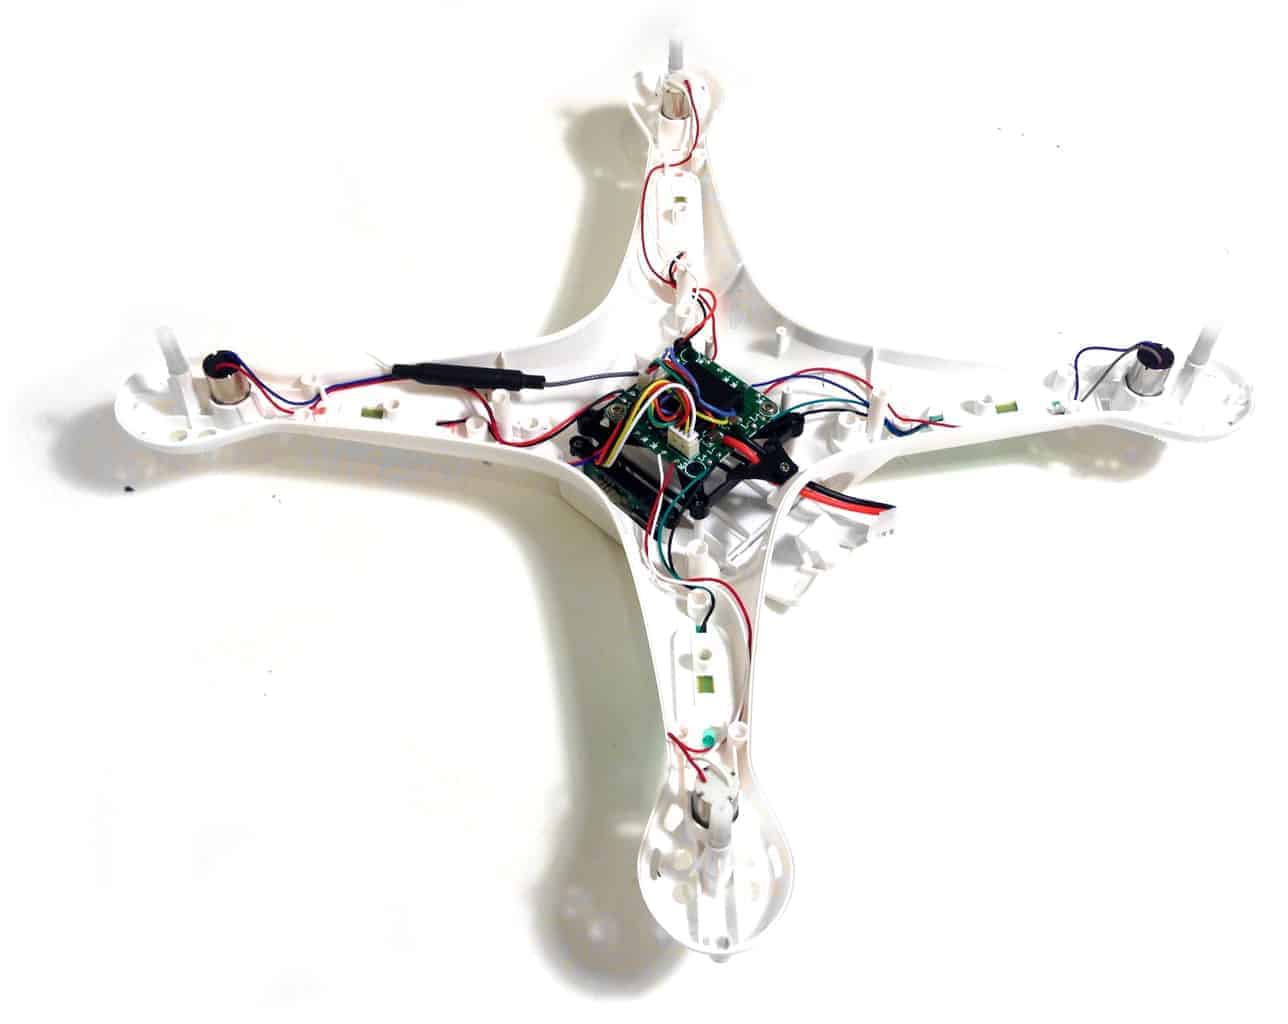
- Disassemble the drone: Refer to your drone’s user manual or online resources to identify how to access the motor. Use the appropriate screwdriver to remove any screws holding the motor housing or cover in place.
- Inspect the motor: Carefully examine the motor for any visible damage, loose connections, or debris. If you spot any issues, take note of them for further troubleshooting or repair.
- Check the wiring: Inspect the wires connecting the motor to the drone’s circuit board or controller. Look for any signs of fraying, loose connections, or soldering issues. If necessary, use a multimeter to test for continuity or resistance.
- Clean and lubricate: If you notice any debris or dirt inside the motor or around its moving parts, use a cleaner and a soft brush to gently clean and remove the contaminants. Additionally, apply a small amount of lubricant to any bearings or moving parts for smooth operation.
- Reassemble the drone: Once you have completed the necessary repairs or inspection, carefully reassemble the drone. Make sure you align the motor correctly and secure it with the appropriate screws.
- Test the motor: Reconnect the power source and turn on the drone to see if the motor is functioning properly. Listen for any unusual noises and monitor its performance. If the motor is running smoothly, you have successfully fixed the issue!
Remember, each drone model may have its unique disassembly and reassembly process. It’s vital to consult the user manual or seek online resources specific to your drone to ensure you follow the correct steps.
Now that you know how to fix drone motors step-by-step, we will move on to troubleshooting common issues you may encounter.
Troubleshooting Common Issues
While fixing drone motors, you may come across common issues that require additional troubleshooting. Here are some of the most frequent problems and their possible solutions:
- Motor not spinning: If the motor is not spinning at all, it could be due to a loose or disconnected wire. Double-check the wiring connections and ensure they are securely in place. If the wiring seems fine, the motor may need to be replaced.
- Intermittent motor spin: If the motor sporadically spins or pulses, it may indicate an issue with the power source or a faulty ESC (Electronic Speed Controller). Check the power supply and inspect the ESC for any visible damage or loose connections.
- Motor spinning in the wrong direction: If the motor is rotating in the opposite direction than it should, you may need to reverse the motor’s polarity. This can usually be done through the flight controller settings or by swapping the motor’s wire connections.
- Overheating motor: If the motor becomes excessively hot during operation, it may be due to an overloaded propeller or a malfunctioning ESC. Ensure that the propeller size is compatible with the motor, and consider upgrading to a higher-rated ESC if necessary.
- Motor vibrations: Excessive vibrations from the motor can negatively affect the stability and performance of your drone. Check that the propellers are balanced and securely attached. If the issue persists, inspect the motor mount and consider replacing it if it is damaged or worn.
Remember to exercise caution during troubleshooting and avoid working on live circuits to prevent injuries or damage to your drone and its components. If you’re unable to resolve the issue or if it’s beyond your skill level, it’s advisable to seek professional assistance.
Now that you’re aware of the common issues and possible solutions, let’s move on to some valuable tips and tricks to help you maintain your drone motors.
Tips and Tricks for Maintenance
Maintaining your drone motors is key to ensuring their longevity and optimal performance. Here are some valuable tips and tricks to help you keep your motors in top shape:
- Regularly clean your drone: After each flight session, clean your drone to remove any dirt, dust, or debris that may accumulate on the motor and other components. Use a soft brush or compressed air to gently clean the motor and surrounding areas.
- Inspect and tighten screws: Periodically check all screws on your drone, including those securing the motors. Over time, vibrations and flight movements can cause screws to become loose. Use a screwdriver to tighten them, ensuring a secure connection.
- Balance your propellers: Unbalanced propellers can create unnecessary strain on the motor and lead to vibrations, decreased efficiency, and potential damage. Invest in a propeller balancing tool and check your propellers regularly.
- Keep an eye on motor temperature: While flying your drone, monitor the motor temperature. Avoid running the motors continuously for extended periods, as excessive heat can shorten their lifespan. Give the motors time to cool down between flights if necessary.
- Perform regular motor tests: Conduct motor tests before each flight to ensure they are running smoothly and without any unusual sounds or vibrations. Check the responsiveness of each motor to the controller inputs.
- Upgrade components if needed: As you gain experience and push your drone’s capabilities, you may need to upgrade motors or other components to handle increased demands. Research and invest in high-quality, compatible upgrades to enhance your drone’s performance.
- Keep spare parts: It’s always a good idea to have some spare motor components, such as propellers, screws, and wires, on hand. This way, if any parts become damaged or lost, you can quickly replace them and get back to flying.
By following these maintenance tips and tricks, you can maximize the lifespan of your drone motors and ensure smooth and enjoyable flights. Proper care and attention to detail will contribute to a better overall drone experience.
Now, armed with the knowledge of fixing drone motors, troubleshooting common issues, and maintaining them, you’re well-equipped to handle any motor-related problems that may arise. Enjoy flying your drone with confidence!
Conclusion
Congratulations! You have now reached the end of our comprehensive guide on how to fix drone motors. We have covered the essential steps, tools, and troubleshooting techniques to help you resolve common motor issues and keep your drone in optimal condition.
By following the step-by-step guide, you have learned how to properly assess the problem, gather the necessary tools, and fix drone motors effectively. Remember to take your time, exercise caution, and consult your drone’s user manual or online resources for specific instructions.
In addition, we provided troubleshooting tips to help you address common motor issues such as spinning, overheating, or vibrations. These troubleshooting techniques can save you time and money by allowing you to identify and resolve problems without the need for professional assistance.
Lastly, we shared valuable tips and tricks that focus on the maintenance of drone motors. Regular cleaning, inspecting, balancing propellers, and keeping spare parts on hand will contribute to the longevity and peak performance of your drone.
Now that you have the knowledge and skills to fix drone motors, you can confidently tackle any motor-related problems that may arise. So, get out there, continue honing your flying skills, and capture breathtaking aerial footage with a drone that’s in tip-top shape!


