Introduction
Chrome extensions are powerful tools that allow users to enhance their browsing experience with additional features and functionalities. Whether you want to block ads, save web pages for offline reading, or improve productivity, there’s a Chrome extension to suit almost every need.
However, with the vast number of Chrome extensions available, it’s easy to lose track of what you have installed and how they may be impacting your browser’s performance. In this article, we will delve into the various ways you can find, manage, and remove Chrome extensions, ensuring you have full control over your browsing experience.
By knowing how to access and navigate the Chrome Extensions page, you can easily view all your installed extensions, including those that may be hidden or disabled. Additionally, we will explore how to enable or disable extensions as needed and how to remove and reinstall them.
Furthermore, we’ll dive into the Chrome Web Store, the official repository for Chrome extensions. This will allow you to discover new and exciting extensions that can add value to your browsing experience and meet your specific needs.
Overall, by understanding how to find and manage Chrome extensions, you can customize your browser to your liking and streamline your online activities. So, let’s get started and take control of your Chrome extensions!
Checking Existing Chrome Extensions
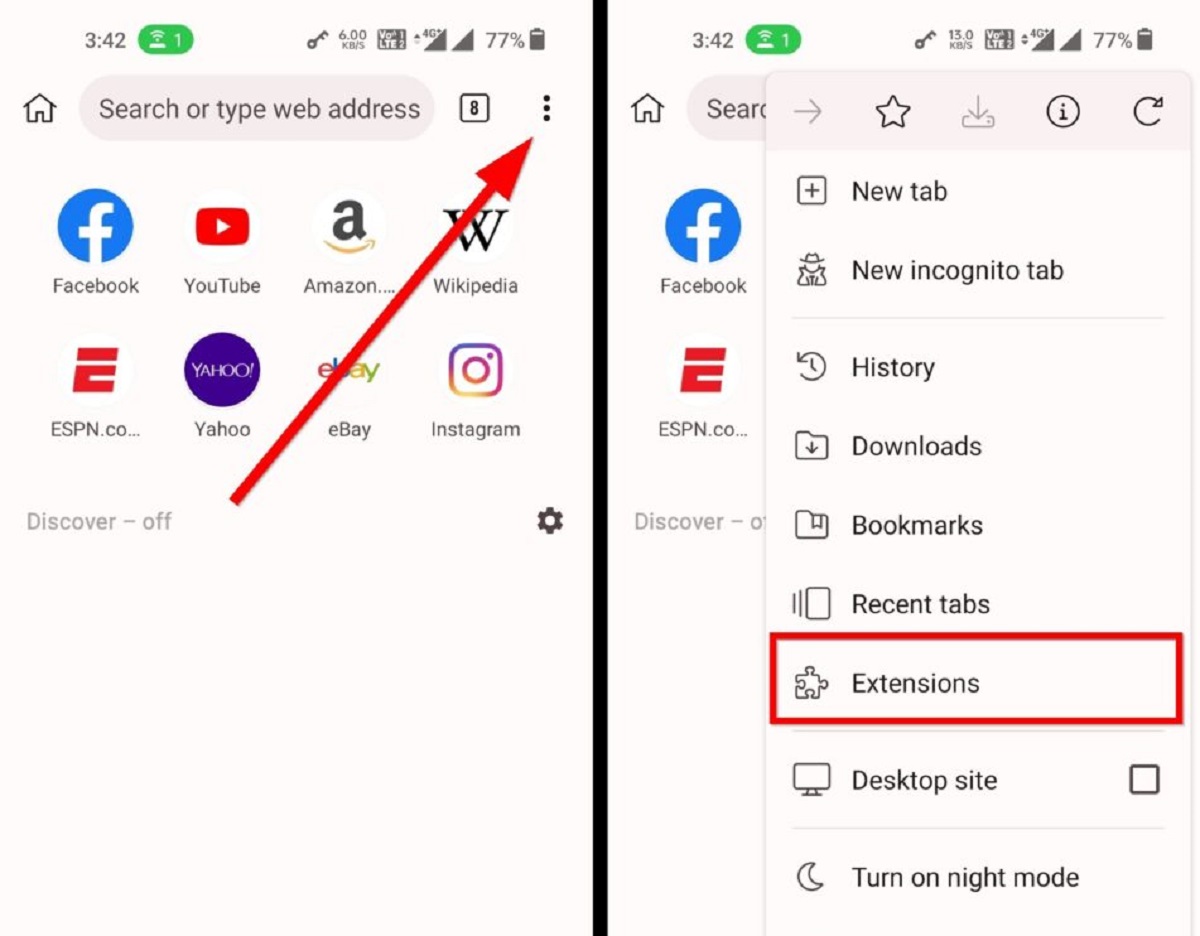
Before we dive into managing your Chrome extensions, let’s start by checking what extensions you currently have installed. Here’s how you can do it:
- Open Google Chrome on your computer.
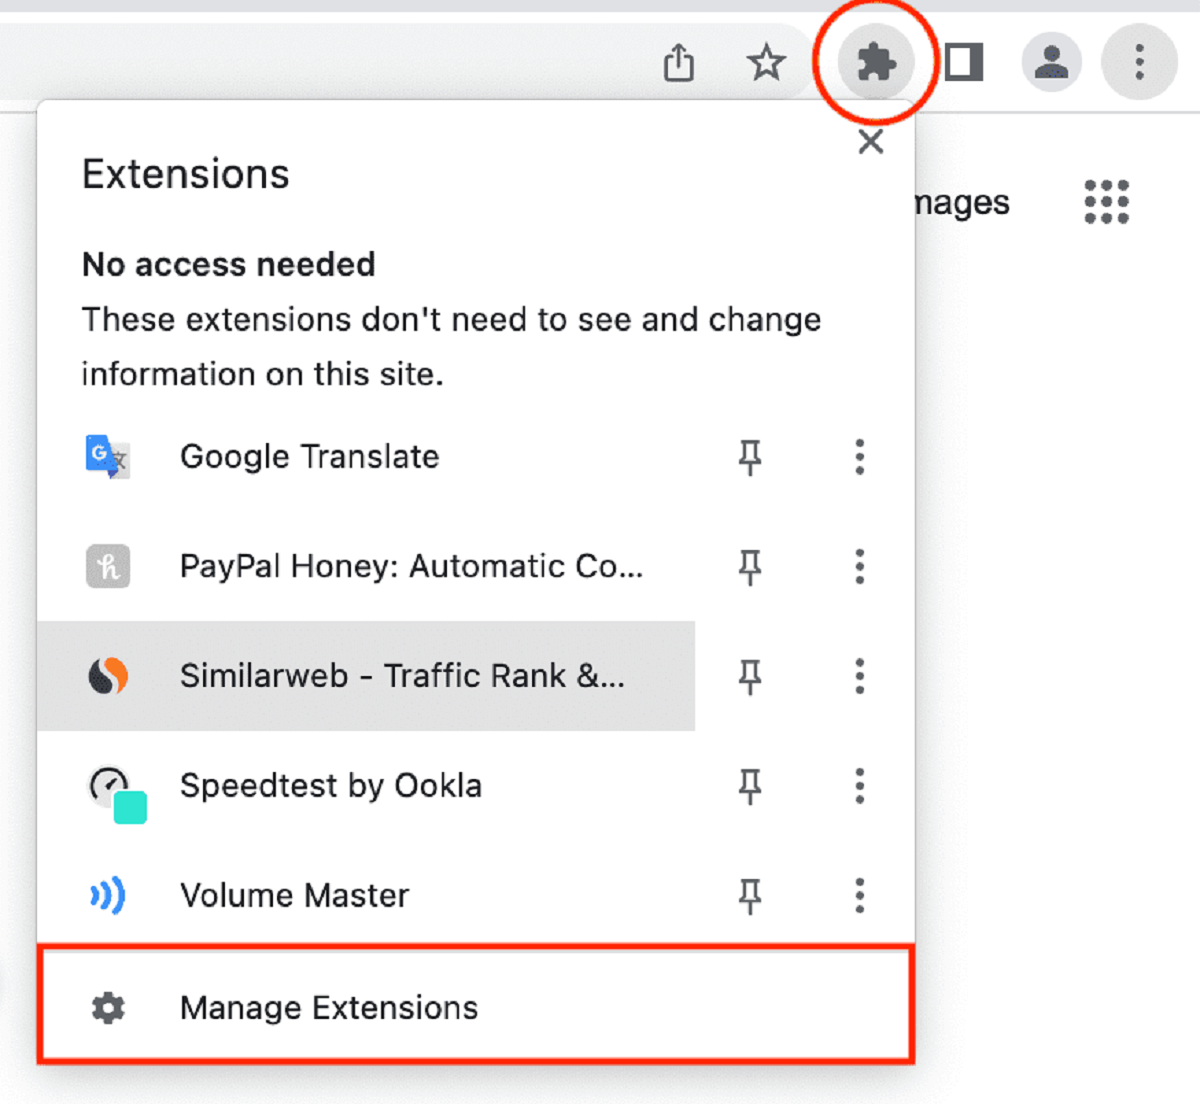
- Click on the three-dot menu icon in the top-right corner of the browser window.
- From the dropdown menu, hover over “More Tools.”
- In the expanded menu, click on “Extensions.”
Alternatively, you can directly access the Chrome extensions page by typing “chrome://extensions” in the address bar and hitting Enter.
Once you’re on the Chrome extensions page, you will see a list of all the extensions you have installed. Each extension will have a card-like layout, displaying its name, logo, and a brief description of its functionality.
Take a moment to review the list and familiarize yourself with the extensions you currently have. Pay attention to any extensions that you may not recognize or remember installing, as they could be potentially unwanted or malicious.
It’s also worth noting that some extensions may be hidden or disabled by default, so they won’t appear in your list right away. Don’t worry; we’ll cover how to check for hidden extensions in the next section.
By regularly checking your existing Chrome extensions, you can ensure that you’re aware of the tools that are running on your browser and make informed decisions about their utility and relevance.
Accessing the Chrome Extensions Page
If you want to quickly access the Chrome extensions page without going through the dropdown menu, there’s a simple shortcut:
- Open Google Chrome on your computer.
- Hold down the Shift key and press E on your keyboard.
This keyboard shortcut instantly takes you to the Chrome extensions page, where you can manage all your installed extensions.
Alternatively, you can access the page by entering “chrome://extensions” in the address bar and hitting Enter.
Once you’re on the Chrome extensions page, you have a variety of options for managing your extensions. You can enable or disable them, remove unwanted extensions, and even search for new ones from the Chrome Web Store.
Take some time to explore the features and settings available on the extensions page. Familiarize yourself with the layout and navigation options so that you can easily access and manage your extensions in the future.
Remember, having quick and convenient access to the Chrome extensions page allows you to have full control over the functionality and behavior of your browser, ultimately enhancing your browsing experience to your liking.
Searching for Installed Chrome Extensions
As you accumulate more and more Chrome extensions, it can become challenging to locate a specific one. Fortunately, Chrome provides a search functionality to help you easily find the extensions you’re looking for. Here’s how:
- Open the Chrome extensions page using the methods mentioned in the previous section.
- Look for the search box located at the top-right corner of the page.
- Type in the name or keywords related to the extension you want to find.
- As you type, the list of extensions will dynamically update, showing only the ones that match your search criteria.
By using the search box, you can quickly filter through your Chrome extensions and locate the specific one you need. This feature proves especially useful if you have a large number of extensions installed and want to save time and effort in finding a particular extension.
Additionally, the search functionality can also help you identify duplicate extensions or identify extensions with similar functionality. You can easily compare and decide which ones to keep or remove based on your specific requirements.
Remember to use descriptive keywords when searching for extensions, as it will yield more accurate results. Also, keep in mind that the search feature is case-insensitive, so you don’t have to worry about capitalization when typing your search query.
Take advantage of the search feature to streamline your Chrome extension management and make it easier to locate and utilize the extensions that contribute the most to your browsing experience.
Checking Hidden Chrome Extensions
When it comes to Chrome extensions, some may remain hidden or disabled by default. These extensions may not appear in your list of installed extensions, making it important to know how to check for hidden ones. Here’s how you can do it:
- Open the Chrome extensions page using the methods mentioned earlier.
- Look for the “Extensions” menu located at the top-left corner of the page.
- Click on the menu icon (three horizontal lines) to expand it.
- Select the “Hidden” checkbox in the menu.
After enabling the “Hidden” checkbox, the Chrome extensions page will refresh, and you will now see any hidden extensions listed alongside your other installed extensions. These hidden extensions may have been disabled, but they can still affect your browser’s performance.
Take a moment to review the hidden extensions and consider whether you want to keep or remove them. If an extension is no longer useful or you suspect it may be causing issues with your browsing experience, you can choose to disable or remove it by following the next section’s instructions.
It’s worth mentioning that hiding an extension doesn’t delete it from your browser; it simply removes it from the toolbar. By checking for hidden extensions, you have better visibility into the tools running in the background and can make informed decisions about their necessity and impact.
Regularly checking for hidden extensions ensures that you have a comprehensive view of all extensions installed in your Chrome browser, allowing you to manage them effectively and maintain a streamlined and optimized browsing experience.
Enabling or Disabling Chrome Extensions
Chrome extensions provide you with the flexibility to enable or disable them based on your specific needs and preferences. Enabling an extension allows it to function and appear in your browser, while disabling it temporarily stops its operation. Here’s how you can enable or disable Chrome extensions:
- Open the Chrome extensions page using one of the methods mentioned earlier.
- Locate the extension you want to enable or disable in the list.
- To enable an extension, ensure the toggle switch next to it is in the “On” position. This allows the extension to function and appear in your toolbar.
- To disable an extension, simply toggle the switch to the “Off” position. This temporarily stops the extension from functioning and removes it from the toolbar.
By enabling or disabling Chrome extensions, you have control over which functionalities are active at any given time. This can help improve browser performance, especially if certain extensions are resource-intensive or interfere with other extensions or web pages.
Disabling an extension can also be a useful troubleshooting step if you experience any issues while browsing. By temporarily disabling extensions, you can identify if any one of them is causing conflicts or slowdowns. You can then enable them one by one to pinpoint the problematic extension.
Additionally, if you have disabled an extension but decide you want to use it again, you can easily re-enable it by following the same steps mentioned above.
Being able to enable or disable Chrome extensions on demand empowers you to customize your browsing experience and tailor it to your specific requirements. Experiment with different combinations of enabled and disabled extensions to find the perfect balance that enhances your productivity and enjoyment online.
Removing Chrome Extensions
Over time, you may find that some Chrome extensions are no longer useful or necessary. In such cases, it’s best to remove them from your browser to declutter and optimize your browsing experience. Here’s how you can remove Chrome extensions:
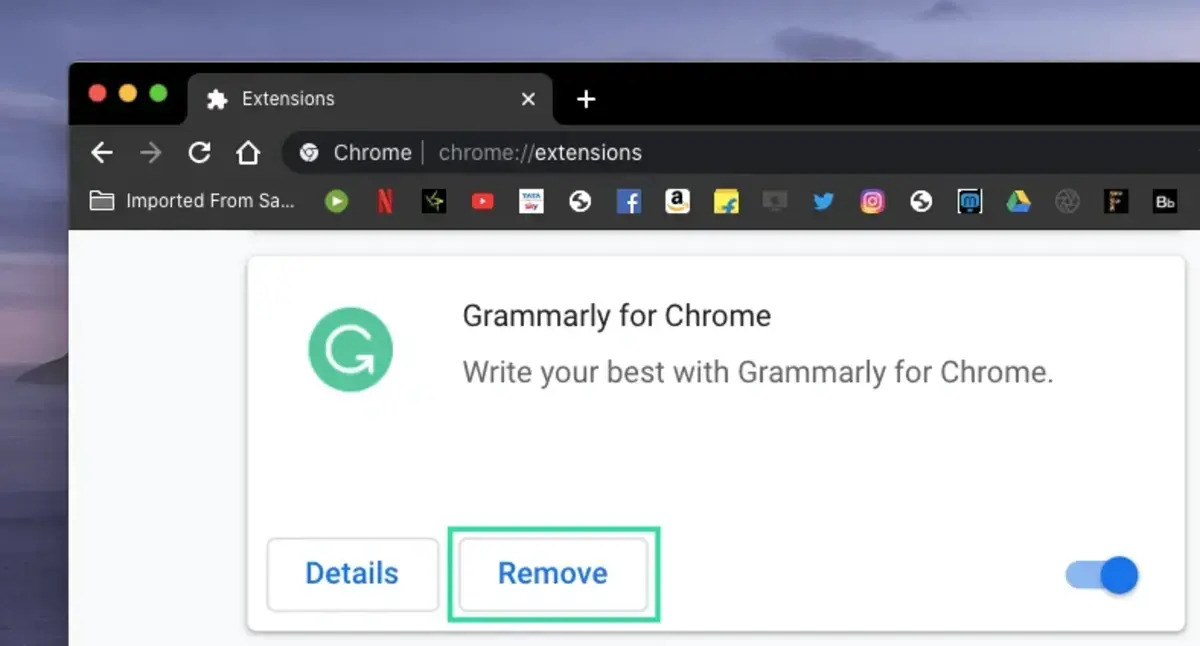
- Open the Chrome extensions page using one of the methods mentioned earlier.
- Locate the extension you want to remove in the list.
- Click on the “Remove” button located beneath the extension’s description.
- A confirmation dialog will appear, asking you to confirm your action. Click on “Remove” to proceed.
Once confirmed, the selected extension will be permanently removed from your Chrome browser.
It’s important to note that removing an extension will also delete any associated settings and data. Therefore, if there’s an extension you may want to use again in the future, consider disabling it instead of removing it completely.
Regularly removing unwanted Chrome extensions helps optimize browser performance, reduce clutter, and maintain a streamlined browsing experience. By evaluating the usefulness of each extension and removing those that no longer serve a purpose, you ensure that your browser remains efficient and tailored to your specific needs.
Take some time to review your installed extensions periodically and remove any that are outdated, redundant, or unused. By doing so, you’ll have a cleaner and more efficient browsing experience.
Reinstalling Chrome Extensions
If you have previously removed a Chrome extension but later decide that you want to use it again, you can easily reinstall it. Chrome retains information about the extensions you’ve installed, making the reinstallation process a breeze. Here’s how you can reinstall Chrome extensions:
- Open the Chrome extensions page using one of the methods mentioned earlier.
- Scroll to the bottom of the page and click on the “Get more extensions” button.
- This action will take you to the Chrome Web Store, the official repository for Chrome extensions.
- In the search bar located at the top-left corner of the Chrome Web Store, type the name or keywords related to the extension you want to reinstall.
- From the search results, locate the desired extension and click on its listing to access its detail page.
- On the extension’s detail page, click on the “Add to Chrome” button.
- A confirmation dialog will appear, asking for your permission to install the extension. Click on “Add extension” to proceed.
After confirming, the extension will be downloaded and installed on your Chrome browser. You will see its icon appear in the toolbar or extensions area, and you can start using its features right away.
Reinstalling Chrome extensions is a straightforward process that allows you to regain access to the functionality and benefits of extensions you previously removed. Be sure to check for any specific instructions or settings related to the extension you’re reinstalling to ensure a smooth experience.
Reinstalling extensions also provides an opportunity to reassess the utility and relevance of the extension. If you find that you still don’t need or use a reinstalled extension, you can always remove it again following the steps mentioned in the previous section.
Utilize the reinstall feature to experiment with different extensions, discover new ones, or revisit old favorites. By actively managing and fine-tuning your Chrome extensions, you can customize your browsing experience and optimize it to suit your preferences and needs.
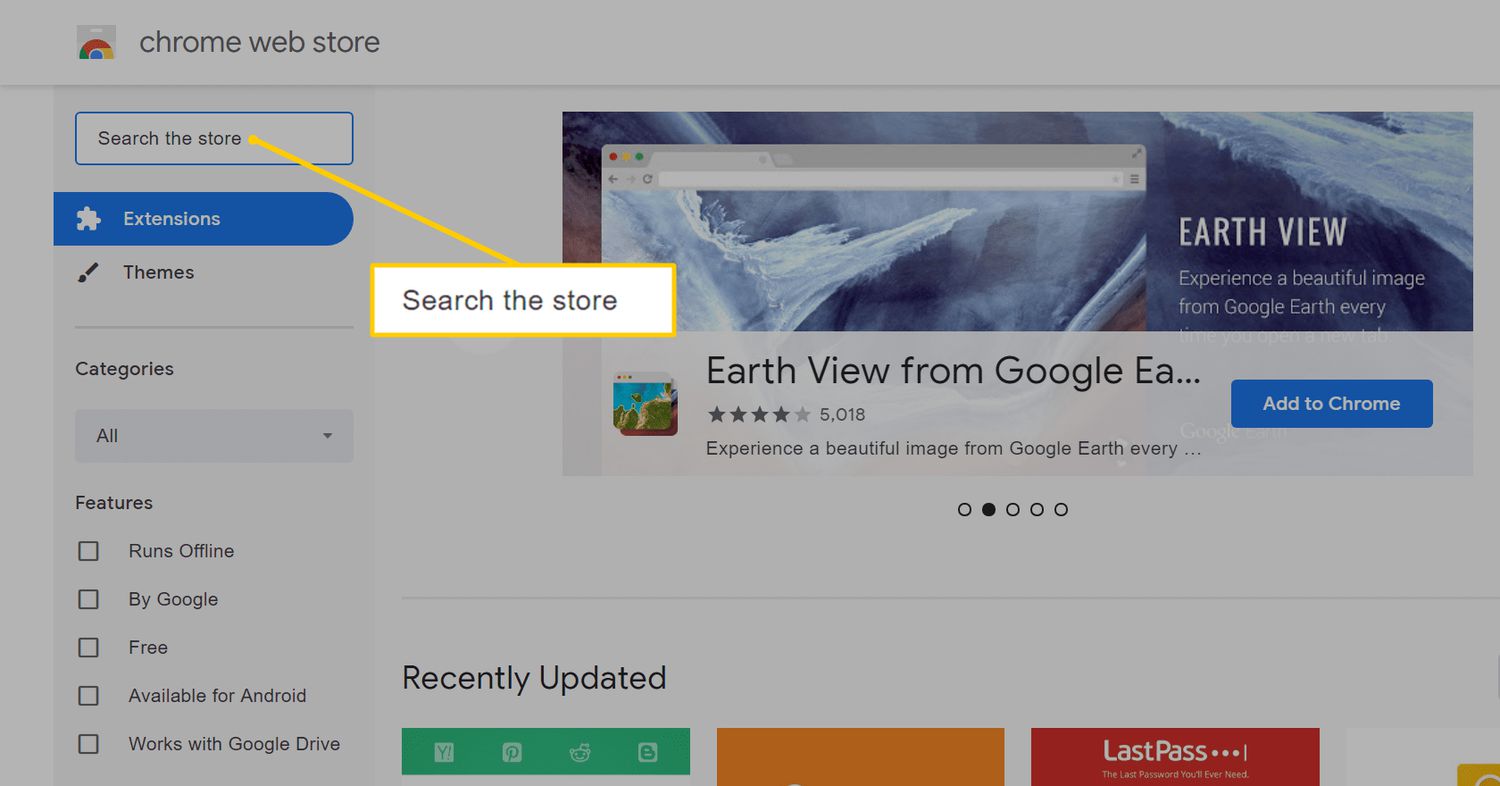
Finding Chrome Extensions on the Chrome Web Store
The Chrome Web Store is home to a wide range of Chrome extensions, offering a plethora of options to enhance your browsing experience. Here’s how you can find and explore new Chrome extensions:
- Open Google Chrome on your computer.
- Click on the three-dot menu icon in the top-right corner of the browser window.
- From the dropdown menu, hover over “More Tools.”
- In the expanded menu, click on “Extensions.”
- Once you’re on the Chrome extensions page, scroll to the bottom and click on the “Get more extensions” button.
- This action will take you to the Chrome Web Store, where you can explore a wide variety of extensions.
- You can use the search bar located at the top-left corner of the Chrome Web Store to search for specific extensions using keywords or names.
- Alternatively, you can browse through the various categories and collections listed on the Chrome Web Store’s homepage to discover new and popular extensions.
- When you find an extension that interests you, click on its listing to access its detail page. Here, you can learn more about its features, read user reviews, and check its rating.
- If you decide to install an extension, click on the “Add to Chrome” button on its detail page.
- Confirm your action in the prompted dialog. The extension will be downloaded and installed on your Chrome browser, ready to use.
The Chrome Web Store provides a platform to explore, discover, and install a wide range of Chrome extensions. Whether you’re looking for extensions to improve productivity, enhance security, or customize your browsing experience, the Chrome Web Store offers an extensive selection to choose from.
Stay informed about new and trending extensions by regularly visiting the Chrome Web Store. With the flexibility to add or remove extensions as you explore different options, you can continuously adapt your browsing experience to meet your evolving needs and preferences.
Be sure to read user reviews and check the extension’s rating before installing to ensure you choose high-quality and reliable extensions. Additionally, pay attention to the permissions requested by each extension to ensure they align with your privacy and security preferences.
Have fun exploring the Chrome Web Store and finding exciting new extensions that can enhance your browsing experience and enrich your digital lifestyle!
Conclusion
Managing your Chrome extensions effectively is crucial for optimizing your browsing experience. By checking existing extensions, accessing the Chrome extensions page, searching for installed extensions, checking hidden extensions, enabling or disabling extensions, removing unwanted extensions, and reinstalling previously removed extensions, you have full control over the functionality and customization of your browser.
The Chrome Web Store provides a vast array of extensions, allowing you to discover new tools to enhance productivity, security, and convenience. Regularly exploring the Chrome Web Store ensures you stay up to date with the latest and most useful extensions available.
Remember to periodically review your installed extensions to declutter and optimize your browsing experience. Removing unnecessary or unused extensions helps improve browser performance and ensures a streamlined experience.
By actively managing your Chrome extensions, you can tailor your browser to suit your specific needs, increase productivity, and enjoy a more personalized and efficient browsing experience. So take control of your Chrome extensions and make the most out of your web browsing!