Introduction
Welcome to this helpful guide on how to factory reset your Acer tablet without a password. There may be various reasons why you would need to perform a factory reset on your Acer tablet, such as forgetting your password, encountering software issues, or simply wanting to start fresh with a clean slate. Rest assured, this step-by-step guide will provide you with several methods to successfully reset your tablet and regain control.
A factory reset, also known as a hard reset, brings your device back to its original factory settings by erasing all data, applications, and personalized settings from the internal storage. It is essential to note that performing a factory reset will permanently delete all data on your Acer tablet, so it is crucial to back up any important files or information before proceeding.
In the following sections, we will explore multiple methods to factory reset your Acer tablet. From using the Settings menu to utilizing the Power and Volume buttons, as well as employing Acer Recovery Management software or a computer, we will cover various options to cater to different scenarios and device models.
By following the instructions provided, you will be able to regain control of your Acer tablet and potentially resolve any issues you may be facing. Whether you are a tech-savvy individual or not, the step-by-step nature of the methods outlined in this guide ensures accessibility for users of all levels.
Now, let us delve into the different methods for factory resetting your Acer tablet without a password. It is important to carefully read through each method to determine which one suits your specific needs and device model. So, let’s get started!
Why do you need to factory reset your Acer tablet?
There are several situations where you might find it necessary to factory reset your Acer tablet. Understanding the reasons behind performing a factory reset can help you determine if it is the right solution for your specific needs. Here are some common scenarios where a factory reset is beneficial:
- Forgotten password: If you have forgotten your Acer tablet password or pattern lock and are unable to access your device, a factory reset can help you regain control. Keep in mind that performing a factory reset will erase all data on your tablet, so it is crucial to have a backup of important files before proceeding.
- Software issues: Over time, your Acer tablet’s operating system and installed apps may encounter glitches or compatibility problems. These issues can lead to crashes, freezing, or sluggish performance. Performing a factory reset can help resolve these software-related problems and restore your tablet to its original state, which often results in improved stability and performance.
- Virus or malware infection: If you suspect that your Acer tablet is infected with viruses or malware, a factory reset can effectively remove these malicious programs. Resetting your tablet to its factory settings eliminates any potentially harmful software and provides a clean slate to start anew.
- Selling or giving away your tablet: Before selling or giving away your Acer tablet, it is important to ensure that your personal data and information are completely erased. Performing a factory reset is the most effective way to delete all data from your tablet, ensuring that your sensitive information remains secure.
- Resolving persistent issues: If you have tried troubleshooting various problems on your Acer tablet, such as app crashes, system errors, or persistent connectivity issues, and have been unsuccessful in resolving them, a factory reset can be a last resort. Resetting your tablet can help eliminate any underlying software issues that may be causing the persistent problems.
Factory resetting your Acer tablet can be a powerful solution for these and many other scenarios. However, it is essential to remember that this process erases all data on your tablet, so it is crucial to back up any important files before proceeding. Now that we have explored the reasons behind performing a factory reset, let’s move on to the different methods you can use to accomplish this task.
Things to consider before factory resetting your Acer tablet
Before proceeding with a factory reset, there are a few important considerations to keep in mind. Taking these factors into account will help ensure a smooth and successful reset process and minimize any potential risks. Here are some things to consider before factory resetting your Acer tablet:
- Data backup: Performing a factory reset will erase all data on your tablet, including apps, settings, and personal files. It is crucial to back up any important data before initiating the reset process. You can create a backup by transferring files to an external storage device, such as a computer, cloud storage service, or a USB drive.
- Account credentials: Take note of any account credentials associated with your Acer tablet, such as Google or Microsoft accounts. You may need to sign in to these accounts after the factory reset to regain access to your apps, contacts, and other synchronized data.
- Software updates: It is advisable to ensure that your Acer tablet is running the latest software updates before performing a factory reset. Updating your device’s operating system and installed apps can help resolve some issues and ensure compatibility with the latest security patches and features.
- External storage: If your tablet has a slot for an external SD card or other removable storage, consider removing it before initiating the factory reset. This precaution helps protect any data stored on the external storage and ensures that it is not accidentally erased during the reset process.
- Charging: Ensure that your Acer tablet has sufficient battery charge or is connected to a power source during the factory reset. A low battery level or interrupted power supply during the reset process can result in incomplete or unsuccessful reset, leading to potential issues.
- Device-specific instructions: Different Acer tablet models may have slightly varying methods for performing a factory reset. It is recommended to consult the user manual or the Acer support website for specific instructions pertaining to your tablet model. Following the correct guidelines for your device will help ensure a successful factory reset.
Taking these considerations into account will help you prepare for a factory reset and minimize any potential issues or data loss. Once you have made the necessary preparations, you are ready to proceed with the factory reset using one of the methods outlined in the following sections. Let’s move on to exploring the different methods you can use to factory reset your Acer tablet without a password.
Method 1: Factory reset Acer tablet using the Settings menu
One of the most common and straightforward ways to factory reset your Acer tablet is through the Settings menu. This method is recommended if you have access to your tablet’s settings and do not have a password locking you out. Follow the steps below to perform a factory reset using the Settings menu:
- Open the “Settings” app on your Acer tablet. You can usually find this app in the app drawer or by swiping down from the top of the screen and selecting the gear icon.
- Scroll down and tap on “System” or “System & Updates,” depending on your tablet’s software version.
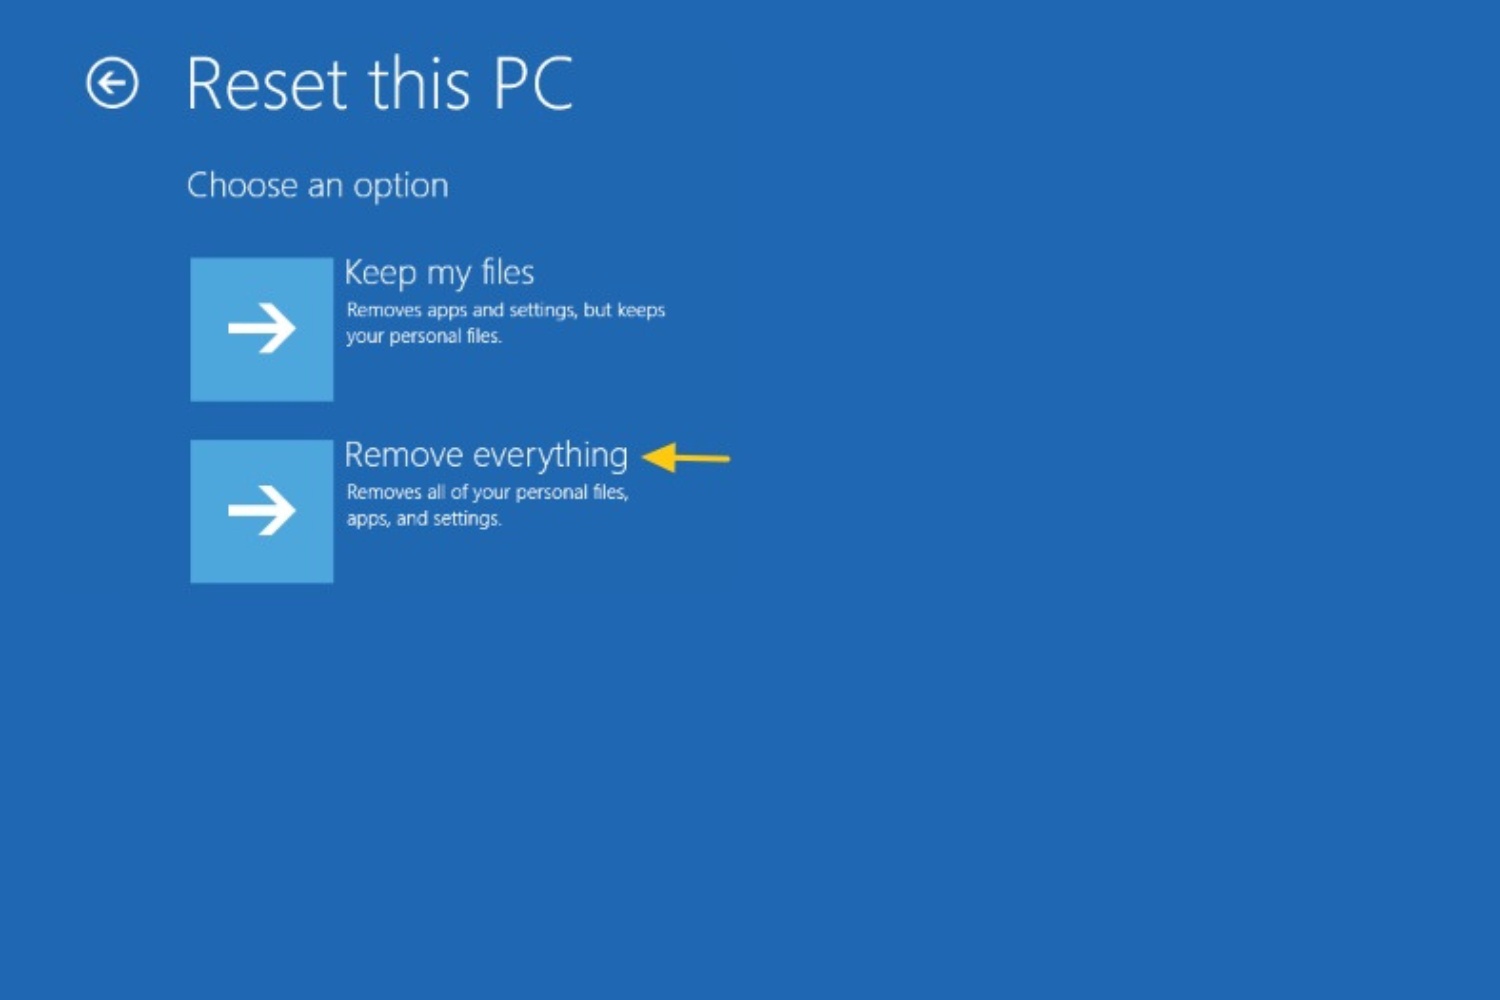
- Tap on “Reset” or “Advanced.” The options may vary depending on your device model and Android version.
- Select “Factory data reset” or “Erase all data.” You may be prompted to enter your tablet’s PIN, pattern, or password.
- Review the warnings and information about the reset process, then tap on “Reset” or “Erase all” to confirm.
- Your Acer tablet will now begin the factory reset process. It may take a few minutes for the reset to complete. Your tablet will restart once the process is finished.
- Follow the on-screen instructions to set up your tablet as a new device. You can log in to your Google or Acer account to restore your apps and settings, if desired.
Note that the exact steps and options may vary slightly depending on your Acer tablet model and the version of Android it is running. It is advisable to refer to the user manual or the Acer support website for specific instructions related to your device.
Performing a factory reset through the Settings menu is a convenient option if you have access to your tablet’s settings. However, if you are unable to unlock your tablet or access the Settings menu due to a forgotten password or other issues, you may need to explore alternative methods, which will be covered in the next sections.
Method 2: Factory reset Acer tablet using the Power and Volume buttons
If you are unable to access the settings on your Acer tablet or have forgotten the password, you can perform a factory reset using the Power and Volume buttons. This method allows you to bypass the lock screen and initiate the reset process. Follow the steps below to factory reset your Acer tablet using the Power and Volume buttons:
- Turn off your Acer tablet by pressing and holding the Power button until the power options menu appears.
- Once the device is completely powered off, press and hold the Power button and the Volume Up or Volume Down button simultaneously.
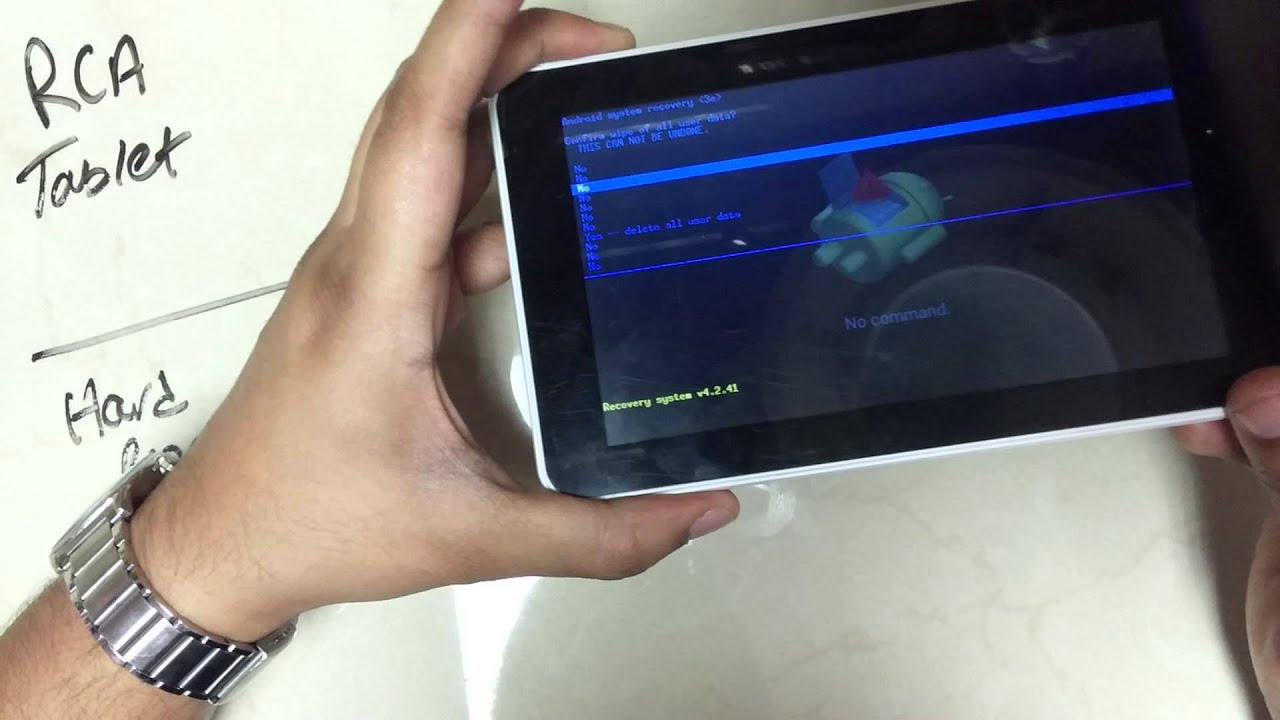
- Continue holding both buttons until the Acer logo or a recovery menu appears on the screen.
- Use the Volume Up and Volume Down buttons to navigate through the menu options and highlight “Recovery.”
- Press the Power button to select the “Recovery” option.
- Your Acer tablet will enter the recovery mode, displaying an Android robot or an Acer logo.
- Press and hold the Power button, then press the Volume Up or Volume Down button once. This will bring up the recovery menu options.
- Using the Volume buttons, navigate to the “Wipe data/factory reset” option.
- Press the Power button to select the “Wipe data/factory reset” option.
- Confirm the factory reset by selecting “Yes” or “Confirm” when prompted.
- Wait for the factory reset process to complete. This may take a few minutes.
- Once the reset is finished, the recovery menu will reappear. Use the Volume buttons to navigate to the “Reboot system now” option.
- Press the Power button to select “Reboot system now.”
- Your Acer tablet will restart and begin the initial setup process. Follow the on-screen instructions to configure your tablet and set it up as a new device.
Please note that the specific button combinations and menu options may vary depending on your Acer tablet model. It is recommended to consult the user manual or visit the Acer support website for model-specific instructions.
Performing a factory reset using the Power and Volume buttons is useful when you are unable to access the settings menu on your Acer tablet. However, if this method does not work or you encounter any difficulties, there are alternative methods available, which will be discussed in the following sections.
Method 3: Factory reset Acer tablet using the Acer Recovery Management software
If your Acer tablet came pre-installed with the Acer Recovery Management software, you can utilize this tool to perform a factory reset. The Acer Recovery Management software provides an easy and efficient way to reset your tablet to its factory settings. Follow the steps below to factory reset your Acer tablet using the Acer Recovery Management software:
- Connect your Acer tablet to a power source or ensure that it has sufficient battery charge.
- Turn on your tablet and wait for it to boot up.
- Open the Acer Recovery Management software. You can usually access it by pressing the designated key during startup. The specific key may vary depending on your Acer tablet model, but common keys include F2, Del, or Esc.
- Navigate through the options in the Acer Recovery Management software until you find the “Restore Factory Settings” or “Reset” option.
- Select the “Restore Factory Settings” or “Reset” option and follow the prompts to initiate the factory reset process.
- Review the warnings and information displayed on the screen, then confirm your decision to proceed with the factory reset.
- The Acer Recovery Management software will begin the factory reset process. This may take some time, and your tablet may restart multiple times during the process.
- Once the factory reset is complete, the Acer Recovery Management software will prompt you to set up your tablet again. Follow the on-screen instructions to configure your tablet and personalize the settings.
It is important to note that the specific steps and options in the Acer Recovery Management software may vary depending on your Acer tablet model and the version of the software installed. Refer to the user manual or visit the Acer support website for detailed instructions specific to your device.
If your Acer tablet does not have the Acer Recovery Management software or you encounter any difficulties with this method, there are alternative options available, which will be discussed in the following sections.
Method 4: Factory reset Acer tablet using a computer
If you are unable to access the settings on your Acer tablet or use the previous methods to perform a factory reset, you can try using a computer to initiate the reset process. This method requires connecting your tablet to a computer and using specific software or tools to perform the reset. Follow the steps below to factory reset your Acer tablet using a computer:
- Ensure that you have a computer with a stable internet connection and the necessary software or tools installed. You will need to download and install the appropriate software or tool specific to your Acer tablet model.
- Connect your Acer tablet to the computer using a USB cable.
- Launch the software or tool on your computer that is designed for performing a factory reset on Acer tablets. The specific software or tool will depend on your tablet model and may be provided by Acer or a third-party developer.
- Follow the on-screen prompts and instructions provided by the software or tool to initiate the factory reset process.
- During the reset process, ensure that your tablet remains connected to the computer and avoid disconnecting it until the process is complete.
- Once the factory reset is finished, disconnect your Acer tablet from the computer.
- Power on your tablet and go through the initial setup process. Follow the on-screen instructions to configure your tablet and personalize the settings.
It is crucial to remember that the specific software or tool required to perform a factory reset using a computer may vary depending on your Acer tablet model. Check the user manual or visit the Acer support website for detailed instructions and recommendations specific to your tablet.
If you encounter any difficulties or are unable to use this method, it is recommended to reach out to Acer customer support for further assistance or explore other alternatives, which will be discussed in the following sections.
Frequently Asked Questions about Factory Resetting Acer Tablet without Password
Factory resetting an Acer tablet without a password can raise some common questions and concerns. In this section, we will address some frequently asked questions to provide further clarification and guidance.
1. Will a factory reset remove the password on my Acer tablet?
Yes, performing a factory reset on your Acer tablet will remove any password, PIN, or pattern lock that you have set. It will reset your tablet to its original factory settings, erasing all data and personalized settings in the process.
2. Will a factory reset delete all my data on the Acer tablet?
Yes, a factory reset will erase all data on your Acer tablet, including apps, photos, videos, documents, contacts, and any other personal files. It is essential to back up any important data before performing a factory reset to avoid permanent loss.
3. Can I recover my data after a factory reset?
No, a factory reset permanently deletes the data on your Acer tablet. Therefore, it is crucial to back up your data before proceeding with a factory reset if you wish to recover it later. Once the reset is complete, the data cannot be retrieved.
4. How long does a factory reset take on an Acer tablet?
The duration of a factory reset can vary depending on the tablet model and the amount of data being erased. It typically takes several minutes to complete. During the process, it is essential to keep your tablet connected to a power source and avoid interrupting the reset.
5. What should I do if the factory reset methods don’t work on my Acer tablet?
If the methods provided in this guide do not work for your Acer tablet or you encounter any difficulties, it is recommended to reach out to Acer customer support for further assistance. They can provide tailored guidance and troubleshooting based on your specific tablet model and situation.
6. Will a factory reset fix software issues on my Acer tablet?
Yes, performing a factory reset can help resolve software-related issues on your Acer tablet. It resets your device back to its original factory settings, removing any problematic software or settings that may be causing issues. However, it is essential to note that a factory reset will not fix hardware issues.
7. Can I perform a factory reset on my Acer tablet if it does not power on?
If your Acer tablet does not power on or is unresponsive, you may not be able to perform a factory reset using the methods mentioned in this guide. In such cases, it is recommended to contact Acer customer support or visit an authorized service center for assistance.
8. Will a factory reset remove viruses or malware from my Acer tablet?
Yes, a factory reset will remove viruses or malware from your Acer tablet. It erases all data, including any potentially malicious software. However, it is advisable to ensure that you have a reliable antivirus program installed after the factory reset to protect your tablet from future threats.
9. Can I stop or cancel a factory reset once it has started?
No, once a factory reset has started, it cannot be stopped or canceled. Interrupting the process can potentially lead to software instability or functional issues on your Acer tablet. Therefore, it is crucial to proceed with caution and allow the reset to complete.
These are some of the most commonly asked questions regarding factory resetting Acer tablets without a password. If you have any additional questions or concerns, it is advisable to consult the user manual or contact Acer customer support for personalized assistance.
Conclusion
Factory resetting your Acer tablet without a password can be a useful solution in various situations, such as forgotten passwords, software issues, or preparing your device for sale or donation. We have explored several methods to perform a factory reset, including using the Settings menu, the Power and Volume buttons, the Acer Recovery Management software, and a computer. Each method offers a different approach depending on your tablet’s accessibility and specific requirements.
Before initiating a factory reset, it is important to back up your data, consider any account credentials, ensure your tablet is adequately charged, and follow device-specific instructions. These precautions will help ensure a smooth and successful reset process, minimizing the risk of data loss or other complications.
While a factory reset can resolve software-related issues and remove passwords, it is crucial to remember that it permanently deletes all data on your Acer tablet. Therefore, it is advisable to create backups and retrieve any important files before proceeding with the reset.
If you encounter difficulties during the factory reset process or have further questions, it is recommended to consult the user manual or seek assistance from Acer customer support. They can provide personalized guidance and troubleshooting based on your specific Acer tablet model and situation.
We hope that this guide has provided you with the necessary information and instructions to factory reset your Acer tablet without a password. By following the steps outlined in this guide, you can regain control of your tablet and overcome various challenges that may arise. Remember to exercise caution and choose the method that best suits your needs and preferences.
Thank you for reading, and we wish you success in factory resetting your Acer tablet!