Introduction
Welcome to this guide on how to edit a Word document on your Samsung tablet. The convenience of having a tablet allows you to work on your documents on the go, whether you’re traveling, at a coffee shop, or simply away from your computer. With the right tools and know-how, you can easily make edits and revisions to your Word documents directly on your Samsung tablet.
Editing a Word document on your Samsung tablet is a straightforward process that involves utilizing the functionality of Microsoft Word for Android. This powerful app allows you to open, view, and edit Word documents seamlessly on your tablet, providing you with a mobile office experience.
In this guide, we will walk you through the steps to open, navigate, and make basic edits to your Word documents. We will also cover how to format text, insert and edit images, and save and share your document for easy collaboration and accessibility. By the end of this guide, you’ll have all the knowledge you need to confidently edit your Word documents on your Samsung tablet.
Before we begin, ensure that you have Microsoft Word for Android installed on your Samsung tablet. You can download the app from the Google Play Store if you haven’t already. Once you have it installed, let’s dive into the step-by-step process of editing your Word documents on your Samsung tablet.
Step 1: Opening the Word Document
The first step to editing a Word document on your Samsung tablet is to open the document you want to edit. Follow these instructions to do so:
- Locate the Microsoft Word app on your Samsung tablet’s home screen or app drawer and tap on it to launch the application.
- Once the app is open, you will be taken to the Recent tab, which displays a list of your recently opened documents. If the document you want to edit is listed here, simply tap on it to open it. If not, proceed to the next step.
- To open a document that is not listed in the Recent tab, tap on the folder icon located at the top right corner of the screen.
- This will open the Open menu, where you can navigate through your tablet’s file system to find the document you want to edit. You can browse through different folders or use the search bar at the top to quickly locate the document by name. Once you find the document, tap on it to open it.
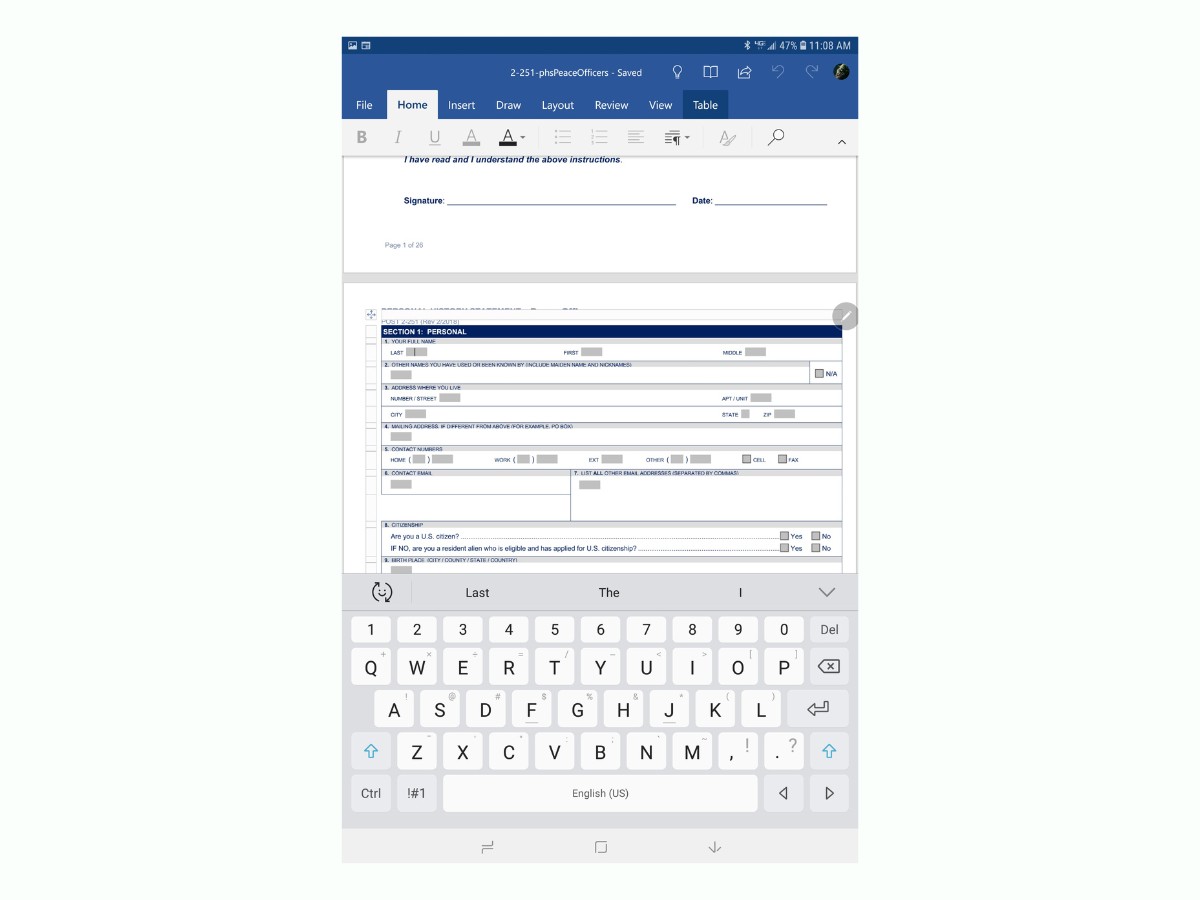
- The Word app will now open the selected document, and you will be able to view its contents on your Samsung tablet’s screen.
Opening a Word document on your Samsung tablet is a simple process that allows you to access your files and begin making edits. Once you have your document open, you’re ready to move on to the next step: navigating the document.
Step 2: Navigating the Document
Now that you have your Word document open on your Samsung tablet, it’s important to know how to navigate through the document efficiently. Here are some key navigation techniques:
- Scrolling: To view different parts of your document, simply swipe up or down on your tablet’s screen. You can use your finger to scroll through the pages smoothly.
- Zooming: If you need to zoom in or out of the document for better visibility, you can use the pinch-to-zoom gesture with two fingers on your tablet’s screen. Spread your fingers apart to zoom in and pinch them together to zoom out.
- Page Navigation: If you want to jump to a specific page in the document, tap on the page indicator located at the bottom of the screen. This will bring up a slider that you can slide left or right to navigate to the desired page. Release your finger once you reach the desired page.
- Search: If you’re looking for a specific word or phrase within the document, you can use the search feature. Tap on the magnifying glass icon at the top right corner of the screen and enter the keyword or phrase you want to search for. The app will highlight all instances of the keyword or phrase in the document, allowing you to easily find what you’re looking for.
- Table of Contents: If your document has a table of contents, you can tap on the three-dot menu icon at the top right corner of the screen and select “Show Document Outline” to view the table of contents. This will provide you with an organized list of sections or chapters in the document, allowing you to navigate directly to a specific section.
Navigating through your Word document on your Samsung tablet is a breeze with these simple techniques. Whether you need to scroll, zoom, search, or jump to a specific page or section, you can now move around your document with ease. Now that you’re familiar with the navigation options, let’s move on to the next step: making basic edits to the document.
Step 3: Making Basic Edits
Once you have navigated to the relevant section or page in your Word document on your Samsung tablet, you can start making basic edits. Here are some essential editing functions:
- Selecting Text: To make edits to specific portions of your document, you need to select the text first. Tap and hold on the desired word or section, then adjust the selection handles to encompass the text you want to modify. Once selected, you can delete, copy, cut, or format the selected text.
- Deleting Text: To remove unwanted text, select the text as mentioned above and tap the delete key on the on-screen keyboard. Alternatively, you can use the cut function to remove the selected text and move it to the clipboard.
- Typing: Tap on the desired area of the document to place the cursor, then start typing to add new content. The on-screen keyboard will automatically appear when you tap inside a text field, allowing you to input your text.
- Undo and Redo: Made a mistake? No worries. The Word app provides an undo and redo button at the top left corner of the screen. Tap on the left-facing arrow to undo your recent changes, or tap on the right-facing arrow to redo them if needed.
- Find and Replace: If you want to quickly find a specific word or phrase within the document and replace it with another, tap the three-dot menu icon at the top right corner of the screen. Select “Find” from the menu and enter the keyword or phrase you want to find. You can then choose to replace it with another word or phrase if desired.
These basic editing functions empower you to make changes to your Word document on your Samsung tablet. Whether you need to delete text, add new content, or find and replace specific words, these tools have you covered. With your edits complete, it’s time to move on to the next step: formatting text.
Step 4: Formatting Text
Formatting text in your Word document on your Samsung tablet is crucial for enhancing readability and emphasizing important information. Here’s how you can format your text:
- Font Styles: To change the font style, select the text you want to modify and tap on the font style option in the formatting toolbar at the top of the screen. You can choose from various font styles such as bold, italic, underline, and more.
- Font Size: To adjust the size of your text, select the desired text and tap on the font size option in the formatting toolbar. You can increase or decrease the size of the text using the provided slider or by typing in the desired font size.
- Text Color: To change the color of your text, select the text and tap on the text color option in the formatting toolbar. You can choose from a wide range of colors to make your text more visually appealing or standout.
- Text Alignment: If you want to align your text differently, you can tap on the alignment option in the formatting toolbar. You can select left alignment, center alignment, right alignment, or justify alignment to adjust the alignment of your text.
- Bulleted and Numbered Lists: To create bulleted or numbered lists, tap on the respective list style option in the formatting toolbar. This allows you to organize your information in a more structured and easily understandable format.
By utilizing these text formatting options, you can make your Word document on your Samsung tablet visually appealing and well-structured. Whether you want to emphasize certain words, change the font size, adjust alignment, or create lists, these formatting tools are your go-to. Now that your text is looking great, let’s move on to the next step: inserting and editing images.
Step 5: Inserting and Editing Images
Adding images to your Word document on your Samsung tablet can enhance visual appeal and help illustrate your ideas. Here’s how you can insert and edit images:
- Inserting Images: To insert an image, tap on the place in the document where you want to add the image. Next, tap on the insert image icon in the toolbar, which looks like a picture. This will allow you to browse through your tablet’s gallery or storage to select the desired image. Once you’ve chosen the image, tap on it to insert it into your document.
- Adjusting Image Size: After inserting an image, you can resize it according to your needs. Simply tap on the image to select it, and resize handles will appear around the image. Use these handles to adjust the size of the image by dragging them inward or outward.
- Moving Images: If you need to reposition an image within your document, tap and hold on the image, then drag it to the desired location. This allows you to place the image exactly where it fits best with your text or other elements.
- Wrapping Text Around Images: To wrap text around an image, tap on the image to select it, and then tap on the text wrapping options in the formatting toolbar. You can choose to wrap text on the left, right, or both sides of the image, depending on your preference.
- Editing Images: If you want to make changes to an inserted image, such as cropping, rotating, or adding filters, tap on the image to select it, and then tap on the image editing options in the toolbar. This will allow you to make adjustments to the image to suit your needs.
By utilizing these image insertion and editing features, you can make your Word document on your Samsung tablet visually engaging and informative. Whether you need to add illustrations, resize images, move them around, wrap text around them, or make edits to the images themselves, these tools have you covered. Now that your images are looking great, let’s move on to the final step: saving and sharing the document.
Step 6: Saving and Sharing the Document
Once you have finished editing your Word document on your Samsung tablet, it’s important to save your changes and share the document if needed. Here’s how you can save and share your document:
- Saving the Document: To save your document, tap on the save icon in the top left corner of the screen. This will automatically save your changes and update the document on your tablet’s storage. It’s a good practice to save your document periodically to ensure that your work is not lost in case of any unexpected interruptions.
- Renaming the Document: If you want to provide a different name for your document, tap on the file name at the top of the screen. This will allow you to edit the name of the document. Enter the desired name and tap on the save icon to confirm the changes.
- Exporting the Document: If you need to share your document with others who may not have Microsoft Word, you can export it to a different format such as PDF. Tap on the three-dot menu icon at the top right corner of the screen, then select “Share” followed by “Export.” Choose the desired format, such as PDF, and tap on “Export” to generate the file.
- Sharing the Document: To share your document with others, tap on the three-dot menu icon at the top right corner of the screen, then select “Share.” This will open a menu of available sharing options on your Samsung tablet. You can select a specific app or method to share the document, such as email, messaging apps, cloud storage services, or even printing the document.
- Collaborating on the Document: If you want to collaborate with others on the document in real-time, you can utilize the collaboration features of Microsoft Word. Tap on the three-dot menu icon, select “Share,” and choose the desired method for collaboration, such as inviting others through email or generating a sharing link. This allows multiple users to edit the document simultaneously and keeps everyone in sync.
By following these steps to save and share your document, you can ensure that your work is secure and easily accessible to others. Whether you need to save your changes, rename the document, export it to a different format, or share it with collaborators, these options provide flexibility and convenience. With your document saved and shared, you have successfully completed the final step of the process.
Conclusion
Editing a Word document on your Samsung tablet is a convenient and efficient way to work on the go. With the right tools and knowledge, you can easily make edits, format text, insert images, and collaborate with others, all from the comfort of your tablet. Throughout this guide, we have walked you through the step-by-step process of opening a Word document, navigating through its pages, making basic edits, formatting text, inserting and editing images, and finally saving and sharing your document.
By following these steps, you now have the skills to confidently edit Word documents on your Samsung tablet. Whether you’re a student, professional, or simply someone who needs to edit documents on the go, this guide has equipped you with the necessary knowledge to make the most out of your Word app experience.
Remember to explore the various formatting options to make your text visually appealing and utilize the image insertion and editing features to enhance the visual impact of your documents. Additionally, don’t forget to save your changes regularly to avoid any potential loss of work.
Now that you know how to edit Word documents on your Samsung tablet, you can take your productivity to the next level. Whether you’re on a business trip, studying at a coffee shop, or simply away from your computer, your Samsung tablet provides you with a versatile platform for document editing on the go. Embrace the flexibility and convenience of editing Word documents on your tablet, and make the most of your mobile office experience.