Introduction
Welcome to the guide on how to do a fresh install of Windows 10. Whether you’re upgrading from an older version of Windows or simply want to start with a clean slate, performing a fresh install can help improve your computer’s performance and eliminate any software issues you may be experiencing.
A fresh install of Windows 10 involves wiping your hard drive and reinstalling the operating system from scratch. It is recommended to backup all your important files and data before proceeding with the installation to avoid any potential data loss. Additionally, you will need to create a Windows 10 installation media, which can be done using either a USB drive or a DVD.
This guide will take you through the step-by-step process of performing a fresh install of Windows 10. From creating the installation media to customizing your settings and installing necessary software, we will cover everything you need to know to ensure a successful installation.
It’s important to note that performing a fresh install of Windows 10 will remove all your personal files, applications, and settings. Therefore, it is crucial to backup any important data before proceeding with the installation. Once the installation is complete, you can then restore your files and data from the backup.
By following this guide, you will not only have a clean and optimized version of Windows 10 but also the opportunity to start fresh and customize your settings and software according to your preferences. So, let’s get started with the first step: backing up your data.
Backup Your Data
Before embarking on a fresh install of Windows 10, it’s essential to back up your data to ensure that you don’t lose any important files or information during the process. Here’s how to do it:
1. Identify the files and folders you want to back up:
Take some time to assess the data stored on your computer and determine which files and folders are essential to back up. This might include documents, photos, videos, music, and any other personal files that you want to keep safe.
2. Choose the backup method:
Next, decide on the backup method that suits your needs. You have a few options:
- External Hard Drive or USB Drive: Connect an external hard drive or USB drive to your computer and manually copy and paste the files you want to back up onto the drive. Make sure the drive has enough space to accommodate all the data you want to store.
- Cloud Storage: Utilize cloud storage services like OneDrive, Google Drive, Dropbox, or iCloud to upload your files and access them from any device with an internet connection. This method is convenient and ensures your files are securely stored.
- Network Attached Storage (NAS): If you have a NAS device or a home server, you can back up your files directly to that storage solution. This method is useful if you have multiple devices connected to the network.
3. Start the backup process:
Once you’ve chosen your preferred backup method, start the backup process. For external hard drives or USB drives, copy and paste the files you want to back up onto the drive. If you’re using cloud storage, upload the files to the corresponding service, following the instructions provided by the service provider.
4. Verify your backup:
After the backup is complete, it’s crucial to verify that the files have been successfully backed up and can be accessed without any issues. Take some time to navigate through the backed-up files and ensure that everything is intact and accessible.
By following these steps, you can safeguard your important files and data before proceeding with the fresh install of Windows 10. This ensures that even if anything goes wrong during the installation process, you can restore your files and get back to where you left off.
Create a Windows 10 Installation Media
Before you can perform a fresh install of Windows 10, you will need to create a Windows 10 installation media. This will allow you to boot your computer from the installation media and initiate the installation process. Here’s how to create a Windows 10 installation media:
1. Obtain a USB drive or DVD:
To create a Windows 10 installation media, you will need either a USB drive with at least 8GB of storage capacity or a blank DVD. Make sure the USB drive is empty or that you don’t mind losing its contents, as the process will erase everything on it.
2. Download the Windows 10 ISO file:
Go to the official Microsoft website (https://www.microsoft.com/en-us/software-download/windows10) and download the Windows 10 ISO file. Make sure to select the correct version and edition of Windows 10 that you want to install.
3. Create the installation media:
Once the ISO file is downloaded, you can use the Windows 10 Media Creation Tool to create the installation media. Run the tool and follow the on-screen instructions. If you are using a USB drive, select “USB flash drive” as the media, and if you are using a DVD, select “ISO file” and then burn it to the DVD using a disc burning software.
4. Wait for the process to complete:
Creating the installation media may take some time, depending on your internet speed and the processing power of your computer. Be patient and allow the tool to complete the process without interruption.
5. Verify the installation media:
After the creation process is complete, it is essential to verify that the installation media is error-free. This can be done by using the built-in Windows 10 ISO verification tool or by comparing the checksum of the downloaded ISO file with the official checksum provided by Microsoft.
With the Windows 10 installation media in hand, you are now ready to proceed with the fresh install of Windows 10. Next, we will guide you on how to access the BIOS settings and boot from the installation media.
Access the BIOS Settings
Before you can boot from the Windows 10 installation media and begin the fresh install process, you need to access the BIOS (Basic Input/Output System) settings of your computer. The BIOS settings allow you to configure the hardware and choose the boot device. Here’s how to access the BIOS settings:
1. Start or restart your computer:
If your computer is already turned on, restart it. If it’s off, power it on by pressing the power button. Make sure you have the Windows 10 installation media connected to your computer. This can be a USB drive or a DVD.
2. Enter the BIOS:
As the computer boots up, a manufacturer logo will typically appear. Look for the key (or combination of keys) that you need to press to enter the BIOS. This key is often displayed on the screen, but it can vary depending on the manufacturer. Common keys include F2, Del, F12, or Esc. Press the designated key repeatedly until the BIOS settings screen appears.
3. Navigate through the BIOS settings:
The BIOS settings screen may look different for each computer, but there are common sections and options to navigate. Use the arrow keys on your keyboard to move between sections and options. Look for a section called “Boot” or “Boot Options.”
4. Set the boot order:
Once you are in the “Boot” or “Boot Options” section, you will see a list of boot devices. Use the arrow keys to highlight the device that corresponds to the Windows 10 installation media. It can be a USB device or the DVD drive. Change the boot order by moving the selected device to the top of the list. This ensures that your computer will boot from the installation media first.
5. Save and exit the BIOS:
After setting the boot order, navigate to the “Exit” section of the BIOS. Select the option to save your changes and exit the BIOS. Your computer will restart automatically.
By accessing the BIOS settings and configuring the boot order, you have ensured that your computer will recognize and boot from the Windows 10 installation media. In the next section, we will guide you on how to boot from the installation media and proceed with the fresh install of Windows 10.
Boot from the Installation Media
Now that you have set the boot order in the BIOS settings, it’s time to boot your computer from the Windows 10 installation media. Follow these steps to proceed with the fresh install:
1. Restart your computer:
Make sure the Windows 10 installation media is connected to your computer. Restart your computer by clicking on the Start menu and selecting “Restart” or by pressing the physical restart button on your computer.
2. Watch for the “Press any key to boot from CD or DVD”:
As the computer restarts, keep an eye on the screen. You should see a message that prompts you to “Press any key to boot from CD or DVD.” This message typically flashes on the screen for a few seconds. Be ready to press any key on your keyboard to proceed.
3. Press any key to boot from the installation media:
Quickly press any key on your keyboard when the prompt appears. This will initiate the booting process from the Windows 10 installation media. Make sure not to press the key repeatedly to avoid any errors.
4. Wait for Windows 10 setup to load:
After pressing a key, the Windows 10 setup screen will appear. This may take a moment, so be patient. The setup screen will display the Windows logo and a loading indicator while the necessary files are loaded.
5. Select your language, time, and currency preferences:
Once the setup screen appears, you will be prompted to select your language, time format, and currency format. Choose the appropriate options for your preferences and click “Next” to continue.
6. Click “Install now” to begin the installation:
On the next screen, click on the “Install now” button to start the Windows 10 installation process. You will be guided through a series of steps to complete the installation, including accepting the license terms and selecting the installation type.
By successfully booting from the Windows 10 installation media, you are now ready to install Windows 10 on your computer. In the next section, we will guide you through the installation process and customizing your settings.
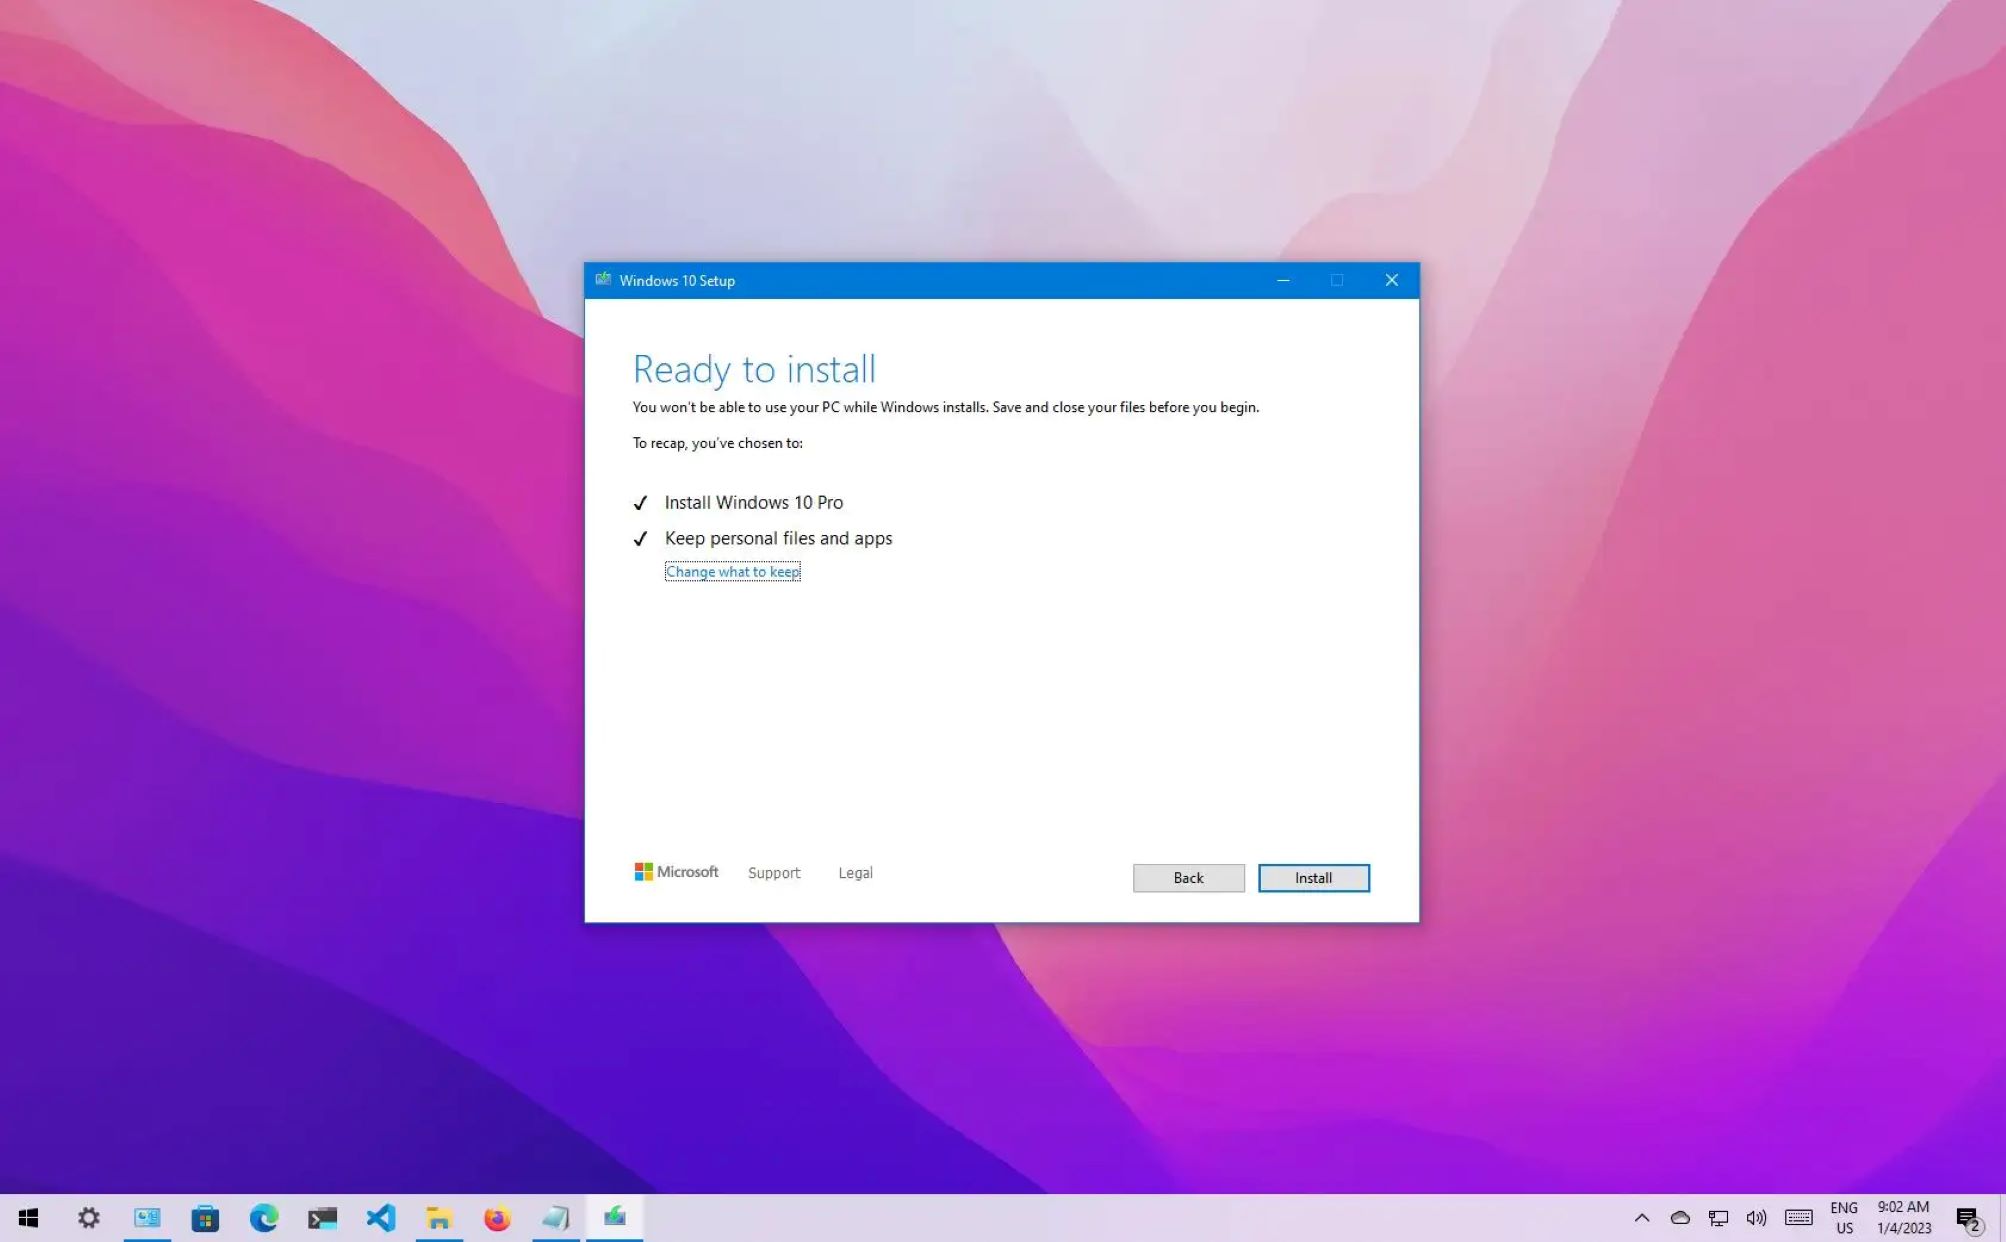
Install Windows 10
With the Windows 10 installation media now booted, you are ready to install the operating system on your computer. Follow these steps to proceed with the installation:
1. Choose the installation type:
On the Windows 10 setup screen, you will be prompted to choose the installation type. If you are performing a fresh install and want to remove all existing data and partitions on your computer, select the “Custom: Install Windows only (advanced)” option. If you are upgrading from a previous version of Windows, choose the “Upgrade” option.
2. Select the installation location:
If you chose the “Custom” installation type, you will need to select the installation location for Windows 10. This is typically the primary hard drive (usually labeled as “Disk 0”). Select the drive and click on the “Next” button to continue.
3. Wait for Windows 10 to install:
The installation process will now begin, and you will see a progress indicator showing the installation status. Windows 10 will automatically copy files, install updates, and configure settings during this process. It may take some time, so be patient and avoid interrupting the installation.
4. Set up your preferences:
After the installation is complete, your computer will restart, and you will be prompted to set up your preferences. This includes selecting your region, keyboard layout, and creating a user account. Follow the on-screen instructions to customize your settings according to your preferences.
5. Sign in to Windows 10:
Once you have set up your preferences, you will be prompted to sign in to your Windows 10 user account. Enter your credentials or create a new account if necessary. After signing in, Windows 10 will finalize the setup process.
6. Customize your Windows 10 settings:
After signing in, you can customize various settings, such as privacy settings and theme preferences. Take some time to explore the settings and personalize Windows 10 according to your preferences.
With the Windows 10 installation complete and the initial setup process finished, you now have a fresh installation of Windows 10 on your computer. In the next sections, we will guide you on how to install essential drivers, necessary software, and applications, and update Windows 10.
Customize Your Settings
Once you have completed the installation of Windows 10, it’s time to customize your settings to optimize your experience and personalize the operating system according to your preferences. Follow these steps to customize your settings:
1. Open the Settings menu:
Click on the Start menu and select “Settings” to open the Windows 10 Settings menu. Alternatively, you can press the Windows key + I on your keyboard to quickly access the Settings menu.
2. Explore the different categories:
In the Settings menu, you will find various categories covering different aspects of Windows 10. Take some time to explore each category to find the settings you want to customize. Some important categories to consider are:
- System: Adjust display settings, manage storage, configure power settings, and more.
- Personalization: Customize the desktop background, themes, colors, and lock screen appearance.
- Accounts: Manage user accounts, sign-in options, and synchronization settings.
- Privacy: Control privacy settings for various features and applications.
- Update & Security: Manage Windows updates, security settings, and backup options.
3. Customize your preferences:
Within each category, you will find specific settings to customize. For example, in the Personalization category, you can choose a new desktop background, select a theme, or modify the color scheme. In the Privacy category, you can control which apps have access to your location, camera, microphone, and other privacy-sensitive features.
4. Explore advanced settings:
To access even more settings and options, click on the “Advanced options” or “Advanced settings” link within each category. This will allow you to adjust specific configurations and access additional features.
5. Test and apply your changes:
As you customize your settings, you can preview the changes before applying them. This will allow you to see how your modifications affect the look and feel of Windows 10. Once you are satisfied with your changes, click on the appropriate buttons or switches to apply them.
By customizing your settings, you can tailor Windows 10 to your preferences and optimize it for your specific needs. Take some time to explore the various options and make adjustments that enhance your overall experience with the operating system.
Install Essential Drivers
After the fresh installation of Windows 10, it’s important to install essential drivers to ensure that your computer hardware functions properly and optimally. Drivers are software programs that enable communication between the operating system and the hardware components of your computer. Follow these steps to install essential drivers:
1. Identify your hardware components:
Before installing drivers, it’s helpful to identify the hardware components in your computer. This includes the graphics card, sound card, network adapter, and any other peripherals. You can usually find the specific model and manufacturer information on the physical hardware or by checking the device manager in Windows.
2. Visit the manufacturer’s website:
Once you have identified your hardware components, visit the manufacturer’s website for each device to find the latest driver versions. Most manufacturers provide a support section on their website where you can search for and download the appropriate drivers for your specific model.
3. Download and install the drivers:
On the manufacturer’s website, locate the driver download section for each hardware component. Look for the driver that matches your operating system version and download it to your computer. Once downloaded, run the driver installer and follow the on-screen prompts to install the driver.
4. Restart your computer:
After installing each driver, it’s recommended to restart your computer to ensure that the changes take effect. This will help prevent any conflicts or issues that may arise from outdated or incompatible drivers.
5. Update drivers using Windows Update:
In addition to manually installing drivers, you can also use Windows Update to automatically check for and install driver updates. This can be done by going to the “Update & Security” section in the Windows 10 Settings menu and clicking on “Check for updates.” Windows will then search for any available driver updates and install them on your computer.
By installing essential drivers, you ensure that your computer hardware functions optimally and that you have access to the latest features and improvements. Regularly checking for and updating your drivers can help enhance the performance and stability of your system.
Install Necessary Software and Applications
After installing essential drivers, it’s time to install the necessary software and applications on your Windows 10 system. These are the programs that you regularly use and depend on for your work, productivity, entertainment, and other activities. Follow these steps to install the necessary software:
1. Identify the necessary software:
Make a list of the software and applications that you commonly use or require for your tasks. This may include productivity tools like Microsoft Office, web browsers, media players, graphic design software, and any other programs specific to your needs.
2. Download from official sources:
Visit the official websites or trusted sources for each software application on your list. Look for the download links or purchase options and ensure that you are downloading the correct version compatible with Windows 10. Beware of unofficial sources that may contain malware or compromised versions of the software.
3. Run the installation file:
Once the software installation file is downloaded, locate it on your computer and double-click to run the installer. Follow the on-screen instructions provided by the installer to install the software. These instructions may include accepting license agreements, choosing installation options, and selecting a destination folder.
4. Configure settings and preferences:
After the installation is complete, launch the software and configure any settings or preferences according to your requirements. This may include options related to language, display, notifications, and customizations specific to each program.
5. Repeat for other software:
Repeat the above steps for each software or application on your list. Install them one by one to ensure a smooth installation process and to minimize conflicts between programs.
6. Update and maintain software:
After installing the necessary software, it is crucial to keep them up to date by installing regular updates issued by the developers. Enable automatic updates whenever possible to ensure that your software remains current and secure. Additionally, periodically check for and install software updates or new versions to take advantage of new features and enhancements.
By installing the necessary software and applications on your Windows 10 system, you can enhance your productivity, entertainment, and overall experience with the operating system. Take your time to install each program correctly and configure them to suit your preferences and needs.
Update Windows 10
Keeping your Windows 10 operating system up to date is essential for maintaining security, stability, and optimal performance. Microsoft regularly releases updates that include bug fixes, security patches, and new features. Here’s how to update your Windows 10 system:
1. Open Windows Update:
Click on the Start menu, select “Settings,” and then choose “Update & Security.” This will open the Windows Update settings page.
2. Check for updates:
On the Windows Update settings page, click on the “Check for updates” button. Windows will search for available updates, including security patches, cumulative updates, and feature updates.
3. Download and install updates:
If there are any updates available, click on the “Download” or “Install” button to initiate the update process. Depending on the size and number of updates, the process may take some time. Ensure that your computer is connected to a stable internet connection during the update.
4. Restart your computer:
After the updates are downloaded and installed, you will be prompted to restart your computer. It’s important to restart your computer as soon as possible to complete the update process. Some updates may require multiple restarts to fully install.
5. Configure update settings:
In the Windows Update settings, you will find options to configure how updates are installed on your system. You can choose to defer updates or schedule automatic restarts to avoid interruptions during your work or preferred usage hours. Adjust these settings according to your preferences and requirements.
6. Enable automatic updates:
It is recommended to enable automatic updates to ensure that your Windows 10 system stays up to date without requiring manual intervention. Automatic updates will download and install updates in the background, keeping your system secure and up to date.
By regularly updating Windows 10, you benefit from improved security, stability, and access to new features. It is essential to stay proactive about updating your system to maintain optimal performance and protect against potential vulnerabilities.
Restore Your Files and Data
After performing a fresh install of Windows 10, it’s time to restore your files and data that you previously backed up. Here’s how you can restore your files and get back to where you left off:
1. Connect your backup device:
If you used an external hard drive, USB drive, or network attached storage (NAS) to back up your files, connect the device to your computer. Ensure that the device is recognized and accessible in Windows 10.
2. Copy your files to the appropriate locations:
Navigate to the location where you backed up your files. This might be in a specific folder or on the root of the backup device. Copy the files and folders to their original locations on your computer. For example, copy your documents, pictures, videos, and any other personal files to their respective folders.
3. Restore application settings and preferences:
While most applications require a fresh installation, some programs allow you to restore settings and preferences from a backup. Check the documentation or settings of each application to see if this feature is available. If available, follow the instructions to restore your previous settings.
4. Reinstall applications:
After restoring your files, reinstall the applications and software programs that you need. Use the installation files or setup executables that you previously downloaded, or access them from official sources. Follow the installation instructions provided by each program.
5. Activate licenses and accounts:
If you have any licensed software or applications, make sure to activate them using the appropriate product keys or license information. Additionally, sign in to any accounts or services that require authentication, such as email clients, cloud storage services, or productivity platforms.
6. Verify the integrity of your data:
Take a moment to go through your restored files and ensure that everything is intact and accessible. Open different file types, check for any missing or corrupted data, and confirm that all your important files are present.
By following these steps, you can restore your files and data after a fresh install of Windows 10. Taking the time to organize and restore your files will help you seamlessly transition back into your regular workflow or activities without losing any valuable information.
Conclusion
Congratulations! You have successfully completed a fresh install of Windows 10. By following this guide, you have learned how to backup your data, create a Windows 10 installation media, access the BIOS settings, boot from the installation media, install Windows 10, customize your settings, install essential drivers, necessary software and applications, update Windows 10, and restore your files and data.
A fresh install of Windows 10 can be a valuable step to improve your computer’s performance, eliminate software issues, and start with a clean slate. Remember to backup your important files and data before proceeding with the installation and keep a copy of the installation media handy for future use.
Throughout the installation process, make sure to follow each step carefully and take time to customize your settings, install necessary drivers, and install the software applications you need. Regularly updating Windows 10 will ensure that your system remains secure, stable, and up to date with the latest features and improvements.
After restoring your files and data, you can enjoy a fresh and optimized version of Windows 10 tailored to your preferences and requirements. Take full advantage of the customization options and explore the vast range of software and applications available to enhance your productivity and enjoyment while using your computer.
Remember to regularly backup your files and maintain a routine of updating your software and drivers to ensure a smooth and secure computing experience. With a fresh install of Windows 10, you now have a solid foundation for a reliable and efficient operating system that will support your work, entertainment, and various activities.
Thank you for following this guide, and we hope it has been helpful for you. Here’s to a seamless and enjoyable experience with your newly installed Windows 10 system!