Introduction
Having duplicate files on your external hard drive can be both frustrating and problematic. Not only do they take up valuable storage space, but they can also make it difficult to find and organize your files efficiently. Fortunately, there are effective ways to delete duplicate files and regain control over your external hard drive’s storage capacity.
Whether you accidentally copied and saved files multiple times or you have downloaded duplicate files from different sources, it’s essential to clean up your external hard drive periodically. This will help you optimize its performance and ensure that you have enough space for new and important files.
In this guide, we will walk you through the steps to delete duplicate files on your external hard drive. We will explore the use of specialized duplicate file finder software that will scan your drive and identify all duplicate files. By following these steps, you will be able to locate and delete duplicate files with ease, freeing up valuable disk space and improving your overall file management.
Step 1: Back up your files
Before beginning the process of deleting duplicate files on your external hard drive, it is crucial to create a backup of all your important files. This step ensures that in case anything goes wrong during the deletion process, you will still have a copy of your files stored safely elsewhere.
You have several options for backing up your files. One common method is to manually copy and paste your important files onto another external hard drive, a USB flash drive, or even a cloud storage service such as Google Drive or Dropbox. This allows you to have an extra copy of your files that you can access in the future, even if something happens to your external hard drive.
Alternatively, you can use backup software to automate the process. Backup software, such as Acronis True Image or Macrium Reflect, allows you to create regular backups of your files and save them to a specified location. This method is especially useful if you have a large number of files or if you frequently update and modify your files.
Remember to take the time to organize and structure your backup so that you can easily retrieve any necessary files later on. Consider creating separate folders for different categories of files, such as documents, photos, videos, and music. This way, you can quickly locate and restore specific files if needed.
By backing up your files before deleting duplicates, you can ensure the safety of your data and have peace of mind during the cleaning process. It’s always better to be safe than sorry when it comes to your valuable files, so make sure to take the time to create a comprehensive backup before proceeding to the next steps.
Step 2: Use a duplicate file finder software
To effectively find and delete duplicate files on your external hard drive, it is recommended to use a specialized duplicate file finder software. These tools are designed to scan your drive, identify duplicate files based on various criteria, and provide you with options to delete them selectively or in bulk.
There are several reliable duplicate file finder software options available for both Windows and Mac operating systems. Some popular choices include Duplicate Cleaner Pro, CCleaner, Duplicate File Remover, and Gemini 2. These programs offer user-friendly interfaces and powerful scanning algorithms that can quickly analyze your external hard drive and locate duplicate files.
When choosing a duplicate file finder software, look for features such as customizable scanning options, file comparison algorithms, preview capabilities, and a secure deletion method. These features will enable you to have better control over the scanning process and ensure that you are deleting the right duplicate files without accidentally removing any important files.
Once you have selected a duplicate file finder software, download and install it on your computer. Make sure to choose the version that is compatible with your operating system. After installation, launch the software to begin the process of identifying and deleting duplicate files on your external hard drive.
Some duplicate file finder software allows you to customize the scanning criteria according to your preferences. You can choose to scan for duplicates based on file names, file sizes, file types, or a combination of these factors. Adjusting the scanning parameters can help you narrow down the search and increase the accuracy of the results.
In the next step, we will discuss how to select the external hard drive as the scanning location using the duplicate file finder software. By using a specialized tool, you can simplify the process of finding and deleting duplicate files, saving you time and effort in the long run.
Step 3: Select the external hard drive as the scanning location
Once you have opened the duplicate file finder software on your computer, it’s time to select your external hard drive as the scanning location. This step ensures that the software focuses its search specifically on your external hard drive to identify and list all the duplicate files present.
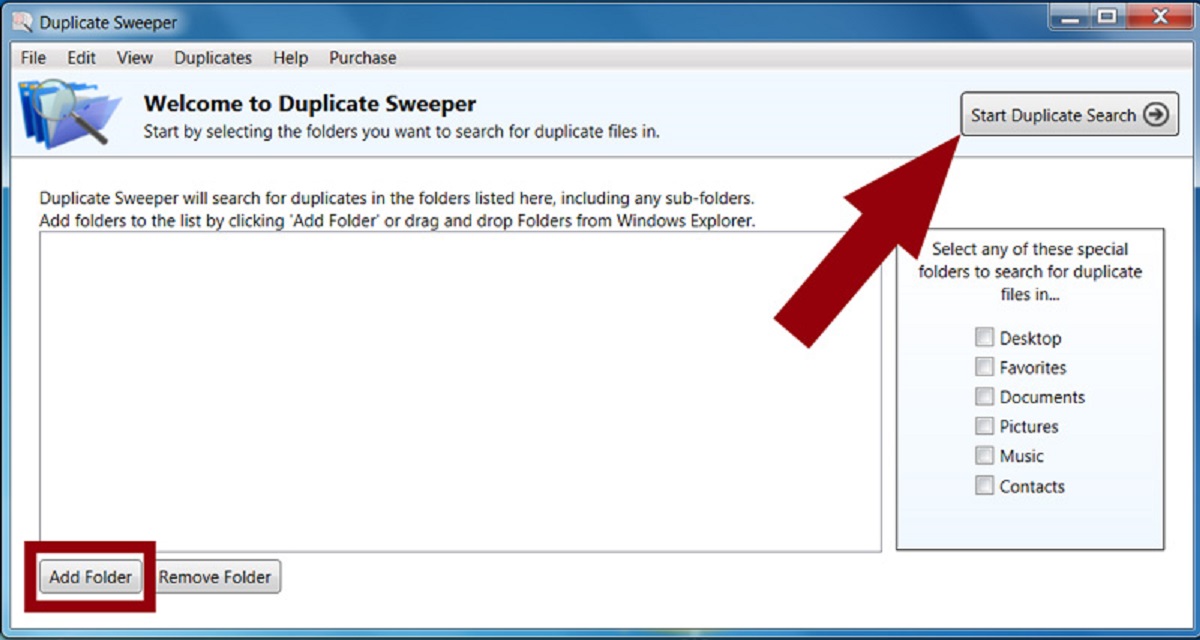
In most duplicate file finder software, you will find a “Scan” or “Add Folder” button that allows you to specify the location you want to scan. Click on this button and navigate to the external hard drive in your file explorer. Select the drive and click “OK” or “Scan” to begin the scanning process.
Depending on the size of your external hard drive and the number of files it contains, the scanning process may take a few minutes or longer to complete. The software will analyze the contents of your drive, comparing file names, sizes, and other attributes to identify duplicate files. The progress of the scan will be displayed on the screen, keeping you informed of the software’s progress.
It is important to ensure that only the external hard drive is selected for scanning. This prevents the duplicate file finder software from scanning unnecessary folders or drives, which would result in a longer and potentially confusing list of duplicate files.
During the scanning process, the software will create a comprehensive list of all the duplicate files found on your external hard drive. This list will include information such as file names, file sizes, and file locations. Some software may also provide a preview function that allows you to see the content of the duplicate files before deleting them.
Take your time and review the scan results carefully. Make sure to double-check that the scanning was limited to your external hard drive and that no important files were accidentally selected. Once you are satisfied with the scan results, you can proceed to the next step: selecting and deleting the duplicate files from your external hard drive.
Step 4: Choose the scan method
After the scanning process is complete and you have a list of duplicate files on your external hard drive, the next step is to choose the scan method that the duplicate file finder software will use to determine which files to delete.
Most duplicate file finder software offers different scan methods or algorithms that can be used to compare files and identify duplicates. The two common scan methods are “Content-based” and “File-name based”.
The “Content-based” scan method compares the actual content of the files to determine if they are duplicates. This method analyzes the file’s data and identifies duplicates based on similarities in the file’s content. It is a more thorough and accurate method but can take longer to complete, especially if you have large files or a significant number of files on your external hard drive.
On the other hand, the “File-name based” scan method compares the file names to identify duplicates. This method looks for identical or similar file names and assumes that files with matching names are duplicates. Although this method is faster, it may not be as precise as the content-based method, as files with different names but identical content can be missed.
When choosing the scan method, consider the size and type of files on your external hard drive. If you have many multimedia files, such as photos or videos, that have different file names but similar content, the content-based scan method may be more suitable. However, if you have a collection of documents or files with similar names, the file-name based method may be sufficient.
Additionally, some duplicate file finder software allows you to customize the scan method by specifying certain criteria, such as file size, date created, or file type. This can help you fine-tune the scan process and provide more accurate results based on your specific requirements.
Once you have selected the scan method, you can proceed to the next step, which involves reviewing and selecting the duplicate files that you want to delete from your external hard drive. Choosing the right scan method ensures that you have control over the deletion process and can effectively remove unnecessary duplicate files while preserving your important data.
Step 5: Review and select duplicate files
After the scanning process is complete and you have a list of duplicate files on your external hard drive, it’s time to review the results and select which duplicate files you want to delete. This step allows you to exercise control over the deletion process and ensure that you are not accidentally removing any important or unique files.
Open the duplicate file finder software and navigate to the list of duplicate files. Take the time to carefully review each entry and consider the file name, location, size, and any other relevant information provided by the software. It’s essential to take a cautious approach and double-check the results before proceeding with the deletion process.
Some duplicate file finder software may provide additional features that can help you make informed decisions. For example, you may be able to preview the content of the duplicate files to determine their relevance or assess their importance. This can be particularly helpful when dealing with files that have similar names but different content.
As you review the list, identify the duplicate files that you no longer need or want to remove from your external hard drive. Pay attention to files that are identical or have minor variations, as these are often safe to delete. However, exercise caution when it comes to files that have similar names or slight differences, as they may be different versions of the same file or have unique content.
During the review process, prioritize files that are taking up significant storage space or are causing clutter on your external hard drive. Consider the purpose or relevance of each duplicate file and whether keeping multiple copies is necessary. By critically evaluating each duplicate file, you can streamline your external hard drive and optimize its storage capacity.
Once you have identified the duplicate files you want to delete, use the selection feature provided by the software to mark them. This may involve checking checkboxes next to each file or using shortcuts provided by the software for different selection options, such as selecting all duplicates from a particular folder or with a specific file size.
After you have made your selections, carefully review your choices to ensure you have not inadvertently selected any important files. Most duplicate file finder software will display a summary of the files selected for deletion before proceeding. Take a final moment to confirm your selections before proceeding to the next step: deleting the duplicate files from your external hard drive.
Step 6: Delete duplicate files from the external hard drive
Now that you have reviewed and selected the duplicate files you want to delete from your external hard drive, it’s time to proceed with their removal. Before proceeding, ensure that you have confirmed your selections and have a backup of any important files that may be affected by the deletion.
Within the duplicate file finder software, there will be an option or button specifically for deleting the selected duplicate files. The exact wording may vary depending on the software, but it is typically labeled as “Delete,” “Remove,” or “Delete Selected.” Locate this option and click on it to initiate the deletion process.
Depending on the software you are using, you may have the option to choose how the duplicate files are deleted. Some software may move the selected files to the recycling bin, allowing you to restore them if needed. Others may permanently delete the files, bypassing the recycling bin. Choose the deletion method that aligns with your preferences and needs.
Once you have initiated the deletion process, the software will begin removing the selected duplicate files from your external hard drive. This process may take some time, depending on the number and size of the files being deleted. The software will typically display a progress bar or indicator to keep you informed of its progress.
While the deletion process is ongoing, it’s important to refrain from unplugging or disconnecting your external hard drive to avoid data loss or corruption. Allow the software to complete the deletion process before disconnecting your external hard drive.
After the duplicate files have been successfully deleted, take a moment to verify that they are no longer present on your external hard drive. You can do this by navigating to the location where the files were previously stored and confirming their absence. This step provides peace of mind that the duplicate files have been effectively removed.
Congratulations! You have successfully deleted duplicate files from your external hard drive. By removing unnecessary duplicates, you have freed up valuable storage space and improved the organization of your files. Moving forward, remember to periodically check for and delete any new duplicate files that may appear on your external hard drive to maintain its optimal performance.
Step 7: Empty your recycle bin to permanently delete duplicates
After deleting the duplicate files from your external hard drive, it’s important to empty your recycle bin to permanently remove them from your computer. The recycle bin is a temporary storage location for deleted files, allowing you the chance to restore them if necessary. However, to clear up disk space and ensure that the duplicates are completely removed, you need to empty the recycle bin.
To empty the recycle bin, locate its icon on your desktop or in the file explorer and right-click on it. In the context menu that appears, select the option to “Empty Recycle Bin” or a similar phrase. Alternatively, you can open the recycle bin and click on the “Empty Recycle Bin” button located in the top toolbar.
A confirmation dialog box may appear, asking if you are sure you want to permanently delete all the items in the recycle bin. Double-check that you have reviewed the duplicate files and that no important files have been accidentally selected. If you are certain, click “Yes” or “OK” to proceed with emptying the recycle bin.
The emptying process may take a few moments, depending on the number and size of the files in the recycle bin. Once the process is complete, the duplicate files you selected for deletion will be permanently removed from your computer, including any trace of them in the recycle bin. This step ensures that the duplicates are gone for good and that they no longer take up any storage space on your external hard drive.
It’s important to note that once the recycle bin is emptied, the deleted files cannot be retrieved unless you have a backup copy. Therefore, it is crucial to review the contents of the recycle bin and ensure that no important files have accidentally been deleted before emptying it.
By emptying the recycle bin, you have completed the process of permanently deleting duplicate files from your external hard drive. Congratulations! You have successfully cleaned up your external hard drive, optimized its storage capacity, and improved your file organization. Moving forward, continue to be mindful of duplicate files and regularly remove them to maintain an efficient and clutter-free external hard drive.
Conclusion
Deleting duplicate files from your external hard drive is an important maintenance task that helps optimize storage space and improve file organization. By following the steps outlined in this guide, you can effectively identify and delete duplicate files, freeing up valuable disk space and enhancing the performance of your external hard drive.
In the process, it is crucial to back up your files before starting, ensuring that you have a safe copy of all your important data. Using a specialized duplicate file finder software simplifies the scanning and identification process, making it easier to locate and select duplicate files for deletion. Careful review and selection of duplicate files averts the accidental deletion of important files, allowing you to maintain control over the process.
Once you have chosen the appropriate scan method and reviewed the results, proceed with deleting the duplicate files from your external hard drive. Finally, remember to empty your recycle bin to permanently remove the duplicates from your computer and free up additional storage space.
Regularly deleting duplicate files from your external hard drive is a good practice to adopt for better file management and improved system performance. By doing so, you can enjoy a more organized and efficient external hard drive, with ample space for your important files and a clutter-free environment.
Take the time to schedule regular checks for duplicate files and perform clean-ups as necessary. This proactive approach will help prevent the accumulation of unnecessary duplicates and ensure that your external hard drive remains optimized and functioning smoothly.
In conclusion, by following the steps outlined in this guide, you can effectively delete duplicate files from your external hard drive and create a more streamlined and organized storage system. Embrace the process and enjoy the benefits of a clutter-free and efficient external hard drive.