Introduction
Welcome to our guide on how to free up space in your hard disk drive. As our dependency on digital data continues to grow, it’s not uncommon to find ourselves running out of storage space on our computers. When this happens, it can slow down our system and make it difficult to store new files or run necessary applications.
Fortunately, there are several methods you can use to reclaim valuable disk space and optimize the performance of your hard drive. In this article, we’ll walk you through various techniques that will help you free up space and ensure that your computer runs smoothly.
From utilizing built-in tools to removing unnecessary files and folders, we’ll cover a range of strategies that are easy to implement, even for those with limited technical knowledge. Whether you’re using a Windows PC, Mac, or Linux system, these tips are applicable across platforms.
By following the steps outlined in this guide, you’ll be able to regain precious disk space, improve system performance, and prevent potential issues caused by full storage. So, without further ado, let’s dive into the various methods for freeing up space in your hard disk drive.
Use Disk Cleanup
Disk Cleanup is a built-in utility in Windows operating systems that helps you remove unnecessary files and free up space on your hard disk drive. It scans your computer for temporary files, system files, and other items that can be safely deleted, such as downloaded program files, recycle bin contents, and Windows error reporting files.
To access Disk Cleanup, simply follow these steps:
- Click on the “Start” button and type “Disk Cleanup” in the search bar.
- Select “Disk Cleanup” from the search results.
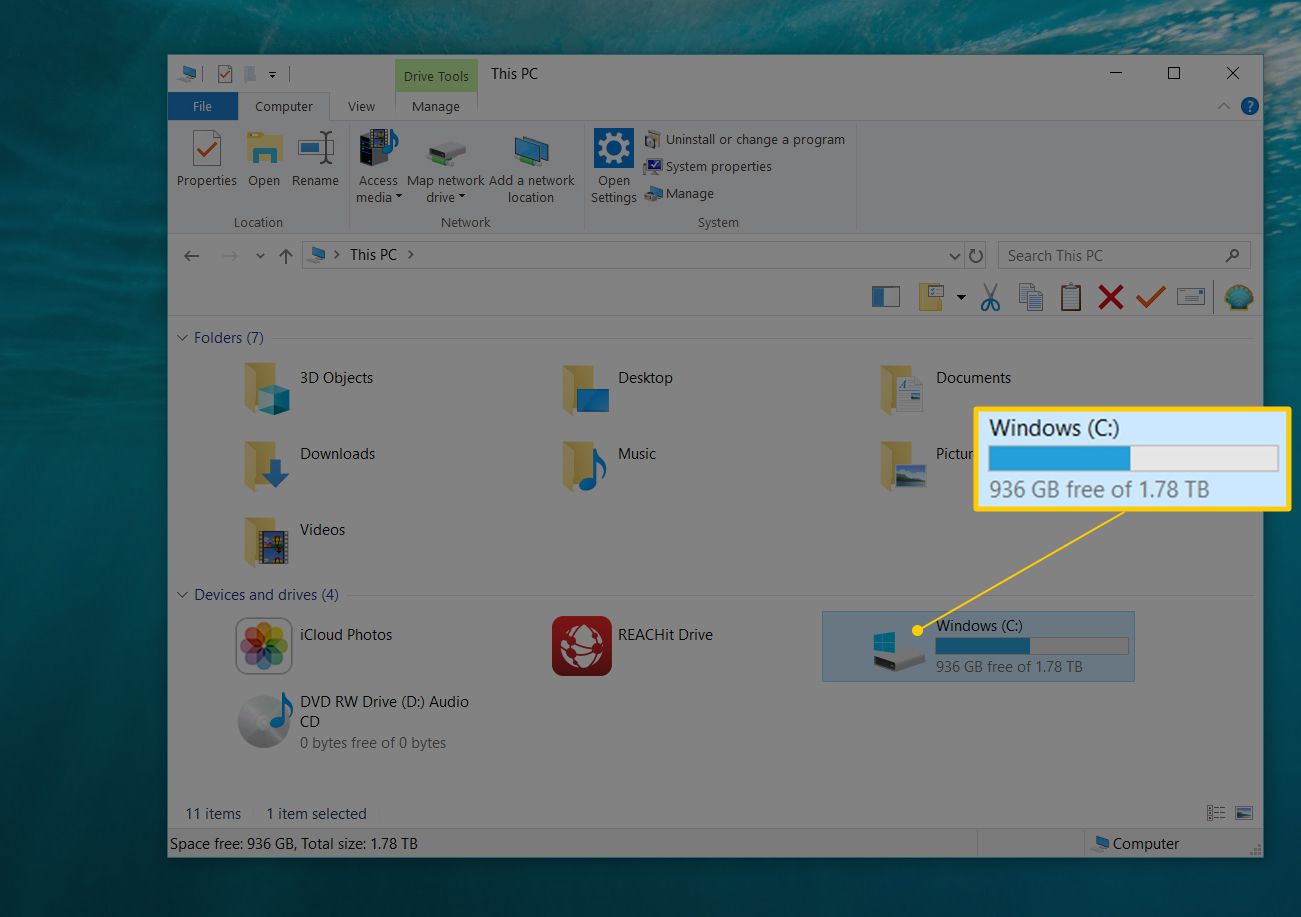
- Once the Disk Cleanup window opens, it will prompt you to select the disk you want to clean up. Choose the drive that you want to free up space on and click “OK”.
- The utility will then calculate how much space can be freed up on the selected drive.
- Check the boxes next to the file categories you want to delete. You can review the description of each category to understand what types of files will be removed.
- Click on the “OK” button to start the cleanup process.
- Once the cleanup is complete, you will see a summary of the amount of disk space that has been freed up.
It is important to note that Disk Cleanup may not remove all unnecessary files on your system. For a more thorough cleanup, you can click on the “Clean up system files” button in the Disk Cleanup window. This will scan for additional system files, such as old Windows installations and system restore points, that can be safely removed.
Regularly using Disk Cleanup can help you maintain a clutter-free hard disk drive and improve the overall performance of your computer. Make it a habit to run Disk Cleanup periodically and regain valuable disk space.
Delete Unwanted Programs and Apps
Over time, we tend to accumulate a lot of programs and apps on our computers that we no longer use or need. These unused programs and apps take up valuable space on our hard disk drive, slowing down our system and contributing to clutter. It’s important to regularly review and remove any unwanted software to free up space and optimize system performance.
To delete unwanted programs and apps, follow these steps:
- Open the “Control Panel” on your Windows computer.
- Click on the “Programs” or “Programs and Features” option.
- A list of installed programs and apps will appear. Scroll through the list and identify the ones you want to remove.
- Select the program or app you want to delete and click on the “Uninstall” or “Remove” button.
- Follow the on-screen prompts to complete the uninstallation process. Some programs may require you to confirm your action or provide additional information before they can be removed.
- Repeat the process for all the unwanted programs and apps you want to delete.
For Mac users, deleting unwanted programs and apps is a straightforward process:
- Open the “Applications” folder on your Mac.
- Locate the program or app you want to remove.
- Drag the program or app to the Trash bin located at the end of the Dock.
- Right-click on the Trash bin and select “Empty Trash” to permanently delete the program or app.
By regularly removing unwanted programs and apps, you’ll not only free up storage space on your hard disk drive but also reduce system clutter and improve overall performance. Make it a habit to review your installed programs and apps and uninstall those that are no longer needed.
Clear Temporary and Junk Files
Temporary files and junk files are created by various applications and processes on your computer. They can accumulate over time and take up a significant amount of space on your hard disk drive. Clearing these files regularly will not only free up storage space but also improve the performance of your system.
Here are a few ways to clear temporary and junk files:
1. Using the Disk Cleanup utility:
As mentioned earlier, Windows has a built-in Disk Cleanup utility that can help you remove temporary files and other unnecessary items. To access and use Disk Cleanup, follow the steps mentioned in the “Use Disk Cleanup” section of this guide.
2. Deleting browser cache:
Browsers store temporary files and cache to improve the loading speed of websites. However, this cache can accumulate and take up a significant amount of space over time. To clear the cache in various browsers:
- Google Chrome: Click on the three-dot menu in the top-right corner, go to “More tools” > “Clear browsing data”, select the time range, and check the box for “Cached images and files”. Click “Clear data” to remove the cache.
- Mozilla Firefox: Click on the three-line menu in the top-right corner, go to “Options” > “Privacy & Security” > “Cookies and Site Data” > “Clear Data”. Check the box for “Cached Web Content” and click “Clear”.
- Microsoft Edge: Click on the three-dot menu in the top-right corner, go to “Settings” > “Privacy, search, and services” > “Clear browsing data”. Select the time range, check the box for “Cached images and files”, and click “Clear”.
3. Using third-party cleanup tools:
There are various third-party software available that can help you clean up temporary files, junk files, and other unnecessary data. Some popular options include CCleaner, Wise Disk Cleaner, and BleachBit. These tools often provide additional features and customization options for a more thorough cleanup.
Regularly clearing temporary and junk files will not only free up storage space but also improve the overall performance of your computer. Make it a habit to perform these cleanup tasks periodically to keep your hard disk drive clean and optimized.
Remove Duplicate Files
Duplicate files can accumulate on our hard disk drive over time, taking up unnecessary storage space. These duplicates can come from various sources, such as file backups, file downloads, and file sharing. Removing duplicate files not only helps free up disk space but also improves file organization and makes it easier to find specific files.
Here are a few methods to remove duplicate files:
1. Manual deletion:
If you have a small number of duplicate files, you can manually search for and delete them. Start by organizing your files by type or category. Then, search for files with the same name or similar content. Select the duplicates and delete them. Be careful not to delete any important files by mistake.
2. Duplicate file finder tools:
There are many duplicate file finder tools available that can help you identify and remove duplicate files efficiently. These tools scan your hard disk drive or specific folders and compare file names, sizes, and content to find duplicates. They then provide you with options to review the duplicates and select which ones to delete. Some popular duplicate file finder tools include Duplicate Cleaner, Easy Duplicate Finder, and Auslogics Duplicate File Finder.
3. File comparison software:
File comparison software allows you to compare the content of files to identify duplicates. These tools analyze the file content byte by byte to determine if two files are exact duplicates or have significant similarities. Some file comparison software options include Beyond Compare, WinMerge, and ExamDiff.
4. Cloud storage solutions:
If you use cloud storage solutions like Google Drive or Dropbox, they often have built-in features to identify and remove duplicate files. These features use algorithms to detect duplicates based on file names, sizes, and content. You can select and delete duplicates directly from the cloud storage interface.
Removing duplicate files is essential for optimizing your hard disk drive’s storage space and improving file organization. It’s recommended to perform regular checks for duplicates, especially if you frequently download or duplicate files on your computer. By eliminating duplicate files, you can ensure that you have more available space for important files and improve the overall efficiency of your system.
Organize and Delete Old Files and Folders
Over time, our hard disk drives can become cluttered with old and unnecessary files and folders. These files may include outdated documents, unused applications, and forgotten downloads. Organizing and deleting these old files and folders can help free up valuable storage space and improve the overall organization of your computer.
Here are some steps to effectively organize and delete old files and folders:
1. Evaluate and categorize:
Start by evaluating the files and folders on your computer. Categorize them based on their type or purpose, such as documents, photos, videos, or applications. This step will help you identify which files and folders are no longer needed.
2. Delete unwanted files:
Go through each category and delete any files that are no longer necessary. This can include old documents, duplicate files, or files that you no longer use or need. Be cautious when deleting files and ensure that you have backups or copies if needed.
3. Remove unused applications:
Review the list of installed applications on your computer and uninstall any that you no longer use. Unused applications take up valuable storage space and can also slow down your system. Use the “Programs and Features” option in the Control Panel (Windows) or the Applications folder (Mac) to easily uninstall these applications.
4. Archive old files:
If you have files that are important but not frequently accessed, consider archiving them. Archive files can be stored on external hard drives, cloud storage, or even physical storage. This step helps declutter your hard disk drive while keeping important files accessible if needed in the future.
5. Create a folder structure:
To maintain an organized system, create a folder structure that makes sense for your files and folders. Use descriptive names for folders and subfolders to easily locate specific files. Group files based on their categories or projects, making it easier to find and manage them in the future.
6. Regular maintenance:
Perform regular maintenance by periodically reviewing and deleting old files and folders. Set a schedule to declutter your computer, whether it’s monthly, quarterly, or annually. This habit will help prevent the accumulation of unnecessary files over time.
Organizing and deleting old files and folders not only frees up valuable storage space but also improves the overall efficiency and organization of your computer. By decluttering your hard disk drive, you can easily find and access important files, and ensure that your system performs optimally.
Disable Hibernation
Hibernation is a power-saving feature in operating systems that allows your computer to save its current state to the hard disk drive and power off. When you power on your computer again, it resumes from where it left off. While hibernation can be useful, it also takes up a significant amount of space on your hard disk drive. Disabling hibernation can free up this space and potentially improve the performance of your system.
Here’s how to disable hibernation:
1. Windows:
- Open the Command Prompt as an administrator. You can do this by typing “cmd” in the search bar, right-clicking on “Command Prompt,” and selecting “Run as administrator”.
- In the Command Prompt window, type the following command and press Enter:
- Once the command is executed, hibernation will be disabled, and the space previously occupied by the hibernation file (hiberfil.sys) will be reclaimed.
powercfg.exe /hibernate off2. Mac:
- Click on the Apple menu, and select “System Preferences”.
- Click on “Energy Saver”.
- In the Energy Saver window, uncheck the box next to “Put hard disks to sleep when possible”.
- Close the Energy Saver window to save the changes.
By disabling hibernation, you can free up additional storage space on your hard disk drive. However, it’s important to note that if you disable hibernation, you won’t be able to use the feature to save your computer’s state and resume from where you left off. You will, instead, need to shut down and restart your computer each time.
Keep in mind that disabling hibernation is an optional step and may not be necessary for everyone. If you require the convenience of the hibernation feature and have enough available disk space, it’s perfectly fine to leave it enabled.
Overall, disabling hibernation can help reclaim storage space on your hard disk drive, leading to better system performance and more available space for your files and applications.
Move Files to Cloud Storage
Cloud storage is a convenient and efficient way to store and access your files. By moving some of your files to cloud storage, you can free up space on your hard disk drive and reduce the strain on your computer’s storage capacity. Additionally, cloud storage offers the advantage of being accessible from any device with an internet connection.
Here’s how you can move files to cloud storage:
1. Choose a cloud storage provider:
There are several cloud storage providers to choose from, such as Google Drive, Dropbox, Microsoft OneDrive, and iCloud. Evaluate the features and storage capacity offered by each provider, and select the one that best suits your needs.
2. Sign up for an account:
Create an account on the chosen cloud storage platform. You may need to provide some personal information and choose a username and password.
3. Install the desktop client:
Most cloud storage providers offer desktop client applications that allow you to synchronize files between your computer and the cloud storage. Install the client application on your computer and sign in to your account.
4. Choose files to upload:
Select the files and folders on your hard disk drive that you want to move to the cloud storage. You can typically do this by dragging and dropping the files into the designated folder on your computer that syncs with the cloud storage.
5. Allow the files to sync:
Once the files are uploaded to the cloud storage, the client application will sync them with the cloud servers. This process may take some time, depending on the size and quantity of the files. The files will be accessible from any device connected to your cloud storage account.
6. Delete local files:
After verifying that the files have been successfully uploaded and synced to the cloud storage, you can choose to delete the local copies from your hard disk drive to free up space. However, it’s essential to back up important files before deleting them.
By moving files to cloud storage, you can keep your hard disk drive decluttered and free up valuable space. Additionally, cloud storage offers the advantage of data redundancy and accessibility from anywhere, making it an excellent option for backing up and accessing your files.
Compress Files and Folders
Compressing files and folders is an effective way to reduce their size and save disk space on your hard disk drive. By compressing files, you can consolidate multiple files and folders into a single compressed file, also known as an archive. This not only frees up storage space but also makes it easier to transfer and share files.
Here are some methods to compress files and folders:
1. Zip compression:
Zip compression is a popular method for compressing files and folders. Most operating systems have built-in support for creating and extracting ZIP files. To compress files and folders into a ZIP archive:
- Select the files and folders you want to compress.
- Right-click on the selected items and choose “Send To” > “Compressed (zipped) folder”.
- A new ZIP file will be created with the compressed contents of the selected files and folders.
2. Third-party compression tools:
There are various third-party compression tools available that offer additional compression methods and options. Some popular options include WinRAR, 7-Zip, and WinZip. These tools provide a range of features, such as high compression ratios, encryption, and support for multiple archive formats.
3. Compression formats:
In addition to ZIP, there are other compression formats you can choose depending on your requirements. For example:
- RAR: The RAR format typically offers higher compression ratios than ZIP, making it suitable for compressing large files or collections of files.
- TAR: The TAR format is commonly used in Unix-based systems and serves as a way to consolidate multiple files into a single archive without compression.
- GZ and BZ2: These formats use the GZIP and BZIP2 algorithms, respectively, to achieve higher compression ratios compared to ZIP.
Compressing files and folders can help you save valuable storage space on your hard disk drive, especially for large files or when transferring multiple files. It’s important to note that compressed files need to be extracted before they can be accessed, so keep that in mind when deciding which files to compress.
In summary, compression is an effective method to reduce the size of files and folders, providing more available storage space while facilitating file transfers and sharing.
Uninstall Unnecessary Language Files
When you install an operating system or software, it often comes bundled with language files for different languages. These language files occupy valuable disk space, especially if you only use one or a few languages. Uninstalling unnecessary language files can free up space on your hard disk drive and optimize the storage capacity of your computer.
Here’s how you can uninstall unnecessary language files:
1. Windows:
- Open the Control Panel on your Windows computer.
- Click on “Clock and Region” (or “Region and Language” in some versions).
- Go to the “Keyboards and Languages” or “Language” tab.
- Click on “Change keyboards” or “Change input methods”.
- In the “Text Services and Input Languages” window, click on the “Language Bar” tab.
- Under “Installed services”, click on the languages you want to remove and click on the “Remove” button.
- Follow the prompts to uninstall the selected language files.
2. Mac:
- Open the “System Preferences” on your Mac.
- Click on “Language & Region”.
- In the “Preferred languages” section, select the language files you want to remove.
- Click on the “-” button below the list of languages to remove them.
- Confirm the removal when prompted.
Removing unnecessary language files can free up a significant amount of storage space, especially if you have multiple languages installed. However, it’s important to note that removing the language files of a language you may need in the future can affect the functionality of certain applications or system settings. Therefore, make sure to keep the languages you frequently use or anticipate needing.
Regularly uninstalling unnecessary language files can help optimize the storage capacity of your hard disk drive and improve overall system performance. It’s a simple and effective way to free up space and declutter your computer.
Conclusion
Freeing up space on your hard disk drive is crucial for maintaining optimal system performance and ensuring you have enough storage capacity for your files and applications. By implementing the techniques outlined in this guide, you can reclaim valuable disk space, improve the organization of your files, and enhance the overall efficiency of your computer.
From using built-in tools like Disk Cleanup and uninstalling unnecessary programs and apps to clearing temporary and junk files, removing duplicates, and organizing files and folders, each method plays a significant role in freeing up space on your hard disk drive.
Additionally, disabling hibernation, moving files to cloud storage, compressing files and folders, and uninstalling unnecessary language files are effective strategies that can further optimize your storage space and streamline your system’s performance.
It’s important to note that these techniques can be applied across various operating systems, including Windows and Mac. Adjustments may be needed based on the specific settings and options available on your system.
Regularly performing these strategies and maintaining good storage management habits will ensure that you have sufficient space for your files, prevent performance issues caused by a full hard disk drive, and enhance the overall user experience. It’s recommended to schedule regular maintenance and cleanup sessions to keep your system running smoothly.
By implementing these techniques, you’ll have a cleaner, more organized, and efficient hard disk drive, providing you with the space you need for important files and applications, and ultimately improving your overall computing experience.