Introduction
Welcome to the guide on how to delete apps on your Samsung tablet! Over time, we tend to accumulate a multitude of apps on our devices. Some apps we use regularly, while others remain untouched and take up valuable storage space. Deleting unused or unwanted apps not only frees up storage but also helps declutter your tablet and improve its overall performance.
Samsung tablets run on the Android operating system and offer various methods to remove apps. In this article, we will walk you through the step-by-step process so that you can easily delete any app that you no longer need. Additionally, we will also discuss how to deal with pre-installed apps, commonly known as bloatware, and offer an alternative method to disable apps instead of completely removing them.
Whether you want to remove an app that you rarely use, clear up space for new apps, or simply streamline your tablet’s interface, this guide has got you covered. So, grab your Samsung tablet and let’s dive into the easy and efficient methods to delete apps.
Step 1: Open the Apps Menu
The first step towards deleting apps on your Samsung tablet is to open the Apps menu. This menu houses all the apps installed on your device, making it easy to locate and manage them. To open the Apps menu, follow the steps below:
- On your Samsung tablet, locate the “Apps” icon on the home screen or navigation bar. It is usually represented by a grid of small squares.
- Tap on the “Apps” icon to access the Apps menu.
- You will now see a list of all the apps installed on your tablet, arranged alphabetically or in a customized order.
By opening the Apps menu, you gain access to all the apps installed on your Samsung tablet, including both pre-installed apps and those you have downloaded and installed yourself. Once you have reached this step, you are ready to move on to the next step and select the app you wish to delete.
Step 2: Select the App You Want to Delete
Once you have opened the Apps menu on your Samsung tablet, it’s time to select the app you want to delete. This step allows you to find the specific app in the list and prepare it for deletion. Follow the steps below to select the app you wish to remove:
- Scroll through the list of apps in the Apps menu to find the one you want to delete. You can also use the search bar at the top of the screen to quickly find the app by typing its name.
- Tap on the app to select it.
- A new screen will open, displaying information about the app, such as its name, size, and version number. You may also see additional options and settings related to the app.
By selecting the app, you are indicating your intention to delete it from your Samsung tablet. Make sure you have chosen the correct app before proceeding to the next step. If you have accidentally selected the wrong app, simply tap outside the app window to deselect it and repeat the process to select the correct app you wish to delete.
Step 3: Tap on the Uninstall Button
Once you have selected the app you want to delete from your Samsung tablet, the next step is to locate and tap on the Uninstall button. This button initiates the uninstallation process and removes the app from your device. Follow the steps below to proceed:
- On the app information screen, look for the Uninstall button. It is usually located towards the top or bottom of the screen, depending on your device’s settings and Android version.
- Tap on the Uninstall button. You may be prompted with a confirmation message or warning about the consequences of deleting the app and any associated data. Read the message carefully to ensure you are okay with deleting the app and its related files.
- If you are sure you want to proceed, confirm by tapping on the OK or Uninstall button in the confirmation prompt.
Once you have tapped on the Uninstall button and confirmed the deletion, your Samsung tablet will proceed to uninstall the app. The time it takes to uninstall the app may vary depending on the size of the app and your device’s performance. You may see a progress bar or loading indicator during the uninstallation process.
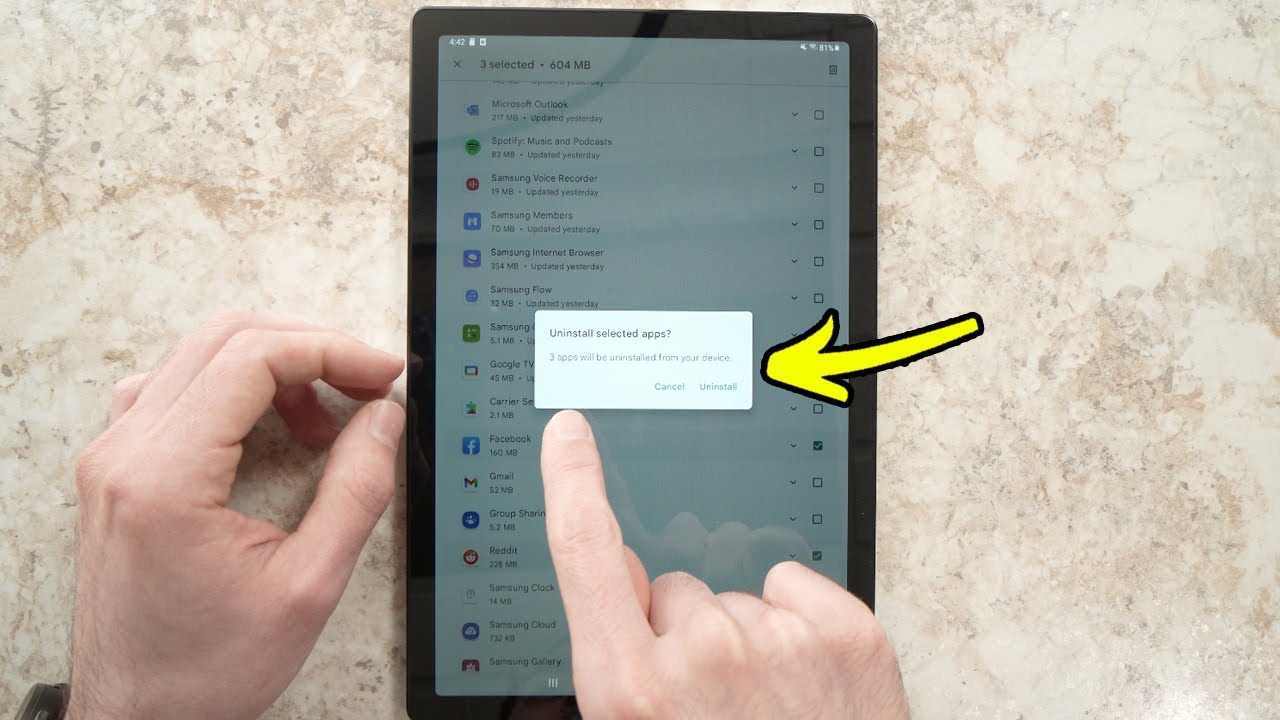
Step 4: Confirm the Deletion
After tapping on the Uninstall button, it is important to take a moment to confirm the deletion of the app from your Samsung tablet. This step ensures that you are aware of the consequences and have made a deliberate decision to remove the app. Follow the steps below to confirm the deletion:
- Once you have tapped on the Uninstall button, a confirmation dialog box will appear on the screen.
- Carefully read the information provided in the dialog box. It may include details about the app, such as its name, size, and the amount of storage space it occupies.
- Double-check that you have selected the correct app for deletion. If you are unsure, you can tap on the Cancel button to exit the confirmation dialog and review your selection.
- If you are certain that you want to delete the app, tap on the confirmation button. It is usually labeled as “OK,” “Uninstall,” or a similar term. This action will initiate the deletion process.
By confirming the deletion, you acknowledge that the app and any associated data will be permanently removed from your Samsung tablet. Once the confirmation is submitted, the uninstallation process will proceed, and you may see a progress bar or loading indicator indicating the removal of the app.
Step 5: Delete Pre-installed Apps (Bloatware)
In addition to the apps you have personally downloaded and installed, Samsung tablets often come with pre-installed apps, commonly referred to as bloatware. These apps are installed by the manufacturer and may not be necessary or useful to all users. If you want to free up even more space by removing these apps, follow the steps below:
- Open the Apps menu on your Samsung tablet by following the steps mentioned in Step 1.
- Scroll through the list of apps and look for the pre-installed app you want to delete. They are usually marked with the label “Pre-installed” or “System app”.
- Tap and hold the app icon until a menu appears.
- Select the option that says “Uninstall” or “Delete”.
- Review the confirmation prompt to ensure you are deleting the correct app, then tap on the confirmation button to proceed with the deletion.
It’s important to note that not all pre-installed apps can be deleted. Some system apps are vital for the proper functioning of your Samsung tablet, and the option to delete them may be disabled. However, you can still disable these apps to prevent them from running in the background and occupying resources. To disable a pre-installed app, follow the steps below:
- Open the Apps menu on your Samsung tablet.
- Find the pre-installed app you want to disable.
- Tap and hold the app icon until a menu appears.
- Select the option that says “Disable” or “Turn off”.
- Confirm the action in the following prompt.
By deleting or disabling pre-installed apps, you can further optimize your Samsung tablet’s performance and free up valuable storage space for apps and files that you actually use and need.
Step 6: Disable Apps Instead of Deleting Them
Sometimes you may come across apps on your Samsung tablet that you don’t want to completely delete but would prefer to keep them from running in the background. In such cases, you have the option to disable the app instead of deleting it. Disabling an app effectively turns it off and prevents it from using system resources. Follow the steps below to disable apps on your Samsung tablet:
- Open the Apps menu on your Samsung tablet.
- Find the app you want to disable.
- Tap and hold the app icon until a menu appears.
- Select the option that says “Disable” or “Turn off”.
- Confirm the action in the following prompt.
Once disabled, the app will no longer appear in your app drawer or home screen, and it will not be able to run in the background. By disabling apps instead of deleting them, you retain the option to re-enable them later if needed.
Disabling apps can be particularly useful for system apps or apps that came pre-installed on your Samsung tablet but are not necessary for your day-to-day use. It allows you to declutter your tablet without permanently removing the app.
It’s important to note that not all apps can be disabled. Some system apps are essential for the proper functioning of your Samsung tablet and cannot be disabled. However, you can still take advantage of other methods to manage and optimize your tablet’s performance, such as clearing cached data or limiting background processes.
Conclusion
Congratulations! You have successfully learned how to delete apps on your Samsung tablet. By removing unused or unwanted apps, you can free up valuable storage space, declutter your tablet, and optimize its performance. We have walked you through the step-by-step process, from opening the Apps menu to selecting and deleting the desired app. We have also discussed how to deal with pre-installed apps, providing options to either delete or disable them.
Deleting apps that you no longer need or use is a simple and effective way to keep your Samsung tablet organized and running smoothly. It not only frees up storage space but also improves battery life and speeds up app navigation. Additionally, knowing how to delete pre-installed apps (bloatware) or disable apps that you don’t want running in the background gives you greater control over your device’s performance.
Remember to take a moment to confirm the deletion before proceeding, ensuring that you are removing the correct app. It’s also a good practice to periodically review the apps installed on your tablet and remove any that are no longer necessary or serving a purpose. This way, you can keep your device optimized and make room for new apps that you’ll use and enjoy.
Now that you have mastered the art of deleting apps on your Samsung tablet, you can enjoy a more streamlined and personalized experience. So go ahead, clear out the unnecessary apps, and make the most of your Samsung tablet!