Introduction
Google Calendar is a powerful tool that helps us manage our schedules, appointments, and events with ease. One of the key features of Google Calendar is the ability to send and receive event invitations. However, there may be instances when you need to decline a proposed time for an event due to conflicting commitments or personal reasons.
In this article, we will guide you through the process of declining a proposed time in Google Calendar. Whether it’s a meeting, appointment, or social event, this step-by-step guide will ensure you navigate through the process smoothly and professionally.
Declining a proposed time in Google Calendar is a polite way of communicating your unavailability to the event organizer. It allows for better planning and rescheduling if necessary. By following these instructions, you can effectively decline event invitations without any confusion or misunderstandings.
So, if you find yourself needing to decline a proposed time in Google Calendar, continue reading to learn the simple steps to politely decline and communicate your unavailability.
Step 1: Open Google Calendar
The first step to declining a proposed time in Google Calendar is to open the Google Calendar application on your computer or mobile device. You can access Google Calendar through your web browser or by downloading the Google Calendar app from the respective app store.
If you are using a web browser, simply navigate to the Google Calendar website and sign in to your Google account. Once you are logged in, you will be directed to the main calendar interface where you can view your upcoming events and invitations.
For mobile users, open the Google Calendar app on your device. If you haven’t already, sign in to your Google account or create one if you don’t have an account. Once you are logged in, you will be taken to the main calendar screen where you can access your events and invitations.
By opening Google Calendar, you have now taken the first step towards declining a proposed time. Next, navigate to the event invitation that you wish to decline.
Step 2: Find the Event Invitation
After opening Google Calendar, the next step is to find the specific event invitation that you wish to decline. Event invitations are typically displayed as notifications on your calendar, marked with a distinct icon or color to differentiate them from your personal events.
In the web browser version, you can find event invitations by looking at the left sidebar. Scroll down until you see the “Invitations” section. Click on it to expand the section and view all your pending event invitations. You can also use the search bar at the top to search for a specific event or organizer.
If you are using the Google Calendar app on a mobile device, navigate to the main calendar screen. Look for the “Invitations” or “Notifications” tab at the bottom of the screen and tap on it. This will take you to a list of all your pending event invitations.
Once you have located the event invitation, click on it or tap on it to view the details of the event. This will allow you to review the proposed time and any additional information provided by the event organizer.
Now that you have found the event invitation, you are ready to proceed to the next step, which is declining the event.
Step 3: Decline the Event
Once you have opened the event invitation, it is time to decline the proposed time. Declining the event allows the organizer to be aware of your unavailability and make alternative arrangements if needed. Follow these simple steps to decline the event:
- In the event details, look for the option to respond or RSVP. This is usually displayed as buttons or links, such as “Yes,” “No,” or “Maybe.”
- Click on the “No” or “Decline” button to indicate that you are unable to attend the event at the proposed time.
- A confirmation prompt may appear asking if you are sure about declining the event. Review the prompt, and if you are certain, click on “Confirm” or “Decline.” Your response will then be recorded.
By declining the event, you are effectively notifying the event organizer of your unavailability. This simple action helps them keep track of attendees and make necessary adjustments to the event if required.
After declining the event, it is recommended to provide a brief explanation for your decline, if appropriate. This can be done in the following step, which allows you to add a message.
Now that you have successfully declined the proposed time, let’s move on to the next step and explore how to add a message, if necessary.
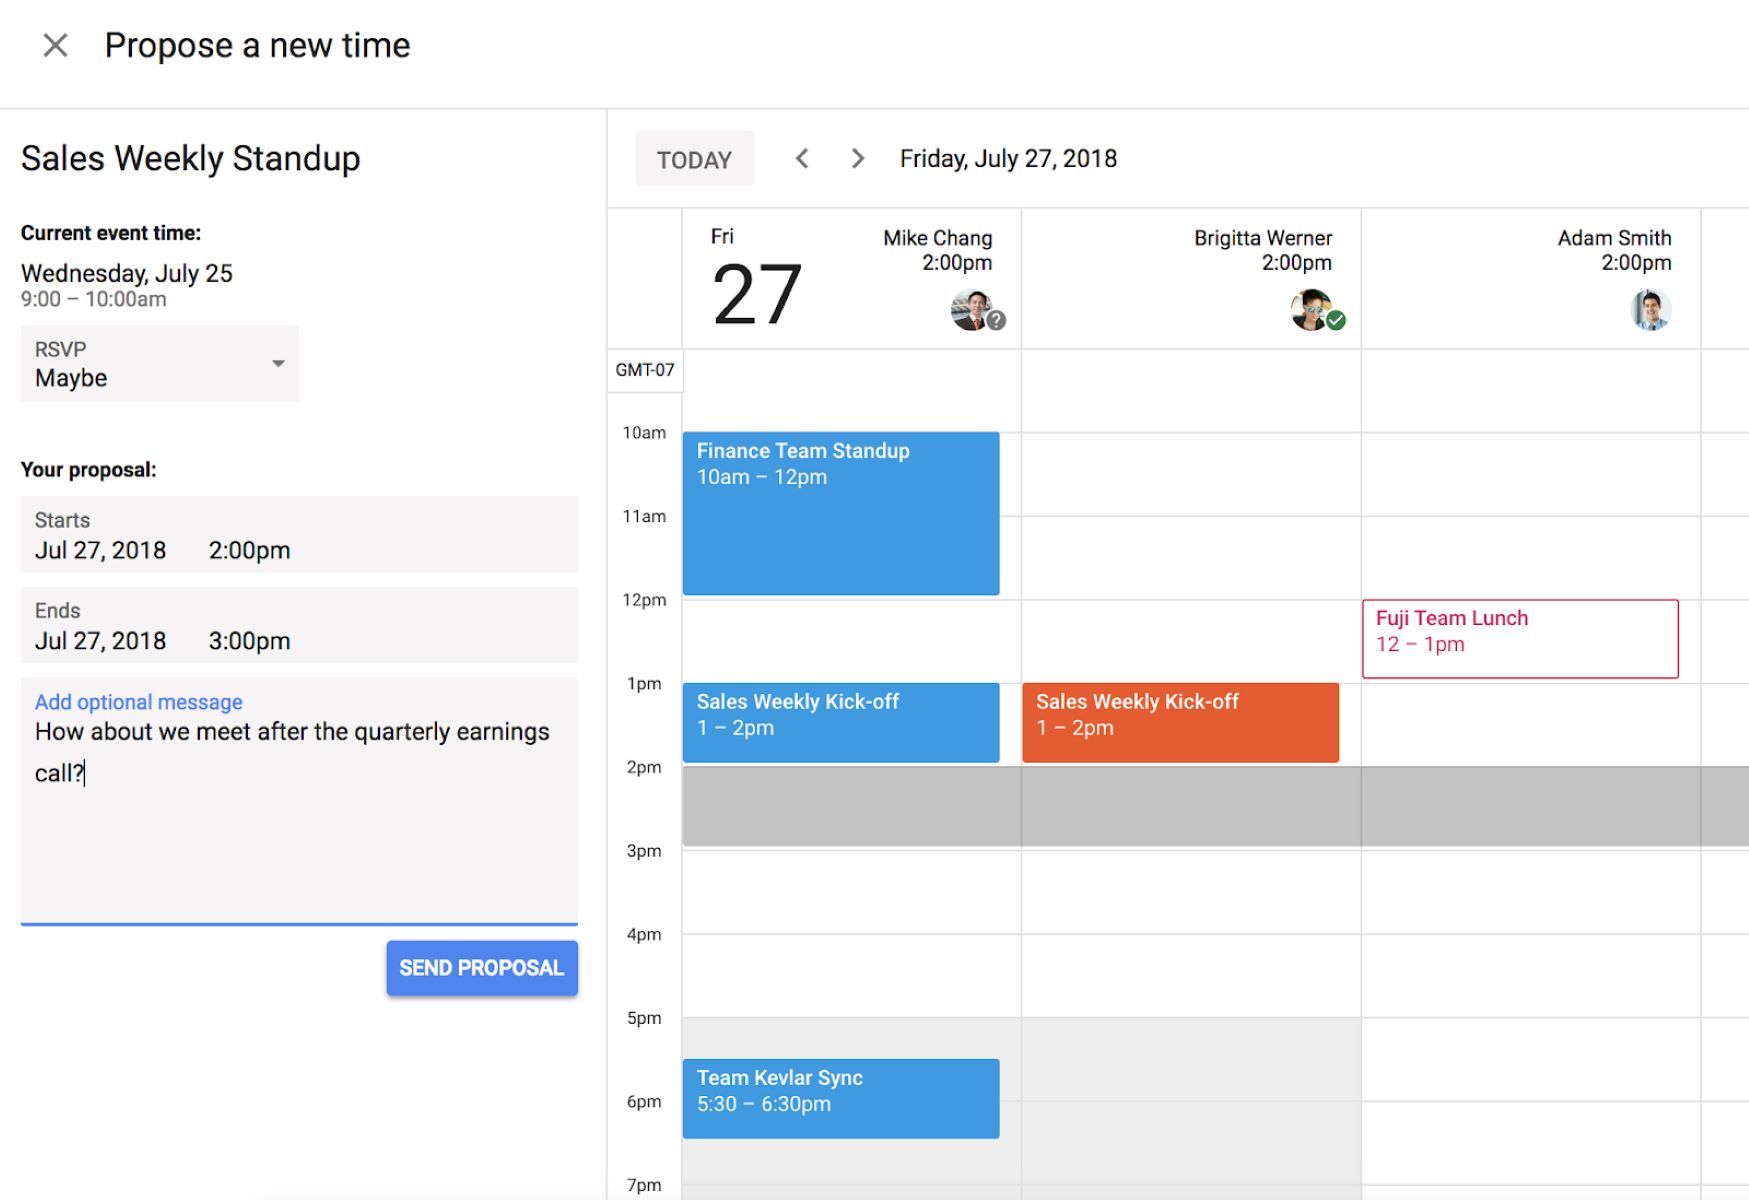
Step 4: Add a Message (Optional)
Adding a message is an optional step when declining a proposed time in Google Calendar. However, providing a brief explanation or apology can help maintain good communication with the event organizer and show your professionalism. Follow these steps to add a message:
- After declining the event, you may see an option to add a message or comment. Look for a text box or a “Add a message” section.
- Click or tap on the text box to start typing your message. Keep your message concise and polite.
- You can express your regrets for not being able to attend, provide a reason for your decline, or offer an alternative option if applicable. Remember to keep your message professional and respectful.
- Once you have composed your message, review it to ensure clarity and correctness.
Adding a message allows you to communicate any necessary information related to your decline and maintain a good rapport with the event organizer. It shows that you value their invitation and their time.
Remember, while adding a message is optional, it can have a positive impact on your professional relationships and help the event organizer better understand your circumstances.
Now that you know how to add a message, let’s move on to the final step and learn how to send your response.
Step 5: Send the Response
After declining the event and optionally adding a message, it is time to send your response to the event organizer. Follow these steps to ensure your response is sent:
- Look for a button or link that says “Send,” “Reply,” or “Submit.” This is typically located at the bottom of the event invitation or message box.
- Click or tap on the “Send” or equivalent button to send your response.
- You may receive a confirmation message indicating that your response has been successfully sent.
By sending your response, you are notifying the event organizer of your decline and any additional message you may have included. This ensures clear communication and allows the organizer to make necessary adjustments or arrangements.
It is important to send your response promptly, especially if there is a deadline mentioned or if the event is approaching soon. This shows your professionalism and respect for the organizer’s time and planning.
After sending your response, you have completed the process of declining a proposed time in Google Calendar. The event organizer will receive your response and take appropriate action accordingly.
Remember, if there are any changes or developments that affect your availability, it is important to notify the event organizer promptly.
Now that you know how to send your response, you have successfully completed all the steps involved in declining a proposed time in Google Calendar. You can now manage your calendar efficiently and maintain clear communication with event organizers.
Conclusion
Declining a proposed time in Google Calendar can be a simple and professional process if you follow these steps. By opening Google Calendar, finding the event invitation, declining the event, optionally adding a message, and sending your response, you can effectively communicate your unavailability to event organizers.
Remember that clear communication is key when declining an event invitation. By promptly declining and providing a brief explanation if necessary, you can maintain positive professional relationships and ensure that the event organizer has the necessary information to make any adjustments or arrangements.
Google Calendar offers a convenient platform to manage your schedule and handle event invitations efficiently. By utilizing the features available, you can stay organized, communicate effectively, and keep your calendar up-to-date.
Whether it’s conflicting commitments, personal reasons, or any other circumstances, declining a proposed time in Google Calendar is a polite and straightforward way to communicate your unavailability. By following these steps, you can navigate through the process smoothly and professionally, ensuring that both you and the event organizer are on the same page.
So, the next time you need to decline a proposed time in Google Calendar, remember this guide and follow the steps outlined. With a few simple clicks or taps, you can decline an event while maintaining clear and respectful communication.
Now it’s time to put your knowledge into practice and manage your calendar with confidence. Happy scheduling!