Introduction
Welcome to this guide on how to create a new virtual machine in VMware vSphere. Virtual machines are essential in modern computing environments, as they allow us to run multiple operating systems and applications on a single physical server. VMware vSphere is a powerful virtualization platform that enables organizations to consolidate their IT infrastructure, improve scalability, and enhance resource utilization. Whether you are setting up a new virtual environment or expanding an existing one, this step-by-step tutorial will walk you through the process of creating a new virtual machine in VMware vSphere.
In this guide, we will cover all the necessary steps, from connecting to the vCenter Server, selecting the appropriate data center and cluster, to configuring the virtual machine’s CPU, memory, disk, and networking settings. We will also explore advanced options for customizing the hardware and allocating storage for the virtual machine files.
Before we dive into the details, it is important to note that creating a virtual machine requires a basic understanding of VMware vSphere and virtualization concepts. It is assumed that you have already installed and set up VMware vSphere in your environment. If you haven’t done so, please refer to the official documentation or consult your system administrator to ensure a smooth setup.
Now that we have covered the prerequisites, let’s get started with the first step: launching VMware vSphere and connecting to the vCenter Server. Follow along as we walk you through each step, providing clear instructions and tips to help you create a new virtual machine in VMware vSphere.
Prerequisites
Before you begin creating a new virtual machine in VMware vSphere, there are a few prerequisites you need to consider:
- Access to VMware vSphere: Ensure that you have access to a VMware vSphere client or web interface. This is required to connect to the vCenter Server and manage virtual machines.
- vCenter Server credentials: Obtain the necessary credentials (username and password) to log in to the vCenter Server. These credentials are typically provided by the system administrator.
- ESXi host(s) configured: Make sure that you have one or more ESXi hosts set up and connected to the vCenter Server. ESXi hosts are the physical servers on which virtual machines will be created and run.
- Data center and cluster: Verify that you have created a data center within the vCenter Server and a cluster within the data center. A cluster is a logical group of ESXi hosts where virtual machines can be managed collectively.
- Storage configuration: Set up the required storage for the virtual machine files. This includes allocating enough disk space on the storage arrays and configuring datastores for the ESXi hosts.
- Network configuration: Ensure that the networking infrastructure is properly set up. This includes configuring VLANs, virtual switches, and port groups to provide network connectivity to the virtual machines.
- Guest operating system ISO image: Prepare the ISO image or installation media for the guest operating system you plan to install on the virtual machine.
- Hardware specifications: Determine the desired CPU, memory, and disk specifications for the virtual machine. Consider the resource requirements of the guest operating system and applications that will be running on it.
By fulfilling these prerequisites, you will be well-prepared to proceed with creating a new virtual machine in VMware vSphere. These requirements ensure that you have the necessary access, infrastructure, and resources in place to successfully create and manage virtual machines.
Step 1: Launch VMware vSphere and Connect to the vCenter Server
The first step in creating a new virtual machine in VMware vSphere is to launch the VMware vSphere client or web interface and connect to the vCenter Server. The vCenter Server is the central management platform that allows you to control and monitor your virtual infrastructure.
To connect to the vCenter Server, follow these steps:
- Open the VMware vSphere client or web interface on your workstation.
- Enter the IP address or hostname of the vCenter Server in the appropriate field.
- Provide your vCenter Server credentials, including the username and password.
- Click on the “Connect” or “Login” button to establish a connection.
Once you have successfully connected to the vCenter Server, you will have access to the full suite of management tools and features provided by VMware vSphere.
It’s important to note that depending on your specific environment and setup, there may be additional steps required to establish a connection to the vCenter Server. For example, if you are using a load balancer or have multiple vCenter Server instances, you may need to specify additional connection details.
If you encounter any issues while connecting to the vCenter Server, double-check the IP address or hostname, ensure your network connectivity is reliable, and verify that the vCenter Server services are running. In case you are unsure about the correct login credentials, contact your system administrator for assistance.
Once you have successfully connected to the vCenter Server, you are ready to proceed with the next steps in creating a new virtual machine in VMware vSphere.
Step 2: Select the Appropriate Data Center and Cluster
After connecting to the vCenter Server in VMware vSphere, the next step in creating a new virtual machine is to select the appropriate data center and cluster in which you want to create the virtual machine. The data center and cluster provide the necessary organizational structure for managing your virtual infrastructure.
Follow these steps to select the data center and cluster:
- Within the vSphere client or web interface, navigate to the “Hosts and Clusters” view. This is typically located in the left-hand sidebar or menu.
- Expand the data center tree view and select the desired data center where you want to create the virtual machine. If you have multiple data centers, choose the one that aligns with your requirements.
- Within the selected data center, expand the cluster tree view and choose the cluster where you want to place the virtual machine. Clusters provide a logical grouping of ESXi hosts that share resources and enable advanced management features such as vMotion and Distributed Resource Scheduler (DRS).
By selecting the appropriate data center and cluster, you ensure that the virtual machine is created within the desired organizational unit and benefits from the resource pools and management capabilities of the selected cluster.
It’s important to consider your specific requirements when selecting the data center and cluster. Factors such as performance, resource requirements, and high availability should be taken into account. You may choose to create the virtual machine in a specific data center to optimize for data locality, or select a cluster with advanced features like DRS for resource balancing.
If you are unsure about which data center or cluster to choose, consult with your system administrator or IT department to ensure the virtual machine is created in the appropriate location.
Once you have selected the data center and cluster, you are ready to proceed with the next step of creating a new virtual machine in VMware vSphere.
Step 3: Right-click on the Desired ESXi Host and Select “New Virtual Machine”
Once you have selected the appropriate data center and cluster in VMware vSphere, the next step in creating a new virtual machine is to right-click on the desired ESXi host and choose the “New Virtual Machine” option. The ESXi host is the physical server on which the virtual machine will be deployed and run.
Follow these steps to create a new virtual machine:
- In the vSphere client or web interface, navigate to the “Hosts and Clusters” view.
- Expand the data center and cluster tree view to display the list of ESXi hosts within the selected cluster.
- Right-click on the ESXi host where you want to deploy the virtual machine.
- In the context menu that appears, hover over the “New Virtual Machine” option.
- Select the appropriate type of virtual machine you want to create, such as a typical, custom, or template-based virtual machine.
The available options for creating a new virtual machine may vary based on your specific environment and vSphere configuration. The “Typical” option provides a simplified wizard for quickly setting up a virtual machine with default settings. The “Custom” option allows you to manually configure each aspect of the virtual machine’s hardware and settings. If you have existing virtual machine templates, you can choose the “Template” option to deploy a virtual machine based on a predefined template.
By right-clicking on the desired ESXi host and selecting the appropriate option, you initiate the process of creating a new virtual machine in VMware vSphere.
Next, you will proceed with configuring the virtual machine’s name, location, and other settings before finalizing the creation.
Remember to consider your specific requirements when choosing the ESXi host on which to deploy the virtual machine. Factors such as performance, resource availability, and storage capabilities of the selected host should align with the needs of your virtual machine.
Once you have completed these steps, you are ready to proceed with the further configuration of the virtual machine in VMware vSphere.
Step 4: Choose the Creation Type and Virtual Machine Version
After right-clicking on the desired ESXi host and selecting “New Virtual Machine” in VMware vSphere, the next step in creating a new virtual machine is to choose the creation type and virtual machine version. These options allow you to define the initial settings and compatibility of the virtual machine.
Follow these steps to configure the creation type and virtual machine version:
- In the virtual machine creation wizard, you will be prompted to choose the creation type. Select the appropriate option based on your requirements.
- Next, you will be asked to choose the virtual machine version. This determines the compatibility of the virtual machine with different features and capabilities in VMware vSphere.
The available options for creation type and virtual machine version may vary depending on the version of VMware vSphere you are using and the level of compatibility you require. The creation type options typically include “Typical”, “Custom”, and “Clone from Existing Virtual Machine”. The virtual machine version options are numbered sequentially, with higher numbers indicating newer versions with additional features.
Choosing the appropriate creation type ensures that you can quickly define the basic settings for the virtual machine, whether you prefer a preconfigured setup (“Typical”) or a more granular control over the configuration (“Custom”). The “Clone from Existing Virtual Machine” option allows you to create a new virtual machine based on an existing one, saving time and effort.
The virtual machine version selection is important as it determines the compatibility with certain features and functionalities in VMware vSphere. Newer virtual machine versions often offer enhanced performance, scalability, and security features. However, it’s worth noting that selecting a higher version may limit the virtual machine’s compatibility with older versions of VMware vSphere.
Consider your specific requirements and the compatibility needs of your environment when choosing the creation type and virtual machine version in VMware vSphere. Review the available options and select those that align with the needs and capabilities of your virtual machine.
Once you have chosen the creation type and virtual machine version, you are ready to proceed with the further configuration of the virtual machine settings in VMware vSphere.
Step 5: Configure the Virtual Machine Name and Location
After selecting the creation type and virtual machine version in VMware vSphere, the next step in creating a new virtual machine is to configure the virtual machine’s name and location. These settings determine how the virtual machine is identified and where its files are stored.
Follow these steps to configure the virtual machine name and location:
- In the virtual machine creation wizard, you will be prompted to enter a name for the virtual machine. Choose a descriptive name that helps to identify the purpose or role of the virtual machine.
- Next, specify the location where the virtual machine files will be stored. You can choose to store the files on a local datastore or a shared storage network accessible by the ESXi host.
When naming the virtual machine, consider using a name that is easy to understand and aligns with your organization’s naming conventions. A clear and concise name can help you manage and identify the virtual machine more effectively.
For the virtual machine’s location, it is recommended to store the files on shared storage, such as a network-attached storage (NAS) or a storage area network (SAN), to ensure better scalability, availability, and ease of management. Selecting a shared storage option allows for advanced features like vMotion and High Availability (HA) to be utilized with the virtual machine.
However, if you do not have access to shared storage or prefer to store the files locally on the ESXi host, ensure that sufficient disk space is available on the local datastore to accommodate the virtual machine’s files.
It is important to plan ahead and consider factors such as disk space, storage performance, and data backups when choosing the virtual machine’s location. Consult your system administrator or storage administrator to determine the best storage option for your virtual machine.
Once you have configured the virtual machine name and location, you are ready to proceed with specifying the guest operating system and version in VMware vSphere.
Step 6: Specify the Guest Operating System and Version
After configuring the virtual machine name and location in VMware vSphere, the next step in creating a new virtual machine is to specify the guest operating system and its version. This setting informs VMware vSphere about the operating system you plan to install on the virtual machine.
Follow these steps to specify the guest operating system and version:
- In the virtual machine creation wizard, you will be prompted to select the guest operating system. Choose the operating system that matches the one you plan to install on the virtual machine.
- Next, select the appropriate version of the guest operating system from the available options.
Choosing the correct guest operating system and version is important, as it ensures that VMware vSphere applies the necessary optimizations and configurations specific to that operating system. This can enhance the performance and compatibility of the virtual machine.
If the guest operating system you plan to install is not listed in the available options, you can choose to install a compatible version that closely matches the operating system you will be using. It’s important to note that selecting the closest match provides a better chance of successful installation and functionality.
Additionally, some guest operating systems may require specific hardware configurations or additional VMware Tools for optimal performance and functionality. Make sure to review the recommendations and requirements provided by the operating system vendor or consult the VMware documentation for more information.
By specifying the guest operating system and version accurately, you ensure that VMware vSphere applies the appropriate settings and configurations to optimize the virtual machine’s performance and compatibility with the chosen operating system.
Once you have specified the guest operating system and version, you are ready to proceed with configuring the CPU, memory, and disk settings for the virtual machine in VMware vSphere.
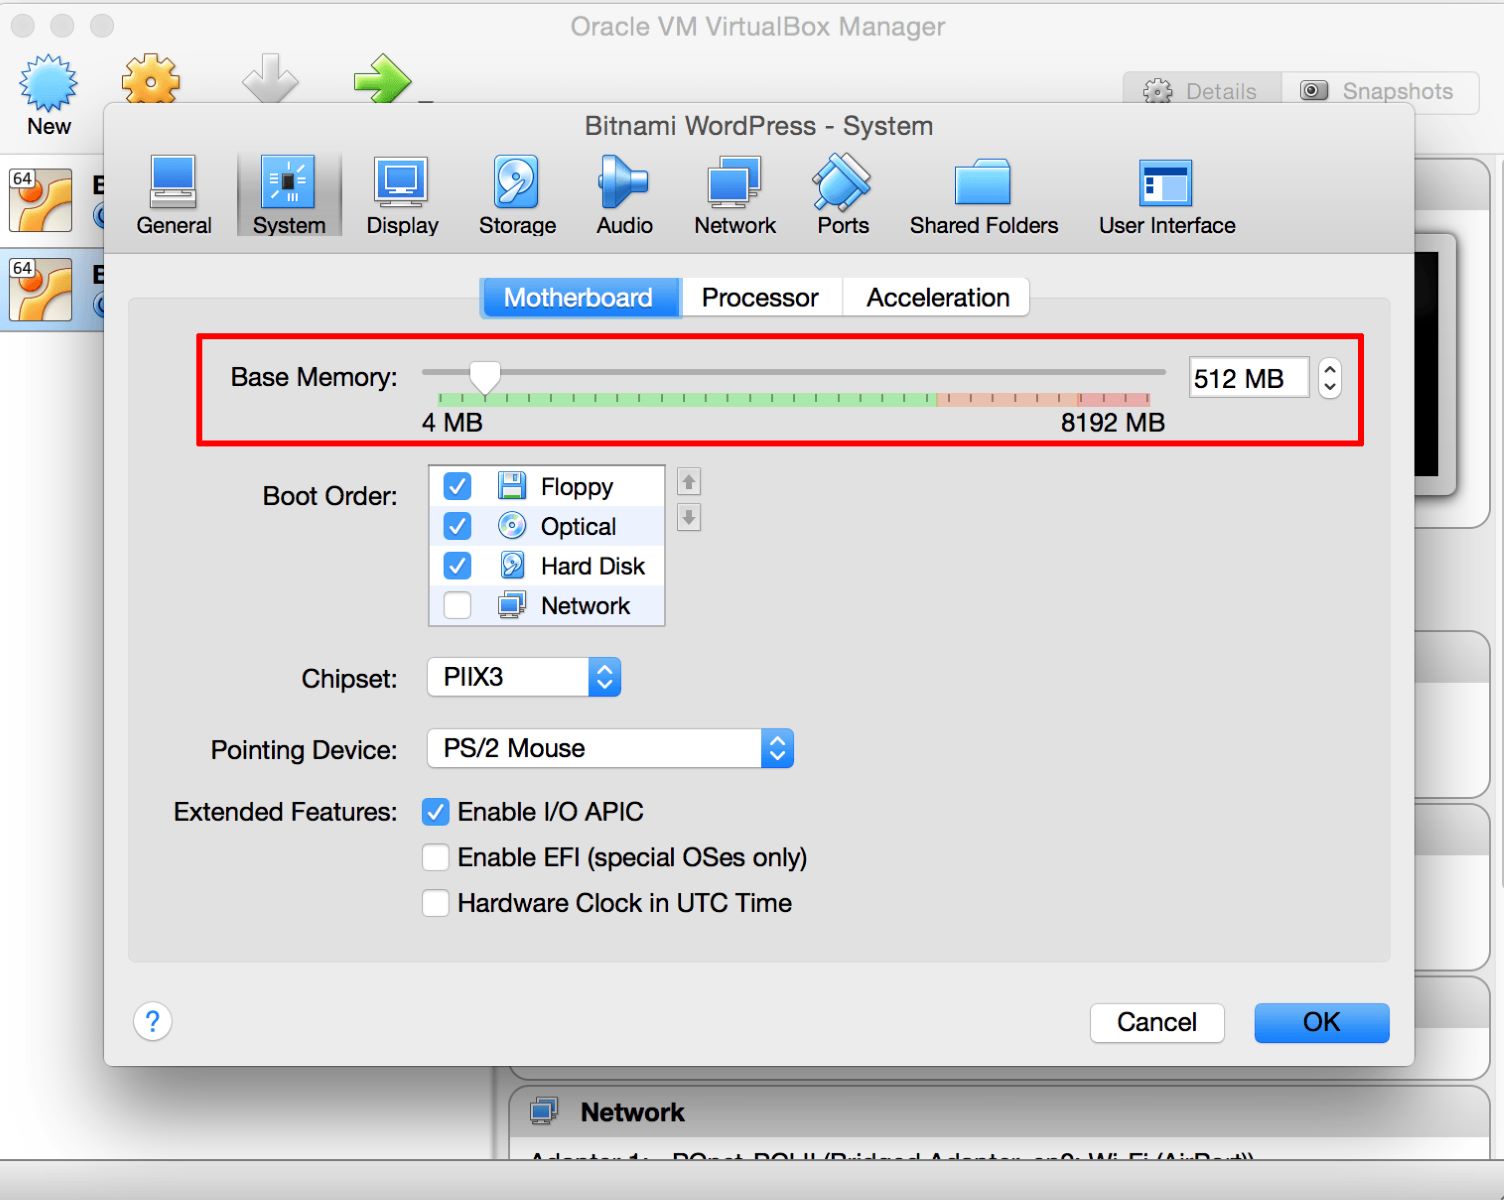
Step 7: Configure CPU, Memory, and Disk Settings
After specifying the guest operating system and version in VMware vSphere, the next step in creating a new virtual machine is to configure the CPU, memory, and disk settings. These settings determine the resources allocated to the virtual machine and play a crucial role in its performance and capacity.
Follow these steps to configure the CPU, memory, and disk settings:
- In the virtual machine creation wizard, you will be prompted to set the number of virtual CPUs for the virtual machine. Choose the appropriate value based on the requirements of the guest operating system and the applications that will run on it.
- Next, specify the amount of memory (RAM) to allocate to the virtual machine. Again, consider the requirements of the guest operating system and the workload it will handle. Ensure that you allocate enough memory to support the applications and processes running within the virtual machine.
- Then, configure the disk settings for the virtual machine. You can choose to create a new virtual disk or use an existing one. Specify the disk size and provisioning type (thin, thick, or eager-zeroed thick) based on your requirements and available storage resources.
Configuring the CPU, memory, and disk settings requires careful consideration to optimize the virtual machine’s performance and resource utilization. The number of CPUs should align with the workload and application requirements, ensuring sufficient processing power. Similarly, allocating an appropriate amount of memory is crucial to avoid performance bottlenecks and ensure smooth operation.
When setting the disk size and provisioning type, consider factors like storage capacity, anticipated storage growth, and performance requirements. Thin provisioning allows for efficient use of storage space by allocating disk space dynamically, while thick provisioning reserves the entire disk space upfront. Eager-zeroed thick provisioning pre-allocates the entire disk space and zeroes it out immediately.
It’s important to note that oversubscribing resources, such as assigning more vCPUs or memory than the physical host can handle, can lead to performance degradation and contention. Ensure that the allocated resources align with the capabilities of the underlying physical host.
By properly configuring the CPU, memory, and disk settings for the virtual machine, you optimize its performance and resource utilization. Take into account the requirements of the guest operating system and applications, as well as the available resources in your vSphere environment.
Once you have completed these steps, you are ready to proceed with customizing hardware settings, if desired, for the virtual machine in VMware vSphere.
Step 8: Customize Hardware Settings (Optional)
After configuring the CPU, memory, and disk settings for the virtual machine in VMware vSphere, the next step in creating a new virtual machine is to customize hardware settings if desired. These settings allow you to fine-tune the virtual machine’s hardware configuration to meet specific requirements or preferences.
Follow these steps to customize hardware settings:
- In the virtual machine creation wizard, you will be presented with options to customize hardware settings. Click on the “Customize Hardware” or similar button to access these settings.
- Within the hardware customization interface, you can modify various hardware aspects of the virtual machine, such as network adapters, CD/DVD drives, USB controllers, sound cards, and more.
- Make any necessary modifications or additions to the hardware configuration based on your specific needs or preferences. For example, you may need to add additional network adapters to accommodate multiple network segments or attach specific devices via USB.
Customizing hardware settings provides flexibility and allows you to tailor the virtual machine’s configuration to suit your requirements. By adding or modifying hardware components, you can enhance performance, connectivity, and functionality within the virtual environment.
It’s important to note that modifying hardware settings should align with the capabilities of the physical host and the resources available in your vSphere environment. Make sure to consider any potential impact on performance, compatibility, and resource allocation when customizing hardware settings.
Additionally, keep in mind that not all hardware settings may be available or supported by certain guest operating systems. Some settings may require specific VMware Tools to be installed within the guest operating system for full functionality and compatibility.
By customizing hardware settings, you can fine-tune the virtual machine’s hardware configuration to meet specific requirements, enhance performance, and expand connectivity within your virtual environment.
Once you have finished customizing the hardware settings, you are ready to proceed with configuring networking options for the virtual machine in VMware vSphere.
Step 9: Configure Networking Options
After customizing the hardware settings of the virtual machine in VMware vSphere, the next step in creating a new virtual machine is to configure the networking options. Networking plays a crucial role in establishing connectivity between the virtual machine and the rest of the network infrastructure.
Follow these steps to configure networking options:
- In the virtual machine creation wizard, navigate to the networking configuration section.
- Choose the appropriate network adapter(s) for the virtual machine. You can select from the available virtual network adapters in your vSphere environment.
- Specify the network connection type for the virtual machine, such as bridged, NAT, or host-only. The selection depends on your networking requirements and the desired level of network isolation.
- If necessary, configure advanced networking options, such as VLAN tagging or setting up specific network security features.
Configuring networking options is critical to ensure that the virtual machine can communicate with other virtual machines, physical devices, and the external network. The choice of network adapter and connection type impacts factors such as performance, security, and network accessibility.
When selecting the network adapter, pay attention to compatibility with the guest operating system and the available driver support within the virtual machine. This helps to prevent any connectivity issues after the virtual machine is created.
The network connection type determines how the virtual machine is connected to the network. Bridged networking allows the virtual machine to share the physical network interface of the host, providing it with its own unique IP address. NAT networking uses the host’s IP address and allows the virtual machine to communicate with external networks via the host’s network connection. Host-only networking creates a closed network environment between the virtual machine and the host without access to the external network.
Additionally, configuring advanced networking options like VLAN tagging or network security features can provide added functionality and security for the virtual machine’s network traffic. Consult your network administrator or refer to the network documentation for more information on these advanced options.
By configuring the networking options, you ensure that the virtual machine can communicate seamlessly with other network resources and services.
Once you have finished configuring the networking options, you are ready to proceed with selecting the storage location for the virtual machine files in VMware vSphere.
Step 10: Choose the Storage Location for the Virtual Machine Files
After configuring the networking options for the virtual machine in VMware vSphere, the next step in creating a new virtual machine is to choose the storage location for the virtual machine files. This includes the virtual machine’s virtual disk files, configuration files, and other associated files.
Follow these steps to choose the storage location:
- In the virtual machine creation wizard, navigate to the storage configuration section.
- Select the datastore or storage location where you want to store the virtual machine files. This can be a local datastore or a shared storage network accessible by the ESXi host.
- If desired, specify a specific folder or path within the selected storage location to keep the virtual machine files organized.
- Optionally, enable the Thin Provisioning option to allocate disk space dynamically rather than reserving the entire provisioned space upfront.
Choosing the storage location is an important decision as it impacts factors such as performance, scalability, and data availability for the virtual machine.
If you have multiple datastores or storage locations available, consider factors like storage capacity, performance, and redundancy when making your selection. Utilizing shared storage can provide benefits such as improved scalability, availability, and ease of management through features like vMotion and High Availability (HA).
Organizing the virtual machine files within a specific folder or path helps to keep the storage environment organized and makes it easier to manage the virtual machines.
The option of Thin Provisioning allows for efficient use of storage space by allocating disk space dynamically as it is actually consumed by the virtual machine. This can help avoid unnecessarily reserving large amounts of space upfront.
Make sure to consider the available storage resources, disk space requirements, and performance needs when choosing the storage location for the virtual machine files.
Once you have chosen the storage location, you are ready to proceed with reviewing the summary of the virtual machine configuration before finalizing the creation in VMware vSphere.
Step 11: Review the Summary and Click “Finish” to Create the Virtual Machine
After configuring all the necessary settings for the virtual machine in VMware vSphere, the final step in creating a new virtual machine is to review the summary of the configuration and click “Finish” to complete the process.
Follow these steps to review the summary and create the virtual machine:
- In the virtual machine creation wizard, navigate to the summary section.
- Review all the configuration settings including the virtual machine name, operating system, hardware resources, networking options, and storage location.
- Ensure that all the settings are accurate and align with your requirements.
- If any modifications are needed, go back to the appropriate sections and make the necessary changes.
- Once you have verified the configuration, click the “Finish” or similar button to create the virtual machine.
Reviewing the summary is a crucial step to ensure that all the settings are correctly configured before creating the virtual machine. It allows you to confirm that the virtual machine will be created with the desired operating system, hardware resources, networking options, and storage location.
Pay close attention to the details provided in the summary, as any misconfigurations or incorrect settings can impact the performance and functionality of the virtual machine.
If you identify any errors or need to make changes to the configuration, you can go back to the respective sections in the virtual machine creation wizard and modify the settings as needed. Once the modifications are complete, return to the summary section and review the configuration again.
After carefully reviewing and confirming the settings, click the “Finish” button to create the virtual machine. Depending on the size and complexity of the virtual machine, it may take a few moments for the creation process to complete.
Once the virtual machine is successfully created, you can start using it to install the desired operating system, configure applications, and perform other necessary tasks.
Congratulations! You have successfully created a new virtual machine in VMware vSphere by following the step-by-step process outlined in this guide.
Conclusion
Creating a new virtual machine in VMware vSphere is a fundamental task that allows you to leverage the benefits of virtualization for your IT infrastructure. The step-by-step process outlined in this guide has provided you with a comprehensive understanding of how to create a virtual machine, from connecting to the vCenter Server to configuring various settings such as CPU, memory, disk, networking, and storage.
By following these steps, you can efficiently set up and deploy virtual machines tailored to your specific requirements. The flexibility provided by VMware vSphere enables you to optimize resource utilization, enhance scalability, and increase the efficiency of your computing environment.
Throughout the process, it is crucial to consider the prerequisites, such as having access to VMware vSphere, appropriate credentials, and a properly configured ESXi host and data center. Taking into account these prerequisites ensures a smooth and successful virtual machine creation process.
Remember to carefully review and validate the configuration settings before clicking “Finish” to create the virtual machine. This step ensures that all the chosen settings align with your needs and prevent potential issues arising from misconfigurations.
By creating a new virtual machine, you open the door to countless possibilities, including running multiple operating systems on a single physical server, optimizing resource allocation, and enhancing the agility and flexibility of your IT infrastructure.
With the knowledge gained from this guide, you can confidently create virtual machines in VMware vSphere and continue exploring the vast capabilities and features offered by this powerful virtualization platform.
Now that you have completed the creation of a new virtual machine, you can move forward with installing the guest operating system, configuring applications, and utilizing the virtual machine to meet your specific computing needs.
Happy virtualizing!