Introduction
Welcome to the world of blogging! If you’ve ever wanted to share your thoughts, ideas, or expertise with a wider audience, creating a blog is a great place to start. In this article, we will guide you through the process of creating a blog using PHP, one of the most popular programming languages for web development.
Creating a blog with PHP allows you to have full control over the design and functionality of your blog. Whether you’re a beginner or an experienced web developer, PHP provides a flexible and powerful platform to build and customize your blog according to your preferences.
In this tutorial, we will walk you through the steps required to set up the environment, create a database to store your blog posts, implement user registration and authentication, create the front-end layout, and implement the necessary functionality to create, display, update, and delete blog posts.
We will be using HTML, CSS, and PHP to build our blog. Basic knowledge of these technologies will be beneficial, but we will also explain the concepts along the way, making it beginner-friendly. By the end of this tutorial, you will have a fully functional blog ready to be shared with the world.
So, if you’re ready to embark on this blogging journey, let’s dive into the exciting world of PHP and create a blog that reflects your unique style and voice!
Setting Up the Environment
Before we start creating our blog, we need to set up our development environment. To begin, you’ll need a local server or hosting environment that supports PHP and a database management system like MySQL.
If you’re using a local server, you can install software packages like XAMPP, WAMP, or MAMP, which provide a complete web development environment with PHP, Apache, and MySQL preconfigured.
Once you have your server set up, you’ll need to create a new directory for your blog project. This will serve as the root directory for all your files. You can name it anything you like, but it’s a good practice to keep it descriptive and easy to remember.
Next, you’ll create an HTML file named `index.php` as the entry point for your blog. This file will contain the structure of your web pages and serve as the central point for rendering content dynamically using PHP.
To check if your server is running correctly, open your browser and enter `http://localhost` followed by the name of your project directory. If everything is set up correctly, you should see the contents of your `index.php` file.
In addition to the server setup, you’ll also need a code editor to write and edit your PHP files. There are many options available, such as Visual Studio Code, Sublime Text, or Atom. Choose the one that suits your preferences and requirements. These editors provide features like syntax highlighting, code snippets, and debugging tools to enhance your development experience.
Finally, it’s crucial to have a basic understanding of HTML and CSS to create the layout and design of your blog. HTML provides the structure and content of your web pages, while CSS is responsible for the visual styling. If you’re new to these technologies, there are plenty of online resources and tutorials available to help you get started.
Now that our development environment is ready, we can move on to creating the database for our blog.
Creating the Database
Now that our development environment is set up, we need to create a database to store our blog posts. A database management system like MySQL is a reliable and popular choice for this purpose.
To start, open your preferred database management tool, such as phpMyAdmin or MySQL Workbench. Create a new database and give it a meaningful name that reflects your blog content. For example, you can name it “blog_db”.
Once the database is created, we will need a table to store our blog posts. In the same database, create a new table named “posts”. This table will have the following columns:
- id: This will be the primary key for each blog post.
- title: This column will store the title of the blog post.
- content: Here, we will store the actual content of the blog post.
- author: This column will store the name of the author who created the blog post.
- created_at: We will use this column to store the date and time when the blog post was created.
Make sure to choose the appropriate data types for each column. For example, the “id” column can be set as an integer with auto-increment enabled, while the “title” and “content” columns can be set as text or varchar.
Once the table is created, you have successfully set up the database structure for your blog. This database will be used to store and retrieve blog posts dynamically.
In the next section, we will focus on creating the registration form for users to sign up and authenticate.
Creating the Registration Form
Now that we have our database set up, we can move on to creating the registration form for users to sign up and authenticate on our blog. This form will collect user information such as their name, email address, and password.
To get started, create a new PHP file named “register.php” in your project directory. This file will contain the HTML markup and PHP code necessary to render and process the registration form.
In the HTML section of the file, create a form element with appropriate input fields for the required user information. For example, you can include fields for the user’s name, email address, and password. You can also add additional fields if needed, such as a confirmation password field.
Make sure to provide labels for each input field to improve accessibility and user experience. You can use the “for” attribute of the label element to associate it with the corresponding input field using the “id” attribute.
In the PHP section of the file, you will handle the form submission and validate the user input. Start by checking if the form has been submitted using the “$_POST” superglobal. If it has, retrieve the submitted values and perform validation on each field.
For example, you can check if the name field is not empty, the email field is in a valid format, and the password field meets the minimum requirements for security. If any validation errors occur, display appropriate error messages to the user.
If all the validation passes, you can proceed to insert the user’s information into the database. Use SQL queries to insert the data into the appropriate table and fields. Remember to hash the password using a secure hashing algorithm before storing it in the database to enhance security.
Once the user is successfully registered, you can provide a success message and redirect them to the login page or display the login form directly. You can also include a link to the login page for users who are already registered but need to log in.
With the registration form completed, you’ve taken a crucial step towards creating a secure and user-friendly blogging platform. In the next section, we will focus on implementing user authentication to allow registered users to log in to the blog.
Implementing User Authentication
Now that we have the registration form in place, we need to implement user authentication to allow registered users to log in to our blog. Authentication ensures that only authorized individuals can access protected areas of our website and perform actions such as creating, editing, and deleting blog posts.
To begin, create a new PHP file named “login.php” in your project directory. This file will contain the HTML markup and PHP code necessary to render and process the login form.
In the HTML section of the file, create a form element with input fields for the user’s email address and password. Additionally, include a “Remember Me” checkbox if you want to provide the option for users to stay logged in across sessions.
In the PHP section of the file, you will handle the form submission and validate the user’s credentials. Start by checking if the form has been submitted using the “$_POST” superglobal. If it has, retrieve the submitted values and query the database to check if the user’s email address exists.
If the email address is found, compare the hashed password stored in the database with the one entered by the user. If the passwords match, set a session variable to indicate that the user is authenticated. You can also set additional session variables to store user information like their name or user ID.
If the authentication is successful, redirect the user to the home page or any other protected area of your blog. If the authentication fails, display an error message indicating that the email address or password is incorrect.
For added security, consider implementing features like password encryption, account lockout after multiple login failures, and password reset functionality.
Additionally, it’s a good practice to provide a “Logout” option for users to securely end their session when they’re done using your blog.
With user authentication in place, you’ve created a secure way for registered users to access your blog. In the next section, we will focus on creating the home page where users can view and navigate through blog posts.
Creating the Home Page
Now that user authentication is implemented, we can proceed to create the home page of our blog. The home page will serve as the landing page where users can view a list of blog posts, navigate through different pages, and access various features of the blog.
To get started, create a new PHP file named “index.php” in your project directory. This file will serve as the main entry point for your blog and will contain the HTML markup and PHP code necessary to render the home page.
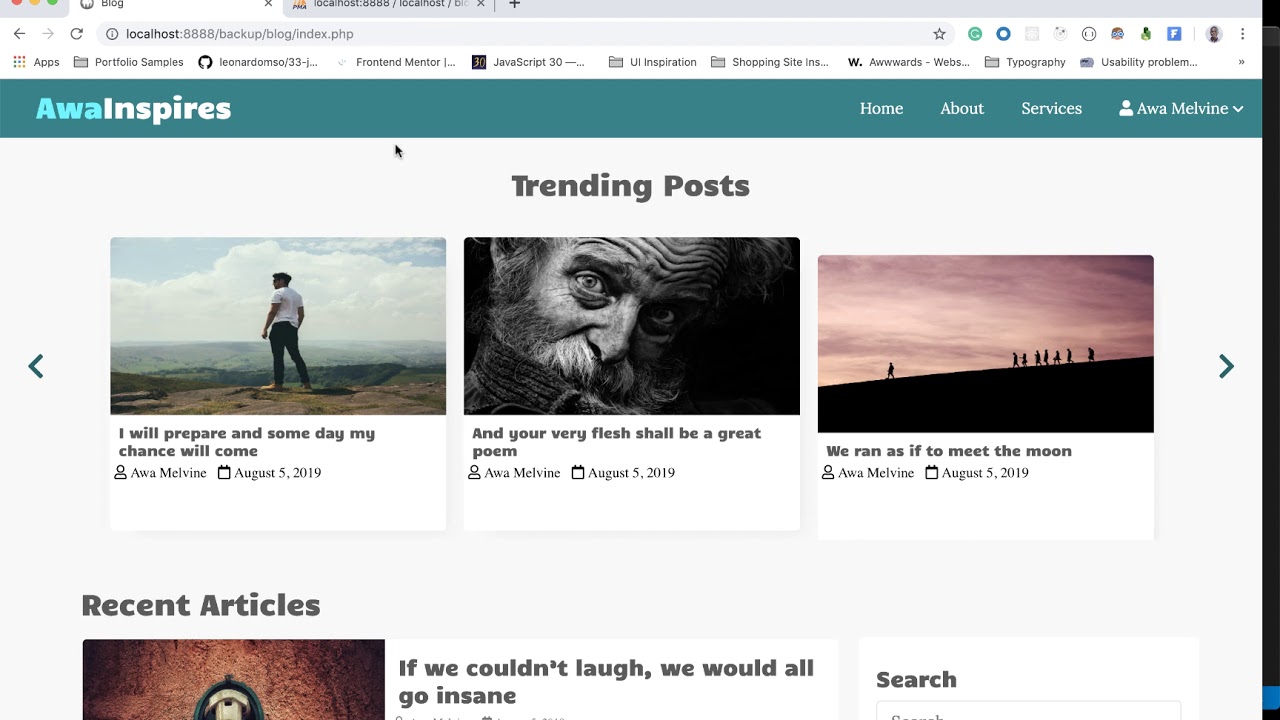
In the HTML section of the file, create the structure for the home page layout. This can include elements such as a header, navigation menu, main content section, sidebar, and footer. Customize the layout and design to match your blog’s aesthetic and branding.
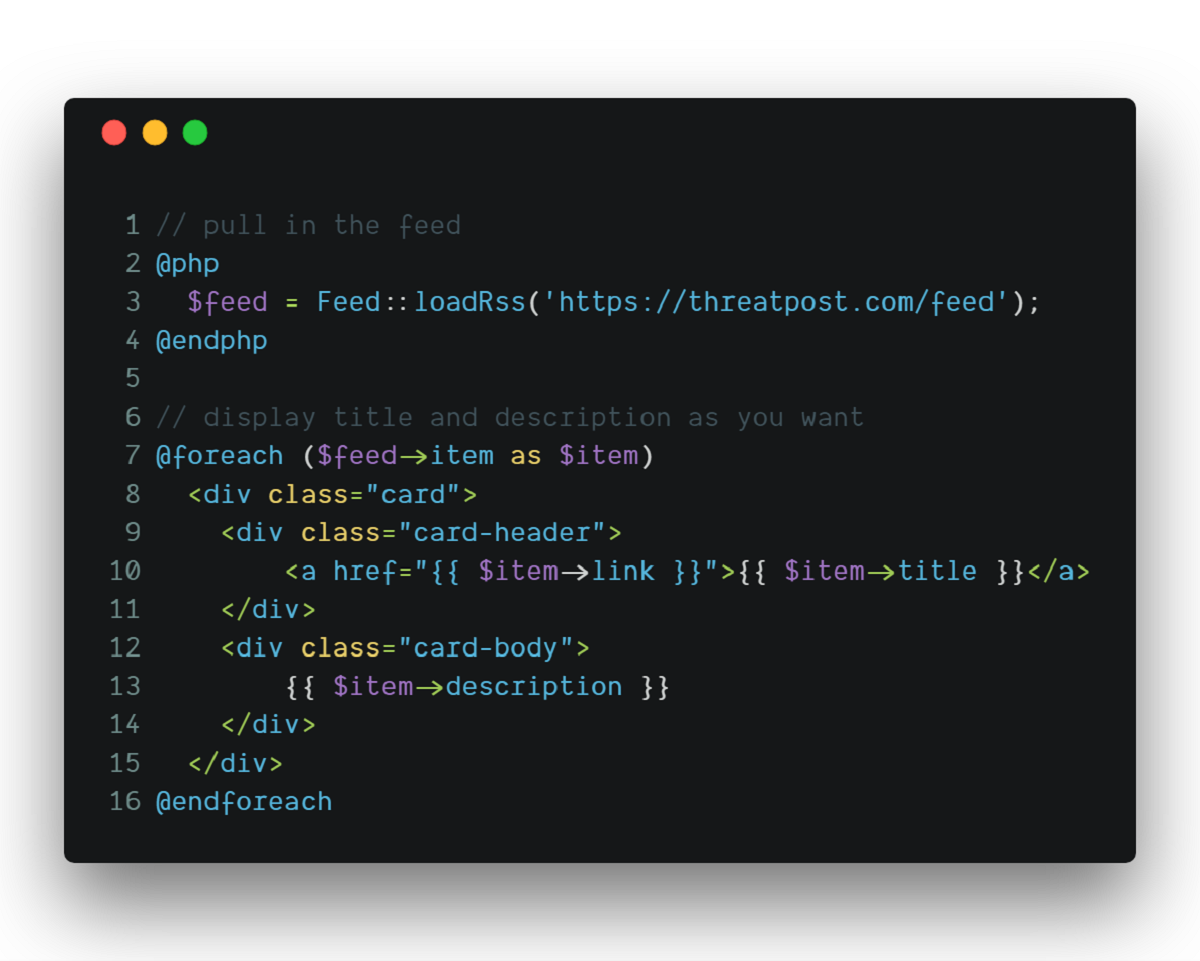
In the PHP section of the file, you will retrieve the blog posts from the database and dynamically display them on the home page. Start by querying the database to fetch the latest blog posts. You can sort them by date or any other criteria you choose.
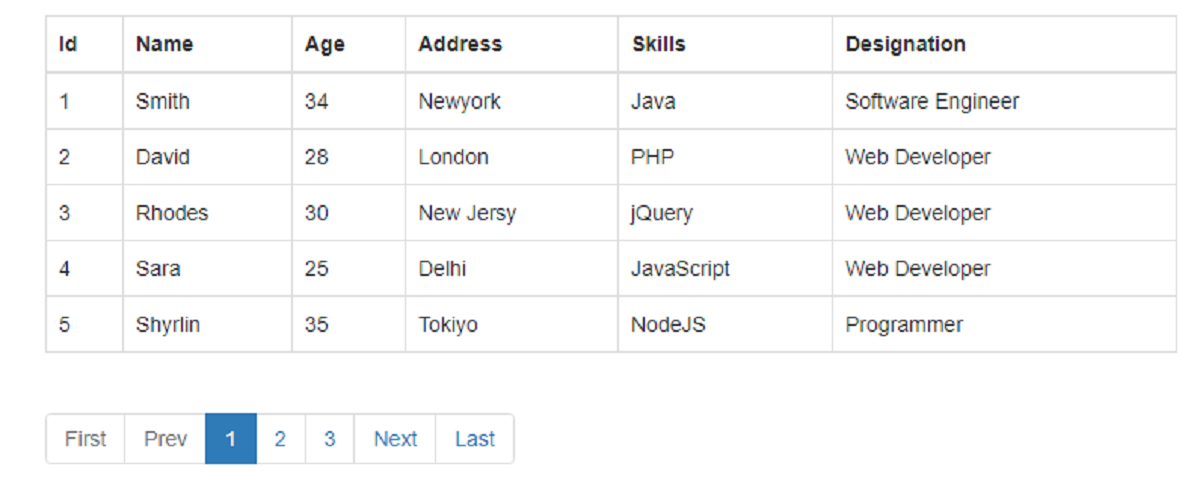
Loop through the fetched posts and display them in the main content section of the home page. For each post, you can include the title, author name, publication date, and a brief excerpt. You can also add a “Read More” button or link to the full blog post.
Consider implementing pagination if you have a large number of blog posts. This will allow users to navigate through different pages of blog posts.
In addition to displaying the blog posts, you can enhance the user experience by adding features like a search bar to search for specific blog posts, sorting options to organize posts by category or popularity, and social sharing buttons to encourage readers to share your posts.
Remember to include navigation links in the header or sidebar to allow users to access other sections of your blog, such as the registration page, login page, blog post creation page, and user profile page.
With the home page created, users can now access your blog, browse through the available blog posts, and interact with the different features you have implemented. In the next section, we will focus on displaying individual blog posts on a separate page.
Displaying Blog Posts
Now that we have the home page set up, it’s time to focus on displaying individual blog posts on a separate page. This will allow readers to view the full content of a specific blog post and engage with it.
To begin, create a new PHP file named “post.php” in your project directory. This file will handle the display of individual blog posts and will contain the HTML markup and PHP code necessary to render the post.
In the PHP section of the file, retrieve the specific blog post from the database based on a unique identifier, such as the post ID. You can either pass this identifier as a URL parameter or retrieve it from the session variable if you have previously stored it.
Once you have the post data, you can dynamically generate the HTML markup to display the title, author, publication date, and full content of the blog post. Add appropriate formatting, such as headings, paragraphs, and images, to enhance the readability and visual appeal of the post.
Consider implementing features like a comment section where readers can leave their thoughts and feedback on the post. This can enhance user engagement and provide valuable insights and discussions related to the blog post.
In addition to displaying the content of the blog post, include navigation elements such as “Previous Post” and “Next Post” links to allow users to easily navigate through your blog and explore other posts.
Finally, make sure to optimize the page for search engines by adding meta tags, such as the post title, description, and keywords. This will improve the visibility of your blog posts in search engine results and attract more readers.
With the ability to display individual blog posts, readers can now access your blog content in a more detailed and engaging manner. In the next section, we will focus on creating a form where users can create and submit their own blog posts.
Creating the Blog Post Form
To allow users to create and submit their own blog posts, we need to create a blog post form. This form will provide an intuitive and user-friendly interface for users to input their post title, content, and any additional information.
To get started, create a new PHP file named “create_post.php” in your project directory. This file will contain the HTML markup and PHP code necessary to render and process the blog post form.
In the HTML section of the file, create a form element with input fields for the post title, content, and any additional fields you want to include, such as tags or categories. You can also provide features like a WYSIWYG editor to allow users to format their post content easily.
Consider including form validation to ensure that the required fields are not empty and that the input meets any specific criteria you set. For example, you can check if the post title has a minimum length or if the content is not exceeding a certain character limit.
In the PHP section of the file, handle the form submission and process the data entered by the user. Retrieve the values from the form using the “$_POST” superglobal and sanitize them to prevent any potential security vulnerabilities.
Once the data is sanitized, you can insert it into the database to create the new blog post. Use SQL queries to insert the data into the appropriate table and fields. Remember to include the necessary columns like title, content, author, and publication date.
After successfully creating the blog post, you can provide a success message to the user and redirect them to the newly created blog post page. If there are any errors during the process, display appropriate error messages to the user.
Consider enhancing the form with additional features like image uploads, categories or tags selection, or a preview option to allow users to review their post before submission.
With the blog post form in place, users can now unleash their creativity by creating and submitting their own blog posts. In the next section, we will focus on saving the submitted blog posts to the database for future retrieval.
Saving Blog Posts to the Database
Once users submit their blog posts through the form, we need to save the data to the database for future retrieval and display. This will allow users to access their posts, and for you to showcase the content on the blog.
To implement this functionality, let’s return to the PHP file handling the form submission, which we named “create_post.php” in the previous section.
In the PHP section of the file, after sanitizing the user input, connect to the database using the appropriate credentials and establish a connection.
Next, construct an SQL query to insert the submitted data into the database. Include the necessary columns such as the post title, content, author, and publication date.
Execute the query using the database connection and verify if the insertion was successful. If it was, provide a success message to the user. Otherwise, handle any errors that occurred during the insertion process and display an appropriate error message.
Consider implementing additional steps to enhance the user experience and ensure data integrity. For example, you can add validation to check if the post title is unique to avoid duplicate entries, or apply measures to prevent XSS attacks by sanitizing the content before inserting it into the database.
If the insertion is successful, you can redirect the user to the home page or the page displaying the newly created blog post.
With this functionality in place, users can now have their blog posts saved in the database, ready to be displayed and accessed on the blog. In the next section, we will focus on displaying a specific blog post based on user selection.
Displaying Specific Blog Post
To provide users with the ability to view a specific blog post in detail, we need to create a page that displays the content of that particular post. This will allow readers to access the full article and engage with the content.
To get started, create a new PHP file named “post.php” in your project directory if you haven’t already. This file will handle the display of the specific blog post and will contain the HTML markup and PHP code necessary to render the post.
In the PHP section of the file, retrieve the ID or unique identifier of the blog post from the URL parameters or any other source you’re using to identify the post.
After obtaining the ID, query the database to fetch the specific blog post based on that identifier. Make sure to sanitize the input to prevent any potential security vulnerabilities.
Once you have the blog post data, dynamically generate the HTML markup to display the post title, content, author, and any other relevant details. Apply appropriate formatting to enhance the readability and visual appeal of the post, such as headings, paragraphs, images, and styling.
Consider adding additional features to enrich the user experience. For example, you can implement a comment section where readers can leave their thoughts and engage in discussions related to the post. Include an option to share the post on social media platforms to encourage readers to spread the content.
Ensure that the URL structure is search engine-friendly by incorporating clean and descriptive URLs that reflect the title or topic of the blog post. This will improve the visibility of your posts in search engine results and attract more readers.
With the ability to display a specific blog post, readers can now access detailed content and engage with the post by leaving comments and sharing it with others. In the next section, we will focus on the functionality to update and delete existing blog posts.
Updating and Deleting Blog Posts
To provide users with the ability to edit or remove their existing blog posts, we need to implement functionality for updating and deleting posts. This will allow users to keep their content up to date and maintain control over their published articles.
To get started, create a new PHP file named “edit_post.php” in your project directory. This file will handle the process of editing and updating individual blog posts.
In the PHP section of the file, retrieve the ID or unique identifier of the blog post that the user wants to edit. This can be passed through the URL parameters or collected from a user selection.
Query the database to fetch the specific blog post based on the identifier. Retrieve the necessary data, such as the current post title and content, to pre-populate the form fields for editing.
In the HTML section of the file, create a form that allows users to modify the post title, content, and any other relevant information they want to update. Display the current values of the post within the input fields so that the user can easily make changes.
In the PHP section of the file, handle the form submission and process the updated data. Retrieve the values from the form using the “$_POST” superglobal and sanitize them to prevent any potential security vulnerabilities.
Construct an SQL query to update the specific blog post in the database. Include the necessary columns, such as the post title, content, and any other fields you want to allow users to update.
Execute the query using the database connection and verify if the update was successful. Provide appropriate success or error messages based on the outcome of the update operation.
To implement the functionality for deleting blog posts, create a separate PHP file named “delete_post.php” in your project directory.
In the PHP section of the file, retrieve the ID or unique identifier of the blog post that the user wants to delete, either passed through URL parameters or obtained from user selection.
Construct an SQL query to delete the specific blog post from the database based on the identifier.
Execute the query using the database connection and verify if the deletion was successful. Provide appropriate success or error messages based on the outcome of the delete operation.
With the ability to update and delete blog posts, users can now manage their published content effectively. In the next section, we will conclude our tutorial and recap the key points covered in creating a blog with PHP.
Conclusion
In this tutorial, we explored the process of creating a blog using PHP, a powerful programming language for web development. We covered essential steps such as setting up the development environment, creating the database, implementing user registration and authentication, creating the home page, displaying blog posts, creating the blog post form, and saving blog posts to the database. Additionally, we discussed the process of displaying specific blog posts, allowing users to update and delete their posts.
By following these steps, you have successfully built a functional blog with PHP. However, this is just the beginning. There are many opportunities to further enhance your blog, such as improving the design with CSS, implementing additional features like a comment system or user profiles, and optimizing the performance and security of your application.
Remember to continuously refine your blog by updating it with fresh content, interacting with your readers, and analyzing user engagement to improve the overall user experience. Utilize search engine optimization techniques to increase visibility and attract more traffic to your blog.
Keep in mind that web development is a continuous learning process. Stay updated with the latest advancements and practices in PHP and web development technologies. Don’t hesitate to explore new tools, frameworks, and libraries that can help you enhance your blog and make development more efficient.
We hope this tutorial has provided you with the necessary guidance and knowledge to create your own blog using PHP. We encourage you to experiment, customize, and personalize your blog to reflect your unique style and voice. Happy blogging!