Introduction
Welcome to this article on how to convert Google Sheets to Excel. Google Sheets is a powerful online spreadsheet application that offers collaboration features and cloud storage. However, there may be instances where you need to work with your spreadsheets in Microsoft Excel, which is a widely used desktop application. Fortunately, converting Google Sheets to Excel is a straightforward process that allows you to easily transfer your data.
In this guide, we will walk you through the step-by-step instructions to convert your Google Sheets files to Excel format. Whether you prefer to work with Excel or need to share your spreadsheet with someone who uses Excel, this article will help you seamlessly transition from Google Sheets to Excel.
Please note that the following instructions assume you have access to both Google Sheets and Microsoft Excel. Additionally, ensure that you have a stable internet connection to download and upload your files.
Now, let’s dive into the steps required to convert your Google Sheets files to Excel!
Step 1: Download the Google Sheets file
The first step in converting your Google Sheets to Excel is to download the Google Sheets file to your computer. Here’s how:
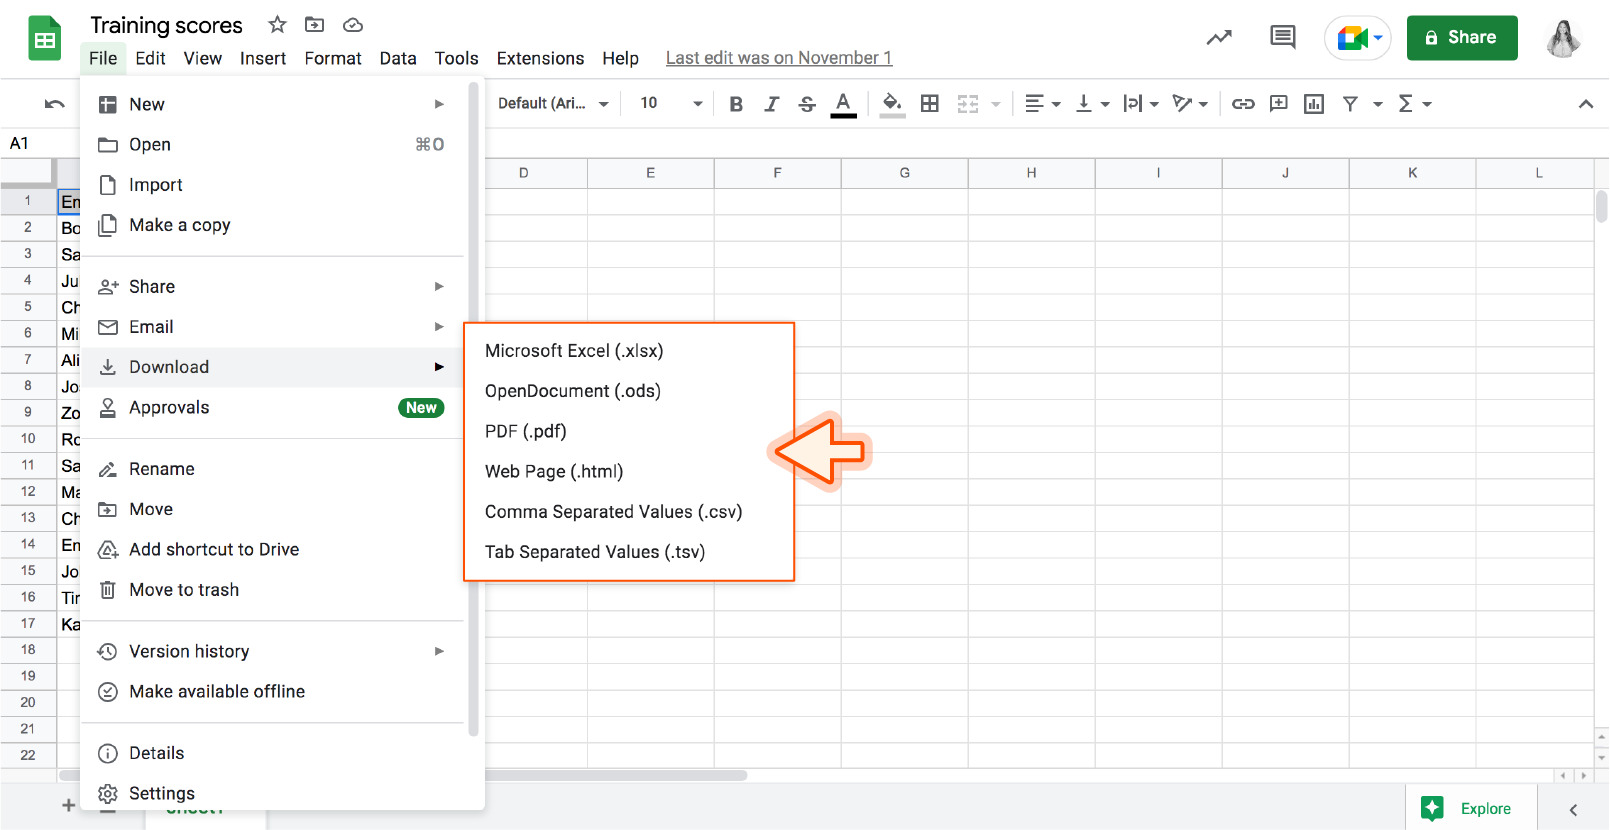
- Open Google Sheets in your web browser and sign in to your Google account if prompted.
- Locate the spreadsheet you want to convert to Excel.
- Right-click on the file and select “Download” from the context menu.
- Choose the desired format for your download. In this case, select “Microsoft Excel (.xlsx)” to ensure compatibility with Excel.
- Select the location on your computer where you want to save the downloaded file.
- Click on “Save” to initiate the download process.
Once the download is complete, you will have a local copy of your Google Sheets file in Excel format ready for further processing.
Note that the downloaded file will be saved with the .xlsx extension, which is the default file format used by Excel. This ensures that the file can be opened and edited in Excel without any compatibility issues.
Now that you have successfully downloaded your Google Sheets file, let’s move on to the next step: opening the file in Excel.
Step 2: Open the Google Sheets file in Excel
Once you have downloaded the Google Sheets file to your computer, the next step is to open it in Microsoft Excel. Follow these simple instructions:
- Locate the downloaded Google Sheets file on your computer.
- Double-click on the file to open it.
- If you have Microsoft Excel installed on your computer, the file should automatically open in Excel. If prompted, select Microsoft Excel as the program to open the file.
Excel will now load the Google Sheets file into its interface, and you can start working with the data.
It’s important to note that not all features of Google Sheets may be fully compatible with Excel. While most data and formatting should transfer seamlessly, there may be some elements that require adjustment or modification inside Excel.
By opening the Google Sheets file in Excel, you now have the ability to leverage the advanced features and functionality offered by Excel for further data analysis, manipulation, and presentation.
Now that you have successfully opened the Google Sheets file in Excel, let’s move on to the next step: saving the file as an Excel file.
Step 3: Save the Google Sheets file as an Excel file
After you have opened the Google Sheets file in Microsoft Excel, the next step is to save it as an Excel file format. This will ensure that any changes or modifications you make to the file are saved in the correct format. Follow these steps to save the file:
- Click on the “File” tab at the top-left corner of the Excel window.
- From the dropdown menu, select the option “Save As.”
- In the “Save As” dialog box, choose the location on your computer where you want to save the file.
- Enter a name for the file in the “File name” field.
- From the “Save as type” dropdown, select “Excel Workbook (*.xlsx)”.
- Click on the “Save” button to save the file as an Excel workbook.
With these steps, you have successfully saved the Google Sheets file as an Excel file. This ensures that any changes you make to the file will be saved in the Excel format, allowing for seamless compatibility with Excel and other applications that support Excel files.
It’s important to note that saving the file in Excel format may result in some formatting differences compared to the original Google Sheets file. Make sure to review the file and adjust any formatting as needed to maintain data consistency and visual appeal.
Now that you have saved the Google Sheets file as an Excel file, let’s move on to the next step: checking for any formatting issues.
Step 4: Check for any formatting issues
After saving the Google Sheets file as an Excel file, it’s important to check for any formatting issues that may have occurred during the conversion process. Here are a few things to consider:
- Check the alignment and formatting of cells: Make sure that the alignment, font styles, and cell formatting, such as bold or italics, are preserved in the Excel file. Adjust any discrepancies to match the original formatting.
- Verify column widths: Check if the column widths in the Excel file match those in the Google Sheets file. If there are any differences, adjust the column widths to ensure the data is displayed properly.
- Review conditional formatting: Conditional formatting rules applied in Google Sheets may not transfer perfectly to Excel. Verify that any conditional formatting rules are still intact and adjust as needed.
- Inspect merged cells: If your Google Sheets file includes merged cells, confirm that they are still merged correctly in Excel. Adjust any merged cells that may have been affected during the conversion.
It’s important to note that while most formatting should transfer seamlessly from Google Sheets to Excel, there may be some variations due to differences in features and functionality between the two applications.
Take the time to thoroughly review the Excel file for any formatting inconsistencies and make the necessary adjustments to ensure the file looks and behaves as intended.
Now that you have checked for any formatting issues, let’s move on to the next step: converting any formulas or functions.
Step 5: Convert any formulas or functions
When converting your Google Sheets file to Excel, it’s important to review and convert any formulas or functions used in the spreadsheet. Here’s how you can do it:
- Open the Excel file containing the converted Google Sheets file.
- Review the formulas or functions used in the original Google Sheets file.
- Check if any formulas or functions need to be adjusted due to differences between Google Sheets and Excel.
- Modify the formulas or functions in Excel syntax if necessary.
While many commonly used formulas and functions in Google Sheets have equivalents in Excel, there may be some differences in syntax or functionality. For example, Excel may use a different type of cell reference or have unique functions not found in Google Sheets.
During the conversion process, it’s important to carefully review the formulas and functions used in your spreadsheet and make the necessary adjustments to ensure they function correctly in Excel.
If you encounter complex or specialized formulas, it’s a good idea to consult Excel’s documentation or online resources to understand any differences or limitations.
By converting your formulas and functions correctly, you can ensure that the calculations and data manipulation in your spreadsheet are accurately maintained in Excel.
Now that you have converted any necessary formulas or functions, let’s move on to the next step: reviewing and saving the converted Excel file.
Step 6: Review and save the converted Excel file
After converting your Google Sheets file to Excel, it’s crucial to review the converted file and ensure that everything is functioning correctly before saving it. Follow these steps to review and save the converted Excel file:
- Thoroughly review the data in the converted Excel file to ensure that all information is accurately transferred.
- Double-check that any formulas or functions in the spreadsheet are working correctly and producing the expected results.
- Verify that any charts, graphs, or visuals are still intact and displaying properly in Excel.
- Test any macros or scripts you may have used in Google Sheets to ensure their functionality in Excel.
- Make any necessary adjustments or corrections to the converted Excel file to match the original Google Sheets file.
- Once you are satisfied with the review and any necessary modifications, save the converted Excel file by clicking on the “File” tab and selecting “Save.”
- Choose the desired location on your computer to save the file, and enter a name for the converted Excel file.
- Click on the “Save” button to save the file, completing the conversion process.
By carefully reviewing the converted Excel file and addressing any issues or discrepancies, you can ensure that the file is accurate and ready for use.
Remember to store the converted Excel file in a secure location and consider making backup copies to prevent any data loss.
Now that you have reviewed and saved the converted Excel file, you have successfully completed the process of converting your Google Sheets file to Excel!
Conclusion
Converting Google Sheets to Excel allows you to work with your spreadsheets in Microsoft Excel, taking advantage of its advanced features and compatibility. In this article, we have provided a step-by-step guide on how to convert Google Sheets to Excel, covering the entire process from downloading the Google Sheets file to saving it as an Excel file format.
By following these steps, you can seamlessly transfer your data and ensure its integrity during the conversion. However, it’s important to note that while most elements such as data, formatting, and formulas transfer smoothly, there may be some differences and adjustments required due to variations in features and functionality between Google Sheets and Excel.
Additionally, checking for any formatting issues and converting formulas or functions correctly are vital steps to ensure the converted Excel file accurately represents the original Google Sheets file. Taking the time to review and make necessary adjustments will help maintain the integrity and functionality of your data in the Excel format.
Remember to save the converted Excel file securely and consider keeping backup copies to avoid data loss. This will ensure that you have a reliable version of your spreadsheet readily available for further analysis, sharing, or collaboration.
Converting Google Sheets to Excel expands the opportunities to work with your data and collaborate with others who use Excel. With the steps outlined in this article, you can confidently convert your Google Sheets files to Excel and take full advantage of the powerful features offered by Microsoft Excel.
We hope this guide has been helpful, and you can now navigate the process of converting Google Sheets to Excel with ease.