


Introduction
Welcome to this step-by-step guide on how to download an Excel sheet as a PDF. Converting an Excel file into a PDF format allows you to easily share and distribute the information in a standardized and secure manner. Whether you need to send a financial report to your colleagues, share a spreadsheet with your clients, or simply want to keep a backup of your data in a PDF format, this guide will walk you through the process.
Excel is a powerful tool for creating and organizing data in a spreadsheet format, while PDF (Portable Document Format) is ideal for sharing documents in a format that preserves the layout and formatting across different devices and operating systems. By converting an Excel sheet to a PDF, you can ensure that the recipient sees the document exactly as you intended, regardless of the software or device they are using.
In the following sections, we will outline a series of simple steps to help you download an Excel sheet as a PDF. Whether you are a beginner or an experienced user, you will find this guide easy to follow and implement. So, without further ado, let’s get started!
Step 1: Open the Excel sheet
The first step in downloading an Excel sheet as a PDF is to open the Excel file you want to convert. Locate the Excel file on your computer or in your preferred storage location and double-click on it to open it. If you have recently worked on the file and it is listed in your recent documents, you can also access it from there.
Once you open the Excel sheet, you will be able to see the data, formulas, and formatting that you have applied to the file. Take a moment to review the content and ensure that it is accurate and up-to-date. If you need to make any changes or updates to the Excel sheet before converting it to a PDF, you can do so at this stage.
If you’re not familiar with Excel or need assistance in navigating through the spreadsheet, you can refer to the toolbar at the top of the Excel window. The toolbar contains a variety of useful options and commands that allow you to perform various functions within Excel. You can use these options to modify the content, format cells, insert or delete rows and columns, and perform calculations, among other tasks.
It’s important to ensure that the Excel sheet is formatted correctly and ready for conversion before proceeding to the next step. This includes checking for any errors, applying appropriate formatting, and organizing the data in a way that makes sense to the reader. Taking the time to prepare the Excel sheet will result in a more professional and polished PDF document.
Once you are satisfied with the content and formatting of the Excel sheet, you are ready to move on to the next step of the process, which involves saving the Excel file as a PDF. This step will be covered in detail in the subsequent section, so let’s proceed to step 2.
Step 2: Go to the “File” tab
Once you have opened the Excel sheet and reviewed the content, the next step is to navigate to the “File” tab. The “File” tab is located in the top-left corner of the Excel window and is represented by an icon that resembles a folder. Clicking on this tab will open a drop-down menu with various options.
When you click on the “File” tab, a new window will open, displaying the backstage view of Excel. The backstage view is designed to provide you with access to file-related commands and options. Here, you will find a range of tools and settings that allow you to manage your Excel file, including saving, printing, protecting, and sharing the document.
In the backstage view, you will notice a navigation bar on the left side of the window. This navigation bar serves as a guide to help you navigate through the different sections and commands available in the backstage view. To proceed with converting the Excel sheet to a PDF, we need to access the “Save As” option, which is located within the backstage view.
To find the “Save As” option, simply look for the icon that resembles a floppy disk, typically located near the top of the navigation bar on the left-hand side. This is the commonly recognized symbol for saving a file. Click on this icon, and it will take you to the next step of the process.
Alternatively, you can also use the keyboard shortcut “Ctrl + S” (for Windows) or “Command + S” (for Mac) to quickly access the “Save As” option. This shortcut is a time-saving method that allows you to bypass the “File” tab and directly open the “Save As” window.
Now that you have successfully navigated to the “File” tab and accessed the backstage view, it is time to proceed to the next step, which involves selecting the “Save As” option. The process of saving the Excel sheet as a PDF will be explained in detail in the following sections.
Step 3: Select “Save As”
After accessing the “File” tab and entering the backstage view in Excel, the next step is to select the “Save As” option. This option allows you to save the Excel sheet in a different format, which in this case is a PDF.
To select the “Save As” option, look for it within the backstage view. You will typically find it listed as one of the options in the navigation bar on the left side of the window. The icon for the “Save As” option is often represented by an image of a floppy disk or a folder with an arrow pointing downwards. Clicking on this option will open the “Save As” window.
Alternatively, you can also use the keyboard shortcut “Ctrl + Shift + S” (for Windows) or “Command + Shift + S” (for Mac) to quickly access the “Save As” window. This shortcut allows you to bypass the navigation through the backstage view and directly open the “Save As” window.
Once you are in the “Save As” window, you will see a variety of options and settings that allow you to customize the saving process. This includes choosing the location where you want to save the PDF file, entering a file name, and selecting the PDF format as the desired file format.
Take a moment to review the options in the “Save As” window. You can navigate through different folders and subfolders on your computer to choose the desired destination for saving the PDF file. It’s important to select a location that is easy to access and remember, so you can easily retrieve the file when needed.
Additionally, make sure to enter a file name for the PDF file. Choose a descriptive and recognizable name that accurately reflects the content of the Excel sheet. This will make it easier for you and others to identify the file later on.
Finally, you need to select the PDF format as the desired file format for saving. In most versions of Excel, the PDF format will be listed as an option in the drop-down menu next to the “Save as type” or “File format” field. Locate this option and choose it from the list.
Now that you have successfully selected the “Save As” option and accessed the “Save As” window, you are ready to move on to the next step, where you will choose the destination folder for saving the PDF file. This will be covered in detail in the following section.
Step 4: Choose the destination folder
After selecting the “Save As” option in Excel and entering the “Save As” window, the next step is to choose the destination folder where you want to save the PDF file. This folder will serve as the location on your computer where the converted file will be stored.
In the “Save As” window, you will see a navigation pane on the left side that allows you to browse through different folders and drives on your computer. This pane displays a directory tree structure, starting with the main drives and expanding to show subfolders and nested directories.
To choose the destination folder, navigate through the directory tree structure and locate the specific folder where you want to save the PDF file. You can expand folders and subfolders by clicking on the triangle or plus sign next to them, and collapse them by clicking on the triangle or minus sign.
If you have a preferred location for saving your files, such as a specific folder dedicated to storing PDF documents, you can navigate directly to that folder. Alternatively, you can choose any other folder that suits your needs, such as the desktop or a specific project folder.
It’s important to consider the organization and accessibility of the destination folder. Choose a folder that is easy to locate and access when you need to retrieve the PDF file in the future. This will save you time and effort in searching for the file.
In addition to browsing through the folder structure, you can also type the path of the destination folder directly into the “File name” field at the top of the “Save As” window. This allows you to quickly navigate to a specific folder by entering its file path.
Once you have selected the destination folder, take a moment to review the chosen location in the “Save As” window. Ensure that it is the correct folder where you want to save the PDF file and that it meets your requirements.
Now that you have successfully chosen the destination folder for saving the PDF file, you are ready to proceed to the next step, where you will learn how to adjust the settings before saving the file. This will be covered in detail in the following section.
Step 5: Choose “PDF” as the file format
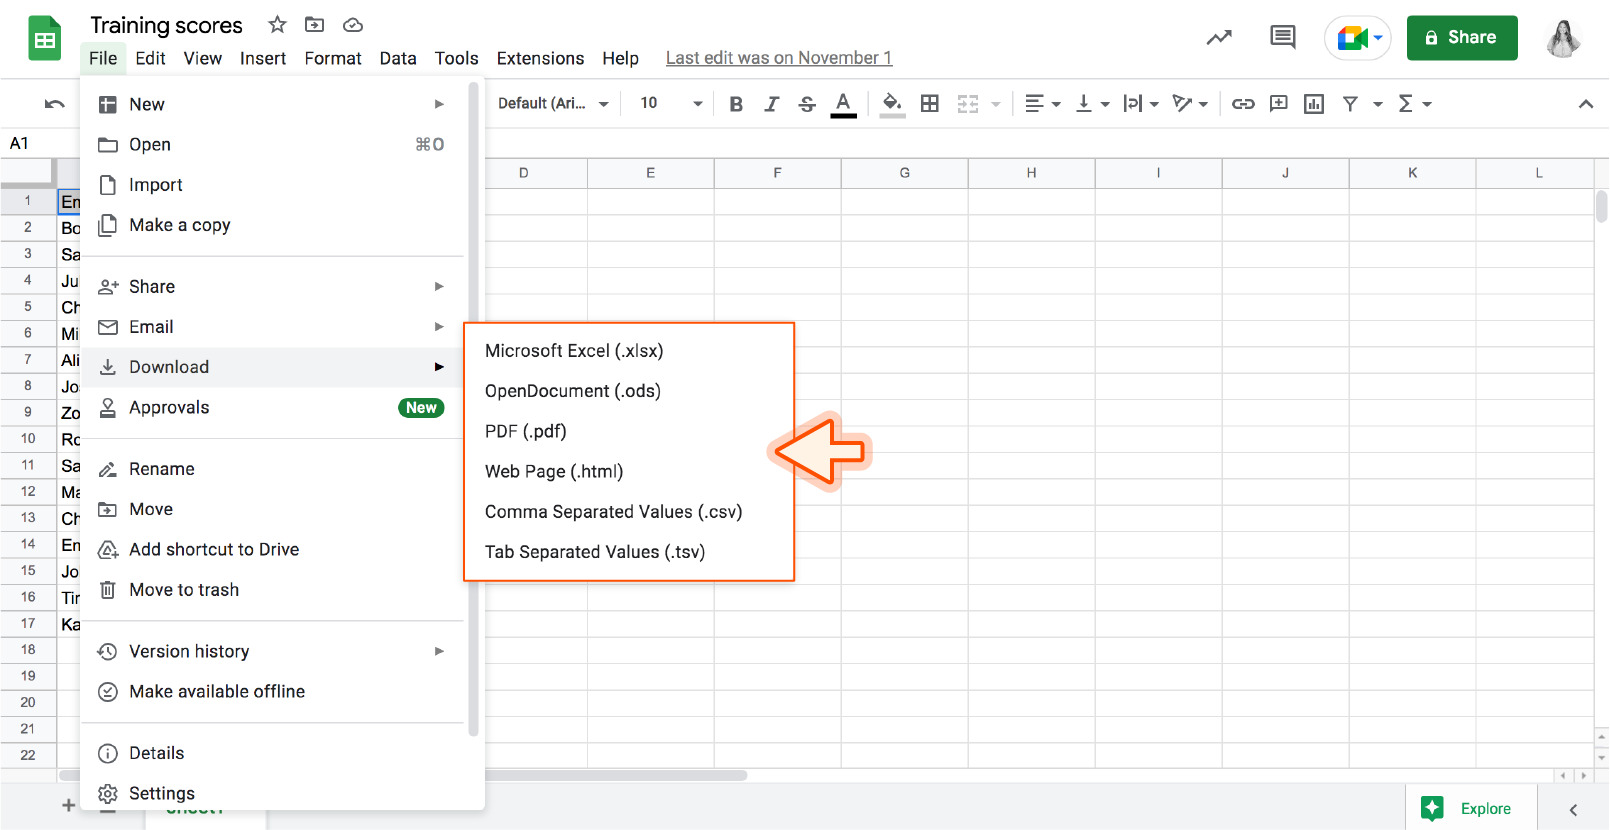
After selecting the desired destination folder for saving your file, the next step is to choose the file format. In this case, you will choose the “PDF” format to convert the Excel sheet into a PDF document.
In the “Save As” window, you will see a field or drop-down menu labeled “Save as type” or “File format.” This is where you can choose the file format for saving your Excel sheet.
To convert the Excel sheet into a PDF, locate the “PDF” option from the list of available formats. In most versions of Excel, “PDF” is listed as one of the standard options for saving files. Click on the “PDF” option to select it as the file format for saving.
By choosing the “PDF” format, you ensure that the Excel sheet is saved as a PDF document with all the data, formatting, and layout preserved. PDF is a widely recognized file format that can be easily viewed and accessed on different devices and operating systems without the need for the original Excel software.
Choosing the “PDF” format also allows you to take advantage of additional features and benefits that PDF files offer. These include the ability to secure the document with password protection, add digital signatures, and even perform data extraction or form filling.
Once you have selected the “PDF” format as the file format in the “Save As” window, the conversion process is almost complete. However, before saving the file, you may also want to explore the available options to adjust the settings for the PDF document. This will be covered in detail in the next step.
Now that you have successfully selected the “PDF” format as the file format for saving, you are ready to proceed to the next step, where you will learn how to adjust the settings before saving the PDF file. This will be covered in detail in the following section.
Step 6: Adjust the settings
After choosing the “PDF” format for saving the Excel sheet, the next step is to adjust the settings to meet your requirements. The settings allow you to customize various aspects of the PDF document before saving it.
In the “Save As” window, you will find a range of settings and options that you can modify to tailor the PDF document to your needs. These settings may vary depending on the version of Excel you are using, but some common options include:
- Page orientation: Choose between portrait (vertical) or landscape (horizontal) orientation for the PDF pages.
- Page size: Select the appropriate page size for the PDF document, such as A4, Letter, Legal, or custom dimensions.
- Scaling: Adjust the scale of the content to fit within the PDF pages, especially if the Excel sheet is larger than the selected page size.
- Headers and footers: Specify any headers or footers you want to include in the PDF document, such as page numbers or document title.
- Options for printing objects: Decide whether to include or exclude objects such as comments, charts, or hidden sheets in the PDF.
- Quality settings: Choose the image quality and resolution for any images or graphics embedded in the Excel sheet.
Take the time to review these settings and adjust them according to your preferences. For example, if your Excel sheet contains multiple pages, you may want to select the appropriate page orientation and size to ensure that the content fits well within the PDF pages.
You can also consider adding headers and footers to provide additional information or branding to the PDF document. This is useful if you plan to share the PDF with others or if you want to maintain a consistent look across multiple pages.
Additionally, depending on the content of the Excel sheet, you may want to include or exclude certain objects in the PDF. For example, if there are hidden sheets or comments that are not intended for viewing, you can choose to exclude them from the final PDF file.
By adjusting the settings, you can customize the PDF document to match your specific requirements and ensure that the converted file meets your expectations.
Once you have made the necessary adjustments to the settings, you are ready to save the Excel sheet as a PDF. The final step of the process will be covered in the next section.
Step 7: Click “Save”
After adjusting the settings for the PDF document, the next step is to click the “Save” button to save the Excel sheet as a PDF file. The “Save” button is typically located at the bottom right corner of the “Save As” window in Excel.
Before clicking “Save,” take a moment to review the settings you have chosen and ensure everything is as desired. Double-check the destination folder you have selected, the file name you have entered, and any additional settings you have adjusted.
Once you are satisfied with the settings, click the “Save” button to initiate the conversion process. Excel will start the process of converting the Excel sheet into a PDF file and saving it to the specified destination folder.
Depending on the size and complexity of the Excel sheet, the conversion process may take a few seconds or longer to complete. You may see a progress bar or loading indicator while Excel is working on converting the file.
During this process, it’s essential to avoid closing Excel or interrupting the saving process. Doing so may result in an incomplete or corrupted PDF file. Instead, allow Excel to finish the conversion, and once it completes, you will receive a confirmation message indicating that the file has been saved successfully.
Now that you have clicked “Save” and saved the Excel sheet as a PDF, the conversion process is complete. Congratulations! You have successfully converted and saved your Excel sheet as a PDF document.
Before concluding this guide, it is important to verify the downloaded PDF file to ensure the conversion was successful and the PDF document is accurate and complete. The next section will guide you through the process of verifying the downloaded PDF file.
Step 8: Verify the downloaded PDF file
After saving the Excel sheet as a PDF file, the final step is to verify the downloaded PDF to ensure the conversion was successful and the document is accurate and complete.
Locate the PDF file in the destination folder where you saved it. Double-click on the file to open it using a PDF viewer or reader program. Popular PDF viewers include Adobe Acrobat Reader, Foxit Reader, and Google Chrome.
Once the PDF file is open, thoroughly review the content to ensure that it accurately represents the information from the original Excel sheet. Check the formatting, data, images, and any other elements to ensure they have been preserved in the PDF version.
Pay attention to the overall layout and formatting of the PDF document. Ensure that the pages are aligned correctly, tables are intact, and any charts or graphs are accurately rendered. Check for any missing or distorted content that may have occurred during the conversion process.
If your Excel sheet contained formulas, verify that the calculations have been correctly transferred to the PDF. Check for any discrepancies or errors in calculations that may have occurred during the conversion.
Additionally, if you had applied any styling or formatting to the Excel sheet, such as font styles, colors, or conditional formatting, make sure they have been correctly translated to the PDF version.
Take the time to thoroughly review the PDF file, with a particular focus on critical or sensitive information. If the Excel sheet contained confidential data, ensure that it has not been compromised and is protected in the PDF.
If you notice any issues or discrepancies in the PDF file, you can go back to the Excel sheet, make the necessary corrections, and repeat the conversion process to generate a new PDF file.
By verifying the downloaded PDF file, you can ensure that the conversion process was successful and that the PDF accurately represents the original Excel sheet.
Now that you have successfully verified the downloaded PDF file and confirmed its accuracy, you have completed the entire process of downloading an Excel sheet as a PDF. You can now confidently share or distribute the PDF document, knowing that it will be accessible and viewable by others without the need for Excel software.
Conclusion
Converting an Excel sheet into a PDF format can greatly enhance its accessibility, portability, and professional presentation. In this guide, we have walked you through the step-by-step process of downloading an Excel sheet as a PDF.
We started by opening the Excel sheet and ensuring it was ready for conversion. Then, we guided you through accessing the “File” tab and selecting the “Save As” option from the backstage view. Next, we covered choosing the destination folder and selecting “PDF” as the file format for saving.
Adjusting the settings allowed you to customize the PDF document according to your specific needs and preferences. Finally, we instructed you to click “Save” to initiate the conversion process and verify the downloaded PDF file to ensure its accuracy.
By following these steps, you can easily convert and save your Excel sheets as PDFs, enabling you to share, distribute, and archive important data and information in a standardized and secure format.
Remember, during the process, it is crucial to carefully review the settings and verify the downloaded PDF file to ensure that the conversion was successful. Taking the time to double-check the document ensures that the content, formatting, and calculations are accurately transferred to the PDF format.
Now that you have mastered the process of downloading an Excel sheet as a PDF, you can confidently share, print, or store your files in a format that is universally recognized and easily accessible to others.
We hope this guide has been helpful and has empowered you with the knowledge to convert your Excel sheets into PDFs effortlessly. Happy converting!


![18 Best Online PDF Readers and Editors in 2022 [100% Working]](https://robots.net/wp-content/uploads/2020/06/PDF-image-300x196.jpg)


