Introduction
Google Sheets is a powerful online spreadsheet tool that allows users to organize and analyze data. Whether you’re using Google Sheets for personal or professional purposes, it’s important to have the ability to insert check marks to signify completed tasks, approvals, or any other important information.
In this guide, we will show you five different methods to insert check marks in Google Sheets. From using the Insert menu to leveraging keyboard shortcuts and even using specific functions, we have you covered. Let’s dive in and discover how you can easily insert check marks into your Google Sheets!
Having the ability to use check marks not only adds visual clarity but also helps streamline your workflow. You can mark off completed tasks, track progress, or create detailed checklists. Whether you’re managing a project, organizing tasks, or keeping track of important information, check marks in Google Sheets can be a useful tool.
Let’s explore the different methods you can use to insert check marks into your Google Sheets. Whether you’re a beginner or an advanced user, these methods are user-friendly and will help you improve your productivity.
Note: The methods we will cover in this guide apply to both the desktop and web versions of Google Sheets.
Method 1: Using the Insert menu
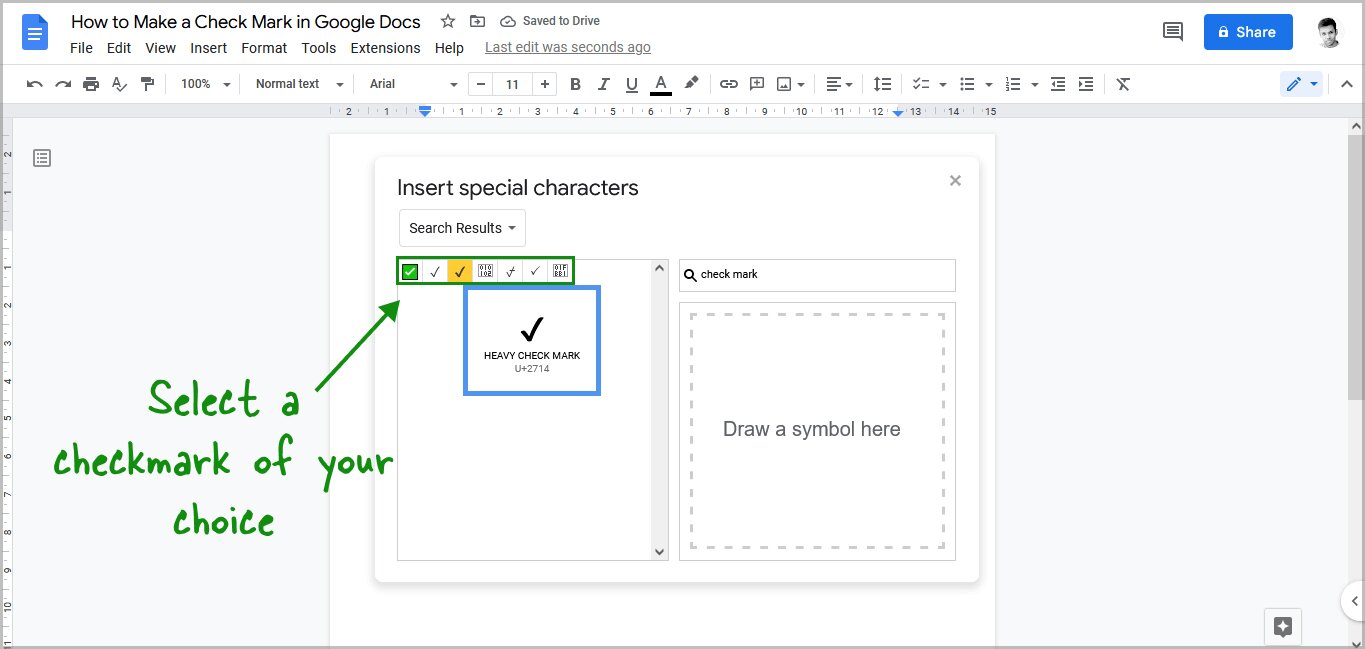
One of the easiest ways to insert check marks in Google Sheets is by utilizing the Insert menu. Here’s how you can do it:
- Open your Google Sheets document.
- Select the cell where you want to insert the check mark.
- Navigate to the top menu and click on “Insert”.
- In the dropdown menu, select “Special characters”.
- A sidebar will appear on the right-hand side of the screen. In the search box, type “check mark” and press Enter.
- Various check mark symbols will be displayed. Choose the one that suits your needs, and then click on it.
- Finally, click on the “Insert” button at the bottom of the sidebar.
After following these steps, the check mark symbol will be inserted into the selected cell in your Google Sheets document.
This method allows you to choose from a variety of check mark symbols, providing flexibility in terms of design and style. You can explore different check mark options to find the one that best matches your preference or fits the context of your spreadsheet.
Using the Insert menu to insert check marks is a straightforward and convenient method, especially for those who are new to Google Sheets or prefer a more visual approach. However, if you regularly need to insert check marks, consider exploring other methods that offer faster and more efficient workflows.
Method 2: Using keyboard shortcuts
If you prefer a faster way to insert check marks in Google Sheets, using keyboard shortcuts can be a time-saving option. Follow these steps:
- Open your Google Sheets document.
- Select the cell where you want to insert the check mark.
- Press the “Equal” (=) key on your keyboard.
- Type the formula “
CHAR(10003)” without the quotation marks. - Press Enter.
Upon pressing Enter, the check mark symbol will be inserted into the selected cell. By using the CHAR formula with the specific code “10003”, you can directly add the check mark symbol without the need for searching and selecting it from a character library.
This method is not only efficient but also allows you to quickly insert check marks in multiple cells by copying and pasting the formula. Simply copy the cell containing the check mark, select the range of cells where you want to insert the check marks, and paste the formula using the “Ctrl+V” (Windows) or “Cmd+V” (Mac) keyboard shortcuts.
Using keyboard shortcuts can significantly speed up your workflow and save you time, especially if you frequently need to insert check marks in your Google Sheets documents. Memorizing this keyboard shortcut can be a valuable asset for increasing your productivity.
Method 3: Using the CHAR function
Another method to insert check marks in Google Sheets is by utilizing the versatile CHAR function. The CHAR function allows you to convert specific character codes into symbols, including the check mark symbol. Here’s how to use it:
- Open your Google Sheets document.
- Select the cell where you want to insert the check mark.
- Enter the following formula into the cell: “
=CHAR(10003)” without the quotation marks. - Press Enter.
After following these steps, the check mark symbol will be displayed in the selected cell. By using the CHAR function with the character code “10003”, you can directly insert the check mark symbol into your spreadsheet.
The advantage of using the CHAR function is the ability to customize the character code to insert different symbols. You can refer to the Unicode character charts to find the specific character codes for various symbols, including different styles of check marks.
Using the CHAR function provides flexibility and control over the symbols you want to insert. This method is particularly useful when you need to insert special characters or symbols other than the standard check mark symbol.
By exploring the possibilities of the CHAR function, you can unlock a wide range of symbol options to enhance your Google Sheets documents with visually appealing and informative check marks.
Method 4: Using the TRANSPOSE function
If you have a column or row of cells that you want to convert into check marks, you can use the TRANSPOSE function in Google Sheets. The TRANSPOSE function allows you to switch the orientation of the data, making it perfect for converting a column or row into a series of check marks. Here’s how you can do it:
- Open your Google Sheets document.
- Insert a new column or row next to the one you want to convert into check marks.
- In the first cell of the new column or row, enter the formula “
=ARRAYFORMULA(TRANSPOSE(ARRAYFORMULA(CHAR(10003))))“, without the quotation marks. - Press Enter.
After following these steps, the entire column or row will be populated with check mark symbols using the TRANSPOSE function combined with the CHAR function. This method allows you to quickly convert a series of cells into check marks.
Furthermore, you can customize the formula by adjusting the character code in the CHAR function, enabling you to insert different symbols or characters as desired.
Using the TRANSPOSE function can be particularly beneficial when you have a large dataset and need to convert multiple cells into check marks. This method saves time and effort by automating the process of inserting check marks across an entire column or row.
Give the TRANSPOSE function a try, and effortlessly convert your data into neatly organized check marks in Google Sheets!
Method 5: Using the IF function
If you want to insert check marks based on specific conditions or criteria, you can utilize the powerful IF function in Google Sheets. The IF function allows you to perform logical tests and return different values based on the result. Here’s how you can use it to insert check marks:
- Open your Google Sheets document.
- Select the cell where you want to insert the check mark.
- Enter the following formula into the cell: “
=IF(logical_test, CHAR(10003), "")“, without the quotation marks. - Replace “logical_test” with the condition or criteria you want to test against. For example, you can use a comparison operator like “
A1>B1” to compare the values of cells A1 and B1. - Press Enter.
After following these steps, the check mark symbol will be inserted into the selected cell if the logical test evaluates to TRUE. Otherwise, the cell will remain empty.
The IF function provides flexibility in determining when to display the check mark symbol based on specific conditions or criteria defined by the logical test. You can customize the logical test according to your needs, allowing for dynamic insertion of check marks into your spreadsheet based on changing data or variables.
This method empowers you to automate the process of inserting check marks based on specific rules, making it highly useful for tracking progress, highlighting completed tasks, or flagging certain conditions in your Google Sheets documents.
Take advantage of the IF function’s conditional capabilities to create dynamic check marks and streamline your data analysis in Google Sheets.
Conclusion
With the ability to insert check marks in Google Sheets, you can enhance the visual representation and organization of your data. Through the five methods we discussed, you have multiple options for adding check marks based on your preferences and requirements. Let’s recap what we’ve learned:
Method 1: Using the Insert menu allows you to easily select and insert various check mark symbols from a character library, providing flexibility in design and style.
Method 2: Using keyboard shortcuts offers a quicker way to insert check marks by utilizing the CHAR function. This method is efficient, especially if you need to insert check marks frequently.
Method 3: Leveraging the CHAR function allows you to customize the character code to insert different symbols or even special characters, providing more flexibility and control over the symbols you want to use.
Method 4: Utilizing the TRANSPOSE function is perfect when you have a column or row of cells that you want to convert into a series of check marks, automating the process and saving time.
Method 5: Using the IF function enables you to insert check marks based on specific conditions or criteria, providing dynamic and automated check mark insertion.
By having these methods at your disposal, you can easily incorporate check marks into your Google Sheets documents, making them more visually appealing and informative. Whether you’re managing projects, tracking progress, or organizing tasks, check marks can be a valuable tool to streamline your workflow.
Experiment with these methods, and find the ones that work best for your specific needs. Combine them as necessary to maximize efficiency and achieve your desired results in Google Sheets.
Now that you have a range of techniques to insert check marks, go ahead and apply them to your own Google Sheets projects, and experience the benefits of visual clarity and streamlined data management.