Introduction
Google Sheets is a powerful cloud-based spreadsheet program that offers a wide range of functionalities for data organizing, manipulation, and analysis. However, there may be instances when you need to download your Google Sheets to Excel for various reasons, such as sharing data with colleagues or clients who prefer working with Microsoft Excel. Fortunately, the process of downloading Google Sheets to Excel is straightforward and can be done in just a few simple steps.
In this guide, we will walk you through the process of downloading a Google Sheet to Excel format so you can easily access and work on your data using Microsoft Excel. Whether you are a beginner or a seasoned user, this step-by-step tutorial will help you export your Google Sheets to Excel without any hassle.
Before we dive into the nitty-gritty details, it is important to note that Google Sheets and Microsoft Excel may have some slight differences in terms of features and formatting options. While most basic data will transfer smoothly between the two platforms, more advanced features, formulas, and functions may not be fully compatible. Therefore, it is recommended to double-check your data and formatting after downloading from Google Sheets to ensure accuracy and consistency.
So, let’s get started with the process of downloading Google Sheets to Excel!
Step 1: Open Google Sheets
The first step in downloading your Google Sheet to Excel is to open Google Sheets. If you already have a Google account, simply navigate to https://docs.google.com/spreadsheets and sign in. If you don’t have a Google account, you will need to create one before proceeding.
Once you are signed in, you will be directed to the Google Sheets homepage where you can see a list of your saved spreadsheets. If you already have the spreadsheet you want to download open, simply click on it to proceed. Otherwise, click on the “+” button to create a new spreadsheet or choose from a template.
Google Sheets offers a user-friendly interface with various tools and features that make it easy to organize and analyze your data. Spend some time familiarizing yourself with the different options available, such as formatting cells, sorting data, and creating formulas. This will help you make the most of your Google Sheets experience.
Now that you have Google Sheets open, you are ready to move on to the next step and select the sheet you want to download.
Step 2: Select the sheet you want to download
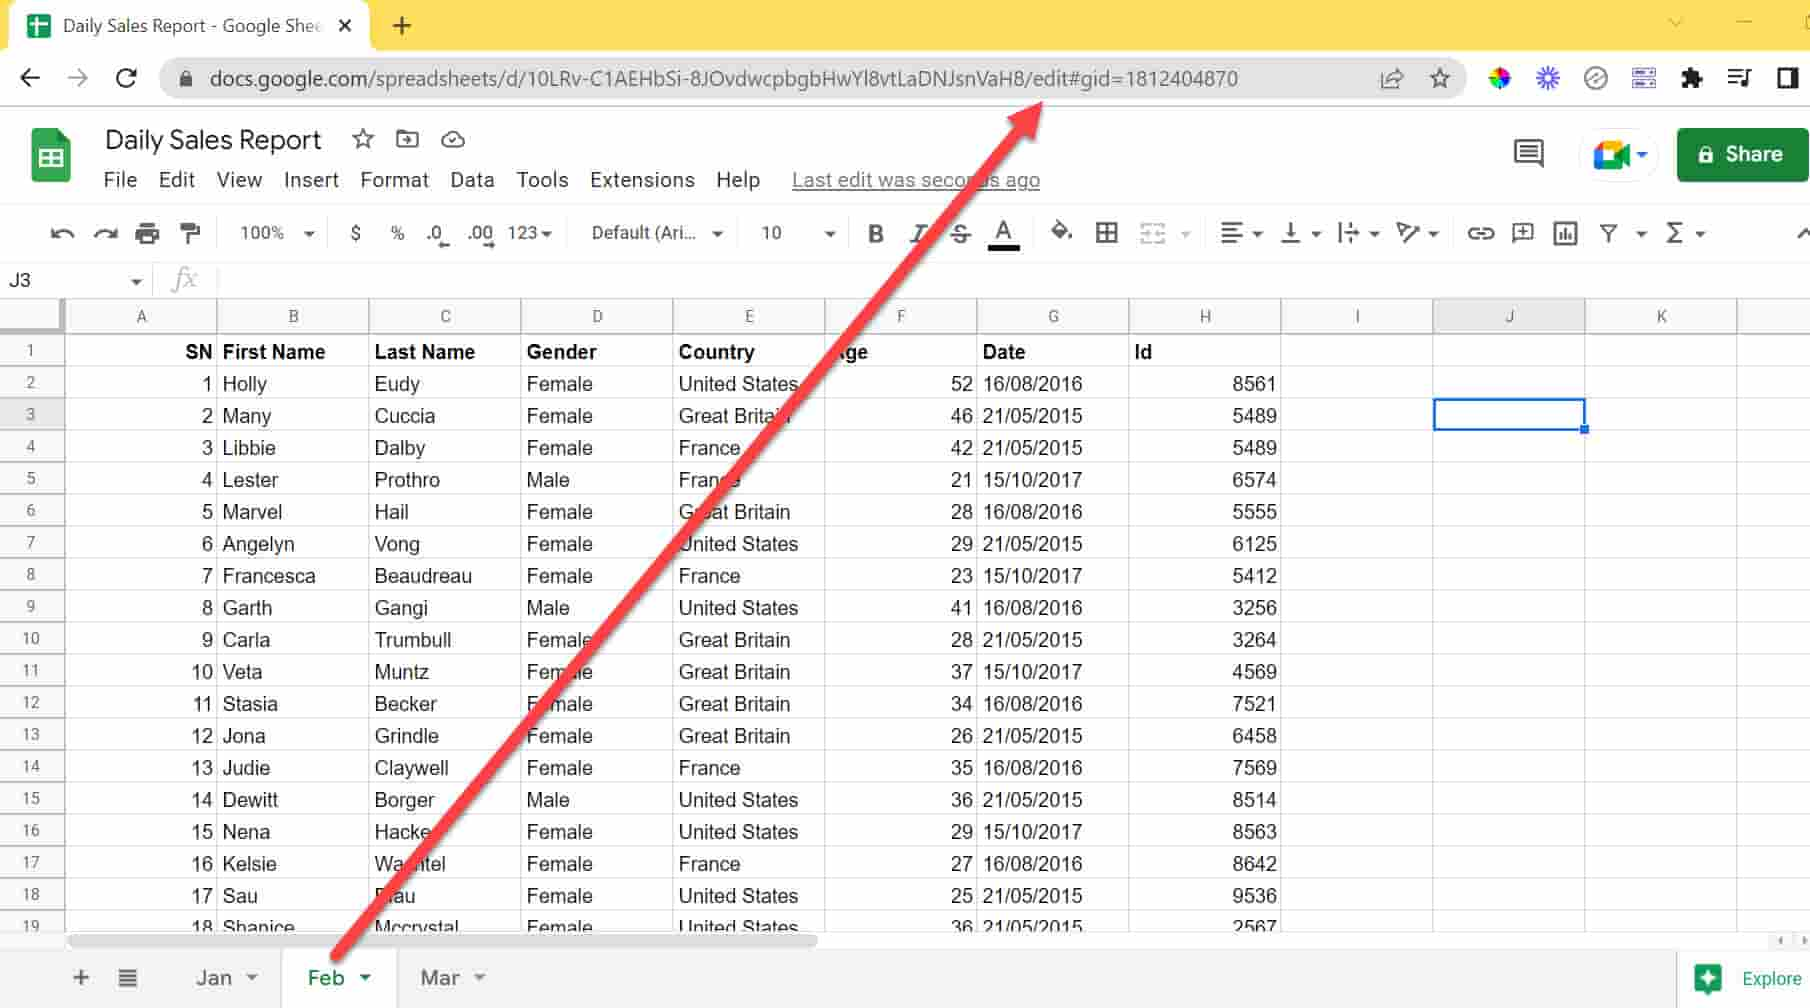
Once you have Google Sheets open, you need to select the specific sheet within the spreadsheet that you want to download to Excel. If your spreadsheet contains multiple sheets, each sheet may have different data or serve a different purpose. Therefore, it is important to choose the correct sheet before proceeding with the download.
To select the sheet, simply click on the tab at the bottom of the spreadsheet. Each sheet is represented by a unique tab, typically labeled with a name or a default “Sheet” followed by a number. Clicking on the tab will bring you to the corresponding sheet, displaying the data and any formatting you have applied.
Take a moment to review the contents of the sheet and ensure that it is the one you want to download. If needed, you can make any necessary changes or updates before proceeding to the next step.
It’s worth noting that you can select multiple sheets to download at once. Simply hold down the “Ctrl” key (or “Cmd” key on a Mac) and click on the tabs of the sheets you want to include. This can be useful if you have related data on different sheets that you want to consolidate into a single Excel file.
Once you have selected the sheet or sheets you want to download, you are ready to move on to the next step and export the sheet.
Step 3: Export the sheet
After selecting the specific sheet or sheets you want to download, it’s time to export them from Google Sheets. Exporting your selected sheet will convert it into a file format that is compatible with Microsoft Excel.
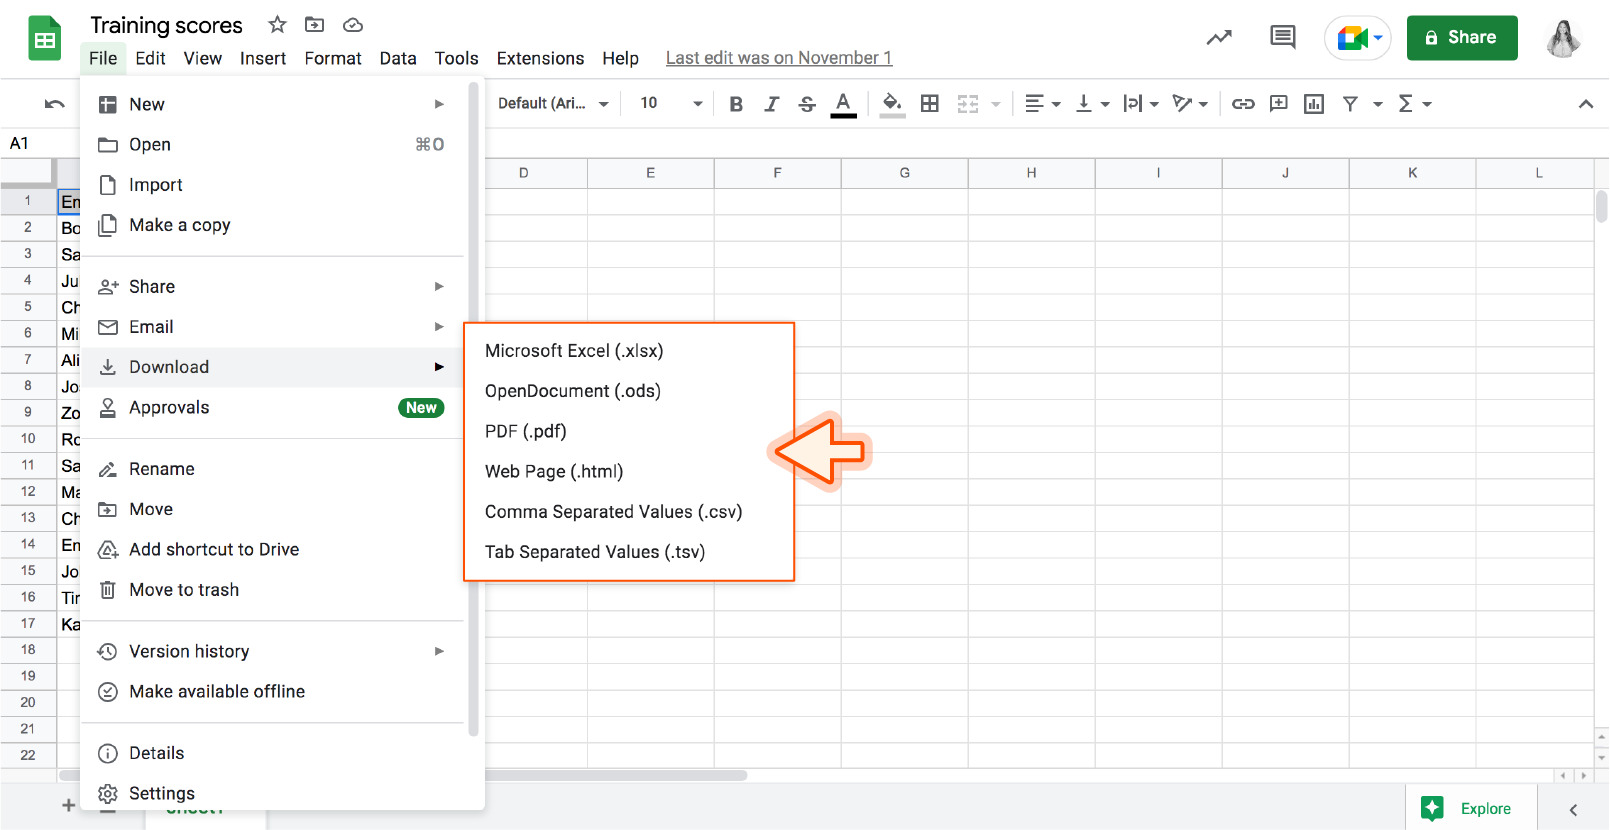
To export the sheet, navigate to the top menu bar and click on “File”. In the drop-down menu, select “Download” and then choose the “Microsoft Excel” option. Google Sheets will then prepare your selected sheet for download in Excel format.
Depending on the size of your sheet and the speed of your internet connection, the exporting process may take a few seconds to complete. Be patient and avoid closing the Google Sheets window or navigating away from the page until the download is finished.
Once the export is complete, your browser will automatically begin downloading the Excel file to your local device. The file will have the extension “.xlsx”, which is the standard file format for Excel. The file will be saved in your default download location, but you can choose to save it in a different location if desired.
It’s important to note that if your sheet contains a significant amount of data or complex formatting, the resulting Excel file may take longer to download or may have a larger file size. Keep this in mind, especially if you have limited storage space on your device.
With the sheet successfully exported from Google Sheets, you are now ready to move on to the next step and choose the file format.
Step 4: Choose the file format
When you export a sheet from Google Sheets to Excel, you have the option to choose the file format that best suits your needs. Google Sheets offers multiple file formats to ensure compatibility with different versions of Microsoft Excel and other spreadsheet programs.
After the download of the Excel file is initiated, you may see a prompt asking you to choose a file format. The available options typically include:
- .xlsx: This is the default file format for Microsoft Excel and is widely supported by various versions of Excel as well as other spreadsheet programs, ensuring seamless compatibility.
- .ods: This stands for OpenDocument Spreadsheet, which is an open-source file format used by software such as LibreOffice and OpenOffice Calc. Choosing this format may be useful if you plan to work with the file in one of these programs.
- .csv: CSV stands for Comma-Separated Values and is a plain-text file format that stores data in a tabular manner, with each cell separated by a comma. This format is commonly used for importing data into other programs or systems.
Depending on your specific requirements and the software you will use to work with the downloaded file, choose the appropriate file format by clicking on the corresponding option.
It’s important to note that if you don’t see a file format selection prompt, the exported file will likely be saved in the default .xlsx format, which is generally the recommended format for working with Excel files.
Once you have chosen the file format, the Excel file will continue to download in the selected format. Make sure to save the file to a location on your device where you can easily retrieve it later.
With the file format selected and the Excel file successfully downloaded, you are ready to move on to the next step and save the file to your computer.
Step 5: Save the file to your computer
After choosing the file format, the Excel file will continue to download to your computer. Once the download is complete, you need to save the file to a location on your computer where you can easily access it.
By default, most browsers will save downloaded files to the “Downloads” folder on your computer. However, you can choose a different location if you prefer. When prompted, select the folder or directory where you want to save the Excel file.
It is recommended to choose a location that is easily recognizable and organized. This will make it convenient for you to find the downloaded file later when you need to open it in Microsoft Excel.
When saving the file, you can also choose to rename it if you wish. By default, the downloaded file will have the same name as your Google Sheet, but you can give it a more descriptive or memorable name to make it easier to identify.
Before saving the file, double-check the location and name to ensure everything is correct. Once you are satisfied, click on the “Save” or “OK” button, depending on your browser, to complete the saving process.
It’s essential to note that if you are working on a shared or public computer, be cautious where you save the Excel file, as others may be able to access and view your downloaded files.
With the file successfully saved to your computer, you are now ready to move on to the final step in accessing your downloaded Google Sheet in Microsoft Excel.
Step 6: Open the downloaded file in Microsoft Excel
Now that you have successfully downloaded the Excel file from Google Sheets, the final step is to open it in Microsoft Excel. With Microsoft Excel installed on your computer, follow these steps to access your downloaded Google Sheet:
- Locate the folder or directory where you saved the downloaded Excel file.
- Double-click on the file to open it in Microsoft Excel.
- Alternatively, you can open Microsoft Excel first and then navigate to “File” > “Open” and choose the downloaded Excel file from your computer.
After opening the file, you will be able to view and work with the data from your Google Sheet in Microsoft Excel. The formatting, formulas, and any data manipulations you applied in Google Sheets should be preserved in the Excel file.
Take a moment to review the file and ensure that everything is intact and as expected. Check for any discrepancies in formatting or formulas that may have occurred during the conversion process.
Now that you have successfully opened the downloaded file in Microsoft Excel, you can leverage all the features and functionalities of the Excel software to further analyze, manipulate, and present your data as needed.
It is important to note that while most basic formatting and formulas should transfer smoothly between Google Sheets and Excel, more advanced features or custom scripting may not be fully compatible. Always verify the accuracy and functionality of your data after downloading to ensure no information was lost or altered during the conversion process.
With the Excel file successfully opened, you are now ready to leverage the power of Microsoft Excel to explore and work with your data.
Conclusion
Downloading a Google Sheet to Excel allows you to seamlessly transition your data from the cloud-based Google Sheets platform to the feature-rich Microsoft Excel software. By following the step-by-step instructions outlined in this guide, you can easily export your Google Sheet and open it in Excel without any hassle.
We started by highlighting the importance of having a Google account and accessing Google Sheets. We then explored the process of selecting the specific sheet you want to download. Next, we discussed how to export the selected sheet, including choosing the file format that suits your needs. We also covered the crucial step of saving the downloaded file to your computer, ensuring easy access in the future. Lastly, we concluded by outlining how to open the downloaded Excel file in Microsoft Excel so that you can fully leverage the functionality of the software.
It is worth reiterating that while the basic data and formatting should transfer smoothly between Google Sheets and Excel, it is essential to double-check the file for any discrepancies or loss of information, especially if you are using advanced features or custom scripting. By being mindful of these considerations, you can ensure the accuracy and reliability of your data when transitioning between the two platforms.
With the ability to download and work with your Google Sheets in Excel, you have the flexibility to collaborate with colleagues, share data with clients, and utilize the rich suite of tools that Microsoft Excel offers for analysis and visualization.
Take advantage of this seamless integration between Google Sheets and Excel to enhance your data management and analysis capabilities. Whether you are a student, professional, or business owner, mastering these steps will empower you to effortlessly move between these two powerful spreadsheet platforms.