Introduction
Watching movies on a portable device has become increasingly popular in today’s fast-paced world. With the wide availability of Android tablets, you can now enjoy your favorite movies and TV shows on the go. However, if you have a collection of DVDs that you want to watch on your Android tablet, you may encounter compatibility issues. DVDs are typically not supported by Android devices, which require digital formats like MP4 or AVI. But don’t worry, with the help of a DVD ripping software, you can easily convert your DVD movies into a format that can be played on your Android tablet.
In this guide, we will walk you through the step-by-step process of converting a DVD to a compatible format for your Android tablet. Whether you have a large DVD collection or just a few movies, this method will allow you to enjoy them on your Android tablet anytime, anywhere.
Please note that it is essential to own the original DVDs or have adequate rights to rip them for personal use. Piracy is illegal and unethical, so it’s important to respect copyright laws.
Step 1: Install a DVD ripping software
The first step in converting a DVD to play on your Android tablet is to install a reliable DVD ripping software. There are several options available online, both free and paid. Look for software that is user-friendly, supports various output formats, and offers high-quality conversions.
Once you have chosen the software that suits your needs, download and install it on your computer. Make sure to follow the installation instructions provided by the software developer.
It’s essential to download DVD ripping software from reputable sources to avoid malware or viruses. Check user reviews, ratings, and forums to ensure that you are downloading a trusted software program.
Before moving forward, double-check that your computer meets the minimum system requirements for the DVD ripping software. These requirements can usually be found on the software’s website or in the installation instructions.
After the software is successfully installed, you’re ready to begin converting your DVD movies to a compatible format for your Android tablet.
By installing a dedicated DVD ripping software, you will have the necessary tools to rip and convert DVDs with ease. In the next steps, we will guide you on how to use the software effectively to convert your DVD movies for Android tablet playback.
Step 2: Launch the software and insert DVD
Now that you have installed the DVD ripping software, it’s time to launch the program and insert the DVD you want to convert into your computer’s DVD drive.
Locate the DVD ripping software on your computer and double-click to open it. Depending on the software you have installed, you may see a straightforward user interface or a more advanced set of options. Don’t worry if the interface looks overwhelming at first. Most DVD ripping software provides intuitive menus and guides to help you through the process.
Once the software is launched, carefully insert the DVD you want to convert into your computer’s DVD drive. Give the software a moment to recognize and load the DVD. You should see the DVD name or title displayed in the software’s interface.
If the DVD does not load automatically, navigate to the software’s menu options and select the option to “Load DVD” or “Import DVD.” This will manually initiate the loading process and ensure that the software recognizes the DVD.
Take a moment to verify that the software has successfully loaded the DVD. You should see the DVD title, duration, and other relevant information displayed on the software’s screen. This step ensures that you are working with the correct DVD and that the software is ready to proceed with the conversion process.
Now that you have launched the DVD ripping software and inserted the DVD, you’re ready to move on to the next step: selecting the output format for your Android tablet.
Step 3: Select the output format
After launching the DVD ripping software and inserting the DVD, the next step is to select the output format for your Android tablet. This step determines the format in which the DVD will be converted, making it compatible with your Android tablet’s media player.
The DVD ripping software will provide you with a range of output formats to choose from. The most common format for Android tablets is MP4, as it offers a good balance of quality and file size. However, depending on your specific needs and preferences, you may also consider other formats such as AVI, MKV, or MOV.
To select the output format, navigate to the “Output Format” or “Profile” section in the DVD ripping software. Here, you should see a list of available formats. Click on the format that corresponds to your Android tablet or choose the one that best suits your requirements.
Keep in mind that different Android tablet models may support different formats and codecs. Therefore, it’s advisable to check your tablet’s specifications or refer to the manufacturer’s website for recommended video formats.
In addition to selecting the output format, you may also have the option to customize specific settings such as video resolution, bitrate, and audio quality. If you’re not familiar with these settings, it’s generally best to stick with the default options provided by the software.
Once you have selected the desired output format and any additional settings, review your choices to ensure they align with your preferences. Double-check that you have selected a format compatible with your Android tablet.
With the output format selected, you’re ready to proceed to the next step: choosing the destination folder for the converted file.
Step 4: Choose the destination folder
Now that you have selected the output format for your DVD conversion, the next step is to choose the destination folder where the converted file will be saved on your computer.
When converting the DVD, the ripping software will create a new file in the chosen output format. It’s essential to select a destination folder that is easily accessible and has enough storage space to accommodate the converted file.
To choose the destination folder, navigate to the “Output” or “Destination” section in the DVD ripping software. Here, you will have the option to browse your computer’s directory and select the desired folder.
You can create a new folder specifically for storing the converted files, or you can choose an existing folder if you prefer. Make sure to select a location that you can easily locate later when transferring the file to your Android tablet.
It’s always a good idea to choose a folder with a clear and recognizable name, so you can easily identify it when you’re ready to transfer the file. Additionally, ensure that the chosen folder has enough free space to accommodate the converted file, as DVD conversions can generate large files.
After selecting the destination folder, take a moment to verify your choice. Double-check that you have chosen the correct folder and that it meets your requirements in terms of accessibility and available storage space.
With the destination folder selected, you’re now ready to move on to the next step: starting the conversion process.
Step 5: Start the conversion process
With the DVD inserted, the output format selected, and the destination folder chosen, you’re ready to start the conversion process. This step initiates the conversion of the DVD into a compatible format for your Android tablet.
In the DVD ripping software, you will find a “Start,” “Convert,” or similar button that begins the conversion process. Click on this button to initiate the conversion.
Depending on the length of the DVD and the processing power of your computer, the conversion process may take some time. During this time, the software will analyze and convert the DVD’s audio, video, and subtitle tracks into the specified output format.
You may notice a progress bar or a percentage indicator displaying the conversion progress. This gives you an idea of how much time is remaining until the conversion is complete.
It’s important to note that the speed of the conversion process can vary depending on various factors, such as the hardware specifications of your computer, the DVD’s size and complexity, and the settings chosen in the DVD ripping software.
While the conversion is in progress, it’s best to avoid running other resource-intensive tasks on your computer, as this can potentially slow down the conversion and affect the overall performance.
Once the conversion process is complete, you will receive a notification or see a message indicating that the conversion was successful. At this point, the DVD has been transformed into a digital file in the selected output format and saved in the destination folder you specified.
With the conversion completed, you’re now ready to move on to the next step: transferring the converted file to your Android tablet for playback.
Step 6: Transfer the converted file to your Android tablet
After successfully converting the DVD into a compatible format for your Android tablet, the next step is to transfer the converted file to your device. You can accomplish this by following a few simple steps:
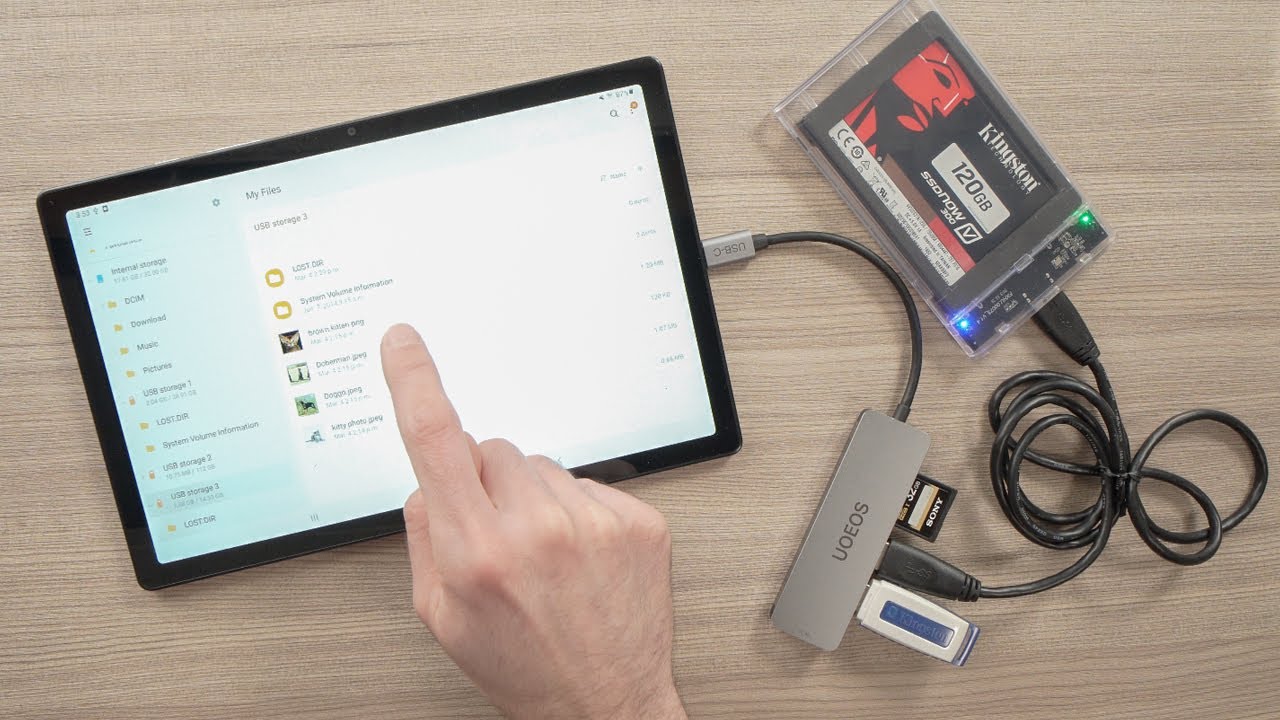
1. Connect your Android tablet to your computer using a USB cable. Ensure that the USB connection is set to “File Transfer” or “Media Transfer” mode on your tablet.
2. On your computer, locate the converted file in the destination folder where the DVD ripping software saved it.
3. Select the converted file and copy it to your computer’s clipboard or right-click and choose “Copy”.
4. Access your Android tablet’s storage by navigating to “Internal storage” or “SD card” via the File Manager or similar app.
5. Navigate to the desired location where you want to store the converted file on your Android tablet. This can be the Movies or Videos folder or any other location of your choice.
6. Paste the copied file from your computer onto your Android tablet’s storage by right-clicking and choosing “Paste” or using the keyboard shortcut (Ctrl + V).
7. Wait for the file transfer to complete, which may take a few moments depending on the size of the converted file.
8. Once the transfer is complete, safely disconnect your Android tablet from your computer by unplugging the USB cable.
Now, the converted DVD movie is accessible on your Android tablet and ready to be played using your preferred media player app.
Note: If you prefer wireless file transfer, you can also use cloud storage services or file-sharing apps to upload the converted file from your computer and then download it to your Android tablet.
With the converted file successfully transferred to your Android tablet, you’re now ready to enjoy your favorite DVD movie on the go.
Step 7: Play the DVD movie on your Android tablet
Now that you have transferred the converted DVD movie to your Android tablet, it’s time to enjoy it on your device. You can play the movie using the built-in media player or by installing a third-party video player app. Follow these steps to play the DVD movie on your Android tablet:
1. Open the media player app on your Android tablet. If you don’t have a preferred media player installed, you can use the default video player that comes with your device.
2. Navigate to the location where you transferred the converted DVD movie. This can be the Movies or Videos folder, or any other folder where you saved the file.
3. Locate the DVD movie file in the folder. It should have the same name as the original DVD title or a name you specified during the conversion.
4. Tap on the DVD movie file to start playing it. The media player will open and begin playback of the movie.
5. You can use the media player’s controls to pause, play, rewind, forward, and adjust the volume as needed. You can also use other features such as subtitles, audio tracks, or video settings depending on the capabilities of your media player app.
6. Enjoy watching the DVD movie on your Android tablet’s screen. The converted file should maintain the same audio and video quality as the original DVD, providing you with an immersive viewing experience.
It’s worth noting that certain media players may support additional features like casting the movie to a TV screen or syncing with cloud storage for streaming. Explore the settings and options within your media player app to discover any additional functionalities.
With the DVD movie successfully playing on your Android tablet, you can now sit back, relax, and enjoy your favorite movies on the go.
Conclusion
Converting DVDs to a format compatible with your Android tablet allows you to enjoy your favorite movies and TV shows while on the go. With the help of DVD ripping software, the process of converting and transferring the files has become easier than ever.
In this guide, we have walked you through the step-by-step process to convert a DVD and play it on your Android tablet. From installing the DVD ripping software and selecting the output format to transferring the converted file and playing it on your device, each step has been outlined to help you achieve a smooth and successful conversion.
Remember to always respect copyright laws and ensure that you have the necessary rights or ownership of the DVDs you convert. Piracy is illegal and unethical, so it’s essential to use DVD ripping software for personal use only.
By following this guide, you can now enjoy your DVD collection on your Android tablet, giving you the freedom to watch your favorite movies and TV shows wherever and whenever you want.
Now that you know how to convert DVDs to play on your Android tablet, grab your DVDs, start the conversion process, and elevate your entertainment experience on the go.
Happy movie watching!