Introduction
Setting up and connecting your Nintendo Switch to a Wi-Fi network is essential for enjoying online multiplayer games, accessing digital content, and downloading software updates. The Switch offers the convenience of wireless connectivity, allowing you to play your favorite games online and stay connected with friends and other players around the world. In this guide, we will walk you through the step-by-step process of connecting your Switch to a Wi-Fi network.
Before we begin, it’s important to note that you’ll need a stable and reliable Wi-Fi connection for the best online gaming experience. Make sure you have the Wi-Fi network name (SSID) and password handy before proceeding.
Connecting your Switch to Wi-Fi is a straightforward process that can be completed in just a few minutes. By following the steps outlined in this guide, you’ll be ready to enjoy online gaming and access a wide range of digital content on your beloved Nintendo Switch.
Step 1: Connect the Switch to Power
Before you can connect your Nintendo Switch to a Wi-Fi network, you need to make sure it is properly powered. To do this, follow these simple steps:
- Locate the AC adapter that came with your Nintendo Switch and plug one end into the charging port on the bottom of the console.
- Connect the other end of the AC adapter into a power outlet.
- Once connected, you should see a battery icon appear on the top right corner of the Switch’s screen, indicating that it is charging.
- Allow the console to charge until the battery is at least partially full. This will ensure that it has enough power to complete the setup process.
It’s essential to have a fully charged Nintendo Switch before proceeding to the next steps to avoid any interruptions during the Wi-Fi setup.
Now that your Switch is connected to power, you’re ready to move on to the next step of the setup process: accessing the settings menu.
Step 2: Enter the Settings Menu
After ensuring your Nintendo Switch is connected to power, you can proceed to enter the settings menu. This menu allows you to access various system configurations and options, including the Wi-Fi settings. To enter the settings menu, follow these steps:
- Power on your Nintendo Switch by pressing the power button, located on the top-left side of the console.
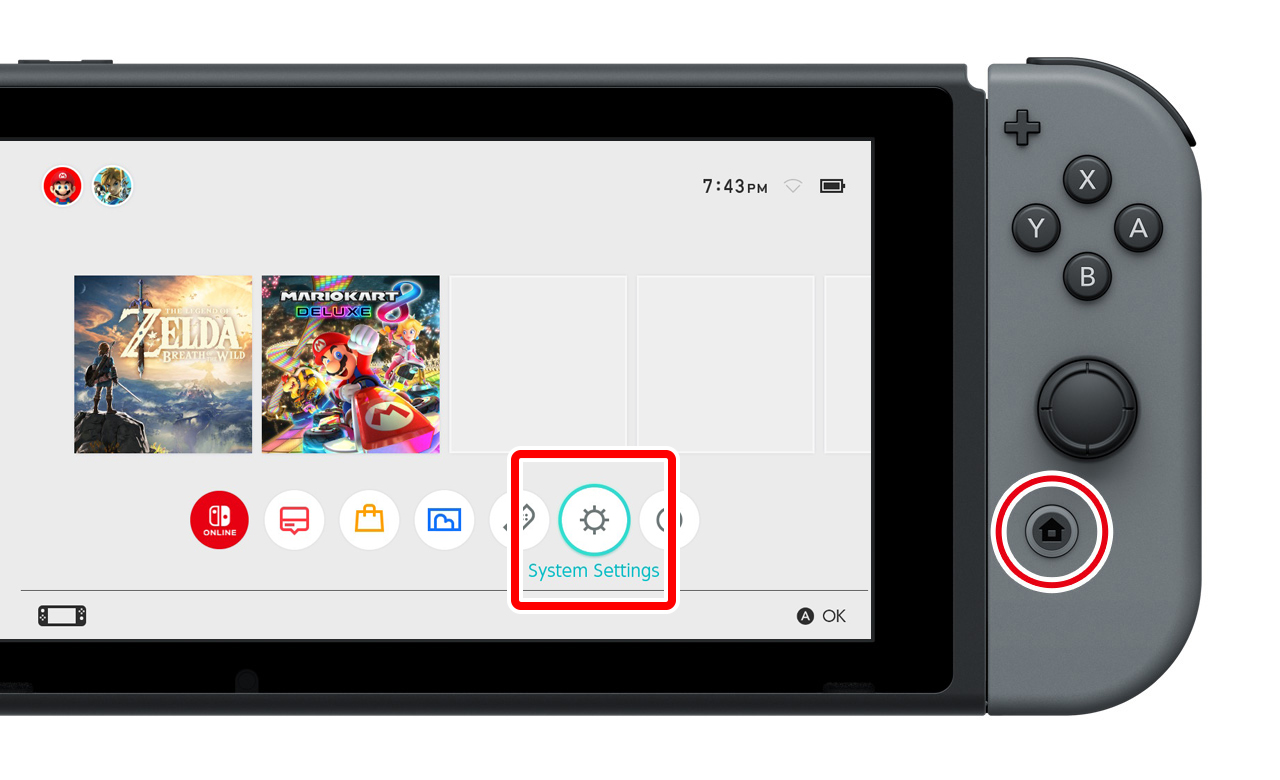
- Once the Switch is powered on, you’ll be taken to the Home screen. From here, navigate to the bottom row of icons.
- Using the Joy-Con controllers or the touch screen, select the “System Settings” icon, which is represented by a small gear symbol.
- Press the “A” button to enter the System Settings menu.
Once you’ve successfully entered the settings menu, you’re ready to proceed to the next step: accessing the internet settings.
Step 3: Access the Internet Settings
After entering the system settings menu on your Nintendo Switch, it’s time to access the internet settings. This will allow you to connect your console to a Wi-Fi network. Follow these steps to access the internet settings:
- In the system settings menu, scroll down and select the “Internet” option from the menu on the left side of the screen. It is represented by an icon with an image of a globe.
- On the right side of the screen, you will see available internet connection options. Choose the one that fits your situation:
- If you have a home Wi-Fi network, select “Internet Settings”, then “Connection Settings”, and choose an available connection slot to set up a new internet connection.
- If you have a nearby public Wi-Fi network, select “Internet Settings”, then “Internet Settings”, and choose the Wi-Fi network from the list of available networks.
- If you have a wired LAN connection available, select “Internet Settings”, then “Wired Connection”, and follow the instructions to connect your Switch to the wired network.
- After selecting the appropriate connection option, your Switch will search for available networks.
- If you’re connecting to a home network or a public Wi-Fi network, the console will display a list of available networks. Select the network you want to connect to by highlighting it and pressing “A”.
Once you’ve completed these steps, you’re ready to move on to the next step: choosing the Wi-Fi network you want to connect to.
Step 4: Choose the Wi-Fi Network
Now that you have accessed the internet settings on your Nintendo Switch, it’s time to choose the Wi-Fi network you want to connect to. Follow these steps to select your desired network:
- In the internet settings menu, your Switch will display a list of available Wi-Fi networks.
- Using the Joy-Con controllers or the touch screen, scroll through the list and select the Wi-Fi network you want to connect to.
- If the desired network is not visible, select the “Search for Networks” option to rescan for available networks.
- Once you have selected the Wi-Fi network, the console will ask you to confirm your selection. Press the “Next” button to proceed.
- If the network you chose is password-protected, you will need to enter the Wi-Fi password. Use the on-screen keyboard to enter the password, and press “OK” when you’re done.
It’s important to ensure that you enter the correct password to successfully connect to the Wi-Fi network. Take your time and double-check your input before proceeding.
Once you’ve completed these steps, your Nintendo Switch will attempt to connect to the chosen Wi-Fi network. The console may take a few moments to establish a connection, so be patient.
With the Wi-Fi network selected and the password entered, you’re now ready to move on to the next step: confirming the connection.
Step 5: Enter the Wi-Fi Password
After choosing the Wi-Fi network you want to connect to on your Nintendo Switch, you may need to enter the Wi-Fi password if the network is password-protected. Follow these steps to enter the password:
- When prompted, use the on-screen keyboard to enter the Wi-Fi password.
- You can navigate through the keyboard by using the Joy-Con controllers or by tapping the on-screen keys if you are using the touch screen.
- Take your time to enter the password carefully, as it is case-sensitive. Make sure to pay attention to uppercase and lowercase letters, as well as any special characters or numbers.
- Once you have entered the password, double-check it for accuracy.
- When you are confident that the password is correct, select the “OK” or “Connect” button to proceed.
Your Nintendo Switch will then attempt to connect to the Wi-Fi network using the provided password. It may take a few moments to establish the connection, so be patient.
If you have entered the correct password, your Switch will successfully connect to the Wi-Fi network. If the password is incorrect, the console will display an error message. In this case, review your password and try again.
Once the connection is established, you’re ready to move on to the next step: confirming the connection on your Nintendo Switch.
Step 6: Confirm the Connection
After entering the Wi-Fi password on your Nintendo Switch, it’s time to confirm the connection. Follow these steps to ensure that your Switch is successfully connected to the Wi-Fi network:
- Once you have entered the Wi-Fi password, your Nintendo Switch will attempt to connect to the chosen network.
- If the connection is successful, your console will display a confirmation message indicating that you are now connected to the Wi-Fi network.
- At this point, you can proceed to enjoy online gaming, download software updates, and access digital content on your Nintendo Switch.
- If the connection fails, your Switch may display an error message. In this case, double-check that you have entered the correct Wi-Fi password and try again.
- If you continue to experience connection issues, ensure that you are within range of the Wi-Fi network and that there are no other technical issues with your internet connection.
It’s important to have a stable and reliable Wi-Fi connection for uninterrupted gameplay and smooth online experiences on your Nintendo Switch.
Now that you have successfully confirmed the connection, you are ready to fully utilize the online features of your Nintendo Switch. Enjoy playing games with friends, accessing online content, and making the most of your gaming experience!
Conclusion
Connecting your Nintendo Switch to a Wi-Fi network is a crucial step in unlocking the full potential of your console. By following the step-by-step guide outlined in this article, you can easily and successfully connect your Switch to a Wi-Fi network within minutes.
From powering up your Switch to accessing the settings menu, entering the internet settings, choosing a Wi-Fi network, entering the Wi-Fi password, and confirming the connection, each step plays a vital role in establishing a stable and reliable connection.
Once your Nintendo Switch is connected to a Wi-Fi network, you can enjoy online multiplayer gaming, download software updates, and access a world of digital content. Just remember to maintain a strong and stable Wi-Fi connection for the best gaming experience.
Whether you’re playing with friends or interacting with a global gaming community, a reliable internet connection will ensure seamless gameplay and keep you connected wherever you go.
Now that you have successfully connected your Nintendo Switch to Wi-Fi, it’s time to dive into your favorite games and embark on exciting gaming adventures. Enjoy the vast world of online gaming and make the most of your Nintendo Switch’s capabilities!